Motion System
General
The Cinema 4D Motion System is an integrated non-linear animation system (NLA). This term may already be familiar to some users from the field of video editing. NLA allows individual animation segments, Motion Clips, to be mixed in various ways. These Clips can be faded in or out, be looped any number of times, moved and scaled temporally and modified via curves. This can be done with individual objects or with an entire object hierarchy, e.g., a character's Joint hierarchy or the Constraint objects that control the character.
Here is a brief Motion System workflow example:
- Create a cube. Create a Keyframe for this cube at frame 0.
- Go to the last frame in the scene. Move the cube a greater distance along its X axis only, e.g., +2000 units. Create another Keyframe.
-
While the cube is still selected, select the Add Motion Clip … command from the Cinema 4D Animate menu. In the dialog window that opens, enter a name for the Motion Clip in the appropriate field (e.g., Move X). Click on OK. You have just created a Motion Clip. The following has occurred:
-
The cube has been assigned a new tag in the Object Manager - a Motion System tag, which indicates that this object is now influenced by the Motion System.
-
The red circles that usually denote an animated parameter in the Attribute Manager have been removed. This means that the cube itself no longer contains an animation.
-
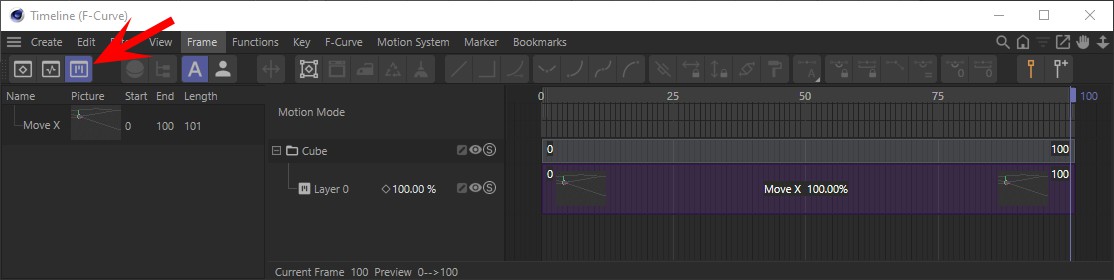
The Timeline will switch to Motion Mode. At the left of the Timeline you will see a new Motion Source and your cube's saved animation with the name you assigned.
At the right you will see a Motion Clip that is linked to this Motion Source and transfers the saved animation back to the cube.
-
The cube has been assigned a new tag in the Object Manager - a Motion System tag, which indicates that this object is now influenced by the Motion System.
In order to make proper use of the Motion System it is important that you know the difference between Motion Sources and Motion Clips. Here's a brief description:
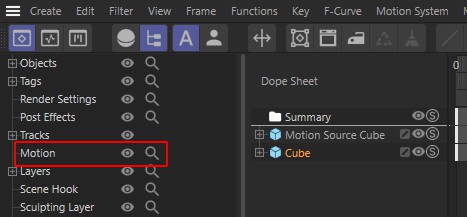
A Motion Source contains your previously created animation, quasi an invisible copy of your animated cube. In Dope Sheet mode in the Timeline, this Motion Source and all its Keys are displayed and can be subsequently modified here.
A Motion Clip is an Instance of this Motion Source with which the animation contained in the Motion Source can be transferred back to the cube. The animation in the Motion Clip can be modified in many different ways, whereby the Motion Source remains unaffected. A Motion Source can be assigned to a Motion Clip at any time. The Motion Clip itself contains no animation.
What took place is, that the animation was moved into the Motion Source, which in turn was assigned to a new Motion Clip that now effects the cube. Since only this Motion Clip exists that influences the cube, the cube's forward movement is identical to the animation in the Motion Source. The cube moves exactly as before.
As previously mentioned, the Timeline has been given a new mode, specifically designed for working with the Motion System". In addition to the Dope Sheet Mode and F-Curve Mode, you now also have the Motion Mode from which to choose (Timeline menu: ).
Record a second Motion Clip. To do so, proceed as follows:
- Switch to the Motion Mode in the Timeline and deactivate the Animation Icon (eye) next to the name, "Layer 0". This ensures that the Motion Clip will have no influence on the cube and you can animate the cube as you would a newly created object.
- Return to frame 0 and set a Keyframe for the cube's Y-position (of course you can animate any number of parameters when creating a Motion Clip, even your own User Data parameters. In this example, however, we will only animate a single parameter in order to more clearly demonstrate how Motion Clips work).
- Create numerous additional Keys for the cube's Y-position. If you now reactivate the previously recorded Motion Clip you will see that the Motion Clip is given priority over the animation that is applied directly to the cube. Deactivate the Motion Clip again.
- Select the Add Motion Clip … command again from the Cinema 4D Animate menu and specify a name for the new Motion Clip. Leave all other parameters unchanged and click on OK.
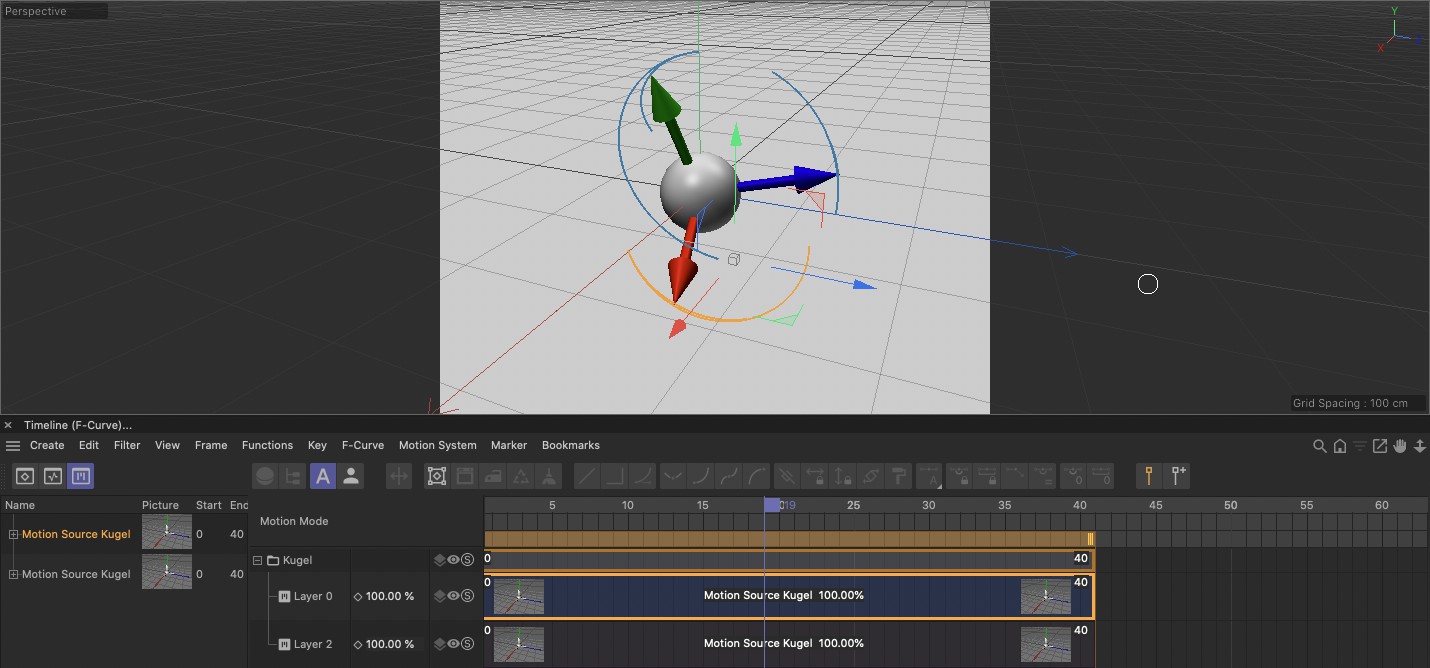
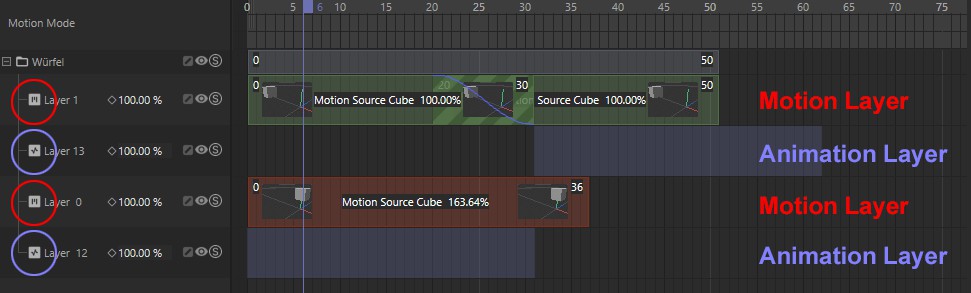
In the Timeline, in Motion Mode, you will find the new Clip on a separate Layer above the Layer containing the first Clip. If you now activate the animation on Layer 0 and play the animation in the Viewport you will see how both animations are mixed with each other.
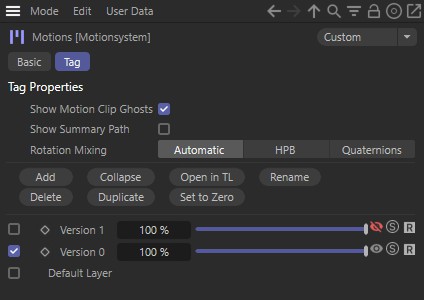
The core of the Motion System is the Motion System tag. This tag has a very unique feature: It not only affects the object to which it was assigned but also the entire object hierarchy below this object. This bears the huge advantage that you do not have to create a separate tag for each of these Child objects. However, do not add a Motion System tag to an object within a hierarchy that is already affected by a Motion System tag. A tag that already affects a hierarchy should also not be assigned to or copied to another tag. In either of these cases, unwanted effects would result.
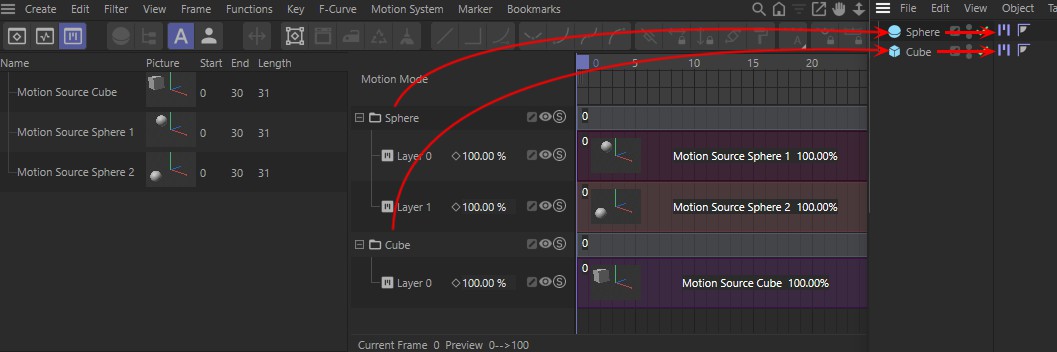
Each object to which a Motion System tag has been assigned will be displayed in the Timeline in Motion Mode in the form of a folder symbol in the Motion System window. All layers in this folder belong to that particular Motion System tag.
If an object (or object hierarchy) has a Motion System tag assigned to it, it can also be affected by Animation Layers, onto which Keyframes can be recorded directly, in addition to Motion Clips. All Keys for a particular object will be saved to the currently active Animation Layer. This lets you organize certain aspects of a keyframe animation across layers. You can, for example, have primary and a secondary object animations on two separate layers that can be turned on or off independently as needed, scaled or moved temporally or have their influence modified. Since individual Animation Layers can be turned on or off you can easily manage alternative animations within a single scene.
Animation Layers can also be easily combined and mixed with Motion Layers and their respective Motion Clips. For example, animations saved to Motion Sources can be easily varied or subsequently be modified.
The Motion System is completely integrated into Cinema 4D, hence numerous menus contain references to the Motion System, including the Animate, View and Motion System Timeline menus as well as in the Object Manager’s context menus and especially in the Timeline in Motion Mode. Motion System references can also be found in the Preferences menu.
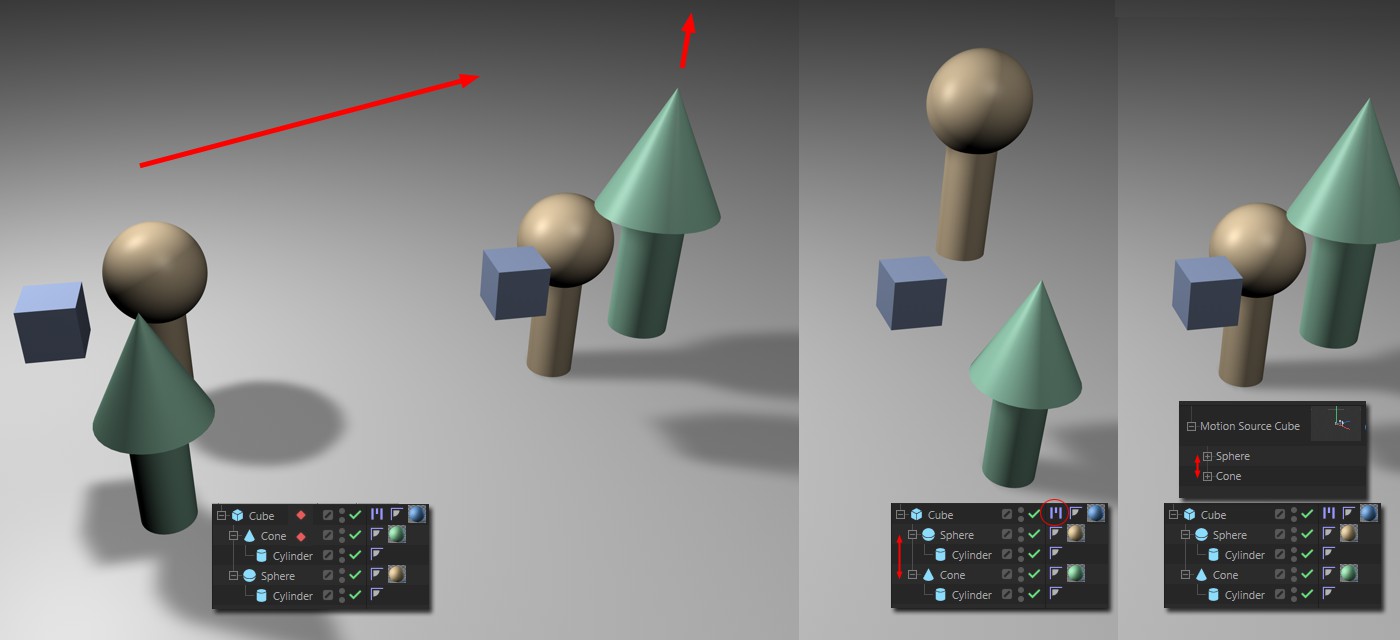 The hierarchy shown is animated. The functions work erroneously (in this example the spheres are animated instead of the cones) if the hierarchy is modified in the
 Note: If a Motion Clip is generated for an animated hierarchy and subsequently change the order of the Child objects in the
Motion System Menu Commands:
This Timeline menu contains numerous commands for working with the Motion System. You can create new Motion Sources, combine Motion Clips and convert various Motion Layer and Animation Layer combinations back into keyframe animations. The following commands are available:
This command creates a new, empty Motion Clip on the active Motion Layer to which a Motion Source can subsequently be assigned.
If no Motion Layer is selected, this command will not be made available.
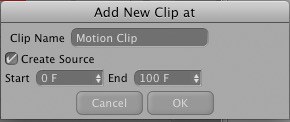
Selecting this command will open a dialog window that contains the following options for creating new Motion Clips on the active Motion Layer in the Timeline:
- Clip Name: Name the Motion Clip to be created here
- Create Source: Enable this option if you want to create a new Motion Source for the object hierarchy to whose Motion System tag the active Motion Layer belongs. The currently defined animation will be saved to the Motion Source but will not be removed from the object hierarchy. However, you have no further options for filtering pre-existing animations, as is the case with the "Add Motion Clip … " command in the "Animation" menu.
- Start: Enter the first frame of the Motion Clip to be created
- End: Enter the last frame of the Motion Clip to be created
Clicking on the "OK" button will confirm your entries and create a new Motion Clip in accordance with these. If a Motion Source is created it will, of course, cover the entire length of the animation currently in the object hierarchy. Only the overall length of the Motion Clip will be adjusted to match the Start and End values you defined.
If no Motion Layer is selected this command will not be made available.
Lets you add a Motion Clip to the Motion Layer currently selected in the Timeline. A new Motion Source will simultaneously be created for the current object hierarchy, to which the Motion System tag belongs, will be saved. However, the keys will not be removed from the object hierarchy and no options for filtering pre-existing animations will be available, as is the case with the "Add Motion Clip … " command in the "Animation" menu. The Motion Clip will be created to 100%, i.e., the same length as the Motion Source.
If no Motion Layer is selected this command will not be made available.
This command lets you create a new, empty Motion Layer. This command is only made available if a Motion System tag is selected.
This command will create a new Motion Layer for the Motion System tag currently selected in the Timeline and create a new Motion Clip as well.
A new Motion Source will simultaneously be created in which the existing keys for the current object hierarchy, to which the Motion System tag belongs, will be saved. However, the keys will not be removed from the object hierarchy and no options for filtering pre-existing animations will be available, as is the case with the "Add Motion Clip … " command in the "Animation" menu. The Motion Clip will be created to 100%
This command is only made available if a Motion System tag is selected in the Timeline's Motion field.
Creates a new Motion Source for any selected object, regardless of whether or not that object has a Motion System tag assigned to it. In Key or F-Curve Mode, select an object in the Timeline and execute this command. A new Motion Source will be created and the object's keyframe animation will be removed.
This command lets you group any number of Motion Clips, even from different Motion Layers, to a single Motion Clip. No new Motion Sources will be created - the relationship between individual Motion Clips and their respective Motion Source remains unchanged. The compounded Motion Clip will be created on a new Motion Layer. The advantage lies therein that complex combinations of various Motion Clips can be combined to create a single Motion Clip that can be worked with much easier. If the Remove Motion Clips after Compound Creation option is enabled in the Motion System menu the previously selected Motion Clips will be removed. You should note that a compounded Motion Clip cannot be "reverse engineered", i.e., broken back down into the individual Motion Clips from which it was created.
Let's say you have a long Motion Clip on one Motion Layer and a short Motion Clip on a second Motion Layer and you want to create a transition between the two. You could animate the layer properties of both Motion Layers so that a smooth transition from the end of one layer to the beginning of the other results.
The Make Transition command can, however, save you some work with regard to creating transitions between layers. First, select the command, then click on the long Motion Clip and drag it onto the short Motion Clip. As soon as you release the mouse the layer properties of both Motion Layers will be animated so that the long Motion Clip is faded out at the beginning of the short Motion Clip and the short Motion Clip is simultaneously faded in. The short Motion Clip's layer properties will be animated inversely at its end so the long Motion Clip will be faded in as the short Motion Clip fades out.
The transition time can be defined with the setting of the same name (Motion Clip Transition Time) in the Preferences menu.
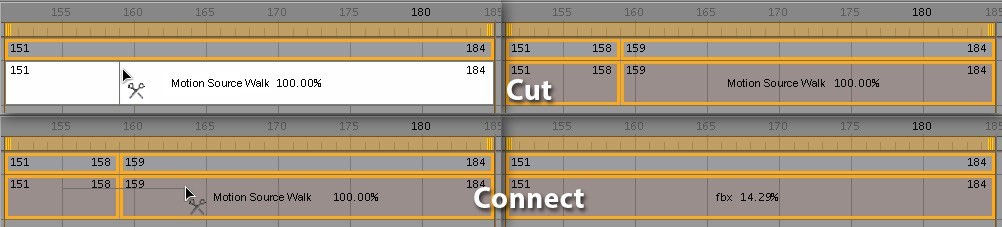
Selecting this command will activate a tool with which a Motion Clip can be cut to create two Motion Clips. If the "Ctrl" key is pressed while cutting, the Clip will not be cut in two but will be trimmed at its beginning, i.e., the section of the Clip to the left of the cut point will be removed and, for the remaining section of the Clip, a corresponding start value will be entered in the Attribute Manager's Trim parameter. If the "Shift" key is pressed while cutting, the Clip will be trimmed at its end, i.e., the section of the Clip to the left of the cut point will be removed and a corresponding end value will be entered in the Attribute Manager’s Trim parameter.
With the same tool, two Motion Clips that lie next to each other on the same Motion Layer can be connected into a single Motion Clip. To do so, click on one of the Motion Clips and drag it onto the second Motion Clip. As soon as you let go of the mouse button the two Motion Clips will be connected to one. A new Motion Source, consisting of both Motion Clips’ animations, will simultaneously be created for the newly created Motion Clip.
If enabled, the layer properties can be animated directly and interactively via the Motion Layer's or Animation Layer's F-Curves. The F-Curve in Motion Layer option in the Motion View … menu must, however, be enabled.

If enabled, a Motion Layer's layer property keyframes that lie near a Motion Clip will be moved congruent to that Motion Clip when it is moved. Even if the length of the Motion Clip is modified the keyframes will be modified accordingly.
If enabled, all Motion Clips used to create a compounded Motion Clip will be deleted once the Add Compound Motion Clip command is selected in the Motion System's Add menu. On the one hand, this can clean up the Timeline enormously. On the other hand, don't forget that the compounded Motion Clip cannot be broken back down into the individual Motion Clips from which it was created.
A new Motion Source can be created by selecting this command for one or multiple (simultaneously selected) Motion Clips. This command will only be made available if at least one Motion Clip is selected in the Timeline or if at least one Motion Layer on which a Motion Clip lies is selected.
Use this command (in Motion mode) to consolidate selected layers of a Motion System tag into a single Motion Source, which will then be saved to a new Motion Layer. The animation saved in this Motion Source will, of course, be exactly the same as the animation resulting from the previously selected layers.
This command is only made available if at least one Motion Clip is selected in the Timeline.
Converts animations back to keyframe animations. The keyframes will be created for the object hierarchy controlled by the Motion System tag. A key will be created for each frame of animation. This command can be used if you subsequently want to modify an object hierarchy for which you have already created a Motion Source. Your Motion Source will be converted back to a keyframe animation. After making modifications you can create a new Motion Source for the animation.
If no Motion Layers are selected, this command will not be made available.
Opens a dialog window that contains Motion mode display options. The following options are available:
Time Group
This group contains four options that affect the display of information regarding Motion Clips in the Timeline:
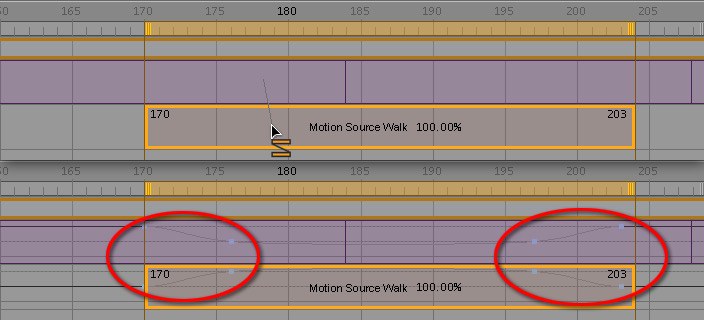
- Start: Enable this option if you want to display the Motion Clip's first frame at the top left corner of the Motion Clip.
- End: If enabled, the number of the Motion Clip's last frame will be displayed at the top right of the Motion Clip. If the Motion Clip is set to loop, this information will be displayed prior to the first loop.
- Looptime: If the Motion Clip is set to loop, the number of the Motion Clip's last frame will be displayed at the top right corner of the last loop, including total number of loops.
- Trim: Enable this option if you want to display information regarding the Motion Clip's trim, as is defined in the Attribute Manager’s Advanced tab. The amount of trim at the start of the Motion Clip will be displayed in the bottom left corner of the Motion Clip and the amount of trim at the end of a Motion Clip will be displayed at the bottom right corner.
Text Group
The options in this group let you select which information should be included in the Motion Clip.
- Source: The name of the Motion Clip's Motion Source
- Clip Name: If enabled, the name of the Motion Clip (instead of the Motion Source) will be displayed
- No Name: Enable this option if no name should appear in the Motion Clips
Remaining Options
- Untrimmed Values: If enabled, information regarding a selected Motion Clip's original time, without trim, will be displayed.
- Scale: Enable this option if you want to display information in the Motion Clips regarding the Motion Clip's scale in relation to the length of the animation originally recorded in the Motion Source.
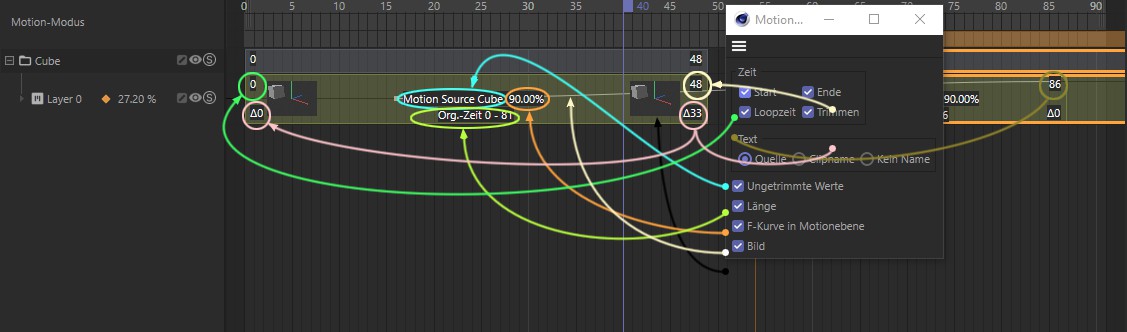
- F-Curve in Motion Layer: Enabling this option displays an F-Curve directly in each Motion Layer or Animation Layer. This F-Curve reflects the layer parameters’ animation.
- Picture: Lets you enable or disable the display of a small preview image for each Motion Clip.