Timeline/Function Graph
When working with keyframe buttons as described here, this option defines whether or not an animation Track will be removed from the Timeline if the last remaining keyframe is deleted.
Otherwise the Track will be cleared.
If this option is activated, the cursor's vertical and horizontal position will simultaneously be displayed in the form of a horizontal and vertical dash, respectively, at the axes.
If this option is enabled, it will determine if the effect of modifying keys or F-Curves will be shown directly in the Viewport - i.e., as long as the mouse button is pressed.
If enabled, keys (and their values) and Motion Clips (incl. a Function Graph's points and tangents) will be highlighted when the cursor is placed over them.
Use this setting to color your tracks as follows:
- Off: Tracks will not be colored.
- Axes: The tracks of each of an object's three basic properties will receive individual colors, as defined in the Preferences menu under Scheme Colors / Interface Colors. In addition, the Track names can be colored in the F-Curve view. To do so, the F-Curve List View must be enabled (this also applies for the next option, Transformation.
- Transformation: The three components that make up a vector track (position, size, rotation) will be colored separately according to the axis colors (X=red, Y=green, Y=blue).
If this option is enabled, Track and key selections will be maintained when switching between Dope Sheet and F-Curve modes. Note also this Tip, which does the same without enabling this option.
Enable this option if you want Tracks, keys and F-Curves from only the object currently selected in the Object Manager (without Child objects and tags) to be visible. This makes it easier to focus entirely on the selected object.
Selected tags will be listed with the object to which they are assigned.
See previous option with the difference that the selected object's unselected tags will be displayed. Tags can be selected here as well in order to display their animation and that of the object to which they are assigned.
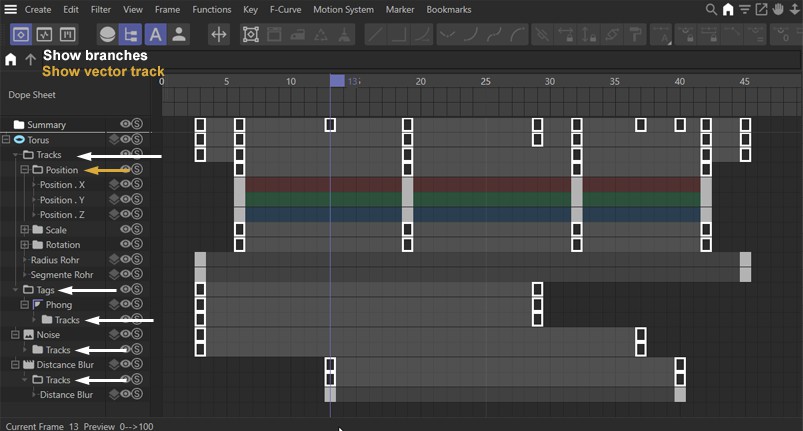 Branches and vector tracks can be displayed as directory names, including additional master keys and master tracks.
If this option is active, additional folders will be added to the Timeline's Objects Area. This helps in navigating your hierarchies when working with large scenes. Master keys and master tracks will be placed in the Keys Area of each folder.
This option determines if a parent folder for position, size, rotation or color should be added to open vector tracks (click on +).
F-Curve Non-Hierarchical List View
When in F-Curve mode, animation Tracks will normally be arranged visually similar to their arrangement in the Object Manager: a tree view with vertical branches, and in the case of Position, Scale and Rotation Tracks, with additional folder names. If the F-Curve List View option is enabled, these elements will be hidden.
Enable the F-Curve Non-Hierarchical List View option if you also want to hide the indented object hierarchies. The +/- symbols will then only open/close trees of objects to which tags are assigned.
Note also the Track Color option in the Preferences menu.
These are display functions only.
This option can be used to display the entire Track. If this element is clicked upon, all visible animation tracks and keyframes will be selected. This makes it possible to temporally scale all animations in the Project (to do so, you might have to call up the ![]() Go to Main Level to make all animated elements visible).
Go to Main Level to make all animated elements visible).
Tracks will be colored in the corresponding layer color.
If it bothers you that the keys are arranged centered with regard to their time in the animation you can align them to the left.
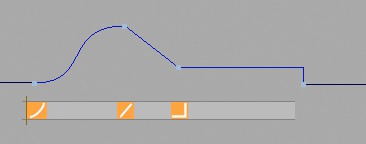 From left to right: Soft, Linear and Step Key Symbols for interpolation.
You should:
- have a sufficiently large key width defined for Keys: Minimum Width,
- have the Timeline view scaled so the keys are displayed large enough to allow this option to display the keyframes’ interpolation type as an icon.
Branches and vector tracks can be displayed as directory names, including additional master keys and master tracks.
If this option is active, additional folders will be added to the Timeline's Objects Area. This helps in navigating your hierarchies when working with large scenes. Master keys and master tracks will be placed in the Keys Area of each folder.
When in Dope Sheet mode, keys will be assigned the current layer color.
When enabled, keys, F-Curves and tracks’ pseudo sequences that lie on the same layer will be assigned the same color as that layer.
Since there is no restriction to the degree to which the Keys Area can be scaled, you may end up making your keys so small that they can barely be seen. Use Minimum Width to define a minimum width, below which the keys cannot be scaled.
Reduced Modification Value[0..100%]
When the command, ![]() Reduced Modification Mode is called up, Modifier Curves will be created that for the most part reflect the shape of the original F-Curve. Use this setting to define the accuracy of this conformity. A lower value will result in a more precise conformity, whereas greater values will increase the simplicity of the original F-Curve accordingly. This value has the same function as the Reduction setting that is made available when the Reset RM Curves command is called up.
Reduced Modification Mode is called up, Modifier Curves will be created that for the most part reflect the shape of the original F-Curve. Use this setting to define the accuracy of this conformity. A lower value will result in a more precise conformity, whereas greater values will increase the simplicity of the original F-Curve accordingly. This value has the same function as the Reduction setting that is made available when the Reset RM Curves command is called up.
If you created transitions using the Make Transition tool, this setting can be used to define how long the transition time should be.