Snapping
Snapping is the positioning of an element at a predefined location on another element (e.g., vertices, edges, guides, temporary guides, layers, etc.). There are numerous ways of using the Snapping feature for positioning objects or vertices when modeling.
If Snapping is enabled, elements to be moved will snap to others that lie within the defined radius (Snap Radius).
Snapping works primarily in conjunction with the Move tool but can also be used with other tools and functions (e.g., ![]() Polygon Pen,
Polygon Pen, ![]() Spline Pen, etc.). Snapping does not work in conjunction with parametric objects’ Handles, Deformers, etc.
Spline Pen, etc.). Snapping does not work in conjunction with parametric objects’ Handles, Deformers, etc.
In the following video, you can see some of the workflows described below; on the left side of the video, you can see the currently active snapping settings.
-
 Line Cut with dynamic guides.
 -
 Move with dynamic guides and perpendicular snapping.
 -
 Polygon Pen with dynamic guides.
Component Snapping
During interactive snapping, each component of each object that lies beneath the cursor to which you can snap is highlighted:
If you have selected multiple components (vertices, edges or polygons) and want to move these using the Move tool, click and drag one of the elements; continue to press the mouse button and drag the element over possible snapping points; release the mouse button when you have positioned the element as desired. All other selected elements will be moved with the element on which you clicked and dragged. If you click and drag in an empty region, the center point of the selected elements will be used as the pivot point.
Object Snapping
Follow these steps if you want to snap the points of an entire object (does not work with Primitives):
- In the Snap settings, set the mode to Point, for example.
- Press and hold the L hotkey to temporarily switch to the Enable Axis mode (if the axis is not moved, the object's origin will be used as the pivot point).
- Click on the corresponding point of the object to be moved (which will then serve as the pivot point) to reposition the object at this location.
- Release the L key to exit the Enable Axis mode.
- Switch to the Move tool and drag the pivot point (including the object) to the position to which you want it to snap. Done.
UV Snapping
When editing UV elements in the Texture UV Editor, snapping also works for the respective tools there (e.g., move, rotate, UV Transform). If desired, a grid can be displayed (![]() UV Grid) to which you can also snap.
UV Grid) to which you can also snap.
You can snap to the following nearest elements (the options of the same name can be enabled in the Snapping settings):
- Vertex: UV points
- Edges: UV edges
- Mid Point: UV edge mid points
- Grid Point: Grid intersection points
- Grid Line: Grid lines
- Pixel Snap: Texture pixels (s. Pixel)
If Snapping is enabled in Polygon mode, the cursor will snap to the next point on the selection on the UV Island to be edited and will then be used as the pivot or anchor point (e.g., rotation point for the Rotate tool) when the mouse button is released.
As long as the cursor has not yet snapped to an element during editing it will be displayed with a small cross. If it can snap to a UV element (or grid), its appearance will change as follows:
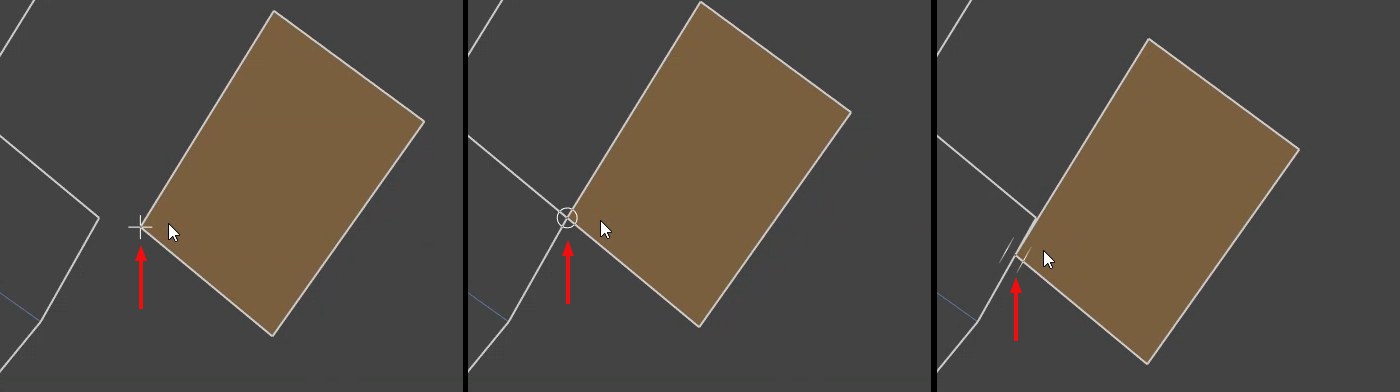
As long as nothing is snapped to, the cursor will appear as a cross; after snapping to a point (or edge mid point or texture pixel) it will appear as a circle and as a double line on an edge.
This lets you see exactly and intuitively where the UV element will be placed.
If you grab the selection approximately at the center, the pivot/anchor point will be placed at the center of the selection.
This works the same in Point and Edge mode.
Dynamic Guides and Reference Points
Completely new in Cinema 4D are the dynamic guides that automatically generate temporary guides around important vertex positions (e.g., object origin, translation type, etc.) or defined reference points.
Example:
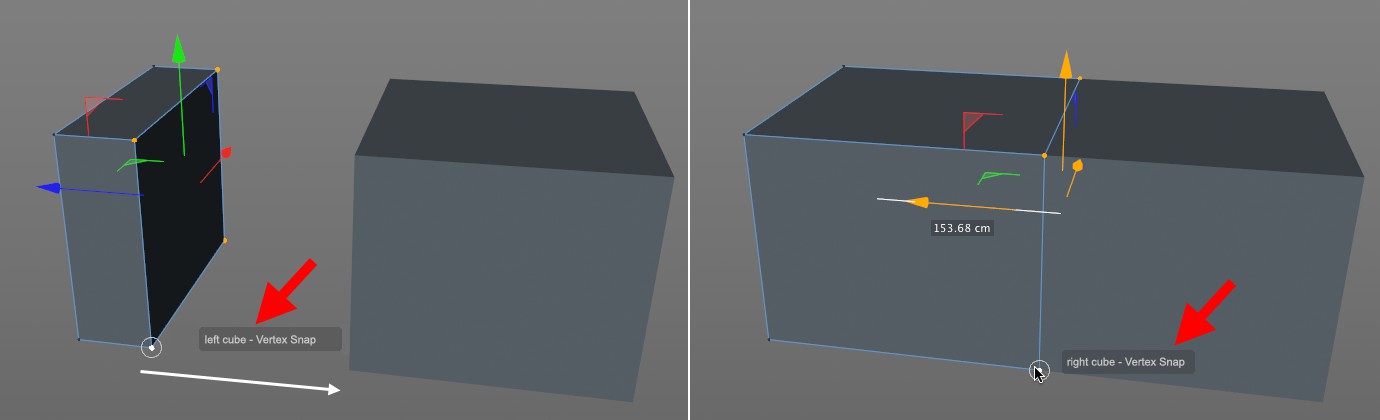
You want to move 4 selected vertices of the cube at the right in a parallel direction to the same height as the front side of the cube on the left (the following workflow is for demonstration only - this can actually be solved much faster using the ![]() Perpendicular Snap command).
Perpendicular Snap command).
 The entire procedure is pictured here and was completed with the mouse button pressed (see also point 2 in the previous video).
Follow these steps:
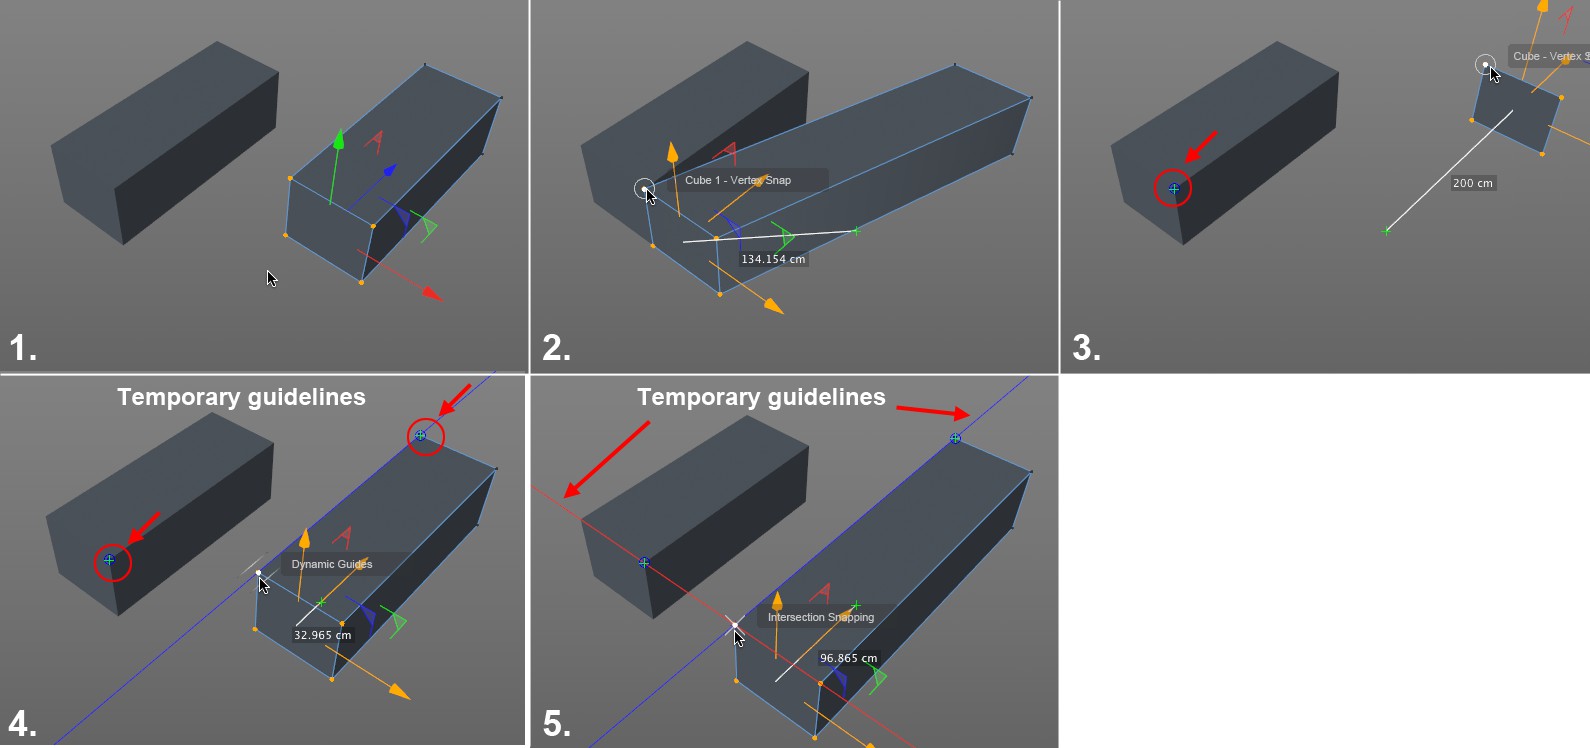
- Select the Move tool and enable the Snap modes Vertex, Intersections, Guides and Dynamic Guides.
- Click and drag on the top-left vertex and drag it to the top-right vertex of the left cube (2.) and hover for about 0.5 seconds; continue to press the mouse button.
- Drag to the vertex at the left rear of the cube on the right and hover for about 0.5 seconds. You have now set 2 reference points.
- Drag back in the direction of the original vertex. A blue guideline (Z axis) will automatically be created (if both cubes did not lie parallel to the global axis the guideline would be neutral in color) along which you can move your selection.
- A red guide (X axis) will be displayed at the height of the first reference point. Snap the selection to the Intersection point of both guides. Done. Remember, this entire process was completed while continuously pressing the mouse button!
Because Snapping also works with other important tools it is also possible to create many types of projected cut lines with the ![]() Line Cut tool, as shown here (and also demonstrated at point 1 in the previous video):
Line Cut tool, as shown here (and also demonstrated at point 1 in the previous video):
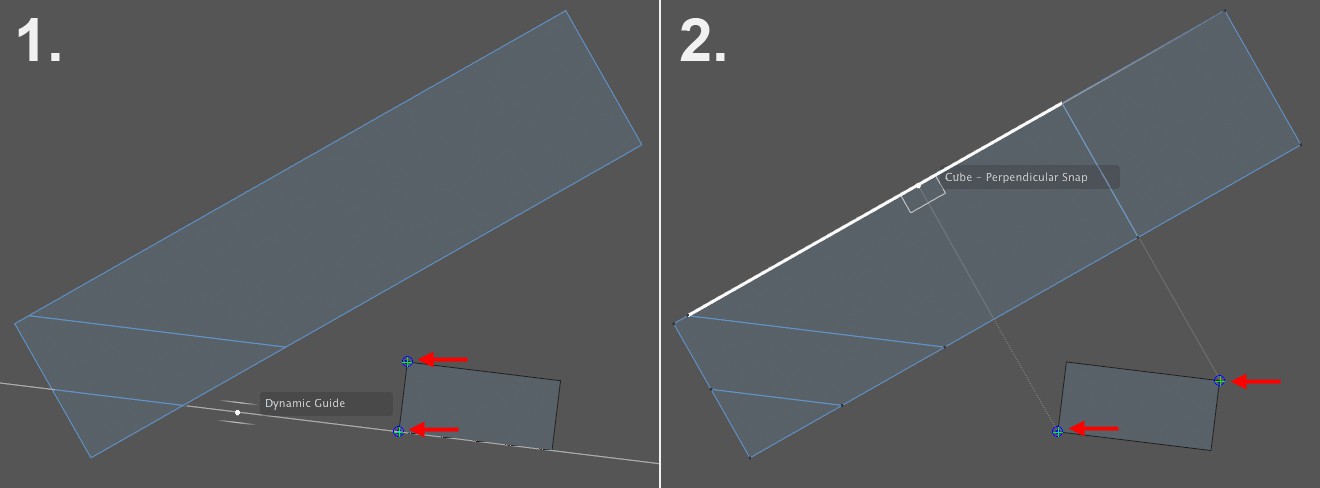
All you have to do is correctly position the guides. The Dynamic Guides (Vertex and Dynamic Guides are enabled here) will take care of the rest.
1. Drag the Knife tool along the Dynamic Guides that are located along the polygon edge.
2. The Perpendicular mode is also enabled.
Dynamic Guides are displayed in definable angles (by default 90°, which is parallel to the working plane axes) parallel to the working plane (with exception of the vertical plane) around the following locations:
- The point at which the move is initiated (this is the object axis for objects in Use Model and similar modes)
- Maximum any two reference points (the guides’ connecting line will also be displayed as a guide).
- At any other useful location.
Dynamic Guides will also be displayed here:
- At the 3 axes at the starting point of the move (marked as a green cross) with regard to the working plane AND the object axis system (or at the modeling axis in the component mode)
- All straights that lie on a connected edge of a polygonal object's selected vertex (or reference point) in Use Point mode
- All straights between the selected vertex (or reference point) of a linear Spline in Use Point mode and the next or previous Spline vertex. And also at the straight between the start or end vertex of an open linear Spline to the next respective point.
Guides can be generated temporarily on snappable object vertices (Vertex Snapping must also be enabled and 3D Snapping is also recommended in most cases) by hovering over such a vertex for at least 0.5 seconds (depending on the tool used, this must also be done with the moue button pressed, e.g., for the ![]() Polygon Pen tool). The reference point will then be marked with a circled cross. A maximum of 2 reference points can be marked at the same time; if a new one is added, the previously created one will be deleted. These points will disappear when you switch tools.
Polygon Pen tool). The reference point will then be marked with a circled cross. A maximum of 2 reference points can be marked at the same time; if a new one is added, the previously created one will be deleted. These points will disappear when you switch tools.
It can happen that so many Dynamic Guides and Intersection points are created that you lose oversight of what's going on in your Project (each of these purple Intersections points can be selected and each will display information about the corresponding Guides):
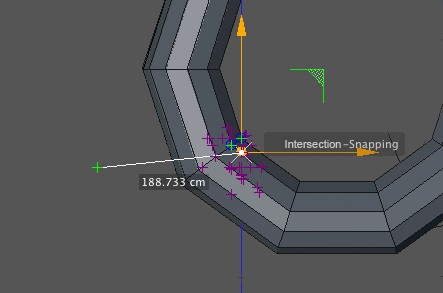
If you lose oversight it's probably because you simply have too many Snap options enabled. Consider carefully, which ones you really need and disable the others.
The purple cross is generated by the enabled Intersections option, which displays possible intersections around the cursor's current position.
The Perpendicular option can also result in numerous "hits" and should only be enabled if you really need it.