The Project Asset Inspector
Overview
General
- Bitmaps (*.tiff, *.jpg etc.)
- Sound files (*.wav, *.aiff etc.)
- XRefs etc. (*.c4d)
- 3D files (*.abc, *.fbx etc.)
- IES lights (*.ies)
- GI and MoGraph cache files (*.gi2, *.mog)
- Substance files (*.sbsar)
- Volume (*.vdb)
- Node Assets that are used in the Node Editor
The Project Asset Inspector shows all assets used in the currently displayed scene, including many of their properties. You can see at a glance whether Assets are missing and can link, exchange or merge them here.
You will always appreciate the Project Asset Inspector if error messages about missing files suddenly appear during rendering. This can happen quickly if you copy projects and open them on other computers.
Example: What to do if you load a project and there are missing textures during rendering?
In the most common case by far, where the original texture folder has been moved and the texture paths simply need to be reset, proceed as follows:
- Go to . You have now selected all the textures to be edited.
- Now go to . A folder selection menu will appear.
- Now navigate to the folder where the textures are actually contained and click on Open. Done. All textures are now newly linked.
- If you want, you can now save the project including ALL Assets via
 Save Project with Assets... and then, for example archive and pass it on. Alternatively, you can also use the new Consolidate Assets command (Assets menu), which does something similar.
The Project Asset Inspector can also list used fonts if they are used in the text, text spline and text node elements. If such a font is not installed on your system, it will be marked as missing in the inspector.
You can reassign fonts - per object - by double-clicking on the font name in the Asset column. A font selection dialog will then open, displaying all installed fonts. Select a new font here, if required.
The Project Asset Inspector also lists missing Node assets that are used in Node graphs, for example. This error is usually due to the fact that the corresponding asset is stored in a database to which the Asset Browser has no access. The corresponding database must then be activated or relinked. You can find out everything you need to know about managing Ssset databases on this page.
The Project Asset Inspector interface
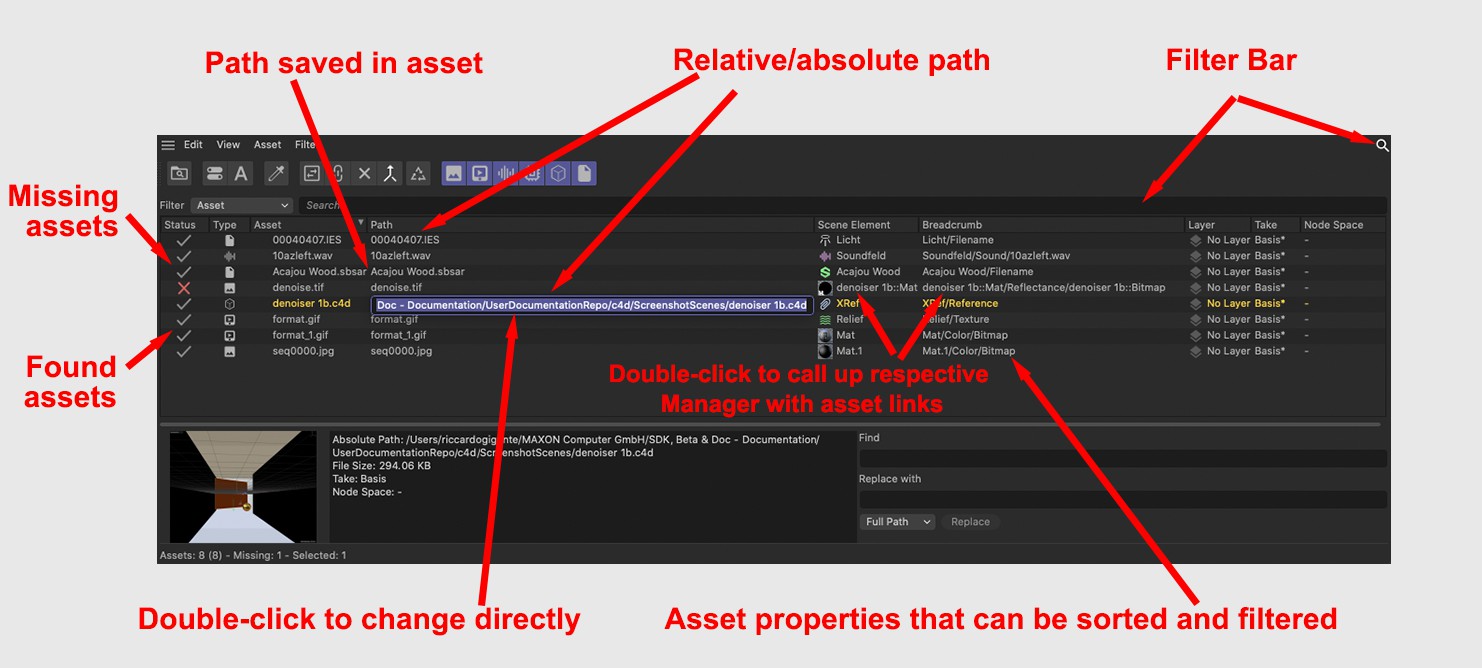
Asset list
In the asset list, you will find a list of all Assets contained in the open project, including some of their properties described below. Note that you can also double-click in the list to turn individual names and paths into an editable text field where the corresponding element can be changed directly (e.g. without having to switch to the Material Manager to select a new Asset path). UDIM tokens, for example, are also processed and evaluated.
Double-clicking on an Asset under Path in Element directly opens the corresponding manager at the position where the Asset is linked. A very practical function that allows you to see directly which function the Asset has.
Assets can be selected or deselected here using the usual Shift and Ctrl/Cmd keys (you can also draw a rectangular selection with the mouse). Executed commands that can usefully handle this then only refer to the selection.
If the columns are too short to display a complete path, for example, hover the mouse pointer over the entry; the complete path will then be displayed.
You can click on the column name to sort the list entries alphabetically using this column. Click on it several times to change the sort order. The columns can be moved horizontally by dragging and dropping the column headings in order to change the order. Click on the column separator to expand all columns so that all entries can be read completely.
The meanings of the individual columns (which can be made visible/hidden in the View menu) are described below:
Status
There are 3 asset states:
- Green check mark: Everything OK, asset has been found.
- Red X: Asset was not found, must be relinked.
- Warning icon: Asset found in the usual search paths (folder "tex", project location etc.), but incorrect absolute or relative path. The renderer will display an error message when run. A new link must also be created here (e.g. using the Localize Filenames command).
Type
The Asset file type (e.g., image, audio, etc.) is displayed here.
Asset
The file name including file type is displayed here. For sequences, the start and end frame numbers are displayed in a single entry.
You can double-click to change the file name and therefore the link manually.
Path
The path saved in the Asset is displayed here (as it was linked in the corresponding parameter). If only the file name is shown here, it is a relative path; if a path is shown, it is an absolute path.
What are relative and absolute paths?

- The upper list entry is a relative path. Such Assets are located in the project storage location or a corresponding subfolder (e.g. "tex"). If you copy the entire project folder to another computer, all Assets will be found again without any problems.
- The lower list entry is an absolute path that explicitly refers to a folder path and only searches for the file here. If you copy the project to another computer, you will encounter difficulties as this path may not be found there.
Both path types can be converted into the other using the commands described below.
The path can be double-clicked; you can then type in the path/filename manually to change the link,
Scene Element
The element name in which the asset was linked is displayed here; this can be the name of a material, sound field or Node, for example.
Here, too, you can double-click to manually assign a new element name (e.g. material or object name). Double-click on the icon to open the corresponding manager where the Asset is linked.
Element Type
This column lists the element type in which the asset is linked, e.g., material, XRef, sound field, etc.
Path in the element
The path (incl. element name) where the Asset is located in the element (e.g. in the material, object, tag, etc.) is displayed here. Double-click on the path to open the corresponding manager where the Asset is linked.
Color Space
Loaded bitmaps and textures normally contain color profiles that are displayed here. If OpenColorIO Color Management has been activated in the Preferences, double-clicking on one of the Color Space entries in this column opens a context menu that lists all available OCIO color spaces for reassignment. If the color spaces of several bitmap entries are to be changed simultaneously, they can be selected one after the other by holding down the Ctrl/Cmd key and clicking on them. You can then right-click to open a context menu in which all available OCIO color spaces are available for selection again under Set Color Space and can thus be reassigned.
In the same context menu, you will also find the Set Color Space with OCIO command, which assigns the original color space already contained in the bitmap file. The same command can also be found in the Assets menu of the Project Asset Inspector.
Layer
If the element contained in the Asset (e.g. material, object) is assigned to a layer, this layer is listed here. You can double-click on the list entry to rename the layer name (not the layer assignment!).
Take
You can exchange Assets when using different Takes. You will therefore find the Take in which the Asset is located listed here. If you do not use Takes, 'Main' is always displayed here. The Take currently active in the project is marked here with an asterisk (*).
The assets of all Takes are always listed, regardless of whether the Take is currently active or not.
Node Space
Materials can be assigned to different Node Spaces (e.g. Physical Renderer). The associated Node Space is listed here. The Node Space currently defined in Cinema 4D is marked here with an asterisk (*).
Database
If the asset is in a database, the database is listed here.
Absolute Path
The absolute path on the data carrier is displayed here, regardless of whether the asset is linked as a relative or absolute path.
New File Path
If you change paths using the replace function below, the resulting new paths (before the replace button is pressed) are displayed as a kind of preview function.
Format
This column shows the file format (JPG, IES, C4D, etc.) of the asset.
File Size
The asset file size on the data carrier can be read here.
Resolution
The image size in pixels can be read here for images.
Preview/Info
At the bottom left of the Manager you will find a preview of the Asset if it can be displayed as an image (this is the case for bitmaps, C4D project files, IES, substances, etc.). With other types, the preview may remain empty or an icon image may be displayed.
You can double-click on the preview image to display it in full resolution. The magnification can be moved with the mouse, whereby a small, superimposed navigator facilitates orientation. Double-click again to display the complete image.
To the right of the preview, you will find an info field containing some properties for the currently selected Asset, such as resolution, color depth, alpha channels (for bitmaps) or length in frames, channels, resolution, sample rate (for sound files) etc. that could be displayed.
Find/Replace
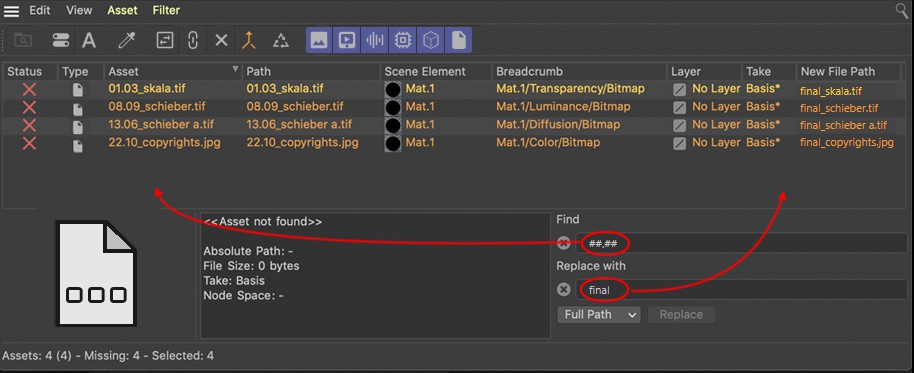
To the right of the preview image you will find the replace function, which you can use to change all possible Asset paths, directory and sset names. The whole thing works as follows (for illustrative reasons here with 1 texture instead of 324 in reality):
Assuming you have a texture in the path: "/Users/olibecker/Desktop/Bunny/Texture/Hare.jpg"
2 years later you open the corresponding file and this file is no longer found because the texture folder including the texture can now be found here:
'/Users/olibecker/Desktop/old-projects/xxx/Texture/Hare.jpg'
To change the old path to the new one, enter 'Bunny' under Find and 'old projects/xxx' under Replace with ( Full path or directory is defined in the options menu below). If you have selected textures, a new absolute path will now be displayed for them in the New File Path column. This should correspond to the real path. If you now press the Replace button, the paths will be rewritten for all selected textures in the material.
When Replacing, the part of the old path (or texture name) that is replaced with the path defined when Replacing with is used. In this way, old paths can be quickly replaced with new ones for many textures/Assets.
In the selection menu, you can define which part of the path should be run through by the Replace function. The path can be divided as follows:
For the Find field, the already described expressions can be used, such as * (any text), ? (any single character) and # (any single digit).
Short example: With these settings, you can replace all texture names with a preceding date with textures of the same name preceded by "final_".
Of course, all of this works particularly well if you adhere to defined rules when assigning path and texture names (e.g. add the date, adhere to certain numbering rules or add a 'low_' in front of low-resolution textures, which you can then later replace with high-resolution textures, which then have a 'high_' in front of them). You can then use it to quickly and easily exchange textures and re-direct paths that are not found onto new paths.
Menu
Edit Menu
All of the following commands only refer to the asset paths within Cinema 4D. Nothing will be changed in the Asset files themselves.
The following also applies: Assets hidden by the filter will not be taken into account (exception: Deselect All).
Most of these commands are also offered in a context menu when you right-click in the Project Asset Inspector.
Displays the file in the Explorer/Finder for further editing.
Opens the file type with the program specified by the operating system.
Loads the file into Cinema 4D's own Picture Viewer. Of course, this only works for bitmaps.
Use this to open the corresponding manager (e.g., Material Editor or Node Editor) at the location where the file is linked.
Use this to open the link in the corresponding manager (e.g., Material Editor or Node Editor).
This option (not a command) defines whether the elements in the Project Asset Inspector of selected assets should be displayed in the Attribute Manager.
This is used to select all Assets displayed in the asset list.
This command cancels any Asset selection (including those that may have been masked out by the filter).
This selects all Assets displayed in the list that are not found.
Use this command if selected Assets are to be deselected and deselected Assets are to be selected.
The elements selected in the respective managers (e.g. material in the Material Manager, object in the Object Manager) will select their assets in the Project Asset Inspector when this command is called. However, this does not work with all possible Assets (e.g. cache files or Assets contained in the scene Node Editor).
View Menu
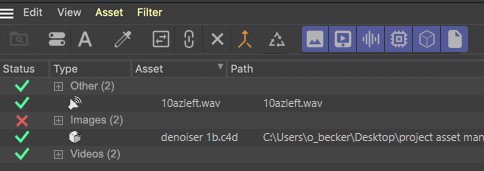
Grouping
Sometimes it can be easier to group Assets according to their properties (e.g. Asset name, type, level, etc.). The groups are then formed in the column for this property (the column cannot be hidden). In the following illustration, for example, all images are grouped according to Type and all images will be grouped in a group of the same name.
The groups can be expanded and collapsed by clicking on the +/- icon; if you press Ctrl, all groups are expanded and collapsed. The same happens when you scroll through the list with the cursor keys and press the left or right cursor key on a group.
Clicking on a group name selects all subordinate Assets (e.g. to apply a command to all group Assets). If you press Ctrl, all grouped Assets are deselected
You can group as follows (it does not matter whether the assets are located in different scene elements (material, Nodes, effectors, etc.)):
This switches off any grouping, whereby all assets will be listed sequentially.
All Assets with identical names and paths will be grouped (e.g., identical bitmaps in different materials)
All Assets are sorted according to the databases in which they are located. If you are not in a database, << Files >> will be displayed here.
All Assets of the same type are grouped (e.g., all sound files or bitmaps used somewhere)
All Assets with an identical element type are grouped (e.g., all bitmaps and sound files that are used in any material (or Effector)).
All Assets that belong to an element of the same layer are grouped. If, for example, an IES file of a light source on layer A and a material (also assigned to layer A) has loaded a bitmap, both the IES and the bitmap will be grouped.
All Assets of the same Take are grouped. For example, if a bitmap is loaded in Take B and a sound file is loaded in a sound effector in Take B, they will both be grouped.
All Assets of the same Node Space are grouped here.
This option lets you group Assets of identical file format. For example, all jpeg files, all wav files, etc.
Visible columns
Use these options to specify which corresponding columns should be displayed in the Project Asset Inspector. The meaning of these categories is explained in this section.
Assets Menu

These two commands create or delete complete file paths.
Localize Filenames removes the Asset paths from all selected assets and only inserts the file name. This practically turns absolute paths into relative ones (which Cinema 4D is looking for here ). This also happens automatically when you save a project using this command ![]() Save Project with Assets....
Save Project with Assets....
Globalize Filenames turns a relative path (where no directory is saved, only the name) into an absolute path for all selected Assets. The complete file path will then be used.
This allows you to reassign a single file to be selected for selected assets.
In the case of UDIM/UVTILE files, these can also be replaced. When selecting such a file type, a dialog opens as described at ![]() Open Texture.... You must then select the UDIMM/UVTILES option.
Open Texture.... You must then select the UDIMM/UVTILES option.
This command opens a small Asset Browser, which you can use to replace all previously selected Assets with one from the Asset Browser.
This opens a small Asset Browser search window with an AI search for the right-clicked Asset. All previously selected Assets are replaced by the one selected here.
This command links selected Assets with assets of the same name in a directory to be selected. Depending on the location, absolute (outside...) or relative (...within Cinema 4D's search paths) paths are created.
This command is always useful if no Assets have been found at all. This is usually the case if the asset folder is located somewhere else. Then simply select all Assets, execute the command and select the current directory. All Asset paths will then be readjusted and nothing stands in the way of rendering.
Use this to delete all links to the selected Assets. This can be used, for example, to eliminate texture links to non-existent files contained in deactivated material channels, which are indicated by red crosses in the Project Asset Inspector.
This command works in a similar way to the well-known ![]() Save Project with Assets... command, with the difference that the project storage location is suggested in the order selection dialog that opens. In addition, the command only affects Assets selected in the asset list (no selection = all Assets).
Save Project with Assets... command, with the difference that the project storage location is suggested in the order selection dialog that opens. In addition, the command only affects Assets selected in the asset list (no selection = all Assets).
The command therefore collects all Assets and saves them (if necessary, corresponding subfolders will be created there: "tex" for textures, "illum" for GI cache files, etc.). Absolute paths will be turned into relative paths.
This reads out the color space contained in the bitmaps and assigns it instead of the default color space.
This command triggers a reload of all bitmaps, provided their file paths are up-to-date, i.e. the bitmaps used are available at the specified paths. This is helpful if textures have been edited in external programs and saved there in the meantime. This command can also be found in the Texture menu of the Material Manager.
Filter menu
The search bar displayed here provides you with a powerful filter that ensures a clear overview even with hundreds of assets.
Use the Select menu to define the list column of the same name that should be used to filter entries. (in the main menu under View you can display all possible columns to see exactly what you can filter for).
The following applies to the Search field: no elements are selected. This is a display filter that works in real-time. It works by simply typing in a character string. Each element whose name consists at least partially of this character string will be displayed. Upper and lower case will be taken into account. Clicking on the x button to the left of the input field will delete the character string, circumventing the filter and everything will be displayed.
There are these 3 expressions that are used here (and also in the Replace field below):
- * Placeholder for any text.
- ? Placeholder for a single character.
- # Placeholder for a number, or for several consecutive "#" minimum number of digits (see example below).
A few examples will shed some light on the subject:
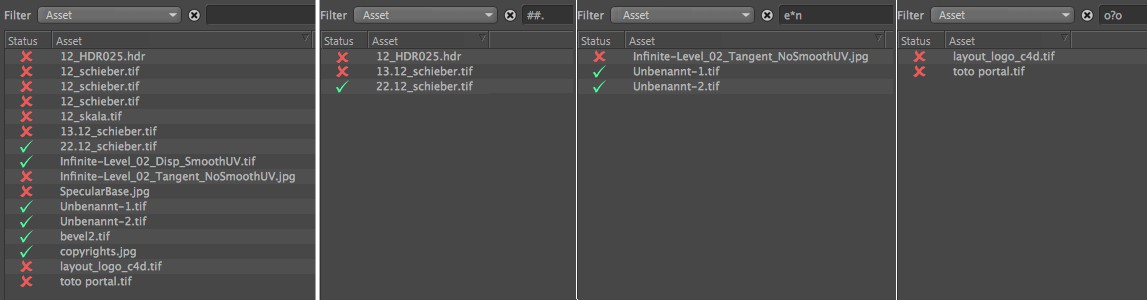
On the left you see the unfiltered asset list, then filtering from left to right:
- ##.: Everything will be listed that contains a character string of at least 2 digits followed by a dot.
- e*n: Everything will be listed where a character string begins with a lowercase e, is followed by any text and ends with a lowercase n.
- o?o: Everything will be listed where a character string begins and ends with an o and there is exactly ONE letter/digit between the two.
The following filters are not text filters, but have been equipped with the following selection menus in order to filter according to certain properties:
- Status: Here you can select whether you want to display existing, missing or assets with warnings.
- File size: Here you can select whether the asset should be displayed if it is smaller, larger or the same size as a defined file size.
- Resolution: Define here whether bitmap assets should be displayed if they are smaller, larger or the same size as an image width and height to be defined. For example, enter 0 for Height if Height is to be ignored and only Width is to be taken into account. If both values are not equal to 0, both conditions must also apply.
Filter by asset type
You can use these filters to define which asset types should be displayed in the asset list.
Please also note the Filter line described above, with which you can filter much more finely (e.g., according to asset properties such as file name, file size, etc.).
Use this to filter bitmaps.
Use this to filter videos.
Use this to filter sound files.
Use this to filter separate cache files (such as those generated by MoGraph or GI).
Use this to filter external 3D files (e.g., *.abc, *.c4d)
Use this to filter everything else that does not fall under the filters listed above (e.g., *.ies, *.sbsar or fonts).