The Assets concept
Quick access:
- What are assets?
- Create your own Node assets and capsules
- Assets and external computers/render farms
- How do you populate the Asset Browser with your own files?
- How can you pass on an asset to other users?
- Faulty or missing assets
What are assets?
Assets can be anything that is contained in or used by a Cinema 4D scene. These are, for example: objects, scenes, Node circuits, images, videos, etc. These assets can be stored locally on the hard disk or on a Maxon or other server. Assets are organized in databases that you can manage and view via the Asset Browser.
There are many assets already supplied by Maxon and constantly being added to (e.g., in the objects or scenes category of the Asset Browser), assets you have created yourself or assets offered by third parties.
Assets - wherever they come from - can hardly be distinguished from "normal" Cinema 4D functionality. They fit seamlessly into the program. You can find assets mainly in the Asset Browser, but also in the Material menu of the Material Manager under Node Material Presets, for example. Assets can consist of a single Null object or a complex, 2GB scene.
A special form of asset is also known as a capsule. These are mainly Node circuits that allow you to extend the functionality of Cinema 4D yourself or, for example, create your own objects or generators. However, new asset capsules are also constantly being added by Maxon, which you as a Maxon One customer can call up almost monthly via the Asset Browser, for example.
On this page you will find examples of how you can create your own capsules, e.g., to add new objects and selection or modeling commands to Cinema 4D.
Create your own Node assets and capsules
What is particularly fascinating about the assets is that you can also use scene Nodes to design your very own objects, modeling and selection functions, which can be inserted into Cinema 4D like the usual objects and generators and operated directly via the Object and Attribute Manager. The Node components required for this can be found in the Nodes tab of the Asset Browser under Nodes > Asset construction.
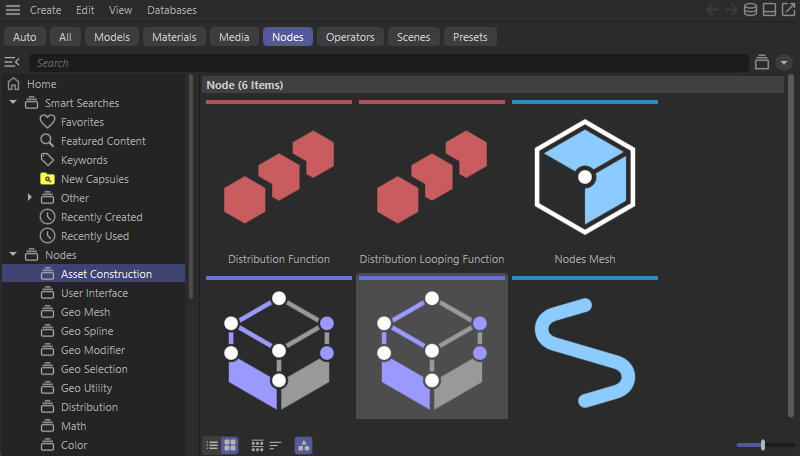 The main components for creating your own Node-based assets can be found in the Asset Construction category in the Asset Browser.
Various Nodes are offered in this category, which do not initially represent a visible function or geometry, but function like groups that we have to fill with Nodes ourselves. These Nodes offer specialized inputs and outputs, which can then be used to combine the results of the Node circuits directly with objects in the Object Manager, for example. Here is a brief list of the functions for which the respective asset Nodes are suitable:
- Nodes Mesh: This is the right choice if you want to create a geometry based on points, edges and polygons. On this page you will find further explanations and examples of how to use this asset.
- Nodes Spline: This Node is thematically closely related to Nodes Mesh, except that Nodes Spline is intended for the creation of spline geometry. On this page you will find more information about this Node.
- Node Modifier: This Node is intended as a basis for the creation of modeling or deformation functions. Additional information can be found here.
- Node selection: You can use this Node to design procedural selection methods for points, edges or polygons. The corresponding information page for this Node can be found here.
These four assets can also be used directly in the Object Manager as capsules, as shown in the following image. To do this, drag the desired asset from the Asset Browser directly into the Object Manager.
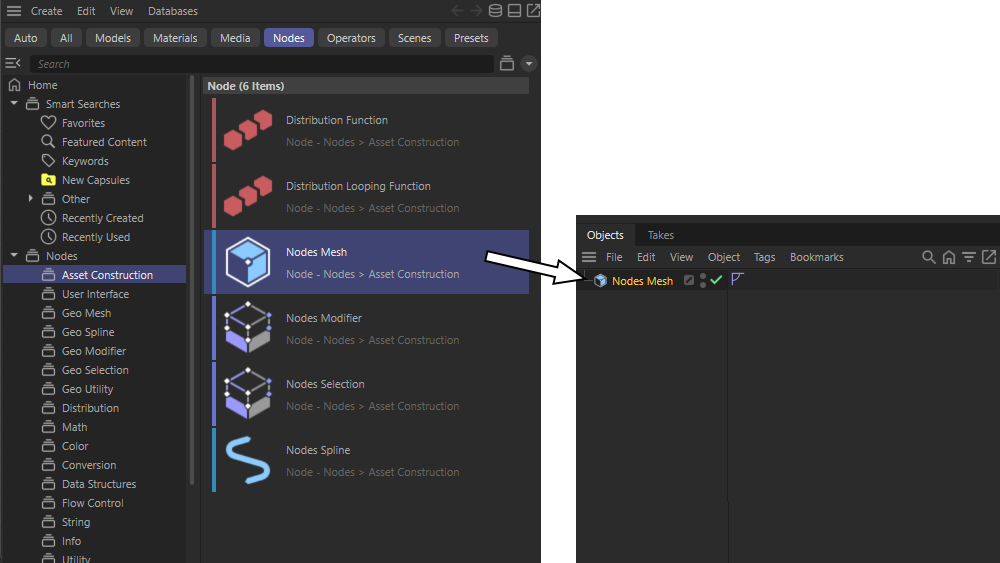 The creation of an asset capsule by dragging an asset construction Node into the Object Manager.
In the Object Manager, this capsule can be renamed like any other object, e.g., by double-clicking on its name, or grouped in hierarchies with other objects. It is often the case that the Node Modifier and Node Selection must be subordinated to an existing object in order to change it. Think, for example, of how the familiar deformation objects work. Nodes Mesh and Nodes Spline, on the other hand, are intended for the creation of new geometry and can therefore often be used independently in the Object Manager.
Double-clicking on the capsule icon to the left of its name in the Object Manager automatically opens the Node Editor and activates its Capsulemode. This displays the content of the asset capsule directly, which is always initially empty. An Asset Browser and an Attribute Manager can be added to the left and right of the Node Editor if you activate the corresponding icons in the header of the Node Editor. These icons have been framed in orange in the following image. The actual Node circuit is created in the area between (see green coloring in the following image). To do this, you can simply drag Nodes from the left-hand Asset Browser directly into the Nodes area, or - if the Asset Browser has not been activated - you can double-click in the Nodes area and then also gain access to the Nodes.
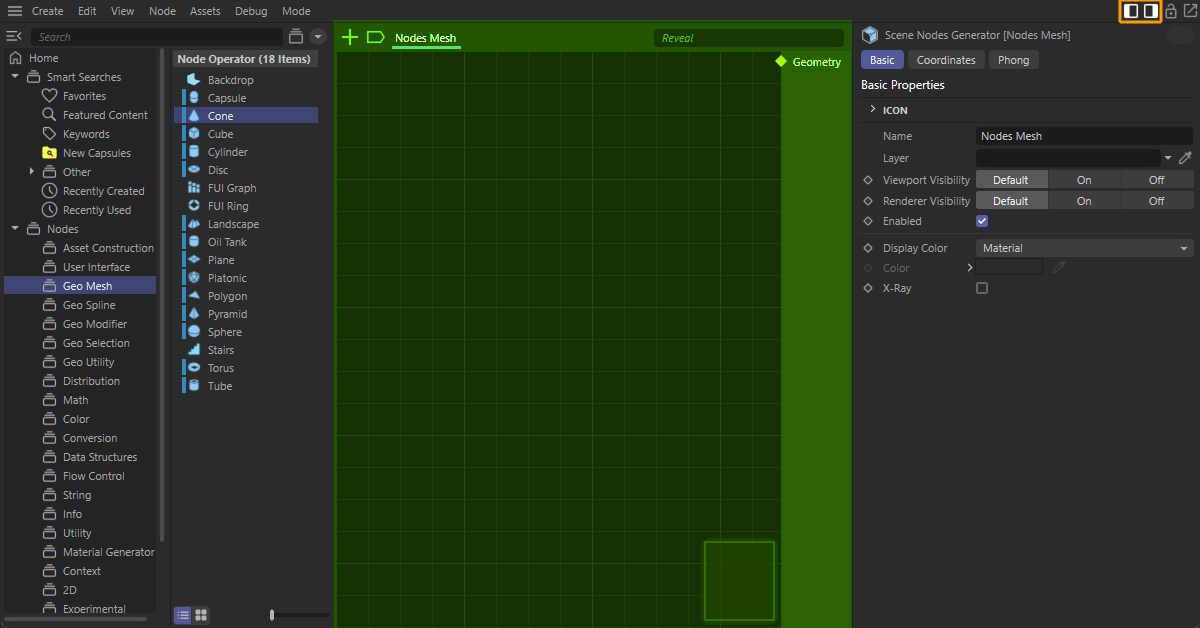 The three main components of the Node Editor: The Asset Browser on the left, the Nodes area highlighted in color here in the middle and the Attribute Manager on the right. The Asset Browser and the Attribute Manager can be shown and hidden individually or both at the same time at any time using the corresponding icons in the header area of the Node Editor (see orange highlighting of these icons).
Now drag the cone from the Geometry Mesh category in the Asset Browser into the Node circuit as a test. The corresponding Node is already highlighted on the left-hand side of the image above. This Node corresponds to what we already know as a basic cone object, only as a Node.
On the right-hand side of the Cone Node, we find a Geometry output that provides us with the calculated cone. In line with this, we also find a Geometry output on the right-hand edge of our Nodes area, which is automatically provided by the Nodes Mesh Asset. The output on the Node Mesh Asset automatically establishes the connection to the Object Manager and, for example, the Viewports. A geometry connected here that contains points, edges and polygons is then displayed like a normal object. We will try this out immediately by creating a connection between the Geometry output of the Cone Node and the Geometry output of the capsule asset with the mouse and holding down the left mouse button, as shown in the following image. This makes the cone visible in the Viewports. As with other objects, materials or deformations, for example, can now also be assigned directly via the Object Manager.
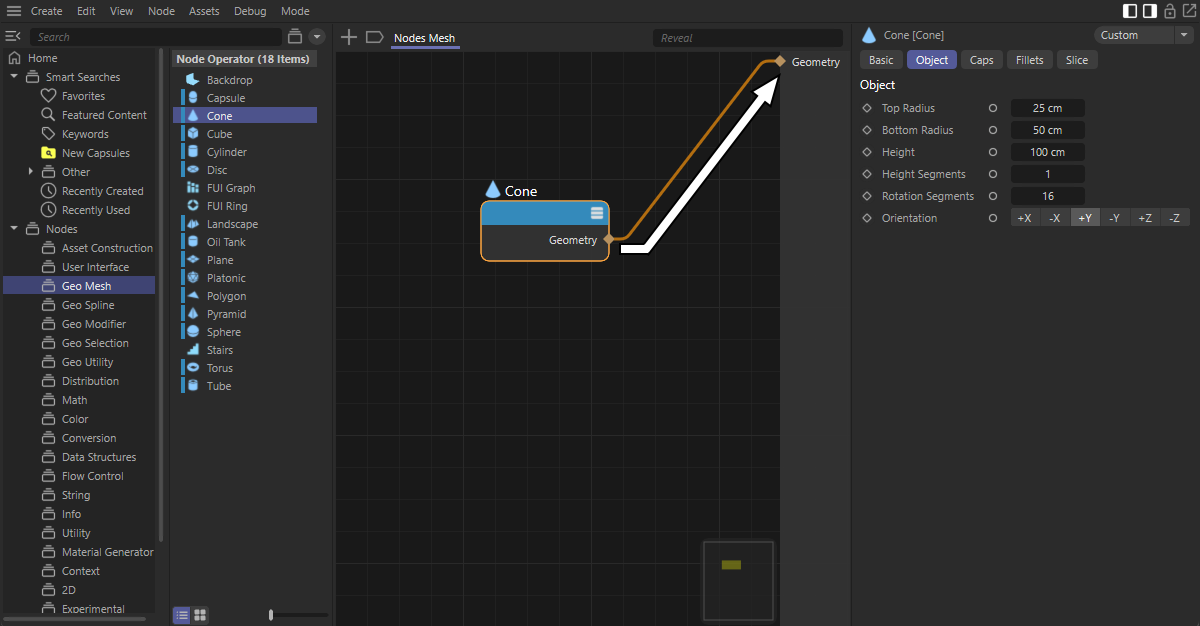 By connecting a geometry to the Geometry output of the capsule, it becomes active and also displays this geometry in the usual views.
One difference to the usual basic objects in Cinema 4D, however, is that when the capsule is selected in the Object Manager, no setting options appear, e.g., for the subdivisions or dimensions of the cone in the Attribute Manager. However, we can also activate this for the capsule. To do this, simply select the Cone Node in the Node Editor by clicking on it and display the Attribute Manager there. To the right of the usual parameters of the cone, we also find additional circle symbols (see colored marking in the following image).
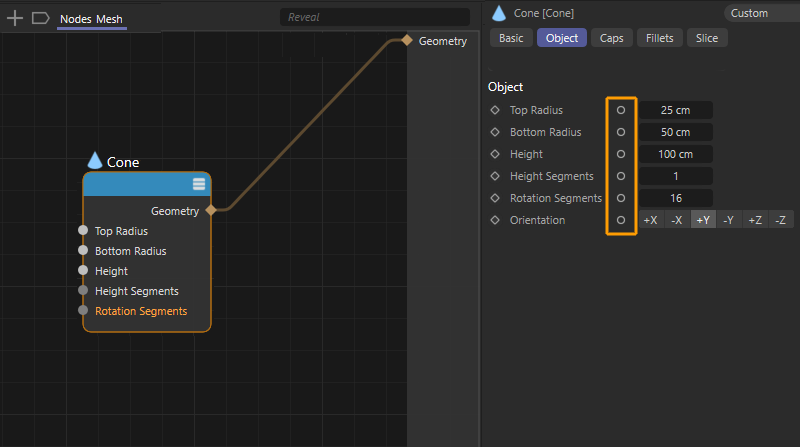 Highlighting of the symbols for the parameters of a selected Node, which can be used to directly create corresponding inputs on the Node.
Ctrl-left-click on one of these circles in the Attribute Manager to create the corresponding input on the Node. The corresponding value can then not only be set as usual via the Attribute Manager, but also sent to the Node via a Node connection. To enable the user to make all relevant dimension and subdivision settings on our capsule, we create the inputs for the top and bottom radius, the height and for the height and circumference segments as described above, as shown in the image above.
These new value inputs now only need to be routed out of the capsule so that they are also offered to the user in the Attribute Manager when the capsule is selected in the Object Manager. To do this, use the mouse and hold down the left mouse button to draw a connecting line from the corresponding value input on the Cone Node and then drop this connection directly into the empty area of the Node Editor by releasing the left mouse button. A context menu then opens in which you can select Add new input. This automatically creates a new input for this value on the left-hand side of the capsule circuit in the Node Editor, which is automatically connected to the corresponding input on the Node. Repeat this process until all Node inputs have been routed to the left side of the capsule circuit, as shown in the following image.
 Forwarding of value inputs created on the Node in order to make them available to the user of the capsule in the Object Manager and the Attribute Manager.
The other two Nodes in the Asset Construction category are somewhat out of the ordinary, as they can only be used within the Node Editor and cannot be dragged directly into the Object Manager:
Assets and external computers/render farms
Assets and capsules are stored in databases (a directory with a few files, or packed as a ZIP) and can be exchanged between users and installations. Such a directory looks like this, for example:
 Assets saved under Preferences, for example, are stored in the preferences directory under userrepository. The character gibberish is used to uniquely identify assets.
Such a directory can be copied and passed on as a whole. However, it is easier to export assets using the special commands provided for this purpose (see Edit menu).
Scenes that contain Asset Nodes must have access to the corresponding assets on external computers (e.g., also team render computers) - similar to bitmaps linked in materials. Otherwise, rendering errors may occur or a scene may no longer work at all. Solutions to this problem can be found below under Faulty or missing assets.
There are basically two options for avoiding such problems:
- The assets are contained in the scene (if you save them with Save Project incl. Assets, copies of the assets will be integrated into the scene file).
- The external computer will have access to assets (e.g., via your company network). Set the database paths accordingly in the Preferences ( Asset Browser tab).
The interface of asset capsules can be defined with a separate editor, the Resource Editor. You will find an example of this on this page for the asset construction groups.
How do you populate the Asset Browser with your own files?
If you would like to populate the Asset Browser with your own files/assets, you can
- add these using the first four commands of the Asset Browser Create menu (Add to Database ...) to one of these in freely selectable categories and databases or
- for Material Nodes in the Assets menu of the Node Editor using the Convert to Asset command.
How can you pass an asset to other users?
If you would like to send an asset to another user, there are basically 2 ways to do this:
- Give the recipient access to the database containing the asset (e.g., via Internet server or via databases shared in the network).
- If there is no connection to another user, assets to be passed on must be exported from the database. The recipient can then import the asset into one of their databases. This works as follows:
- Let us first assume that the asset to be passed on is already contained in a database. If this is not the case, see the previous section How do you populate the Asset Browser with your own files?
- Then select the assets to be exported - if you have assigned the keyword "Export" to the 84 assets to be exported, for example, these can only be displayed (keyword: "export") and selected - and select Create/Export Latest Version from the Asset Browser menu. Enter a file name in the dialog and save the export. The result is a zip file that you can now pass on.
- The recipient can now select Create/Import Assets from the Asset Browser menu and then select their own database in which to store the imported assets.
- Alternatively, you can link directly to the zipped database by calling up the Databases/Connect Zip Database ... command in the Asset Browser.
Faulty or missing assets
The fact that custom-created assets can also be saved in their own databases (e.g., via Create new database... in the Database menu of the Asset Browser or directly when saving a new asset via Convert to asset ... in the Assets menu of the Node Editor) can also mean that not all assets used can be found when opening a project, e.g., on another computer. Cinema 4D will display an error message directly when loading such a project. Two scenarios are possible, but both can be corrected in the same way.
Scenario 1: Missing asset in the Object Manager
If you have used a Node circuit created with asset construction groups directly in the Object Manager and the database in which this asset was saved is not available in the Asset Browser or has been deactivated there, you will receive this error message directly when loading the scene:
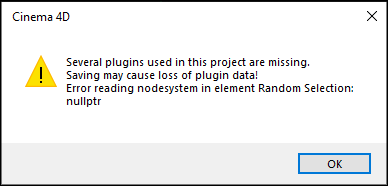 Error message when opening a project in which an asset is used in the Object Manager and this asset cannot be found in the active databases of the Asset Browser.
To solve this problem, you must activate the corresponding database in the Asset Browser or add it there. If you then update the scene via File/Old Project Version... the asset should be found again and the functionality of the scene should be restored. You can find out more about this in the troubleshooting section further down on this page.
Scenario 2: Missing asset in the Node Editor
If an asset is used within a Node circuit in the Node Editor and this asset cannot be found in the active databases of the Asset Browser, you will receive this error message when loading the scene:
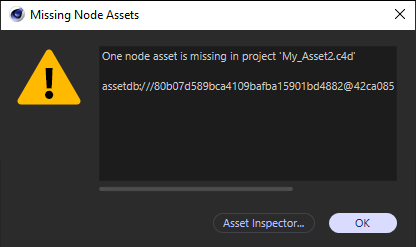 Error message when opening a project in which an asset is used in the Node Editor and this asset cannot be found in the active databases of the Asset Browser.
You can also get similar feedback at any time in the Project Asset Inspector, which you can open via the button at the bottom of this error message or directly via the Cinema 4D Window menu.
 List of missing assets in the Project Asset Inspector
Your Node circuit remains intact even if an asset is missing. An empty Node with the same inputs and outputs is used as a placeholder for the missing asset so that the existing connections between the Nodes can be retained. However, the function of the circuit is no longer given and is indicated by a corresponding colored marking and error message directly in the Node Editor:
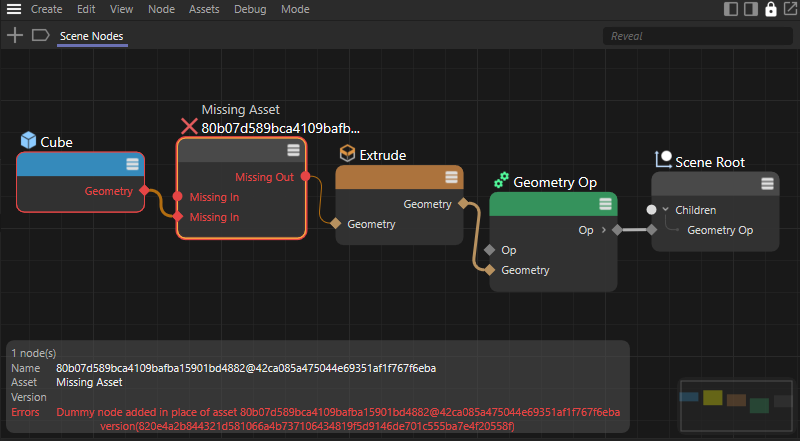 Inserted placeholder for a missing asset in a Node circuit and corresponding warnings and markings in the Node Editor.
Integration of missing assets
The solution to both of the above problems is to activate or relink the asset database in which the previously missing asset was stored. To do this, open the Asset Browser and activate the display of the databases using the symbol with the three stacked disks (see red marking in the following image):
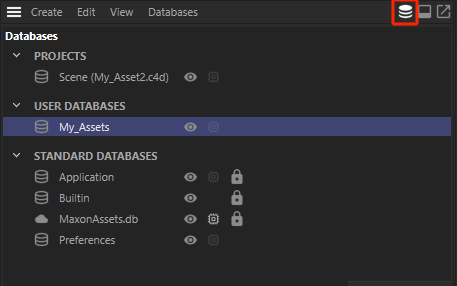 List of the linked asset databases in the Asset Browser.
If the database from which the loaded asset originates is already listed here, check whether this database is also active. To do this, right-click on the name of the database and check whether the check mark in front of Activated Database is present. If it is a database that has been integrated via a URL, you must ensure that you have an online connection to this database. If in doubt, right-click on the database and select Show Details. In the lower part of the Asset Browser, an additional will open in which you can see the storage location of the database.
If the database in which the asset was saved is missing in the Asset Browser list, select the Connect database... entry in the Database menu. You can then directly select the folder in which the asset was saved. Alternatively, URL Connect Database ... can also be used to create a link to a database that has been saved online, e.g., in a cloud. The Connect zip database... command is also available if you have an asset database in zipped form. How you can transfer a database from one computer to another, for example, has already been explained in this section.
After you have activated or reloaded the database matching the missing asset, execute File/Old Project Version ... to reload the scene and the assets it contains. If the asset is contained in the newly linked database, the project should now work again without restrictions.