Surface
In this tab you can define object-specific settings such as the Bendiness of a cloth or its tensile strength. General information about the new Simulation System can be found on those pages.
Unfortunately, some parameters are not constant, but also change depending on the simulation project settings or mesh density. The Substeps and Iteration settings in particular produce a stiffer cloth behavior.
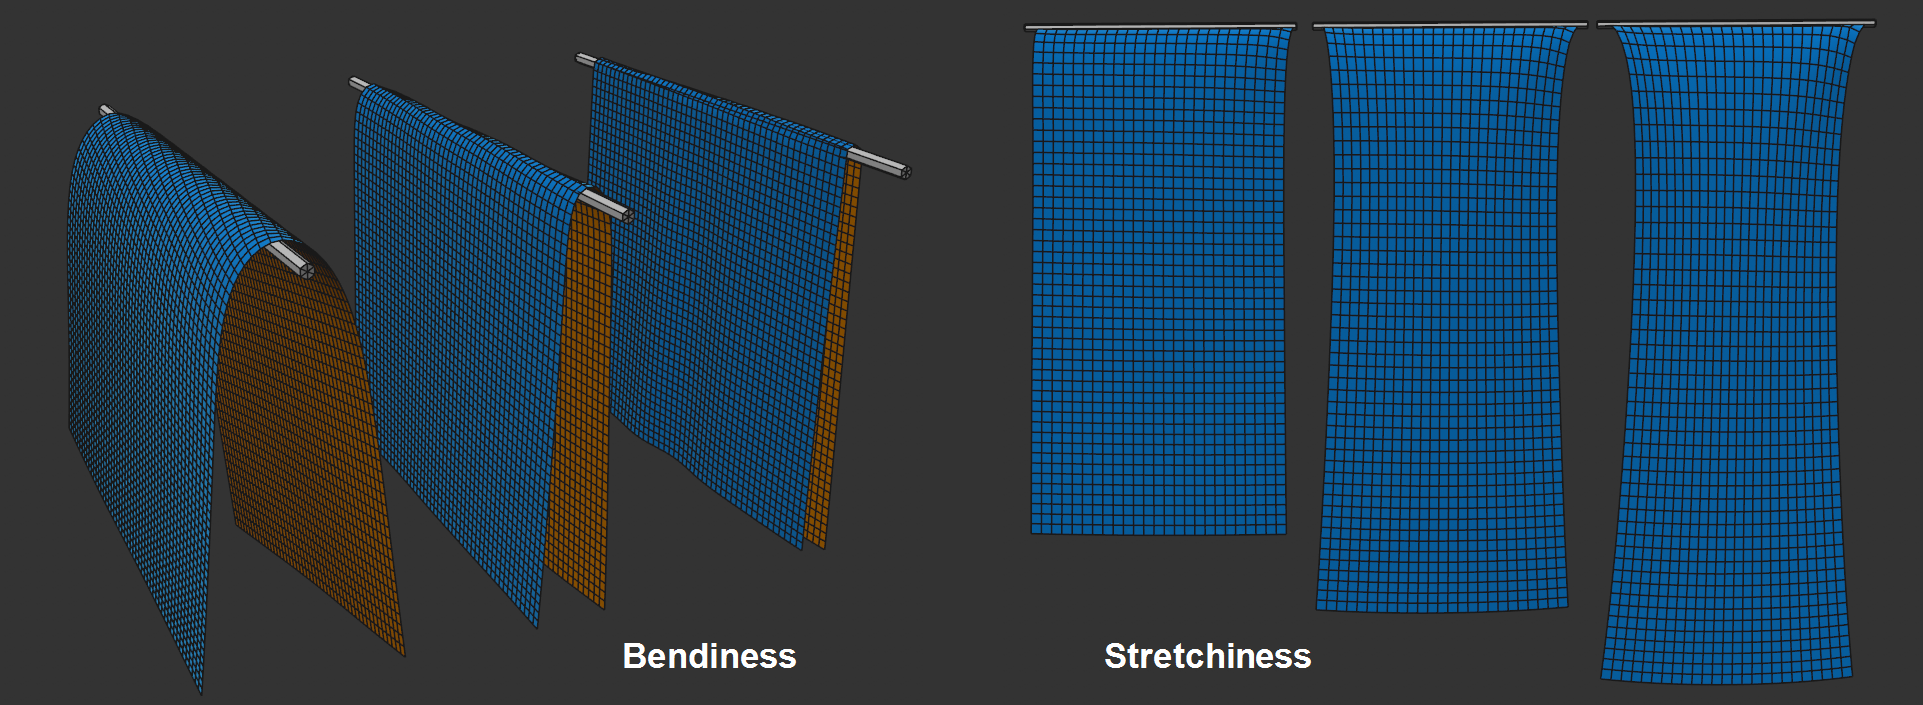
 The two parameters Bendiness and Stretchiness each with increasing values.
Imagine a thin square object hanging vertically downward, and you're holding it by the ends of the upper side. Also imagine rotating your hands horizontally 90 degrees.
The Bendiness defines how far the hanging object rotates: Small values behave like a thin sheet of metal, increasing values lead to a behavior of aluminum foil up to that of a towel as values increase.
In other words, Bendiness is a measure of the resistance that a Cloth object presents to an external force for rotational changes between the object point edges.
Bendiness also depends on the Substeps parameter of the project presets. The larger the Substeps, the stiffer the cloth will be.
With Map, Vertex maps can be used to define the Bendiness at point level. If you define a maximum value for a related value, the Vertex map will use this value if Weighting is set to 100%; if set to 50% it will use half the value and so on.
Stretchiness is a measure of how tightly object points are connected by their edges - and any diagonal constraints. Or, put differently, how strong the connected constraints are.
For small values, which is, for example, advisable when simulating real textile fabric without elastic, the points are firmly connected. If, on the other hand, high values are defined, the cloth will stretch like rubber.
With Map you can use Vertex maps that define Stretchiness at the point level. If you define a maximum value for a related value, the Vertex map will use this value if Weighting is set to 100%; if set to 50% it will use half the value and so on.
See also Substeps, which also affects the Stretchability.
If collisions occur, this setting defines a "springing back" force in the direction of the contact point Normal direction. If, for example, a cloth falls parallel on a plane, the cloth will spring back slightly if higher values are defined. It will repel slightly from the surface. Since textiles normally don't behave this way, the default value is 0.
If one of the touching objects has the value 0, the effective spring strength is also 0.
Be careful with very high values here, otherwise faulty behavior may occur.
Map allows you to use Vertex maps that define Bounciness at the point level. If you define a maximum value for a related value, the Vertex map will use this value if Weighting is set to 100%; if set to 50% it will use half the value and so on.
When 2 Simulate objects collide or a Simulate object touches itself, Friction comes into play. This is a measure for the resistance elements have when they rub against one another. Smaller values define correspondingly less friction and larger values increase the friction accordingly.
Contact or collision occurs whenever points, triangles or edges approach closer than defined under Thickness.
If one of the touching objects has the value 0 here, the total friction will also be 0.
Map allows you to use vertex maps that define Friction at the point level. If you define a maximum value for a related value, the Vertex map will use this value if Weighting is set to 100%; if set to 50% it will use half the value and so on.
In the following example, the two fabrics have been stapled together in the middle using adhesive zones defined by fields:
If you want your objects to stick to each other or even to themselves, this is the right parameter. Make sure that enough points contact each other so the bounciness works best. Here, higher values such as 500 can be helpful.
For best results, internally Bounciness is disabled and Friction is applied at half the value of Bounciness.
If one of the touching objects has the value 0, the effective Stickiness will also be 0.
Note that both the Rope tag and Collision object can also have their own adhesive Strength settings.
Vertex maps can be used with Map to define the bounciness at point level. If you define a maximum value for a related value, the Vertex map will use this value if Weighting is set to 100%; if set to 50% it will use half the value and so on.
When Simulate objects get close to each other, the collision will occur when points, triangles or edges get closer than defined under Thickness.
A very important setting if you want to avoid penetration. To avoid this, collisions should always occur when the geometry has not yet met (this is why the default is set to 1.5 cm).
If you want to use a very small Thickness for visual reasons - for example, to avoid objects hovering over surfaces as much as possible - it may be useful to increase the Substeps setting in the Simulation Project Settings. This lets you calculate collisions more precisely for faster movements.
If you have very fine mesh geometry, point spacing may turn out to be smaller than Thickness, which would trigger a continuous collision. This is what you want to avoid: Internally, Cinema 4D automatically selects a lesser thickness for the respective points ((80% of the shortest edge that is attached to this point). This means that the defined Thickness value is not fixed and can be undercut internally depending on the mesh density. This applies to self-collision and collision with other Cloth objects/splines. However, for Collision objects (Collision tag), the defined Thickness applies.
Map allows you to use Vertex maps that define Thickness at the point level. If you define a maximum value for a related value, the Vertex map will use this value if Weighting is set to 100%; if set to 50% it will use half the value and so on.
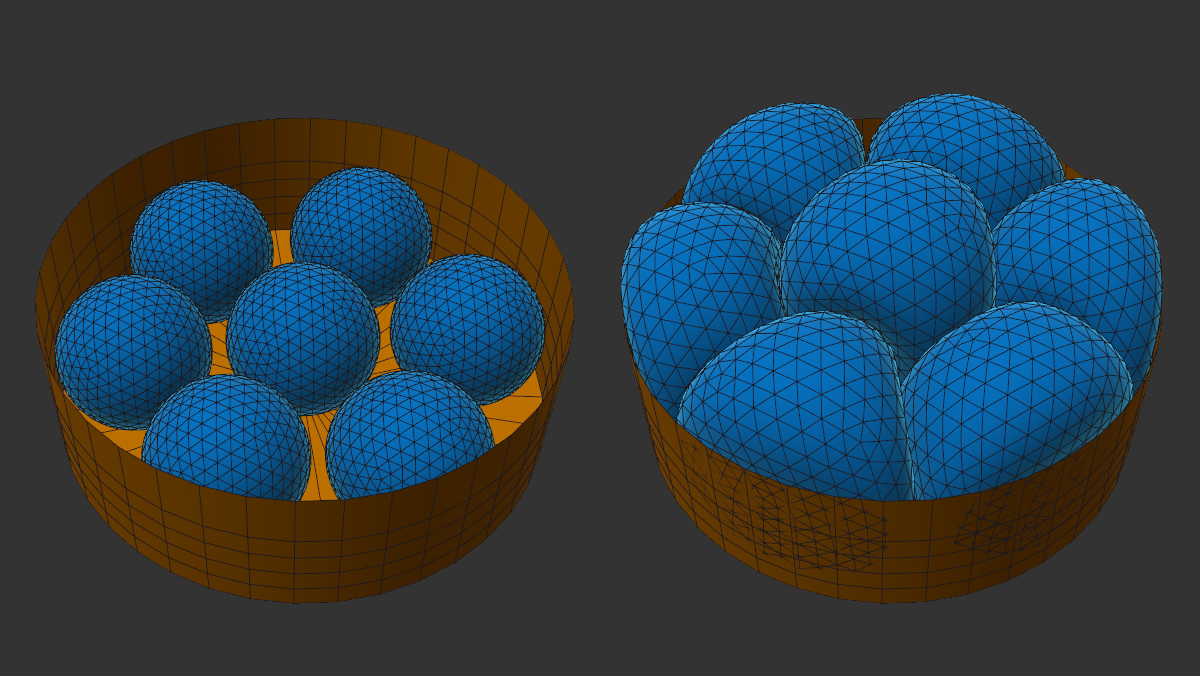
 Here, the target length of the spheres has been animated (in principle, something similar would also be possible with the balloon functionality, but you can use the Target Length at the point level to define where exactly the change should occur).
When a constraint is created (normally at frame 0 at the beginning of a simulation), when the cloth is still in its initial state, each constraint will have its own defined length. The object will try to maintain this length in order to ensure the object's stability.
You can now control or animate these Target Lengths as a percentage of the output length. This lets you grow or shrink objects or even let them pulsate (if the value is, for example, oscillated around 100%).
Map allows you to use Vertex maps that set the Target Length at the point level. Use the following Min Target Length setting to fine-tune the evaluation of the Vertex map.
If you have placed a Vertex map at Map, the setting here defines the Target Length 0% weighting to which it corresponds.
Here you can define the total mass of the garment, which is initially distributed evenly among all points (can be changed with a vertex map in the Map field below).
Greater masses develop more "thrust" when colliding with lesser ones. In other words: You have greater inertia.
If you want to arrange several garments on top of each other, make sure that a lower layer always holds a larger mass than the one above it. This helps prevent penetrations.
Map allows you to use Vertex maps that define Mass at the point level. Define a value - that is distributed across all points - for the corresponding parameter. If Weighting is set to 100%, the Vertex map will use precisely this value; if set to 50% only half and so on.
When creating a Vertex map, it is often the case that you paint on 100% values or have them generated by Fields. All other points would have the value 0%. This is often not desired for a variety of reasons. Therefore, a minimum value can be defined here that applies to points that have 0% weighting. Since the minimum value here is 1%, point masses of 0 are thus automatically excluded.
Otherwise, Min. Map can also be used for fine-tuning. The higher you set the value, the less influence the Vertex map will have on the mass distribution - at 100% it will have no effect.
Here you can define from which polygon side to check for collisions. You can choose from:
-
Front: Collisions only occur when collision components approach from the outside (with respect to the Normals).
-
Rear: Collisions only occur when collision components approach from behind (with respect to the Normals).
-
Both: Collisions will take place on both sides.
This setting becomes more relevant whenever penetrations in collisions occur. Penetrations are almost never wanted. Once objects intersect it is difficult to separate them using the Both option. If, on the other hand, you have Front selected, it will be easy to separate the objects. In fact, at those locations at which it makes sense, a small impulse will be set internally that will help keep the objects apart.
Both is suitable for a garment of a moving character, for example, while Soft Bodies and Balloons always have Front activated when generated.
In order for garments to retain their shape, it is necessary to internally place constraints on quads, and to do so in a diagonal fashion. Imagine a single-polygon plane that you're holding at one corner: if constraints were only along the edges, the quad would collapse. Diagonal constraints on the other hand prevent the deformation of the original quad.
You can select from the following:
-
None: No diagonal constraints are used.
-
Single: 1 diagonal constraint is created per quad. Here, asymmetrical simulation behavior can sometimes occur, e.g., on simple planes. In such cases, switch to the following option:
-
Double: 2 intersecting diagonal constraints are created per quad.
In short, the more constraints there are here, the greater the shape retention of the Cloth tag-wearing object.
If the mesh consists only of triangles, this setting has no function (triangles have no diagonal). It only applies to quads - N-gons are, by the way, internally made up of triangles and quads, which are processed accordingly.
Damping
You can already find a Damping setting in the Project Settings (Damping), but this applies to the entire scene. The following settings can be used to define the damping per vertex map down to the individual object point.
Damping is nothing more than an artificial removal of kinetic energy from a simulation.
With increasing attenuation, the objects assigned to the tag (clothing, balloon or soft body) behave more and more as if they were moving in increasingly viscous environments (from air -> water -> honey etc.).
 This is how attenuation works at point level (left and right front cloth corners have 100% vertex map weighting as shown below left).
Activate this option if you want to set the attenuation at tag or object level. Otherwise the global Attenuation will apply (see previous paragraph).
Enter a maximum level of damping here, which can be adjusted at point level using a vertex map in the following Map field. Without a vertex map, the Strength will apply to all object points.
With increasing values, object points behave more and more viscously - as with movement in air -> water -> honey, etc.
Values greater than 100% are possible.
Place a vertex map here if you want to define damping at point level. Set a maximum value for Strength. With 100% vertex map weighting, the corresponding point is assigned exactly this maximum value; with smaller values correspondingly less.
Please note that a 0% weighting does not affect the values defined in the following Min parameter. Strength defines the strength that is applie.
If you have placed a vertex map under Map, the setting here defines which attenuation level corresponds to 0% weighting.
This simplifies the drawing of the vertex map, as you usually operate with 0% and 100% values here. You then do not have to define intermediate values such as 2% in the painting tool.
When a garment is stretched beyond a certain extent it begins to tear - the deciding factor here is the elongation of object edges. You can use Tear Guiding to roughly control the course of the tear or Map for more precise control.
Enter here the factor by which an edge may lengthen before it relents at one of its points - the separation will take place at this point.
A Vertex map can be loaded here to paint on weaknesses in specific areas of the garment structure. If Tear Past is set to 300% and you paint using 50% or 100% Weighting, the respective points will tear at 150% or according to the edge length defined by Min Tear Past.
With this you can influence the course of the tear:
Paint an approximate course of the tear. This is where the cloth will tear when stretched far enough. You can also paint on a linear point row: The tear will then occur exactly along the corresponding edges.
It always depends on the degree to which the individual edges are stretched. If no edges stretch along the painted tear line, no tear will appear.
When you create Vertex maps, there are areas that have a 0% weighting. When tearing it would mean that the tear should take place here and, in extreme cases, the entire garment would tear apart. If, on the other hand, the default 120% is applied, the respective edges will first tear if stretched to 120%, even if 0% weighting is defined here.
This setting is somewhat more difficult to understand. Simply put, the edges that are part of each tear have an imaginary cone applied to them. Here you can define the angle of the cone. Edges within this cone will not tear.
This can be used to affect tear tendencies. It's much easier to use Vertex maps to influence this (see previous setting).

