Transparency

Here you can define the transparency. If the material has a color, the color is automatically reduced with increasing transparency. The equation is: color percentage + transparency percentage = 100%. So a white material with 0% transparency is white (100%). A white material with 50% transparency is 50% white (gray). A white material with 100% transparency has no color.
You can load a texture as a transparency map using the three dots button. The brighter a pixel in the transparency map, the more transparent the corresponding region of the material. A transparency texture is similar to a photographic slide: Red parts of the slide allow only red light to pass through; white parts allow all light through. With black, no light can pass through the slide.
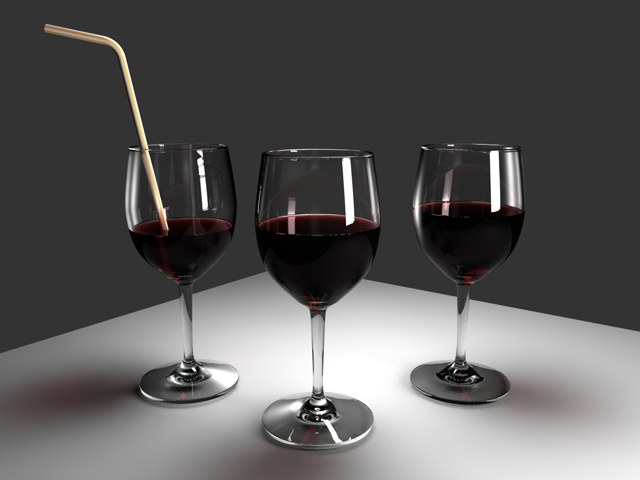 Figure 6: Transparency may be controlled by a transparency map or by the Transparency Color.
You can use a transparent material with a light source to create a light map or gel (look up gels). If a transparent texture is assigned to a light source, the light will be filtered according to the texture's coloration, just like a real gel.
You can specify a color on most of the material channel pages using a color chooser.
The Brightness value defines the brightness of the above-mentioned color and thus its transparency.
Here you will find numerous refraction presets that automatically apply the correct Refraction value. These are the same presets that can be found in the Reflectance channel's Fresnel function.
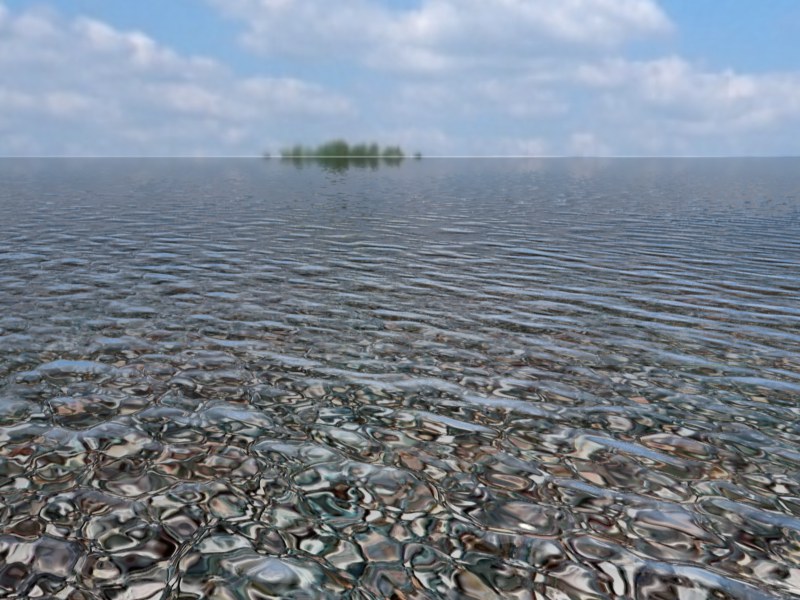
Objects that are not closed, such as a hemisphere without a cap, can give unexpected results with refraction. See Figures 1 to 3. In the figures, the Refraction value is represented by the character n.
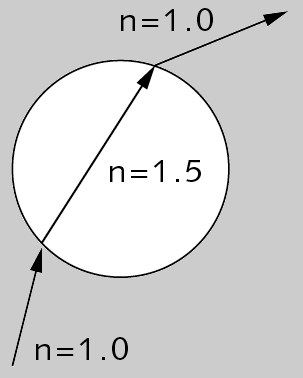 Figure 1.
When a ray hits a closed surface (Figure 1) with transparency and refraction, the ray is bent to simulate refraction. The bent ray is considered to be inside the object. When the ray reaches another surface of the object (the exit side), it is bent back as in real life.
However, if the object is open, the ray may not hit a second surface of the object (Figure 2). Thus the ray may not be bent back and the refraction effect may be inaccurate.
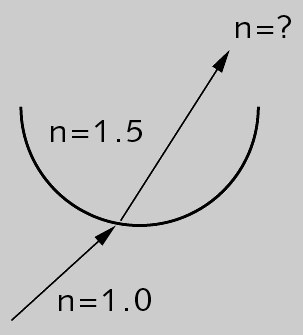 Figure 2.
For this reason, ensure that all transparent surfaces in the scene are closed (Figure 3).
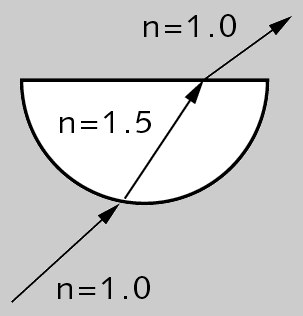 Figure 3.
If the Fresnel Reflectivity value is larger than 0% the viewing angle — the angle between the camera and the surface — will be taken into account. If you observe a real pane of glass with your eyes parallel to the pane (i.e. with a 90 degree viewing angle), you will notice that the pane barely reflects, almost all light passes through. However, look at the pane from a narrow viewing angle and you will see that it reflects much more of its surroundings. The transparency and reflection values are dependent on the viewing angle.
The Fresnel option simulates this phenomenon for you.
Note that the reflective properties (Roughness, Anisotropic, etc.) can be fine-tuned using the Reflectance channel's * Transparency * setting.
For example, provided Fresnel Reflectivity is set to 100%, if you set transparency with RGB values of 80%, 80%, 80%, the material is 80% transparent and 0% reflective when the viewing angle is 90 degrees. With a very low viewing angle, the material is approximately 0% transparent and 80% reflective. If you have entered a reflection value in addition to transparency, the reflection value is added to the angle-dependent reflection.
If the Fresnel Reflectivity value is larger than 0% the transparency and reflection values are used as they are irrespective of the viewing angle.
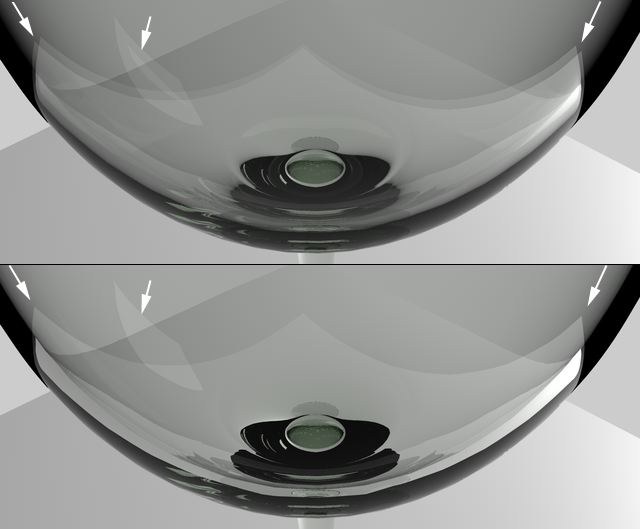 At top, Exit Reflections enabled; at bottom, disabled.
As soon as a reflection meets a surface after being refracted through glass one of two slightly different reflections can be calculated - ones that result when they enter glass and those that exit the glass. A single reflection is often visually the most appealing one (even if it is in fact false). To achieve this effect, disable the Exit Reflections option.
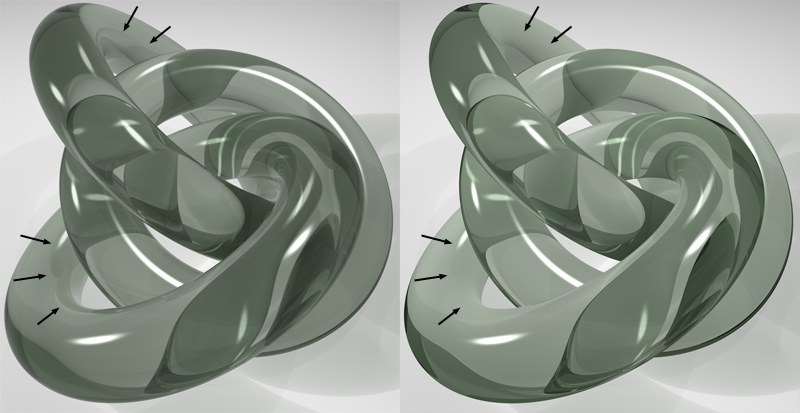 Figure 4: Fresnel Reflectivity set to a high value (left) and low value (right).
The Fresnel Reflectivity controls the strength of the Fresnel reflections (see Figure 4).
Note the Fresnel Shader, which offers additional settings.
Usually, if the material has a color, the color is automatically reduced with increasing transparency. This can help to ensure a realistic effect. However, if you don't want this automatic behavior to take place, you can enable the Additive option.
Here an image texture or a 2D shader can be defined. Refer to the Textures chapter for details.
Use these parameters to mix the color and texture panes using one of four modes. The default mode for all channels is Normal, except for the Environment page, which uses Multiply as the default mode. Not all channels have Mix settings. If you load a texture or a 2D shader, it is placed on a layer above the color (i.e. the texture is placed on top of the color).
In normal mode, the Mix Strength sets the opacity of the texture. If the value is set to 100%, you will see the texture only (remember, the texture is the top layer, so if it is opaque you will not see the color underneath). If the value is set to 70%, the result is 70% of the texture and 30% of the color.
For example, if a texture pixel of RGB 255/0/0 (red) is used with a color value of RGB 255/255/0 (yellow) with the Mix Strength set to 50%, the resultant color is 255/128/0 (orange).
The texture’s RGB value is added to the color’s RGB value.
No values will be clamped (e.g., to 255/255/255)
The color’s RGB value is subtracted from the texture’s RGB value. Thus if a texture pixel is RGB 255/255/255 (white) and the color value is 255/0/0 (red), subtracting with Mix Strength set to 100% gives the result 0/255/255 (cyan).
The RGB value of the texture is multiplied by the RGB value of the color. For example RGB 255/128/0 (orange) multiplied by RGB 0/255/0 (green) results in RGB 0/128/0 (dark green).
Mix Strength defines the mixing proportion between the texture and color panes or between the brightness and transparency (depending on which mode is selected) of the texture to be mixed.
Absorption
 Green Absorption colors.
When light enters a transparent medium it weakens and changes color to one degree or another (glass is very rarely completely colorless). The thicker the material the weaker the light becomes as it passed through (glass is not completely transparent). These effects can be emulated in Cinema 4D using the following two parameters. In the following the term Color refers to the Color parameter at the top of the Transparency channel.
 Different Absorption colors from left to right: Green, blue, black (color set to White for each object).
The Absorption Color is the color that is multiplied by the Color when a "ray of light" has traveled the distance defined in the Absorption Distance (next parameter) parameter.
The Transparency channel then has two colors. These are defined as follows:
- Color: The color that appears in a very thin object (e.g., a window pane or a thin film of water)
- Absorption color: The color a massive object assumes
When creating glass you will almost always set the Color to white, but not always:
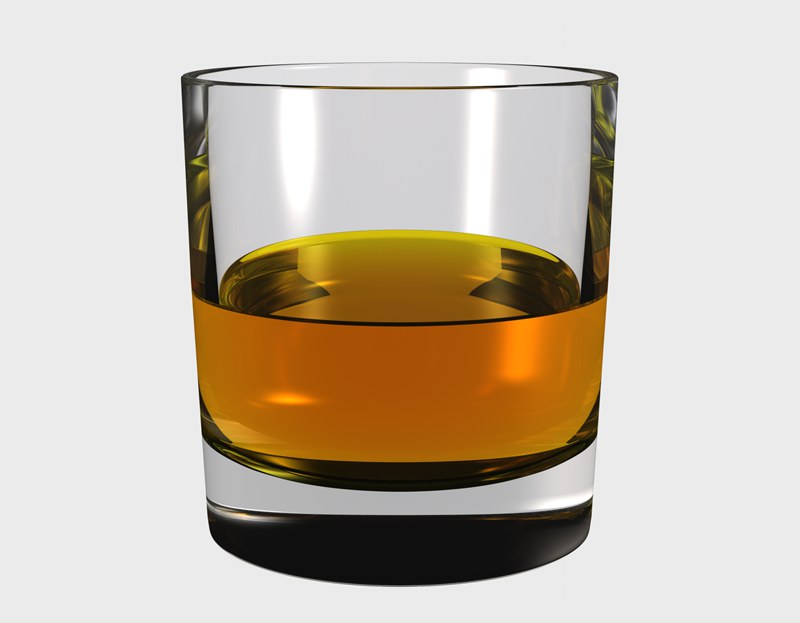 The settings for the fluid's color: Transparency color = yellow, Absorption color carmine red.
Modeling glasses filled with fluid
The best way to model glasses filled with fluid in them is to model the fluid and the glass separately. The fluid object should extend slightly into the glass object. In the case of normal, off-the-shelf glasses (modeled using Splines, each placed into a Lathe object) this would look like:
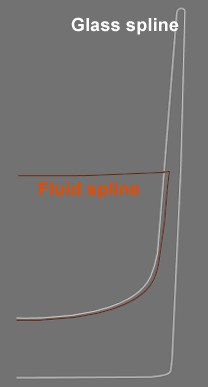 Scale the spline used to model the fluid and place it so it extends slightly into the glass.
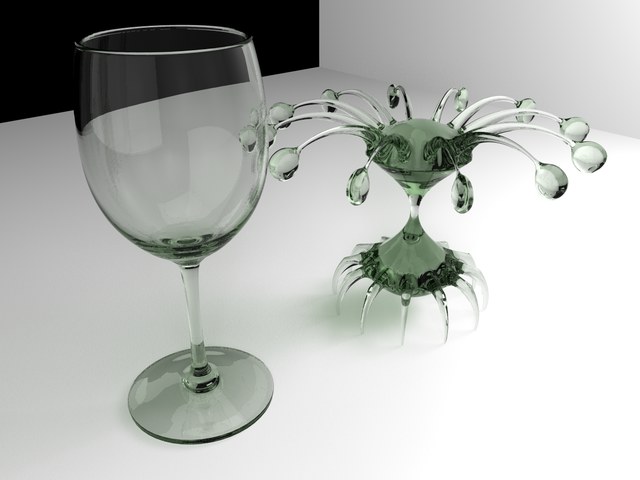
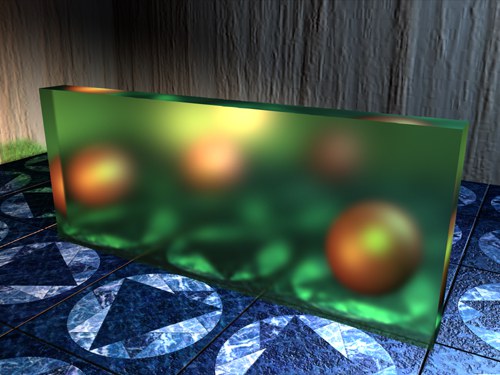
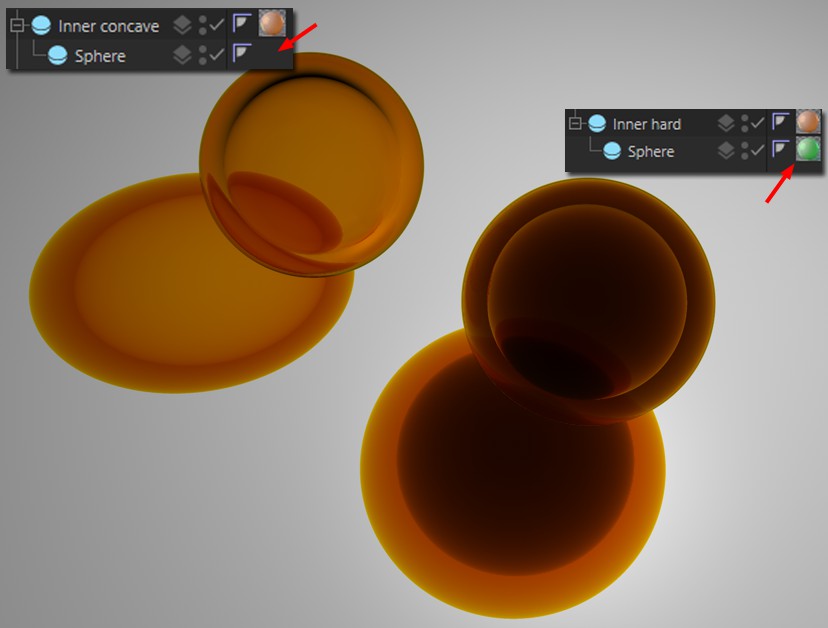 Left: Concave, absorbing objects, no Boole; right: Two objects with different absorbing materials.
Absorbing, concave objects can be created without using the Boole Object by making the concave object a Child of the larger object and assigning it an absorption material.
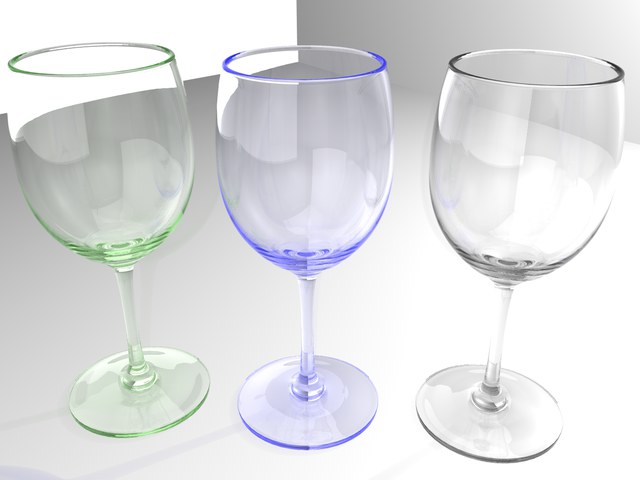
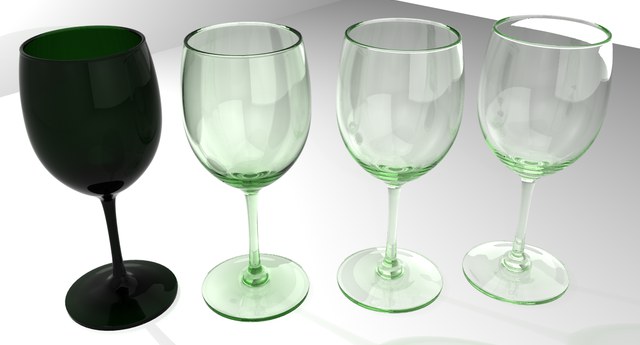 Increasing Absorption Distance values from left to right. At left a very low value, slightly greater than 0. All glasses have the same Color (white) and Absorption color (green).
Use this setting to define the distance rays of light have to travel before Absorption is completely multiplied with the Color. The lower the value the more intense the Absorption Color will be, even for thin glass. A value of 0 will turn Absorption off completely.
You can blur the transparency using the Blurriness, Min Samples, Max Samples and Accuracy settings. The Blurriness value defines the strength of blur for the transparency. 0% means no blur. Increase the value to increase the strength of blur.
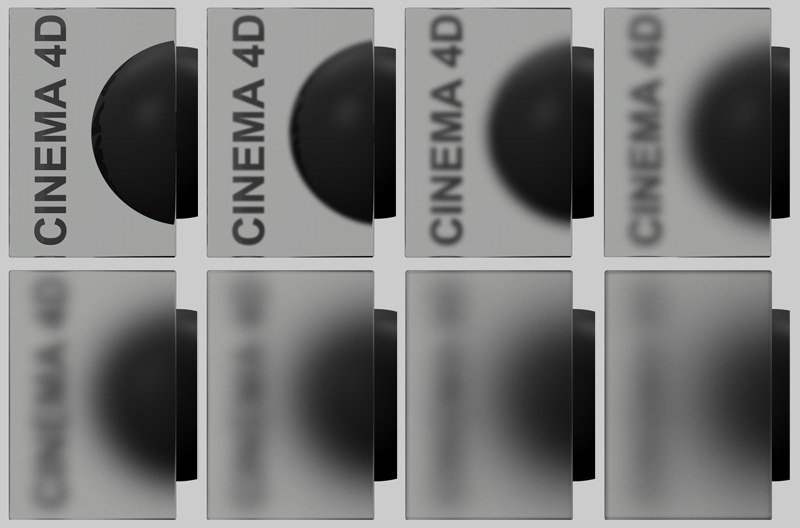 From upper left to lower right: Blurriness effect 0, 5, 10, 15, 20, 25, 30, 35. The render times will increase exponentially.
If you're wondering why transparent regions are still displayed so clearly despite the activated blurriness effect (i.e., when Total Internal Reflection is enabled), the blurriness effect can be defined for total reflection in the Reflectance material channel without this channel having to be activated.
 Left: blurriness effect in Transparency channel only; right: blurriness effect also enabled in the Reflectance channel.
These parameters will only be available if Blurriness is set to a value higher than 0%.
Increasing Min Samples and/or Max Samples gives a higher quality blur, but a longer render time also.
Cinema 4D uses samples to create the blur effect. Rather than take samples at even distances, the samples are concentrated where they are most needed. Max Samples defines the number of samples used for the most important areas. Min Samples defines the number of samples used for the least important areas.
If you see black areas when rendering overlapping transparency objects, increase the Ray Depth value on the Options page of the render settings. If you can't see weak reflections in the render, ensure that Threshold is set to 0%. You will also find this parameter on the Options page of the render settings.
This parameter will only be available if Dispersion is set to a value higher than 0%.
Increasing the Accuracy value gives a more accurate blur, but a longer render time also.
Affects the accuracy of the blur effect by controlling the number of samples per shading point. With a value of 100%, the maximum number of samples defined under Max Samples will be used in critical areas. Lower the value to reduce the number of samples used.