Units
You can find more information regarding units by reading here: Project Scale
Enables or disables units globally within Cinema 4D (the values that are displayed when this option is disabled are the real values that are saved with the file itself). This saved value will be multiplied by the unit defined in the Project Scale setting, i.e., if a value of 200 is saved internally and Document Scale is set to Meters, a Cube will be 200m high; if Document Scale is set to Millimeters the Cube will be 200 mm high.
 Left enabled, right disabled
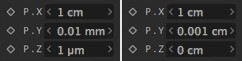
If disabled, very small values (e.g., 0.001m) will result in a value of 0.1m being displayed. Numerous after-comma places can be avoided by using smaller units. However, this can result in different units being displayed, as shown above, which can be confusing. If this occurs, disable this option and the unit defined in the following parameter (Unit Display) will be used. Note in the image above that the P.Z value is set to 0cm even though the correct value is saved internally.
Converts the displayed values in the corresponding fields. The values will be converted accordingly. For example, a value of 3cm will be converted to 0.03m if the unite of measure is changed to Meters (or to 0.033 yd. if changed to Yards). These settings have no affect on the scene itself an only serve to display the units.
In older versions, the maximum number of decimal places for float comma values was restricted to 4. If the accuracy of a value exceeded this it was rounded to maximum four places for display. The maximum number of decimal places can be defined individually for display purposes. This can, for example, make it easier to enter realistic values when using larger units such as meters. This makes it possible to display fractions of millimeters without them being rounded. If too few decimal places are available, minute differences between values can occur that won't be displayed.
Note that internally the actual value will always be used, which can differ from the rounded and abbreviated display in the parameter field. This setting only affects the number of decimal places and not how the value is saved and calculated internally.
Here you specify the time units used for animation. Your choice is from frames, seconds and SMPTE time codes that use the format: Min:Sec:Frame.
For example, 3:20:14 refers to the time 3 minutes, 20 seconds, 15th frame. The last value in the time code is the frame number of the current second (starting at frame 0).
Suppose you are working with a frame rate of 25 fps and the frame value is in the range of 0 to 24. If the minutes value is 0, you can omit it when entering SMPTE time codes. For example, 15:14 means 15 seconds and the 15th frame.
You can use the following abbreviations when you enter time values:
- Frame: F
- Seconds: S
- SMPTE: min:sec:frame
Color Chooser presets
Information about how to use the Color Chooser, color harmonies and more can be found in the Color Chooser section.
Use this setting to define if the RGB values should be displayed as 0%-100% or 0-65535 throughout Cinema 4D.
This setting is applied per session. If enabled, and you open a Color Chooser and change the layout, each new Color Chooser that is opened anywhere in the program will be displayed with the new layout. If this option is disabled, newly opened Color Choosers will be displayed using the layout defined in the Default Set menu.
The layout of Color Choosers that were already opened during the session will be maintained.
Default set
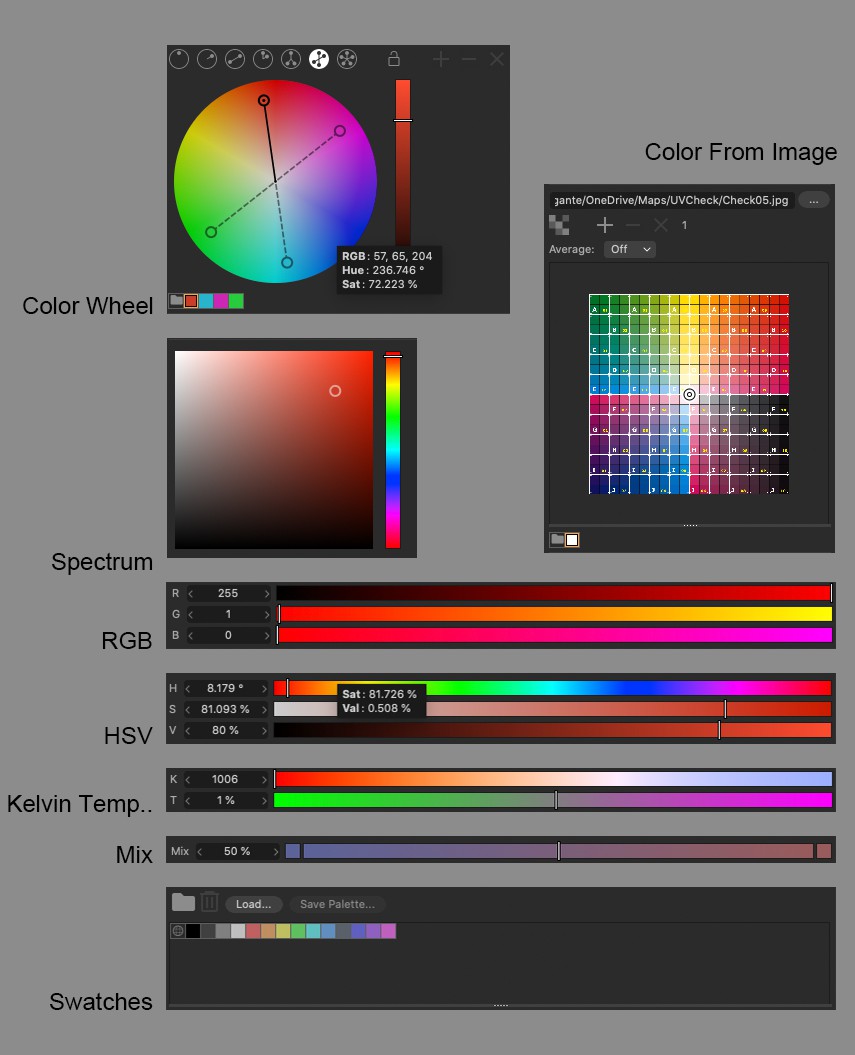 These individual displays/dialogs can be used to put together your own individual Color Chooser.
These settings can be used to set up your Color Chooser UI. Simply activate the respective options to display the Color Chooser the way you want. Note that all other elements can still be displayed temporarily for the current Color Chooser (e.g., in the material channel) by simply clicking on the respective display icon.
After the application has re-started, the selected combination will be available at all respective locations.
Use this option to define whether or not the Compact Mode (a reduced layout that takes up less space and contains the most important element such as spectrum, RGB and HSV) should be displayed.
This mode defines the top part of the Color Chooser (see top half of image) and whether or not one of these elements should be displayed or a smaller version of it.
Use these settings to define the size of the respective element.
Use this setting to define if the RGB slider should be displayed.
Define whether or not the hexidecimal field (e.g., 1D272D) assigned to the RGB mode should be displayed.
Enable this option if you want to use the old RGB slider (without changing the defined colors when moving the slider)
Use these settings to define if the respective element should be displayed.
Enable this option to show each group's name over the folder icon.
Use this setting to define the size in which the swatches will be displayed.
When selecting colors for materials, the problem is that these have to be recalculated multiple times and output as numeric values.
Since colors can, of course, also be animated using keyframes, the animation transitions are not always interpolated as desired. For example, an animated grayscale between 0% and 100%: a gray value of 50% in the RGB system is visually in the middle between black and white but this value is merely a linear brightness of approx. 21.4%
 On the left side you can see how this new preset works. This makes it possible to predict the brightness values for an animation with uniform transitions. The right half of the image shows the effect with the option disabled. The HSV value is the same as before but the RGB values are converted so that the preview visually represents a 50% gray. The RGB values will also be modified accordingly.
To solve this problem, the brightness and colors can also be displayed as correctly linearized numeric values. For this, the new Linear Numeric Values option, located in the Preferences / Units menu, can be used. This option is enabled by default. If, for example, a Saturation of 0% and a Brightness of 50% for a gray value are used, the RGB saturation will internally also be 50%, 50%, 50%. This is useful since keyframes can be assigned to the RGB values for the animation. Precisely those values that are also used internally by Cinema 4D will be displayed.
The display of brightness in the Color Chooser's preview area is linear thanks to the Linear Workflow function, i.e., visually brighter for us than assumed with the 50% gray.
 If Linear Numeric Values option is disabled, the HSV values can be modified to match the displayed brightness.
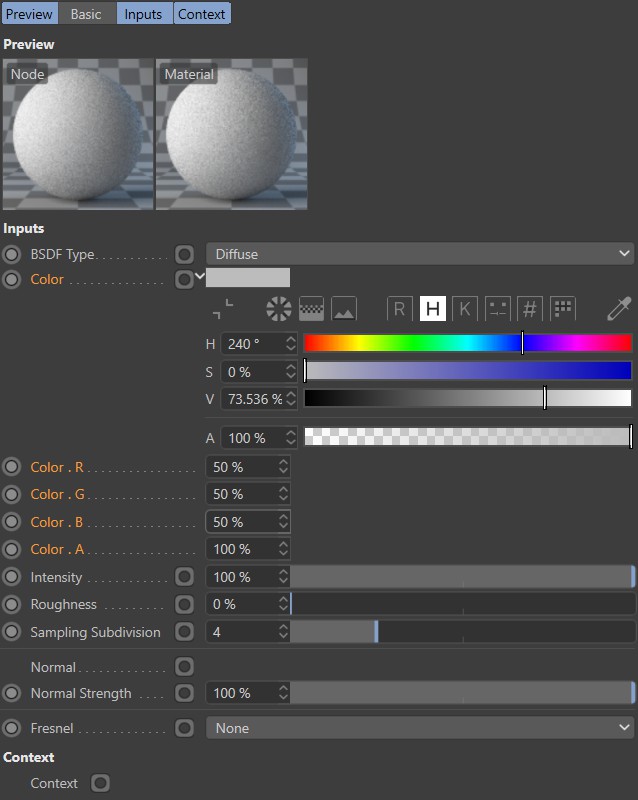
If this visual effect should be avoided, the Color Chooser's icons offer a possibility to adapt the HSV values to the RGB values and the displayed brightness. In our example, the RGB values 50%, 50%, 50% will then be HSV values 0%, 0%, 73.536%.
Use this setting to define the vertical displayed size of the gradient.

Use this option to define if the marked selection handles should be shown in the gradient for a multiple selection.
If you disable the Show Result option for a gradient or color (Nodes) that uses an alpha channel, the background visible through the transparency will be displayed using a checkered grid. The dark squares can be displayed with different grayscales using this setting's options.