Color Chooser
General
Colors define an image’ esthetic and technical quality. If used properly, an image not only conveys more visual information but can also offer greater realism, which is one of the benchmarks by which programs like Cinema 4D are measured. This is why Cinema 4D offers its own sophisticated color chooser.
The Cinema 4D Color Chooser can be used to quickly and easily select, combine and save all colors that need to be defined.
The most important and common color models are included: RGB, HSV, Kelvin. The color wheel can be used to mix colors according to composition and color theory. These color groups or palettes can be saved as presets for later use.
Either bitmaps can be loaded to reconstruct their color palette or the Color Chooser can be used to pick any color on your monitor, including colors outside of Cinema 4D.
The Color Chooser can be found at numerous locations within Cinema 4D - everywhere where colors can be defined. The Color Chooser is only described here.
The Color Chooser will be displayed when you click on the small arrow or on the color swatch itself next to the respective setting (colors can be selected directly using the dropper on the right):

It will open when clicked and displayed in a separate window.
Interpolating color values
The OpenColorIO color management system can be selected in the Scene Settings, where the size and in part loss-free color spaces can be activated, which offers a high level of security for long-term archiving and professional post-production of your rendered image material.
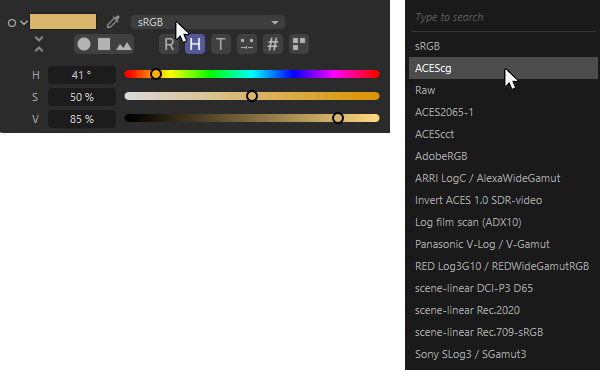 Right next to the color field and the color picker you will see a menu where you can select the color space in which the color values can be entered.
When using OpenColorIO, very large ACES color spaces are generally used for rendering, which in turn result in correspondingly detailed and in particular uncompromized color and brightness values that can be used directly for post-production - assuming the fitting file format OpenEXR was used. The color values you input either via the color chooser or a loaded texture will also be automatically converted to the selected color space. You can set which color space should be used for inputting color components when slecting the color value via the color space menu on the right next to the color field and the color chooser.
Only if you want to intentionally use HDR color values, for example, is it worth it to switch to larger color spaces. Note, however, that when switching back to a smaller color space, the defined colors can be clipped and change accordingly. An example of this can be seen in the image below.
As you can see at the bottom of the image, colors with a color angle of 45° and 100% saturation were defined for both materials. The difference between the materials is only that one material uses a color in the ACEScg color space and therefore has an increased brightness of 300% in this example, which is not a problem. The second material uses the sRGBcolor space is restricted to a maximum of 100%. These materials will look correspondingly different when rendered. Here they are distributed randomly on cubes. The cubes with the ACEScg color react much more strongly to the illumination since they reflect three times as much light.
If the ACEScg color is switched back to the sRGB system, a smaller color space wlll be available. Cinema 4D will still try to maintain the defined color (compare the color fields on the left and right of the image below) but the effect of the HDR can no longer be simulated in this color space. The cubes will react more normally to the illumination in the rendering on the right and the color angle has also changed after the switch.
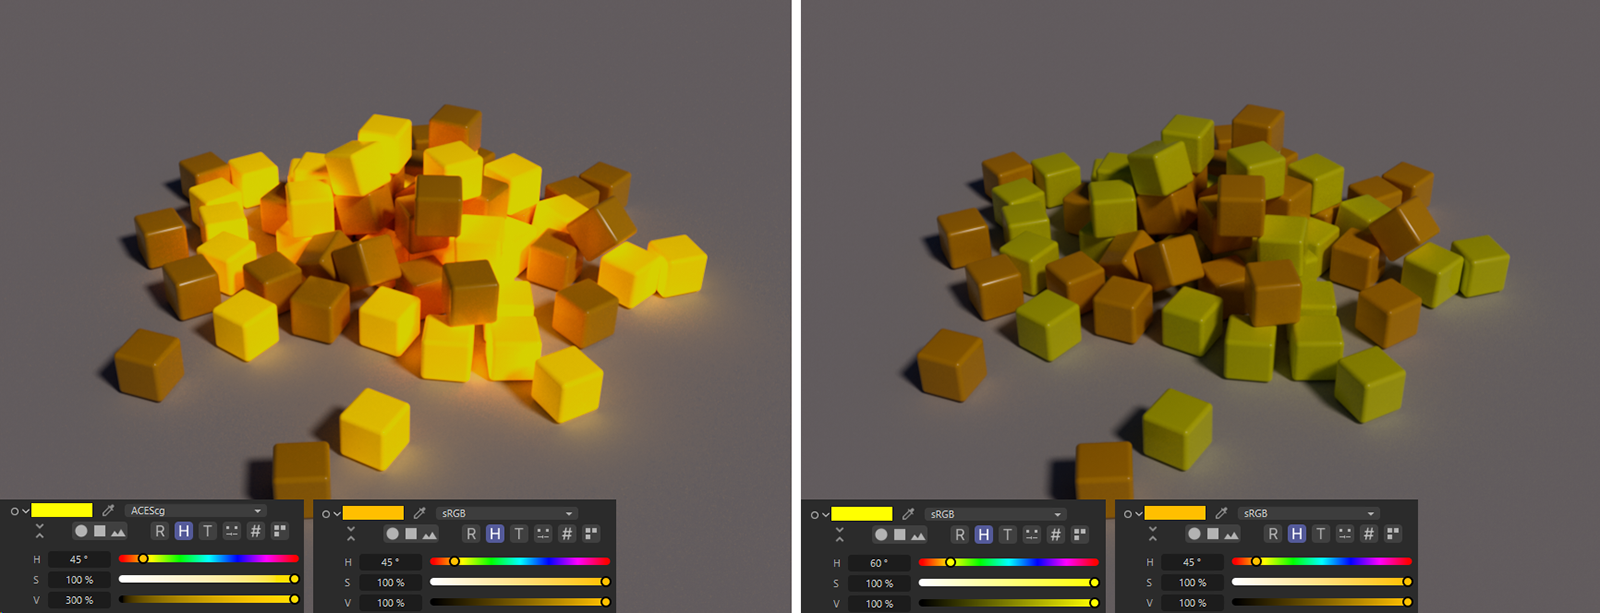 On the left, a group of cubes textured with a ACEScg color space color with 300% brightness; on the right, the color space was switched to sRGB, which causes the colors to change.
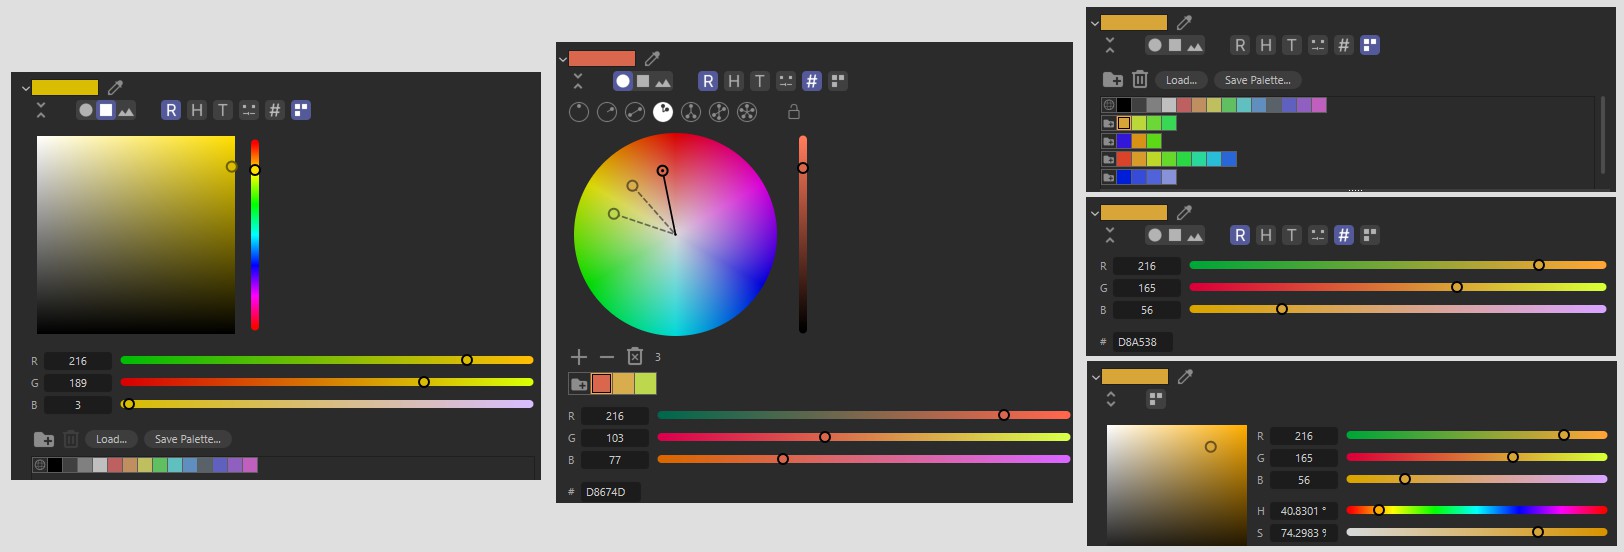
When working with RGB color components, the clamping of values when switching to smaller color spaces will also be denoted by the red color directly in the dialog window, as can be seen in the image below. Internally, the color values of the larger color space will be saved and will be restored if you switch back to the larger color space.
 On the left a color with RGB sliders in the ACEScg color space. After swittching to the sRGB coor space, the red and blue color channels are clipped, which is symbolized by a red icon (see right side of image).
Color box
The color box shows the currently active color. Right-clicking on the box will open a context menu with the following commands:
Enlarged Size
If this option is enabled (only when Color Chooser is opened), the color box will be displayed in double its vertical size. Alternatively you can interactively drag one color onto another.
Copy / Paste
Lets you copy a color from one color box and paste it into another.
Set Swap Color / Swap Colors
These commands can be used to swap colors between two separate color boxes. To do so, select the first color to be swapped (Set Swap Color), then switch to the other color box and select Swap Color there. Calling up Swap Color will swap the colors back.
Alternatively you can interactively Shift+drag one onto another.
Color Swatches
Here, all color swatches, including their directory names and color and alpha values (the color elements adhere to the Units settings in the Preferences menu) are listed that can also be found in the Color Swatches in the color selection dialog.
Alternatively you can Alt + right-click on the color box. All existing color swatches will be listed for selection.
 Different incarnations of the Color Chooser.
Color sliders are not shown with their isolated basic color range beneath them but are displayed in conjunction with other color sliders:

- On the one hand you are able to see which overall color is created if one of the color component sliders is moved
-
On the other hand the other color sliders’ color gradients also change.
For the RGB slider, the behavior of older Cinema 4D versions can be defined in the Preferences Units menu.
The currently active color for the respective setting is displayed in the elongated color swatch at the top left. This color swatch is split when the color handle or slider is moved and the new, temporary color will be displayed to the left of the original color.
As soon as you release the mouse button the temporary color will be made the currently selected color. As long as you are still in the process of interactively adjusting the color you can press the Esc key to cancel the process and keep the original color.
The Compact Mode is activated/deactivated by clicking on the far-left icon below the color field. The Compact Mode is a reduced layout that contains the most important Color Chooser functions.
Color Selection Modes
Depending on the mode you select from the icons beneath the color swatch, the corresponding selection elements such as sliders, color swatches, etc. will be displayed. Several combinations are possible (in some cases the Shift and Cmd/Ctrl keys can be used to add or omit modes). In the Preference menu's Units menu you can define a combination that will then appear each time the Color Chooser is opened. Each combination is described individually below.
Color Wheel and Color Harmonies
Color wheels are also commonly used outside of Cinema 4D to define harmonious (complementary) colors. First we will explain what a color wheel is.
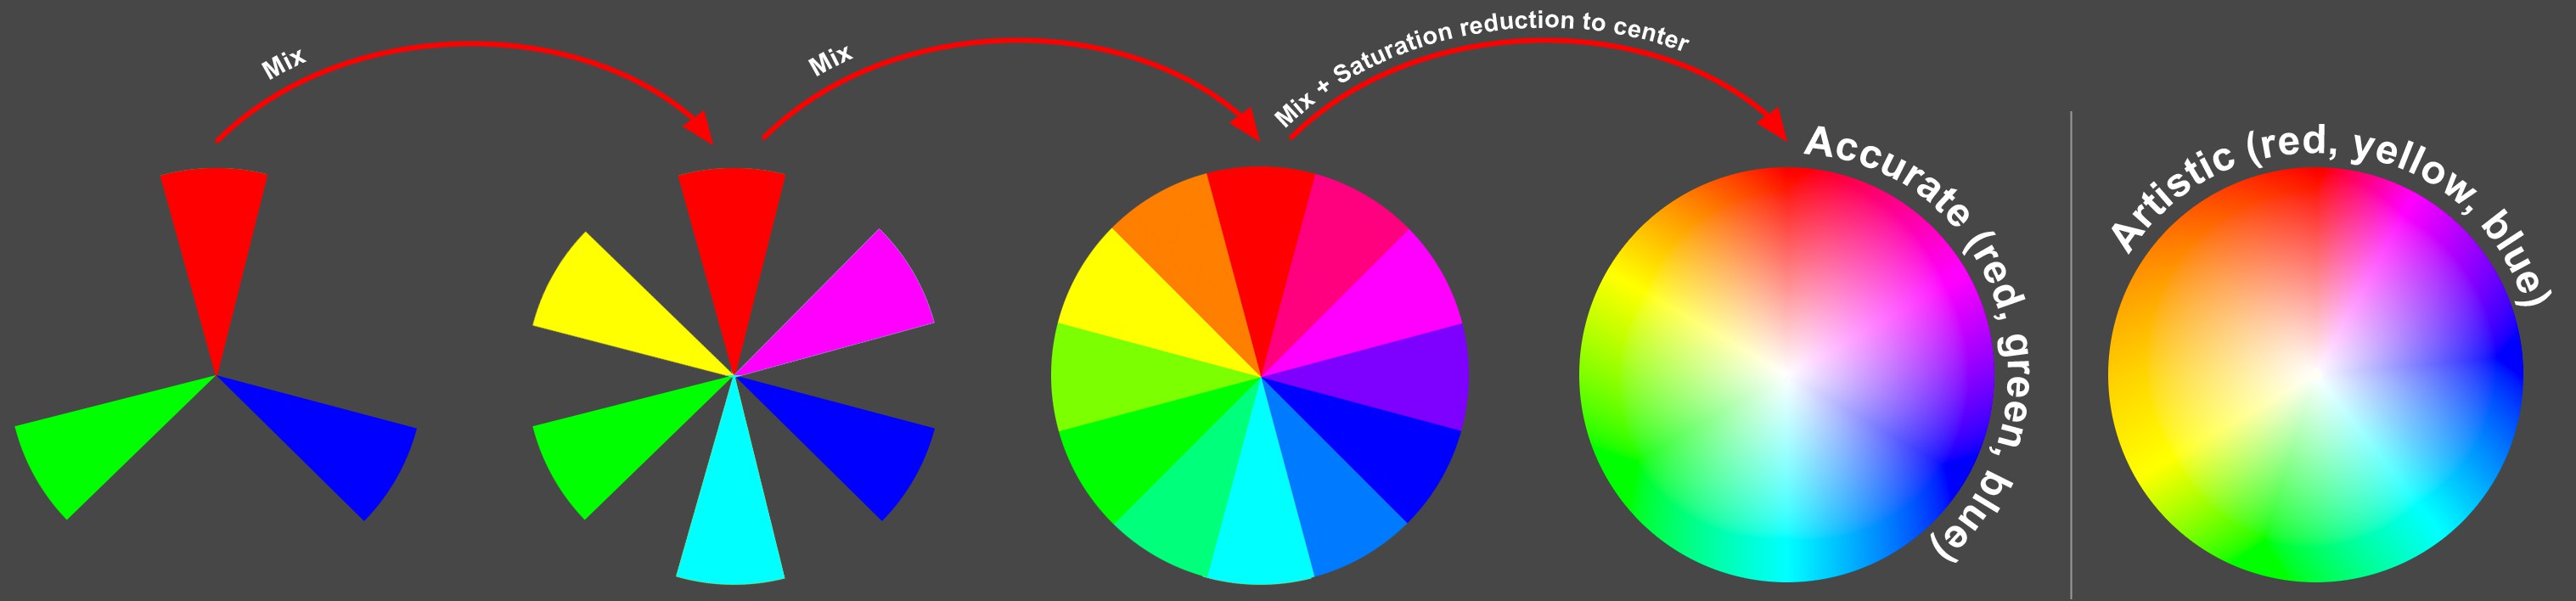
An additive color wheel works as follows: initially the three primary colors, red, green and blue - the three visible spectral colors that lie farthest apart at the edge of the wheel -, are arranged at an equal distance of 120° apart on the wheel. If you then mix each with 2 neighboring primary colors (e.g., red and green produces the secondary color yellow) and place the resulting color at the center you will have six colors in total. If you now mix each secondary color with a neighboring primary color (e.g., red and yellow produces the tertiary color orange), the color wheel will have a total of 12 colors. This is a lot but by far not enough.
Finally, each of the 12 colors is mixed steplessly with its neighboring color and the resulting colors in turn are mixed steplessly and their saturation reduced towards the wheel's center. You now have a complete color wheel. The color wheel has a slider to the right that can be used to adjust the brightness (value) (default mode) of the color selected on the wheel.
So what does a color wheel have to do with complementary colors? In fact, some colors simply look better when combined with certain other colors:
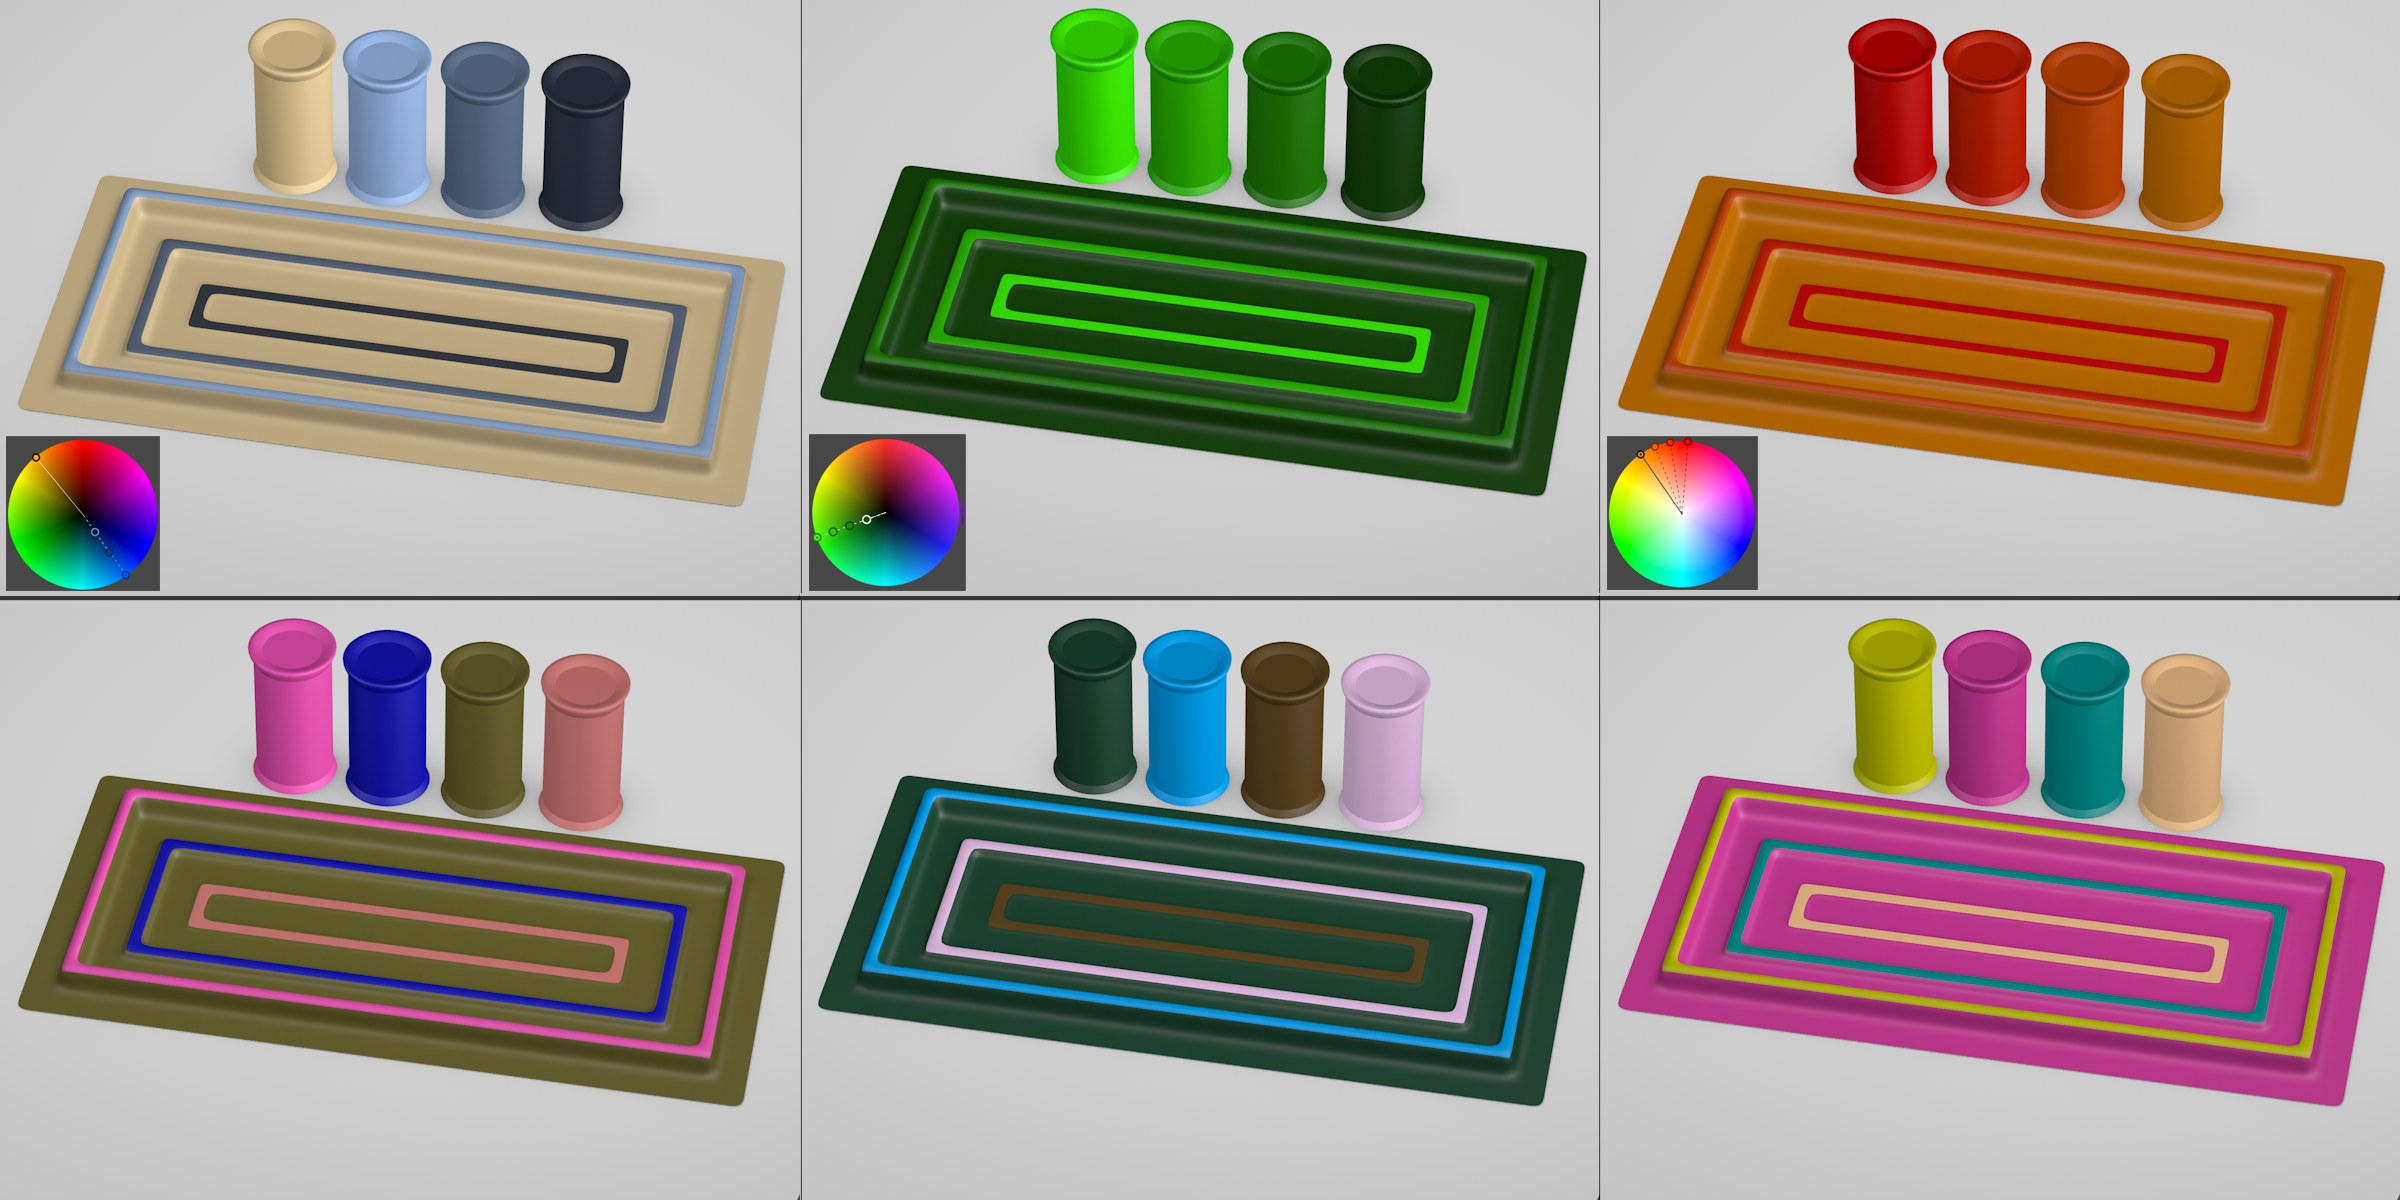
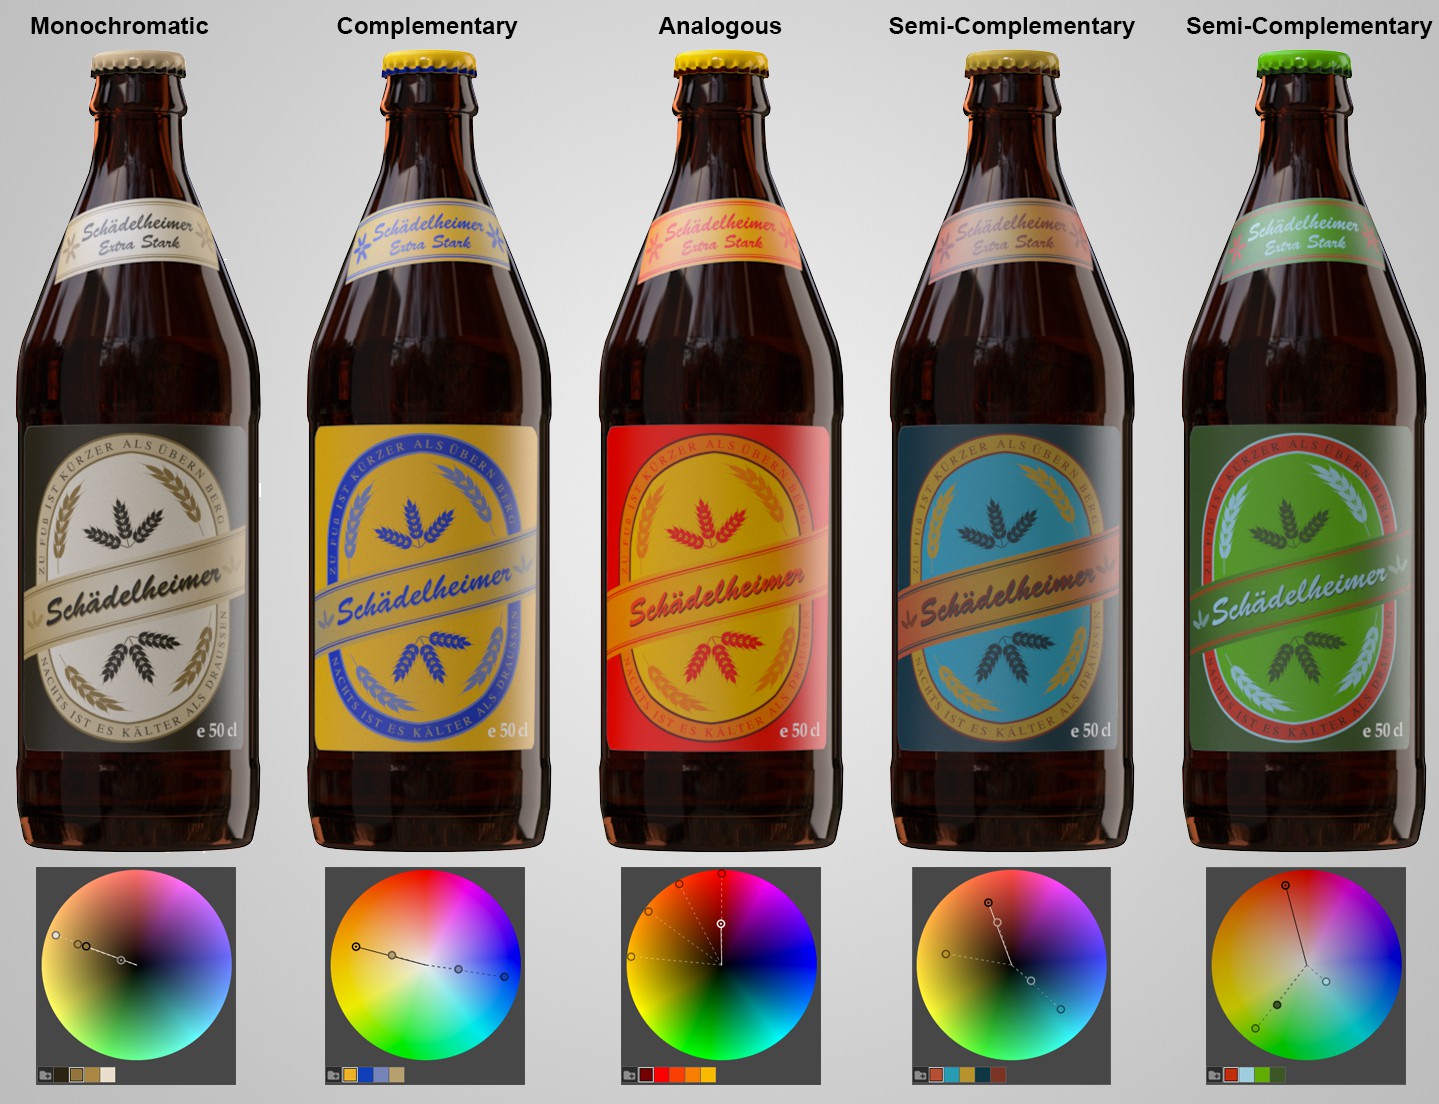
In the image above there are six examples (see also Bottle Labels). As you can see, the color combinations in the top row (colors selected according to the rules of color harmony; from left to right: complementary, monochromatic, analogous) fit better together than the combinations in the bottom row (random color selection). These color harmonies can be displayed using a color wheel:
 At left a color wheel with a complementary color harmony; at right a depiction of the most important color harmonies.
If the color handles (one of the small circles) is placed approximately as shown on the right (which happens automatically when one of the buttons above the color wheel is clicked), the respective color harmony can be easily created.
How to use the Color Wheel
Basically, the following can be done:
- Ctrl/Cmd + click: Creates a new color handle
- Selected color handles can be shifted in the color wheel via click and moved via drag and drop
- Clicking on a color handle will activate it and display its color in the color swatch
- Selected color handles can be deleted by pressing the Del or backspace keys

The colors of all color handles are displayed under the color wheel as temporary color swatches/palettes (the palette can be saved temporarily - it will then be displayed in Color Swatch selection mode - by clicking on the folder on the left).
At least one color handle will always be displayed marked with a dot. This is the active color. The active color will be marked in the palette and is also the color that will be assigned to the respective setting in the Attribute Manager. The active color can be changed by selecting a different color handle.
Color handles can be moved by clicking on them or via drag and drop within the color wheel, whereby, depending on the color harmony selected, other color handles may also move or the brightness (value) or saturation might be adjusted.
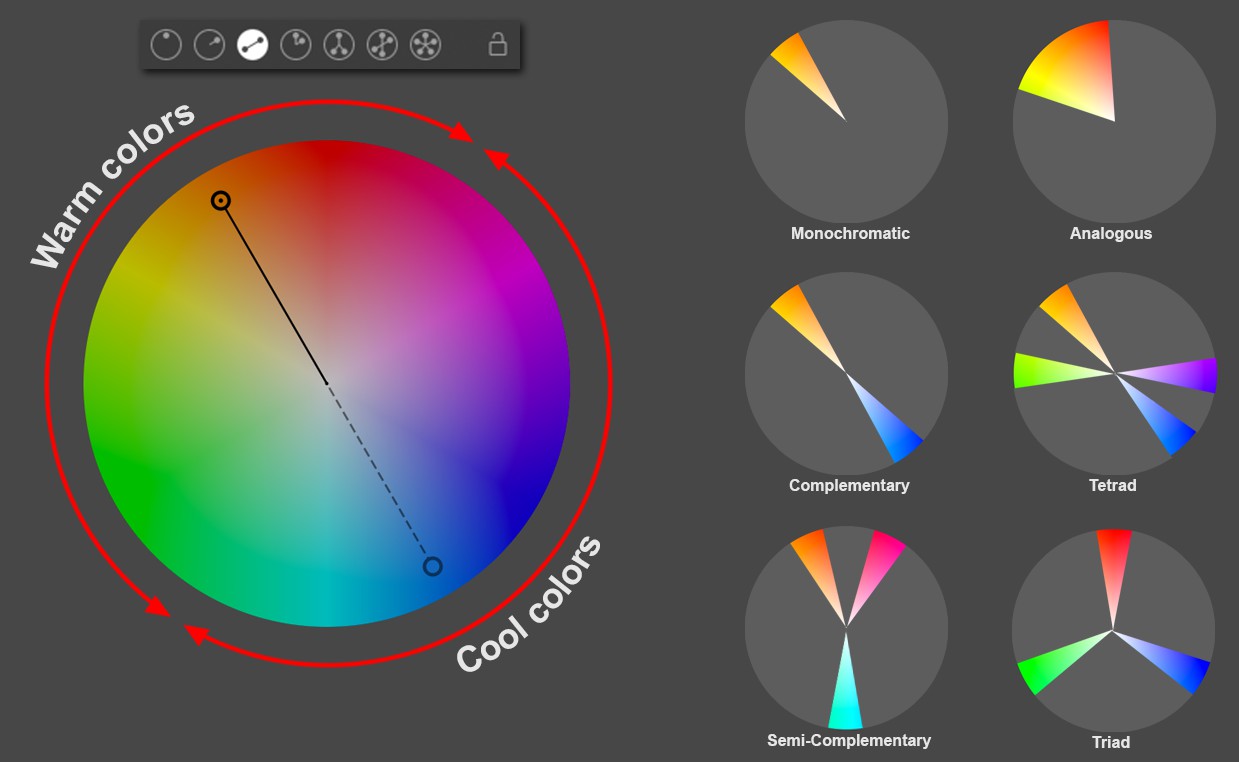
Color Harmonies

In the Color Chooser's mode selection menu you will find icons for color harmonies and their color counts. The icons - the last 4 on the right are arranged for the respective modes under the color circle or spectrum - from left to right are:
Free
In this mode you can move color handles independently of one another. In most cases, simply defining a color harmony is not enough. Often, a color handle will be adjusted, e.g., the saturation will be reduced, without wanting to automatically affect all other colors. This is the right mode to use in such a case.
By the way, as soon as you create a new color handle using the Cmd/Ctrl key, the Free Cinema 4D will automatically switch to Free mode.
Monochromatic
Complementary
Analogous
Split Complementary
Tetrad
Equiangular
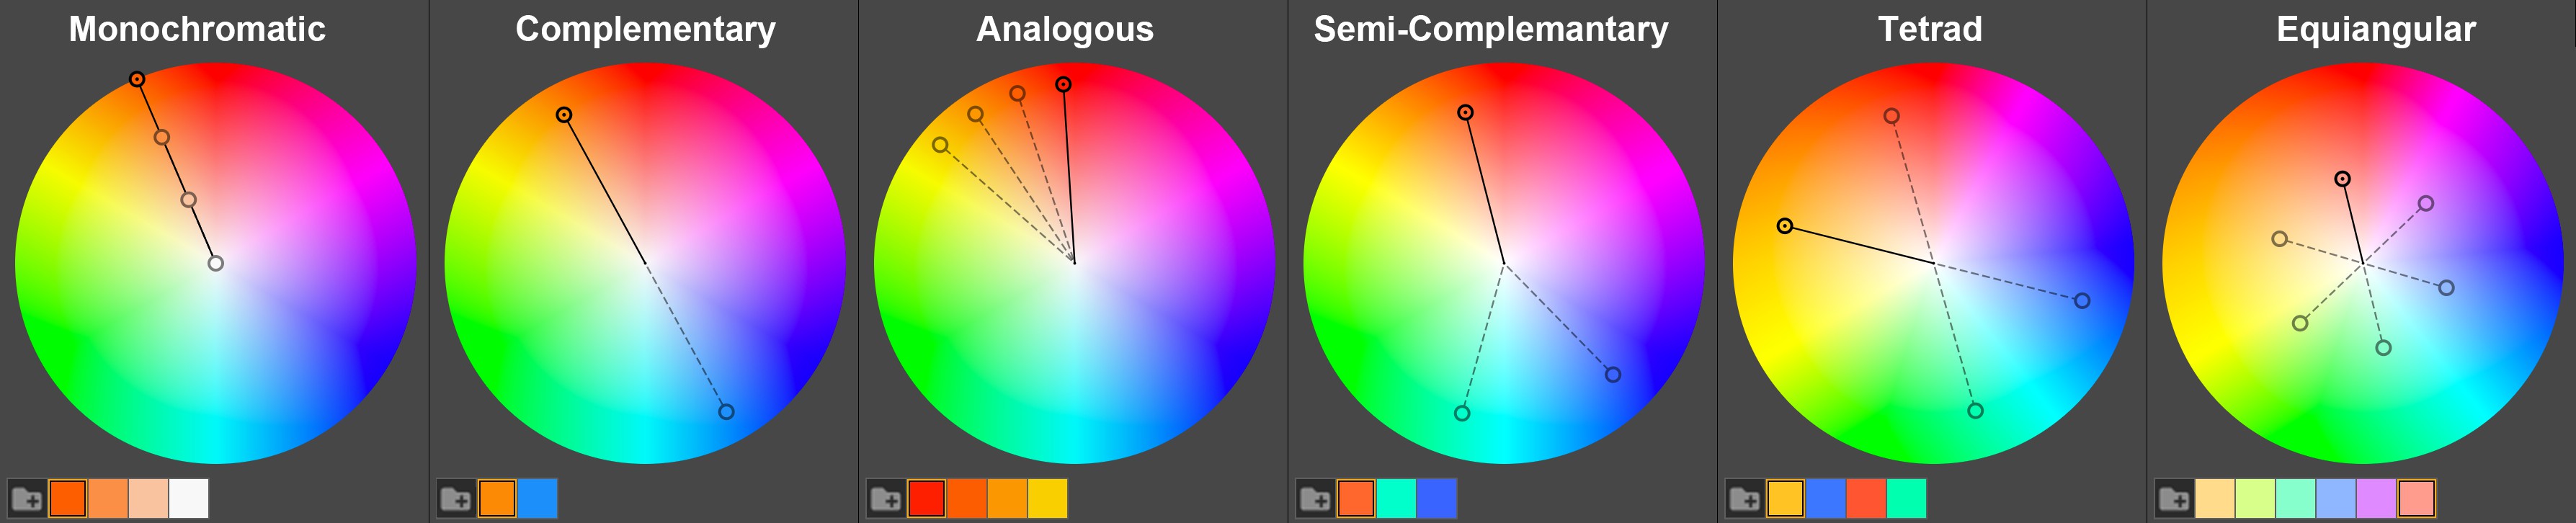 The default color harmonies in Cinema 4D.
- Monochromatic: This color harmony consists of colors with the same hue but with different saturation and brightness (value).
- Complementary: The most commonly known color harmony consists of 2 colors that lie on opposite sides of the color wheel. Mixed equally they produce a gray color. Complementary colors have a maximum contrast to one another.
- Analogous: This is a color harmony that is made up of colors with equal brightness (value) and saturation but with different hues. On the color wheel, these colors are either 15° or 30° (can be switched using the context menu on the color wheel) apart. You can check the number of colors by clicking on the + and - icons on the right.
- Split Complementary: This is a color harmony that is made up of one color and two complementary, analogous colors.
- Tetrad: This color harmony is made up of 2 analogous colors and 2 additional analogous that are complementary to the first two colors.
- Equiangular: In this mode, any number of colors can be created that are arranged in equal radius distances from each other (and have a consistent saturation/brightness (value)).
Lock Radius
If you have freely created a color combination you can lock the individual colors’ radius distance, saturation and brightness (value). If you then move the active color handle, all other handles will move correspondingly (which also happens if multiple colors are selected in the temporary color swatches).
Add Color / Remove Selected Colors
Here you can adjust the number of color handles - and therewith the number of colors in a color swatch - for a respective color harmony (no all permit this). This can also be done interactively by Ctrl/Cmd+clicking on the color wheel (to add) or Del (delete) for the selected color handle.
Remove All Colors
Deletes all colors handles in the respective mode with the exception of the currently selected handle.
Example
If you look at the example below you will see that all colors in the combinations below are part of a given color harmony without adhering to a precise angle distance.
By the way, randomly selected color harmonies don't automatically look good - you still need a good eye for color to be successful!
 A few examples of possible color harmonies.
Context Menu
Right-clicking on the color wheel will open a context menu with the following options:
Accurate (Red, Green, Blue)
Artistic (Red, yellow, Blue)
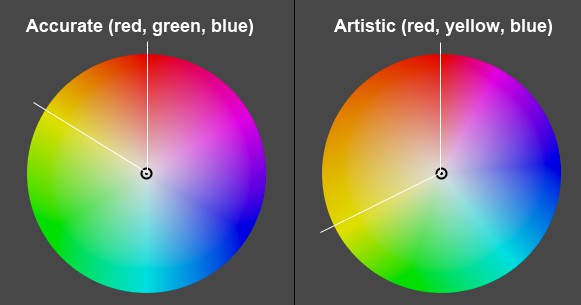
Here you can define if the color wheel should be, as described above (Accurate (Red, Green, Blue)) or if it should be more traditional, artistic and make use of the basic colors red, yellow and green.
For the latter, the range between red and yellow will be spread at the expense of the other colors. This makes it possible to create more natural-looking color harmonies whereas Accurate (Red, Green, Blue) is a better base for technical, additive RGB models, and Artistic (Red, Yellow, Blue) is a better base for a subtracted model, which stems from the field of painting.
Note that this model cannot display all RGB colors.
Wheel: Saturation, Slider: Value
Wheel: Value, Slider: Saturation
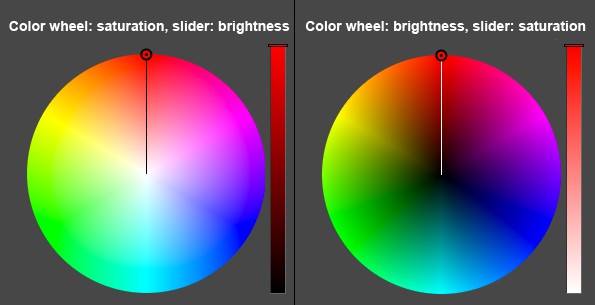
Here you can define which color setting should expand (from the center outward) on the color wheel. For
- Wheel: Saturation, Slider: value it's the saturation
and for - Wheel: value, Slider: Saturation it's the brightness (value).
The color slider on the right can be used to adjust the other of the aforementioned settings.
Analogous: 15°
Analogous: 30°
For Analogous color harmonies, an equidistant radius can be defined for neighboring analogous colors. For example, if you have 4 analogous blue tones, 30° would be too great a distance because a large amount of violet and green would be included.
Monochrome: Equalize
For the Monochrome color harmony only, color handles that lie on a hue (angle) can be arranged with a consistent radial distance. Arrangement will take place according to saturation or brightness (value) so the color palette below is also sorted.
Small, Medium, Large Size
Defines the size of the color wheel's diameter.
Temporary color swatches
This is where all colors of currently available color handles are listed. They are temporary and can be modified at any time; they are not listed in other settings and will be deleted when Cinema 4D is closed. If you want to make these colors available throughout the document, click on the folder icon at the left and save the color with a unique name. These color fields will then be saved in the project file and can be displayed by clicking on the color swatch icon.
Here you will find a context menu with the following commands (multiple colors can be selected or deselected in temporary color fields by using the Shift and Ctrl/Cmd keys, respectively):
Add Color
Creates a new color handle. Alternatively you can use the Shift or Ctrl/Cmd + click on the color circle or the image.
Remove Selected Colors
Deletes all temporary color fields and their color handles.
New Group with All/Selected Colors
Creates a new (non-temporary) color group with a unique name from all or selected temporary color fields.
Small/Medium/Large Size
Defines the display size for the temporary color fields.
Spectrum
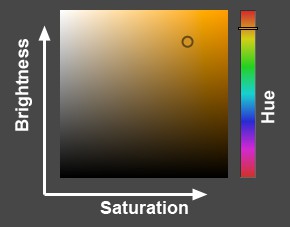
The Spectrum mode was also available in previous Cinema 4D versions. It's similar to the HSV mode, whereby brightness (value) (V) and saturation (S) are applied together in a two-dimensional color swatch. The slider at the right can be used to adjust the hue.
The size of the spectrum can be defined by right-clicking on it.
The active color handle can be affected by the cursor arrows as follows:
- Left/Right: Changes the saturation in 1% steps (+Shift or Ctrl/Cmd key: 10% steps)
- Up/Down; Changes the brightness (value) in 1% steps (+Shift or Ctrl/Cmd key: 10% steps)
- If the Alt key is also pressed, the handle will jump to the spectrum's respective edge (i.e., 0% or 100%)
Color From Picture
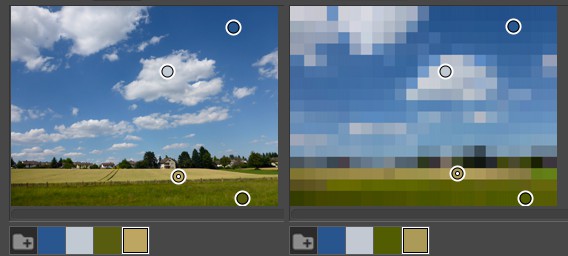
Sometimes it is necessary to create a color palette that matches an existing picture. This can be done by clicking on the Color From Picture icon and loading a picture (alternatively you can drag and drop an image file from the Explorer/Finder into the Color Chooser's respective field.
The following interactive functions can be used:
- The image can be zoomed in or out using the scroll button on your mouse
- The image can be moved via click and drag
- Cmd/Ctrl+click on the image to create a color handle at that location. This handle's color will be displayed in the temporary color swatch. An existing color handle can be selected by clicking on it.
Color handles can be re-positioned via drag and drop. - The image area can be scaled to 100% by double-clicking on or next to the image; double-click on a color handle to center the handle and the image.
The following settings are available:
File Selection
You can click on the button to the right of the path field to select an image from the Explorer/Finder. Alternatively you can drag and drop an image into the image field (or onto the mode's icon).
Mode
Click on this icon to switch between Average and Detail modes.
+/-
Use these icons to add or remove color handles (this can also be done via Cmd/Ctrl+clicking on the image). Each color handle represents one color in the temporary palette that is displayed beneath the image.
x
Removes all color handles except one.
Detail
In this mode, the image is split up into squares with the median color of each square's pixels. The smaller the Detail value is, the larger the squares will be. The advantage of this mode is that Cinema 4D summarizes the image regions, which makes it easier to recognize the dispersion of the image's most relevant colors.
Average
If the Detail mode is disabled, you can define a pixel square size from which the median color should be generated. Let's say you have an image with a lot of noise in which the color of many neighboring pixels can deviate from the original color but still create a harmonious overall color combination. If no medial values were generated, incorrect, non-harmonious colors could be generated instead.
Temporary color swatches
This is where all colors of currently available color handles are listed. They are temporary and can be modified at any time; they are not listed in other settings and will be deleted when Cinema 4D is closed. If you want to make these colors available throughout the document, click on the folder icon at the left and save the color with a unique name. These color fields will then be saved in the project file and can be displayed by clicking on the color swatch icon.
Here you will find a context menu with the following commands (multiple colors can be selected or deselected in temporary color fields by using the Shift and Ctrl/Cmd keys, respectively):
Add Color
Creates a new color handle. Alternatively you can use the Shift or Ctrl/Cmd + click on the color circle or the image.
Remove Selected Colors
Deletes all temporary color fields and their color handles.
New Group with All/Selected Colors
Creates a new (non-temporary) color group with a unique name from all or selected temporary color fields.
Small/Medium/Large Size
Defines the display size for the temporary color fields.
RGB
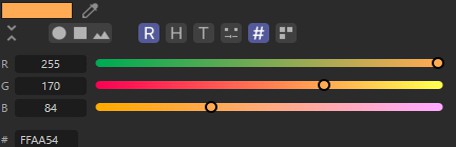
RGB is the best-known color model. It's an additive model that is made up of 3 primary colors of light, Red, Green and Blue. If, for example, red and green have maximum values and blue no value, the resulting color will be yellow. If all three colors have maximum values, the resulting color will be white.
Contrary to the HSV model described below, RGB is more technical in nature and less vivid (for example, you have to be aware of the fact that yellow is made up of red and green light).
R, G, B
Use the value fields or the slider to define the amounts of red, green and blue.
#
The display of this setting can be enabled in the Preferences (Units) menu. This setting lets you display or define colors as hexadecimal values. The RGB values will be converted automatically.
Websites, for example, use hexadecimal values in their HTML codes.
HSV
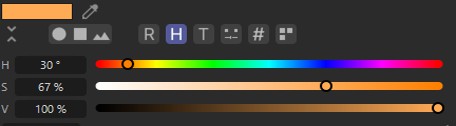
The HSV model comes closest to representing humans’ perception of color. No prior knowledge of the amounts of red, green or blue needed to create a color is required. The HSV model defines a color using Hue, Saturation and Value (brightness). This model can be used to intuitively define color palettes, i.e., colors that complement each other. This is why the function used to create color palettes in Cinema 4D uses the HSV color wheel (see also Color Wheel).
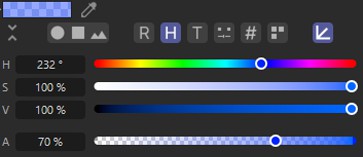
H
This value defines the hue. It is displayed as an angle on the Color Wheel .
S
This value defines the amount of saturation of the hue (H). Simply put, this value affects the vividness of the color. A saturation of 0 with a maximum V value will produce a white color (lesser V values will produce correspondingly darker gray values).
V
This value defines the color's brightness (value). A value of 0 will produce a black color.
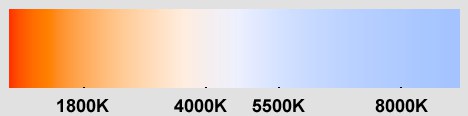
Kelvin Temperature
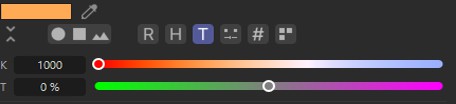
Kelvin is a color model that orients itself according to the color of a glowing (heated) object. Hence, this model is best suited for defining the color of light sources since these are often created using glowing metal (filaments). A Kelvin value is also used to simulate modern methods of creating light (e.g., gas discharge, LED, etc.) (see also White Balance (K)).
Kelvin
This value defines the color analogous to the slider's color gradation. The color behaves pretty much as pictured below:
Temperature
This setting lets you fine-tune the color hue by adding magenta or green values.
TMI
The TMI color model is good for cinematography and photographic color preparations. It is defined using the following 3 settings:
- T (Temperature): Here you can adjust the color temperature between red and blue tones.
- M (Magenta): This setting defines the mix between green and magenta.
- I (Intensity): Intensity can be used to brighten or dull a color (similar to "V" in the HSV color model).
Color Mixer

This function lets you steplessly mix two colors. Both colors can be modified by clicking on the respective mix color (double-click on the swatch to open a separate Color Picker window). The slider can be used to adjust the color.
Colors with Alpha channels (e.g., for Nodes) can also be defined in Cinema 4D. Then - and only then - will the Alpha mode be displayed:
In addition, a Linear Numeric Value mode can be enabled for Nodes. Details can be found here.
Hexadecimal

Use this option if you want to define Hexadecimal colors, as is often the case for Web colors.
Color Swatches
Color swatches are made up of a combination of colors (groups) that are available for the Scene (saved in the project file) or for the application itself (the first group (any number is possible) with the globe icon or as a preset in the Asset Browser). You can save often-used color palettes for use with other projects.
How to use color swatches
Colors can be swapped between groups via drag and drop. If you simultaneously press Cmd/Ctrl, the swatches will be duplicated. The same applies to groups: their order can be re-arranged. Simultaneously pressing Cmd/Ctrl will duplicate a group.
Selections work as usual: click on a color or group to select it. Cmd/Ctrl+click to add or remove a selection. Shift+click can be used to select a range of elements. Click in an empty area to deselect all elements.
In addition, the following functions can also be used:
- Double-clicking on a color swatch makes it the Color Chooser's active color
- Use the mouse wheel over the swatches to scroll through the swatch list (see also explanation about keyboard shortcuts below)
- Double-clicking on an empty area next to the color swatches will create a new group
- Double-clicking on a group icon will let you rename it
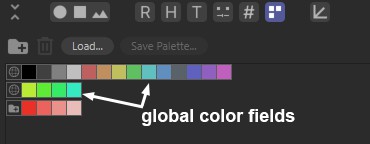
The group listed first consists of global color fields that will be available in each Cinema 4D session.
You can drag any number of swatches into or delete them from this field.
The following icons and buttons are available in the color swatches field:
Create New Group
Click on this icon to create a new, empty group. Double-clicking on an empty area of the field will do the same. If you simultaneously press Cmd/Ctrl, a group will be created from the currently selected swatches.
Remove Selected Items …
Deletes selected groups/swatches. The same can be done by pressing the Del key.
Load …
Save Palette …
Click on Save Palette to save the current color swatches as a preset, which makes them available for all Cinema 4D Scenes. These presets will be saved in the Asset Browser .
Click on Load to display a list of available color swatch presets from which you can choose. The current swatches will be replaced by the preset that is loaded.
Context menu
Right-clicking on an element or on a color swatch will open a context menu, which will differ depending on if you clicked on a swatch or a group.
The following options are included:
Edit Swatch
This command calls up a new Color Chooser for the selected color field.
New Empty Group
By selecting this option (or double-clicking on an empty region next to the color swatches) you can create a new, empty group (see above for additional ways of doing this), to which color swatches can be added. Group names will only be displayed of the respective option is enabled (see below).
Copy/Move Selected Swatches to New Group
Use these commands for copying/moving selected color swatches into a new group with a new name. These commands can differentiate between selected groups and color swatches!
Save this Group as Document Group
This command makes the selected group to a group that is present only in the current scene.
Save this Group as Global Group
This command makes the selected group to a global group, which will always be present.
Rename Group …
Use this command to rename a group (or simply double-click on the respective group's name).
Sort Swatches
Sorts a group's color swatches according to color values (i.e., H(ue) value). For swatches with the same color values, saturation or brightness (value) will be used for sorting.
Remove Duplicates
Removes duplicate swatches from the selected group.
Remove Group …
Deletes the selected group. Multiple selected groups can be deleted using the trash can icon.
Save Group as Preset …
Saves the selected group as a preset. Note also the previously described Palette button, which saves ALL existing groups as a preset.
Remove Empty Groups …
Deletes group that do not contain any swatches.
Show Group Names
Shows the group names of each group via the folder icon.
Edit Swatch
Opens a new Color Chooser for the selected swatch.
Save this Swatch as preset …
Saves the swatches as a new preset. Note also the previously described Save button, which saves ALL existing groups as a preset.
Remove Selected Items …
This command deletes all selected groups or swatches. Note that this cannot be undone!
Small
Medium
Large
Defines the size of the swatches. This can be done interactively and steplessly using Alt+mouse wheel.
Pick Color From Screen
Click on this icon if you want to select a color from anywhere on your screen - including locations outside of Cinema 4D. The cursor will change to a pipette until the color is selected. The process can be aborted by pressing the Esc key on your keyboard.
What affect do colors have in general?
Colors have a subliminal effect on people in that they evoke certain moods or feelings. However, the perception of color is subjective and has a lot to do with individual experiences and associations. Depending on culture, colors can even have opposite meanings, for example the color of mourning being black in the Western world and white in the Eastern world.
Generally speaking, in the Western world the following colors have the following meanings:
Red: energetic, dynamic, love, hate, active, sensual, passionate, dangerous, angry.
Yellow: cheerful, light, bright, warm, glaring, fresh, jealous, envious.
Orange: funny, sociable, happy, stimulating, cheap, brash.
Violet: mysterious, spiritual, unconventional, charming, decadent, dissatisfied.
Blue: cool, deep, distant, calm, relaxing, harmonious, satisfied, melancholic, hard, icy.
Green: natural, calming, fresh, secure, lively, fertile, hopeful, poisonous, ill, envious.
Black: death, darkness, loneliness, sadness, emptiness, conservative, earnest, powerful.
White: pure, easy, complete, joyful.
Gray: neutral, colorless (literally), inconspicuous, monotone, puristic, factual.
Don't consider this list to be written in stone but rather as a subtle means of artistic color design (which is ignored in many 3D scenes anyway as soon as the client's new pneumatic hammer has to be visualized in front of a white background …).