Options
This option is rÏelevant for the options Color, Luminance, Diffusion, Bump, Alpha and Transparency. If the polygon selection should thereby be evaluated, the "Use Polygon Selection" option should be activated. Otherwise only the top-most material (farthest to the right in the Object Manager) will be calculated.
When active, this option takes into consideration (for effects created by Normals) changes made to the orientation of Normals caused by the relief channel.
Lets you define whether or not the current camera angle should influence baking. This would, for example, have an effect upon the Fresnel effect of transparent materials.
Another example: This option should be deactivated if you have a sphere onto which you want to bake a sky reflecting onto it. This will ensure that the object Normals are calculated in the direction the sky is mirrored and not in the direction of the camera angle (this would lead to unwanted results because the reflection would be calculated from the camera’s angle of view).
Use this option to bake a particular object’s Color material channel. If several materials are applied to the object, the various color channels will be merged according to their hierarchies and alpha channels.
Use this option to bake the respective object’s Luminance material channel.
Activate the respective option(s) you would like to bake.
 The effect of the bump channel can be seen in the surface color (right, the baked texture).
The surface color contains the effects of numerous material channels, including Illumination, GI (see also Bake Object ) and cast shadows (not including Reflectance, Transparency, Fog or Glow). The most important material channels that make up the object surface will be made a part of the texture.
If a texture baked in this manner is placed into the Luminance material channel, lighting the object when rendering may not be necessary, as long as the light source(s) and object don’t move. This will result in much shorter render times.
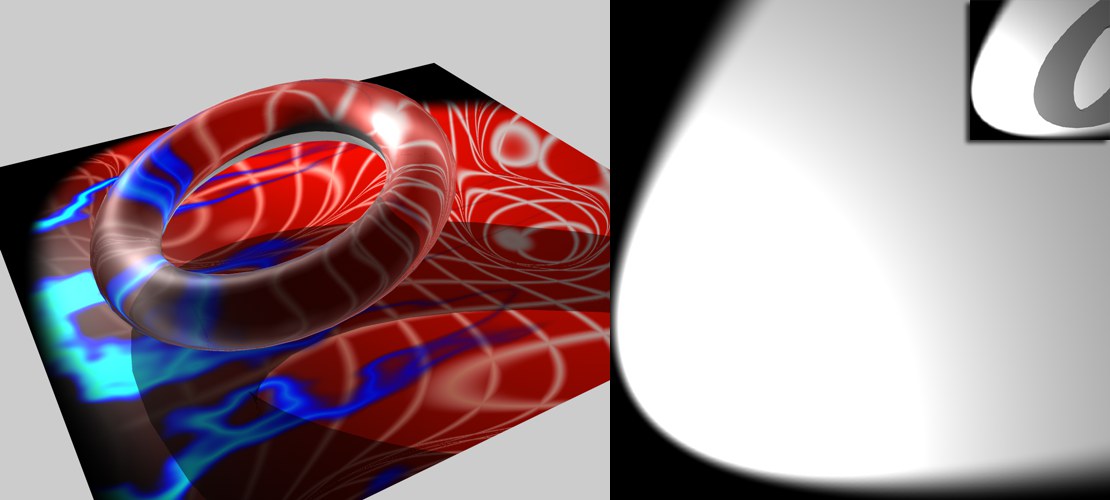 Illumination only bakes the Spot light source’s lighting; top right, the Shadows option was activated.
Illumination includes the effects of light sources and, when active, those from GI. If the Shadows option is also activated, any cast shadow that may be present will also be taken into consideration (see insert above).
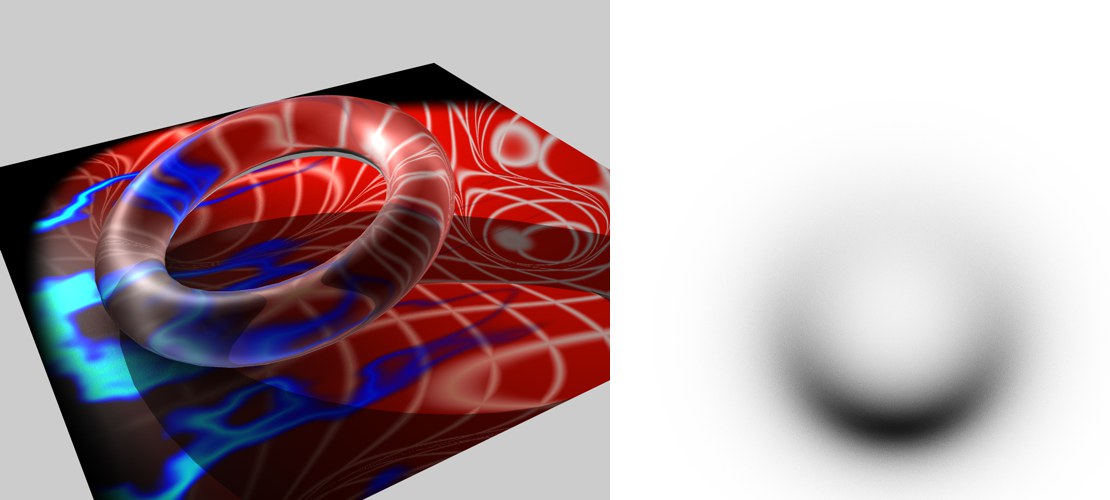
 The scene is lit by two colored lights, one using Hard shadows, the other Area shadows. On the right are the baked shadows.
Only shadows that are present will be rendered. Areas in which no shadows are present will be rendered white, and the shadows will be rendered in accordance with light and shadow color.
 Left, the scene; right, the baked Ambient Occlusion texture.
You can bake the Ambient Occlusion portion of a texture. The Ambient Occlusion settings reflect those of the Render Settings … , with two exceptions.
Self Shadowing Only: This function can be set here independently, without having to change the Render Settings … .
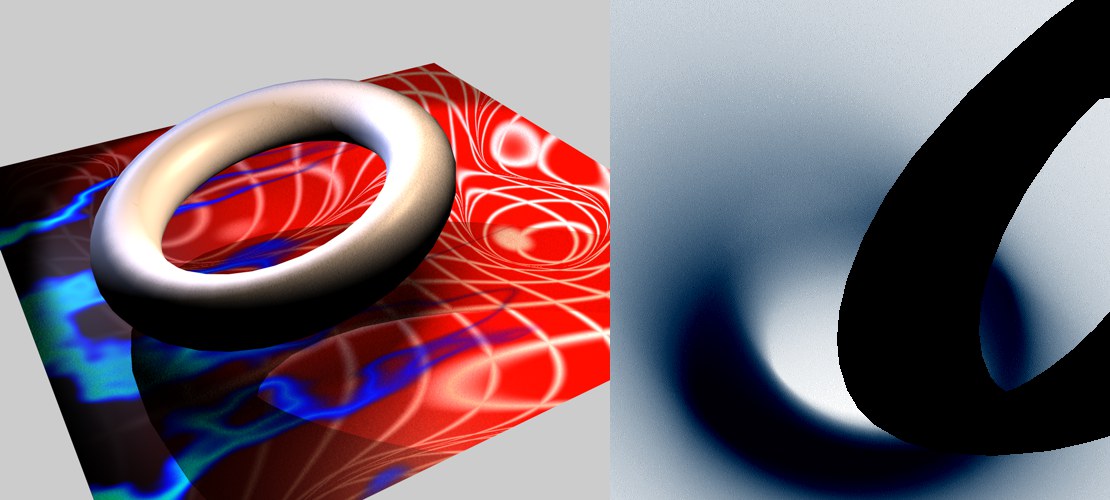
 Left, the object, right, the Normals texture baked using the object (Object Method).
If you want to bake a Normals texture, you have come to the right place. What exactly it is that you can do with Normals textures is described this chapter) and cast shadows (not including Reflection, Transparency, Fog or Glow). The most important material channels that make up the object surface will be made a part of the texture.
If a texture baked in this manner is placed into the Luminance material channel, lighting the object when rendering may not be necessary, as long as the light source(s) and object don’t move. This will result in much shorter render times.
Illumination only bakes the Spot light source’s lighting; top right, the Shadows option was activated.
Illumination includes the effects of light sources and, when active, those from GI. If the Shadows option is also activated, any cast shadow that may be present will also be taken into consideration (see insert above).
The scene is lit by two colored lights, one using Hard shadows, the other Area shadows. On the right are the baked shadows.
Only shadows that are present will be rendered. Areas in which no shadows are present will be rendered white, and the shadows will be rendered in accordance with light and shadow color.
Left, the scene; right, the baked Ambient Occlusion texture.
You can bake the Ambient Occlusion portion of a texture. The Ambient Occlusion settings reflect those of the Render Settings … , with two exceptions.
Self Shadowing Only: This function can be set here independently, without having to change the Render Settings … .
 Left, the object, right, the Normals texture baked using the object (Object Method).
If you want to bake a Normals texture, you have come to the right place. What exactly it is that you can do with Normals textures is described this chapter.
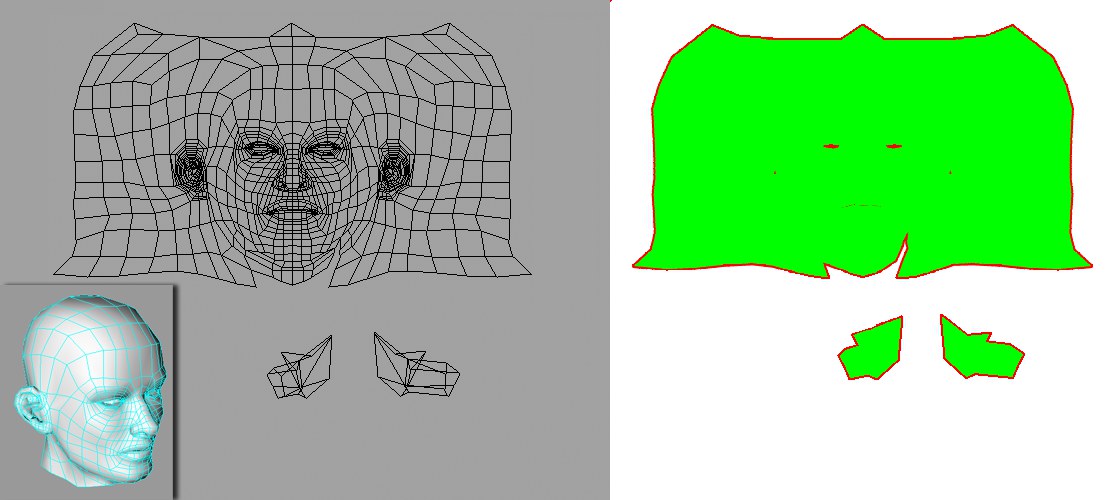 With this option active, this head’s UV mesh will be baked as shown on the right.
This UV map lets you visualize your texture’s UV-assignment: Those texture areas with UV polygons assigned will be green, the Pixel Border (Tag tab’s Pixel Border setting) red, and other texture areas white.
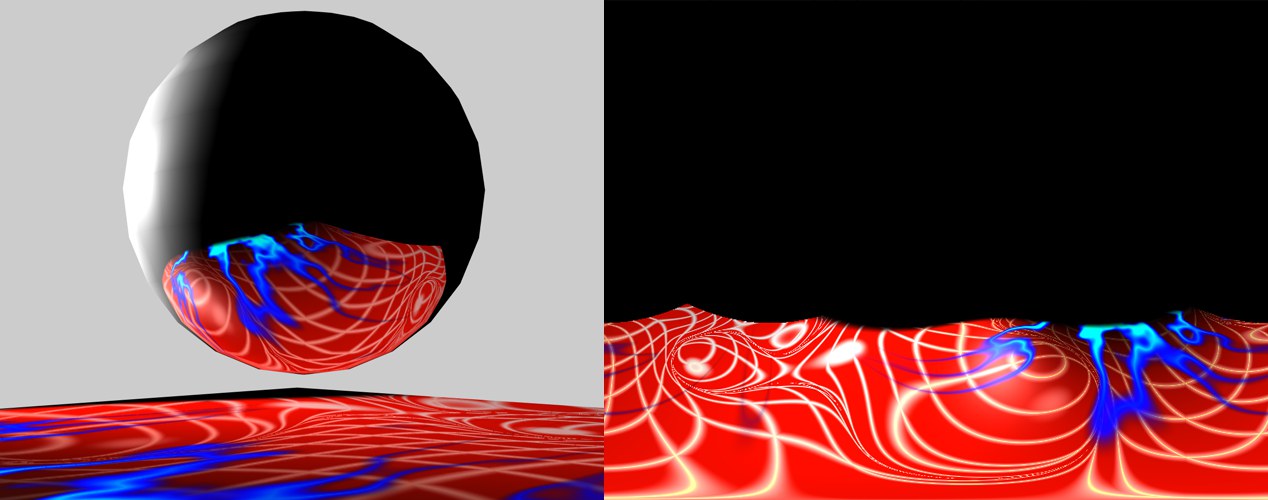 The reflection on the sphere will be baked as shown on the right.
When rendering reflections, one exception applies compared with the other material channels: Here you don’t have to specifically activate Reflectance – reflections will be baked regardless.
Sky Textures
Sky textures can be baked very quickly and can later be used in Image Based Lighting, i.e., the lighting of materials using GI. Textures can also be output in HDR formats, which means their light sources can have any brightness.
This is done as follows:
-
Create a sphere and apply a new material. Leave Render Perfect active.
-
Select Bake Material … (Render / Bake Material … ).
-
In the tag you just created, activate Reflection only. An output size much wider than high should be selected.
- Click on Bake. When using Physical Sky, you will get a texture that looks like this:
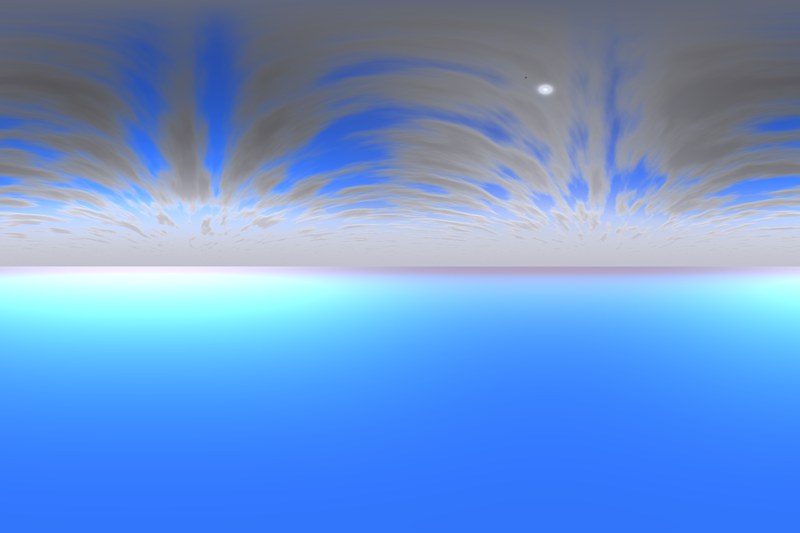
You can now apply this texture to a Sky object or project it onto a very large sphere, with which you can create a perfect sky. This sky can also be used in other applications. Of course you can also load this sky into material channels, such as Environment, for example.
 Color
Color
Upon activation of this option, additional options will be made available, with which the following can be baked:
The lighting generated by light sources or GI.
The shadows that fall onto the object.
Any illumination that may be present in the Luminance material channel.
Any diffusion that may be present in the Diffusion material channel.
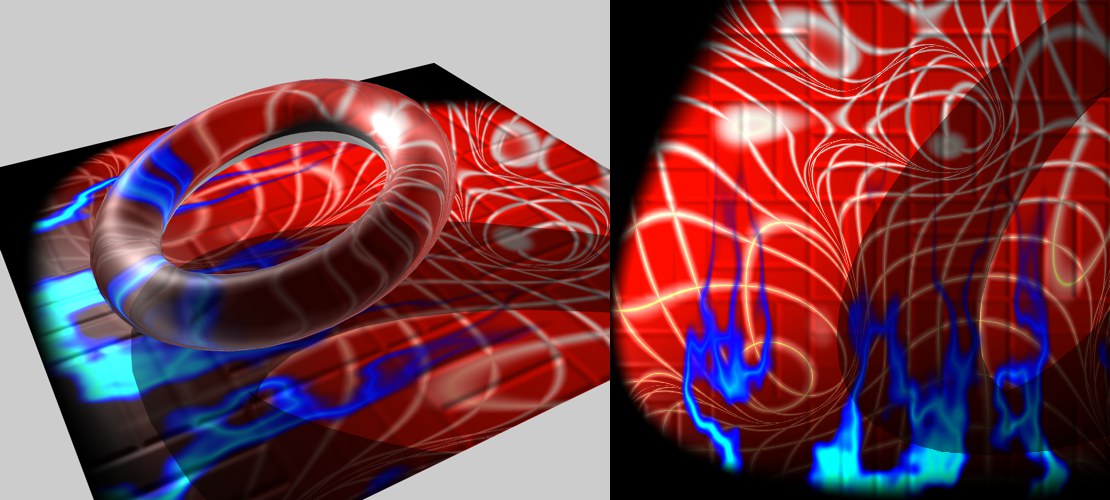
Example:
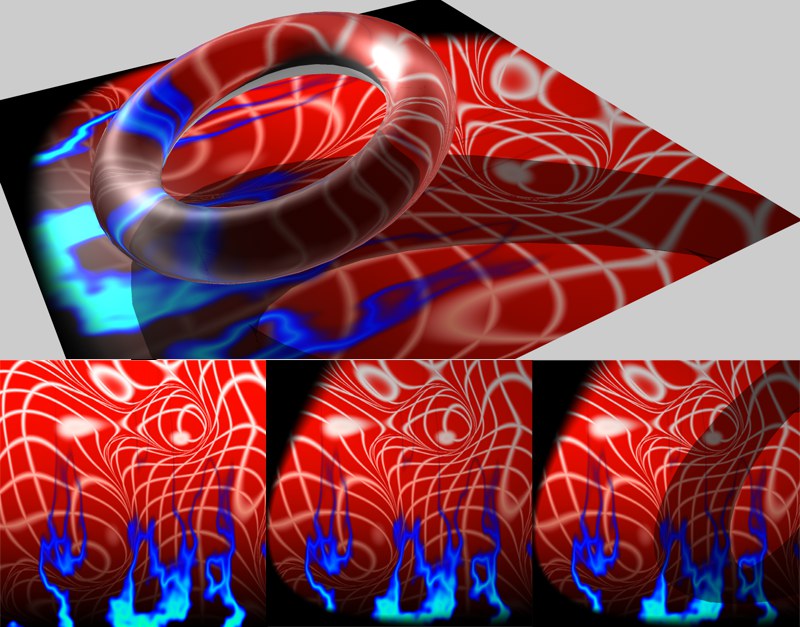
In the scene above, a Spot light is used to light a transparent Torus, which in turn casts a shadow on a plane with a complex texture; the plane will be baked. At the bottom left, the color channel was baked with no additional options active. In the center, the Illumination option was used. At right, the Shadow option was added.
Luminance
If active, the Illumination channel will be multiplied by the Diffuse channel.
Illumination
If Shadows is activated, shadows may also be accounted for (see top right of image):
Normals
If you want to bake a Normal texture on a high-res object onto a low-res object, drag the high-res object into the Source field. In principle, this works exactly like baking displacements, which is described here.
Important:
- The bake settings defined here must also be defined exactly the same in the Normal channel.
How to bake a Normal map:
- Two versions of the same object must exist: A high-res and a low-res version.
- Assign a Bake Material tag to the low-poly object (Object Manager / Tags / Cinema 4D Tags / Bake Texture)
- Enable the Normal option in the tag’s Options menu and define a save path for the texture (16-bit color depth is recommended).
- In the Option tab’s Normals menu, drag the high-res object into the Source field and set Method to Tangent, for example. Do not modify the other settings. Click on the Bake button.
- Create a new material and assign it to the low-poly object. Enable the material’s Normal channel.
- Load the Normal Map you just baked into the material’s Normal channel.
- Set Method to Tangent. Done.
Note that the Sculpt functionality has its own Bake function that basically does the same as described above. Sculpting lets you switch between high and low-res objects.
Note that Normal maps can also be created without a Source object. Simple Normals will be ascertained for the object to which the tag is assigned and coded into the texture.
There are several methods with which to define Normals textures. Without going into great detail, the following applies:
- Tangent: The most common method. The direction of the Normals will be defined according to the underlying surface. This makes it the ideal method for objects that deform (character animation). These textures can be easily identified by their bright blue or bright green color; these are the areas in which the Normals are perpendicular to the surface.
- Object: The object’s coordinate system is used to orient the Normals. Such textures emit, for the most part, in all colors of the rainbow.
- World: The world coordinate system will be used to orient the Normals. This setting is suitable only for non-animated, static objects. These textures will also emit in all colors of the rainbow.
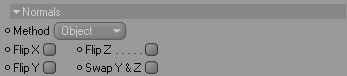
Since there is no standard way of generating Normal textures, several methods are possible: Sometimes the color green, sometimes the color blue is used for the Y-direction. Here you can switch between colors for a better orientation.
Ambient Occlusion
This option can be set separately, without changing the render settings.
If this option is active, Ambient Occlusion will be written to a vertex map that can be made visible via the vertex map shader. Vertex maps only affect object points, and the Ambient Occlusion resolution will therefore be much lower than if you let Ambient Occlusion be calculated the conventional way.
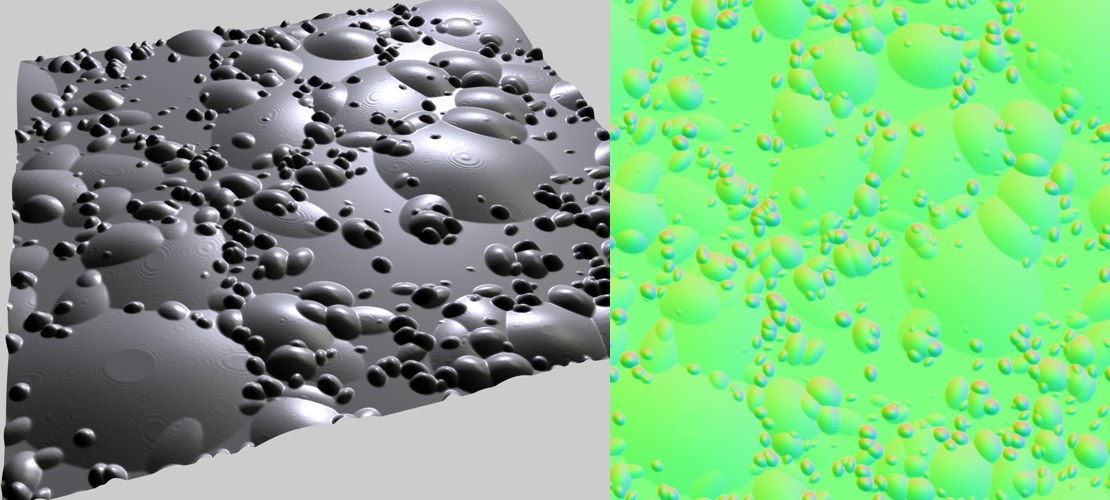
Displacement
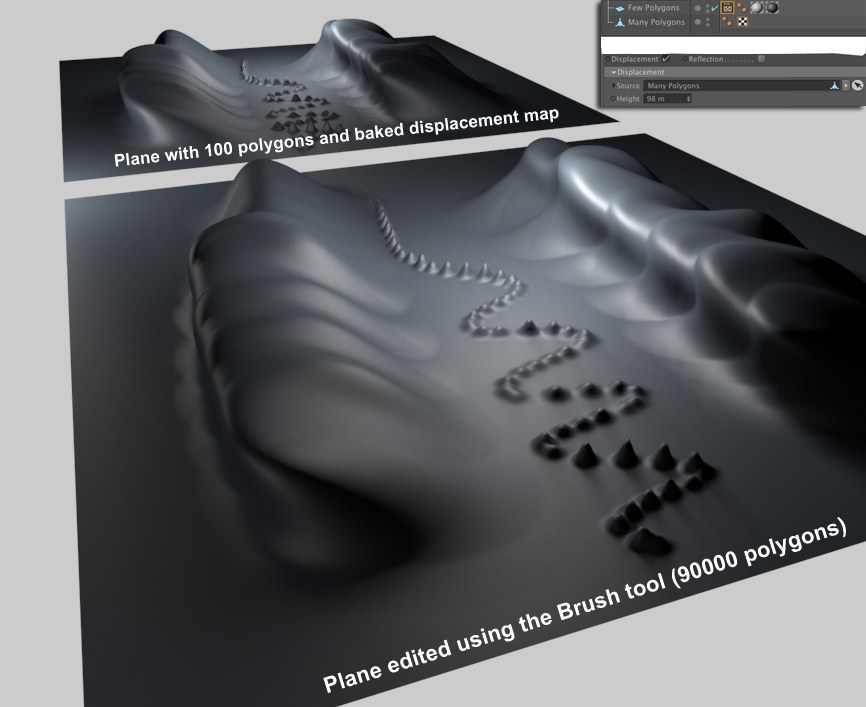 Even overhanging structures can be created.
One trick that’s often used to keep file size low is to use Displacement maps or Sub-polygon Displacement to render finer details.
To create such Displacement maps you need both a low-poly and a high-poly, modeled version of the object.
Normally the low-poly object will be assigned the Bake Material tag and the detailed object is assigned to it. During baking, the tag will determine how far apart correlating positions on both objects lie and will calculate the corresponding Displacement map (the displacement type, including all Displacement settings that you know from the Displacement material channel, can be defined freely).
For the Types RGB (XYZ Object), RGB (XYZ Tangen) and RBG (XYZ (World), the following applies: In order for this to function correctly, both objects must have identical UV projections, i.e., the high-res object’s UV map basically has to display a subdivided version of the low-res object’s UV map. In practice, though, this can be quite laborious when working with complex objects. Hence, this works best when done with less complex bodies such as Planes since their UV coordinates are identical and lie on top of each other without distortion.
How to bake a Displacement map:
- You have 2 versions of the same object: a high-poly and a low-poly version.
- Assingn a Bake Material tag to the low-poly object (main menu: ).
- Enable the Displacement option in the Options tab and define a save path for the texture (we recommend using 32-bit color depth).
- Drag the high-poly object into the Option tab’s Source field and set Type to Intensity, for example. Do not modify the other settings. Click on the Bake button.
- Create a new material and assign it to the low-poly object. Enable the material’s Displacement channel.
- Load the baked Displacement map into the Displacement channel (and set Sampling to None).
- Set Type to RGB (Intensity) and enter the Bake Texture tag’s Height value into the Displacement channel’s Height field. Done.
Drag the high-poly object of the object pair into this field.
This value will be defined automatically during baking. Enter this value into the Displacement channel’s Height field.
See Type.
See Subdivision Level.
See Round Geometry.
See Round Contour.
See Map Rounded Geometry.
See Keep Original Edges.
See Best Distribution.
Ray Casting
Don’t be irritated by the term ,Sculpt Mesh’ in the following. The same function can be found when baking sculpted objects. Simply imagine the source object instead of a ,sculpt mesh’.
If you want to bake a displacement (only 3 types: Intensity, Intensity (centered) and Red/Green), a ,ray cast’ technique will be used. Simply put, it works as follows for displacements: Imagine an initial mesh that is placed over a Sculpt mesh. Position and Normal orientation will be ascertained for each position on the initial mesh. Now a ray is emitted in the direction of the Normals and back and the distance in which it intersects with the Sculpt mesh and which Normals lie at that location will be ascertained. The distance of the first Sculpt mesh surface found will be calculated into the Displacement map.
In most cases, this works very well but can also fail in certain areas. This can, for example, occur at geometry edges where the ray can easily shoot into empty space. It can also occur that the ray hits false geometry. The texture will then be calculated incorrectly and high spikes will appear at these locations when the scene is rendered. The following settings are designed to reduce errors as much as possible. Therefore, if high spikes appear, it can help to disable the Use Auto Spike Filter Threshold and use a smaller Custom Spike Filter Threshold value.
Use Max Ray Cast Distance
Custom Ray Cast Distance
If the Use Max Ray Cast Distance option is disabled, the ray will basically not be restricted. If the option is enabled, the ray will end at the distance defined by the Custom Ray Cast Distance setting and a displacement (Height = 0) will be calculated at that distance.
Use Auto Spike Filter Threshold
Custom Auto Spike Filter Threshold
The spike filter examines the baked texture and uses a statistical method for ascertaining which displacement region is the most prevalent and identifies extreme spikes. These spikes are then removed. If you want to influence this process yourself, disable this option. The smaller the Use Custom Spike Filter Threshold value, the greater the suppression of spikes will be. However, if the values are extremely small, little or none of the displacement will remain.
 Left: the UV mesh after modeling, center and at right after the UV mesh was re-calculated with Packing with various settings.
BodyPaint 3D users are already familiar with these functions . It adjusts the UV coordinates so that, for example, UV polygons no longer overlap. In the image above, the UV mesh as it is after the cube was modeled is shown on the left. Since the UV polygons overlap on all six sides of the cube, baking would not be a good idea since the cube would look the same on all sides.
If you select Packing from the Auto UV menu, all UV polygons will be arranged separately onto the texture. The cube’s surface is thus displayed in texture form.
The following modes are available:
- Packed: This is the advanced mode that can be used to optimally unwrap the UV mesh (see Packed)
- Off: The UV coordinates will not be realigned; only use for baking if you already have a UV mesh that fits.
- Cubic: When possible, connected UV mesh groups will be created.
- Angle: The UV mesh will broken down into numerous pieces.
Relax defines the number of internal levels of relaxation for the UV mesh. UV coordinates will be rearranged in such a manner that large UV polygons become smaller and smaller UV polygons become larger.
The Baker’s most important button: Clicking it bakes the texture.
Since baking can take a long time to complete if complex functionalities are involved (Ambient Occlusion, GI, etc.), this option lets you stop the process, if desired.
Deletes the contents of the preview window.
Quickly displays a low-res preview of the baked texture, which gives you an impression of what the final texture will look like.
Preview Window
This window has the following functions:
- Lets you follow the baking process
- Shows you a low-res preview of the texture
- With the mouse, drag an area to be rendered
By right-clicking on the preview window a menu with the following items will open:
- Open Window: Opens a scalable window in which the baked texture is shown.
- Layer: If you bake several layers at once (e.g., Surface Color, Shadows, Normal, etc.) you can use this menu to select individual layers. This function is also available in the window that is opened when Open Window … is selected.