Keys Area
All existing keys that have not been hidden by filters will be displayed in chronological order in the Keys Area. In addition, F-Curves can be displayed by clicking on the small arrow next to each curve.
A key’s value can be changed manually, without having to go to the Attributes Manager, by double-clicking on a real key (i.e. not a master key). A new key can be created via
Selection And The Concept Behind Master Keys
Items in the Timeline are ordered chronologically. Maybe you are wondering why keys are also assigned to parent objects. These parent (master) keys, depicted as outlines, have themselves no key value and serve only as handles and selection assistants. A master key will be created in the parent hierarchy (i.e. for objects, tags, materials, etc.) for each key you create for a given track.
When a master key is selected, all keys of child hierarchies located at the exact same time in the animation will also be selected. When normal keys are selected, corresponding master keys higher up in the hierarchy will also be selected, however without the respective master key’s corresponding real keys being automatically selected (only those actually belonging to the interactive selection).
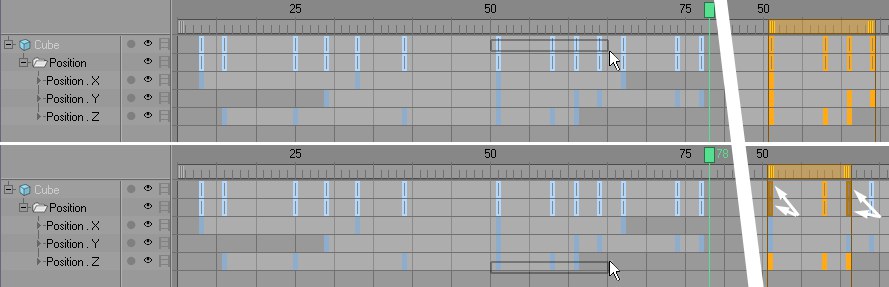 Selecting master keys will automatically select all child keys. Selecting individual keys automatically selects the corresponding master keys. The marked master keys are colored differently when not all of their real keys are selected.
Master keys are colored differently, depending on the selection of real keys made:
- Selected: All of a given master key’s real keys are selected.
- Partially selected: Not all of a given master key’s real keys are selected.
- Deselected: None of a given master key’s real keys are selected.
Selecting a master key will always result in all child keys being selected that are located at the same time in the animation.
Keys can be selected interactively as follows:
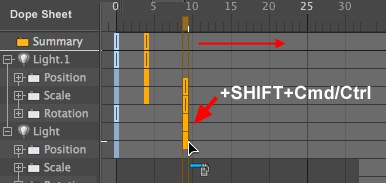
- By clicking on individual keys. Simultaneously pressing the
Shift button will make a from to selection available: Select a key andShift + click on a second key. All keys that lie between these two keys, both horizontally and vertically, will be selected. Keys within this selection can be deselected or (re)selected viaCtrl/Cmd + click. - Drag a selection box around the keys you want to select. By simultaneously pressing the Ctrl-key (after pressing the mouse button), keys can be from an existing selection.
Selected keys’ properties are displayed in the Attributes Manager.
So I’ve selected some keys. What now?
You can move all selected keys by:
- moving one of the selected keys.
- moving the Selection Range in the Timeline Ruler.
You can scale (slow motion, cycle) the selected keys temporally by moving one of the Selection Range’s handles in the Timeline Ruler.
Simultaneously pressing the Ctrl-key while executing one of the selection methods just described will copy the selected keys. Press
A symbol next to the cursor will alert you to whether or not the selected keys can be copied to a desired location.
- Cursor with small Copy icon: OK
- Prohibition sign: not possible
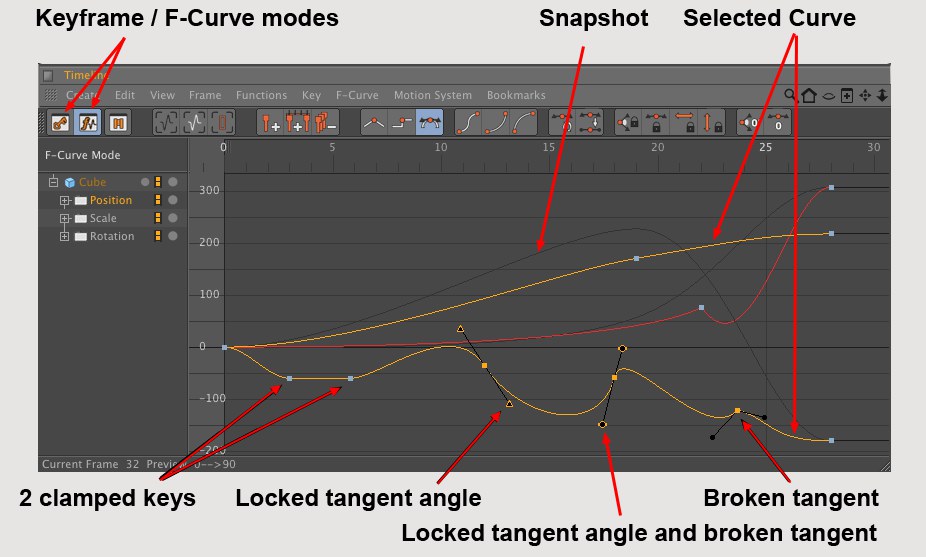
The F in F-Curves stands for function (Function Curves). F-Curves represent the interpolation between keys. F-Curves are not linked to any form of unit and can therefore be used in conjunction with any property that can be interpolated smoothly between keys.
What role do all the different types of interpolation play in a simple animation?
Take a look at the F-Curves shown below.
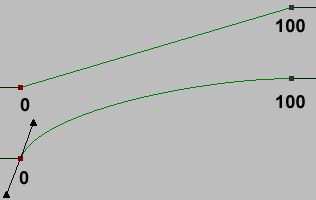 Linear interpolation (top) and Spline interpolation (bottom)
The keys on both F-Curves are located at the same time in the animation and have the same position, i.e., the initial and final values are the same. If these were Position keys, the start and end positions would be the same.
Keys representing the brightness of a given light source or any other object property could also have been used in the example above.
How each F-Curve affects the animation can best be seen by playing the animation.
Example 1: A position animation in which an object moves at a constant velocity between point A and point B. The fact that the object’s velocity remains constant makes its movement look unrealistic. A realistic movement always involves an acceleration phase and a deceleration phase.
In contrast, example 2: A curve ascends rapidly, quickly reaches its crest and continues in a straight line until it arrives at the second key. The movement is as follows, based on the properties at hand: The value increases rapidly and slows as it reaches the last frame, at which point no more changes will occur to the value.
The object will move rapidly at the beginning of the animation, quickly slow until it stops. This is what a realistic movement would look like.
F-Curves define the temporal interpolation between keys. The Timeline offers numerous functions that let you easily create acceleration and slowing movements for your objects.
If no settings have been changed in the
For the most part, key tangents are displayed for selected keys and can be moved or edited interactively to change the tangents (several selected keys can be edited at once). The following keyboard shortcuts can be used (also in conjunction with Mini F-Curves in Dope Sheet mode):
- Shift: Edit individual tangents. Left and right tangents are broken and can be edited separately.
- Ctrl: Tangent ascension remains constant; only tangent length can be edited.
- ALT: Tangent length remains constant; only tangent rotation can be edited.
Keys can be selected by clicking on them or dragging a selection box around the keys you want to select. You can switch between selection states by simultaneously pressing the Ctrl-key.
Selected keys can be moved using the
A line will be displayed along which individual keys can be moved.
An entire F-Curve can be selected by clicking on it (selects an individual F-Curve) or by dragging a selection box (multiple selection). Simultaneously pressing
Most options in the
A key can be added to an F-Curve via