Key Properties
Note that most of the settings described here can also be defined in the Project Settings menu’s Key Interpolation as a default for newly created keyframes.
This key is located on the current time in the animation.
Use this setting to lock a key at a specific location so it cannot be moved horizontally, neither in Dope Sheet mode nor in F-Curve mode.
Locked keys (with regard to time) are given a different color in the Key and F-Curve modes so they can easily be differentiated.
This is the scale value saved within the key. This can represent a position, the brightness of a light, an option’s activated or deactivated state or one of a thousand other properties that can be animated.
Use this setting to lock a key’s value to prevent it from inadvertently being changed.
Locked keys (with regard to key value) are given a different color in Dope Sheet mode.
 These are the three interpolation types. They are also displayed in each key in Dope Sheet mode (the keys must be scaled large enough for the icons to be visible).
Use this menu to define how the interpolation between the active key and the next key should be calculated. The following options are available:
- Spline: This is the most common type when creating realistic animations in which objects accelerate and decelerate.
- Linear: The change in value will remain constant.
- Step: No interpolation will take place. A key value will remain unchanged until the next key is reached, at which point the value will jump to the next value. This option is good for on / off animations in which the jump to another value is intentional.
Details regarding the Quaternion functionality can be found under Quaternion Rotation.
You can use the options in this menu to temporally affect the Quaternion interpolation (the rotational values saved in the keyframes will remain unchanged) Linear (SLERP) animates temporally in a linear fashion (i.e., with identical velocity) while Cubic near a keyframe will decelerate (approximately comparable with an FCurve’s horizontal tangent).
Linear (SLERP) represents the "linear" and Cubic the "losh" setting for the Quternion tag.
If a key is muted, the key will be treated as if it does not exist and the F-Curve will no longer run through it. However, the key can still be selected and reactivated. A change in value from an alternate source, such as an Expression (Vibrate tag) for example, can be implemented within this range.
 The white keys were made Breakdown keys. If the orange key were moved, the Breakdown keys would move with it, temporally relative to its movement.
Breakdown keys are special keys that, for example, depict a special character pose or another important animation state. These allow for the fine tuning of very tight animation sequences. If the key values should remain the same when moved, simultaneously press the
Breakdown keys are otherwise the same as normal keys and possess the same properties, which can also be edited in the Attributes Manager.
This option can be used to assign a different (single!) color to keyframes, e.g., to mark important keys or poses. This color will be displayed at all corresponding locations (e.g., Timeline, Animation Palette, etc.). No other key properties will be affected.
Several new settings were added to the Timeline to make working with F-Curves even easier by helping you create better and softer F-Curves. Constantly adjusting tangents after moving keys used to be unavoidable. This has now, in part, been automated and made stepless. The main goal of the improved handling is to ensure the creation of soft, flowing transitions between keys and avoiding overshoots.
Key presets are each a combination of keyframe properties (click on the small arrow on the left next to Key Preset to display these) that work well together. You can select from the following:
- Custom: This option will be shown if you use a unique combination.
- AutoKey Classic: The Auto Tangents will behave exactly like they did in pre-R17 Cinema 4D versions.
- AutoKey No Overshoot: Like AutoKey Classic but with optimized, stepless overshoot prevention.
- AutoKey Weighted: Use this mode if you are not sure which one to use. This mode applies most of the new options.
Unfortunately these presets can’t be applied strictly to a single animation task (e.g., character animation or technical animations). There are only different types of behaviors for Auto Tangents. You can test which presets you want to use or if you would rather use a unique combination, depending on your individual workflow.
This tangent mode has predefined values and should only be applied in conjunction with the Spline interpolation type. Auto Tangents automatically sets tangent length and angle to a soft interpolation. The tangents will run horizontally from the first key to the last key.
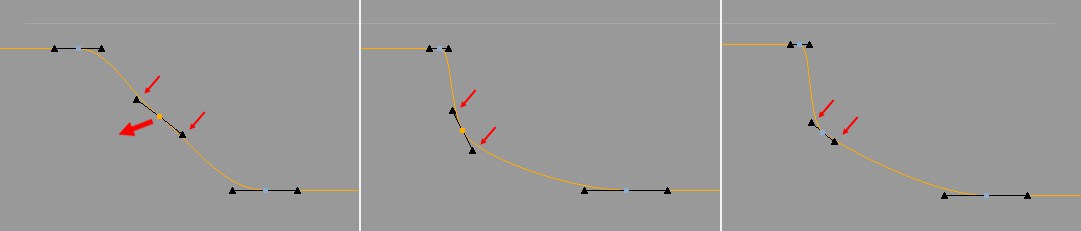 The middle keyframe is moved to the left. At center, Slope set to Classic, at right set to Fixed Slope (here you also see the additional Weighted Tangent option).
You can choose between two methods for automatically creating tangents:
- Classic: This is the method used in pre-R17 versions of Cinema 4D. When a keyframe (or a neighboring key) is moved, the tangent slope is variable and it changes the closer you are temporally to a neighboring key. In general, softer curves will be generated.
- Fixed Slope: The tangent slope remains constant between two neighboring keys (as long as these aren’t modified or affected by options such as Clamp). The key can be moved while maintaining a constant tangent slope. This mode works best in conjunction with the Weighted Tangent option.
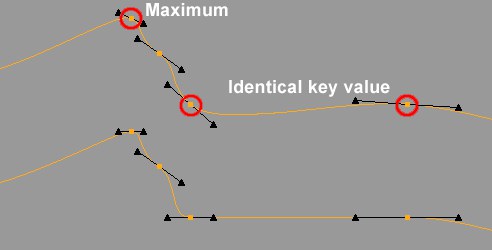 Applying the Clamp setting can prevent overshoot between keys with the same value and minimum / maximum. Top: Initial state. Bottom: With Clamp applied.
.
This special setting lets you prevent overshoot in soft interpolations Auto Tangents between keys with the same value. Normally overshoot is not critical, although it can be bothersome at times. For example, if an animated foot should not sink into the floor when it steps.
Clamp replaces the soft interpolation between 2 keys (this setting must be activated for both keys) with the same value with a linear interpolation. If the value of one of these keys should later be changed, Clamp will no longer apply and the normal interpolation will take place.
In addition, local Maxima and Minima (keys whose neighboring keys to the left and right are larger or smaller), as well as a track’s first and last keys will be assigned horizontal tangents
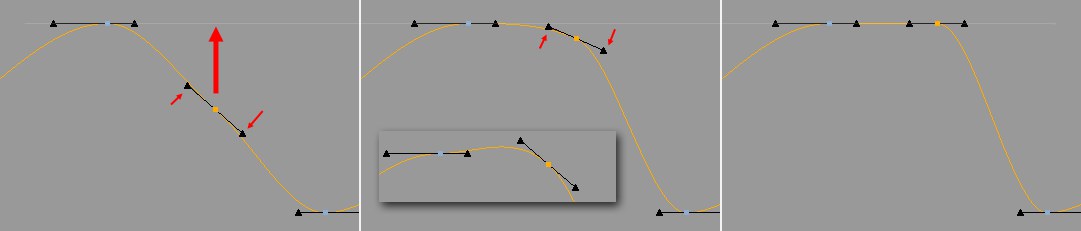 The overshoot effect with the Clamp option enabled is shown at the lower center of the image above.
This option is very similar to the Clamp option with the difference that the ,overshoot prevention’ does not set in abruptly when the key value deviates from that of the neighboring key (whereby a brief overshoot can nevertheless occur) but the tangents will be more horizontal the closer they are to the limit. This means that no overshoot will take place.
Note how the tangents in the image above are more horizontal the closer the key values comes to the neighboring key’s value.
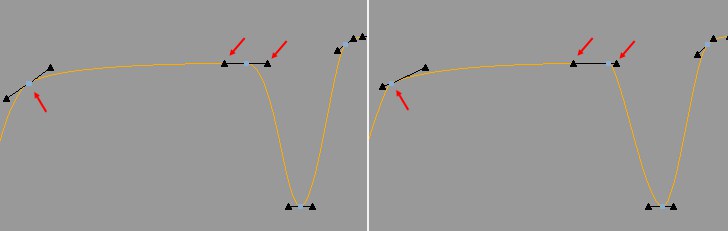 Left Weighted Tangent disabled, right enabled.
If this option is disabled, weighted tangents will change their tangent length according to the distance from the neighboring key if the Auto Tangents option is also enabled. The closer the neighboring key lies, the shorter the respective tangent half will be (the opposing half will be lengthened accordingly). Depending on the Slope option selected, this will be done differently but this is something that isn’t relevant at this point. The slope will remain the same whether or not this option is enabled or disabled.
The ratio of short and long tangents can only be defined freely by breaking the tangent manually.
A tangent whose halves are different lengths automatically produce somewhat more uniform F-Curve shapes.
If the Auto Tangents option is disabled, the ratio between left and right tangents will remain constant when keys are moved. If you drag an unbroken tangent, the length of the other tangents will change relative to the length of the previous tangent.
If this option is disabled, the unbroken tangent halves will be reset to equal lengths.
If this option is enabled, a one-time weighting as described for the Weighted Tangent option will be applied. After that, the tangent’s Time(=X) component will be fixed. The tangent handles can then only be moved vertically and the tangent itself can only be rotated. When the key is moved, the slope will remain constant. This option behaves similarly to the auto tangent functions in other applications.
Left Time
Right Time
Left Value [-∞..+∞]
Right Value [-∞..+∞]
This is where the tangent handle coordinates, from the key outward, are displayed. In most cases it will not be necessary to manually make any changes. It is much easier to edit the tangents interactively in the F-Curve mode. As a reminder: The following keys can be used when editing tangents (
-
Shift : Tangents will be broken; left and right tangents can be edited separately. -
Ctrl/Cmd : Only the tangent length can be edited. -
Alt : Only the tangent’s angle can be edited. The effects of using these keys can be limited by opposing settings (e.g., applying the
Use this setting to lock a tangent’s ascension. The animation velocity in the vicinity of the key will remain constant.
A tangent’s handles will be marked with a colored edge and only its length can be edited. The Ctrl-key can be pressed while editing a tangent’s handles in order to maintain a constant angle.
If the Lock Tangent Lengths is also enabled the key tangents will be hidden.
With this option you can keep the angle between left and right tangents constant. This option is only available for broken tangents (angle between both not equal to 180°).
Activate this setting to lock a tangent’s length. Only the tangent’s rotation can be changed. The ALT-key can be pressed while pulling a tangent’s handles in order to temporarily maintain a constant length.
If the Lock Tangent Angles is also enabled the key tangents will be hidden.
Activating this setting will let you edit the left and right tangents independently of one another. The tangent’s handles will change from a triangular shape to a disc shape.
Using broken tangents will result in a jerky motion.