Tag Properties
The settings found on this tab affect the actual structure of the control cage. This also provides functions that handle the stored calculations of the cloth simulation.
If the Auto option is enabled, the Cloth engine will be linked to the maximum length of the current scene. In the Project Settings dialog, for example, if the Maximum frame is set to 150, the cloth engine will calculate for the entire 150 frames.
When the Auto checkbox is disabled, the Start and Stop field will become active. This allows for the length of time at which the cloth engine will calculate for.
This parameter basically controls the overall elasticity of a fabric. In Cinema 4D versions prior to R11.5 this was automatically defined internally (primarily based on the object subdivision and Stiffness setting), which however presented several disadvantages. The new incarnation allows for a separate, manual definition. Note that render times will increase as the defined value is increased and values near 0 can lead to unstable cloth calculations, which can then virtually "explode".
Iterations should be viewed as a mass for the overall stiffness of a fabric, which can be adjusted using the Stiffness, Flexion and Rubber parameters.
If an older scene is loaded (prior to R11.5) the Iterations and Stiffness parameters will be set so the original Cloth behavior is maintained.
This parameter controls the overall stiffness of the cloth object. The higher the value, the more stiff and less stretchable the cloth will be. Note that Iterations also has an effect and higher values will increase the Stiffness as well (which lets you simulate effects that resulted from setting the Stiffness to a value greater than 100% in previous versions).
The vertex map in this field controls the cloth’s stiffness value. The following can apply for any given point: The stiffness is set to 40% and the vertex map has a gradient of 100% to 0% applied to it. All points that receive a weighting of 100% have a stiffness of 40%. In turn, all points with a weighting of 50% will have a stiffness of 20%.
As the name suggests, these springs make it possible for the cage to flex. Springs are created that connect an individual point of a given polygon with a point of another polygon, as long as these polygons are not adjoining. To put it differently: the spring omits one point between start and end points. The percentage value defines the strength with which the Cloth object will flex around the given points.
This vertex map defines where and how a cloth object’s springs work. If Flexion is set to 50%, all points with a weighting of 100% will have a Flexion of 50%; all points with a weighting of 50% will have a Flexion of 25%.
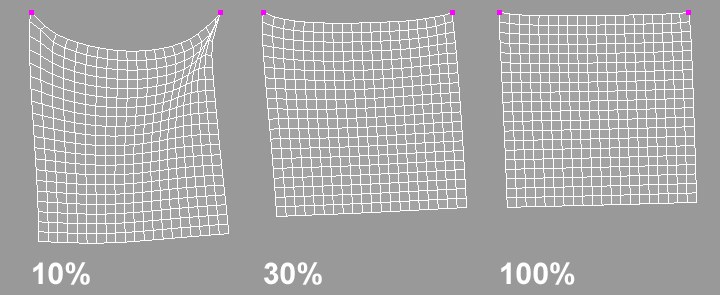
This parameter controls the amount of stretching that the cloth object will be able to do. The default value of 0% will not allow for the cloth to stretch; whereas, a value of 100% will allow the cloth to be stretched. This parameter can also be controlled through a vertex map by using the respective field on the Effects tab.
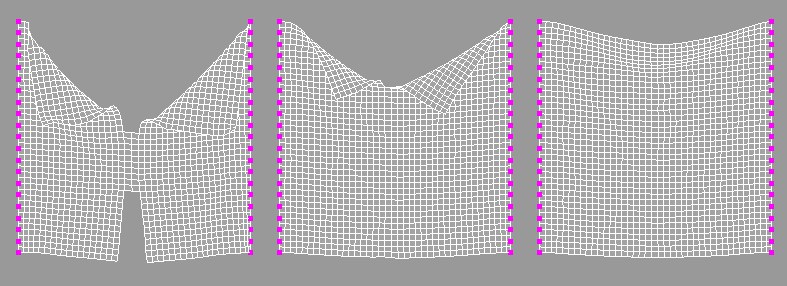
The image above shows three identical cloth objects with the exclusion that the Rubber setting has been altered. The higher that this value is, the more that the cloth objects can stretch.
A vertex map can also be applied, similar to the other spring types. This map controls where and how the cloth object should behave as rubber. If the rubber value is set to 50%, any point with a weighting of 100% will have a rubber value of 50%; any point with a weighting of 50% will have a rubber value of 25%.
This parameter controls the amount of bounce for the cloth object. This value is taken into account during a collision with a Collider object. The higher this value the more bounce will occur from the cloth object when colliding with an object. So, a very high value will cause the cloth to bounce away from the collision object. This value will also look at the Bounce value found in the Collider tag for the collision object.
Providing real world examples here will aid in understanding how this parameter affects cloth collisions. With a leather jacket, for example, this would create a high amount of bounce due to its sturdy, heavy surface. A woolen sweater, however, would create very little bounce because of its soft, airy surface.
Certain areas of a garment may have a lot of friction with its colliding surface, primarily in the collar and shoulder areas of a shirt, for example. But that’s not to say that one Friction value will be able to achieve this.
Painting these areas using a vertex map can specify what areas are stickier than others. A point weight value of 0% will have no friction, whereas a point weight value of 100% will have complete friction.
Different areas on a piece of fabric can have different mass values. Depending on if the garment has a pocket, a collar, a zipper, and so on those areas will carry more mass due to the extra amount of cloth involved.
Specifying a vertex map in this field will allow for adding extra mass to those areas. With a Mass value of 2, a point that has been painted with 50% weight will now have a Mass value of 1.
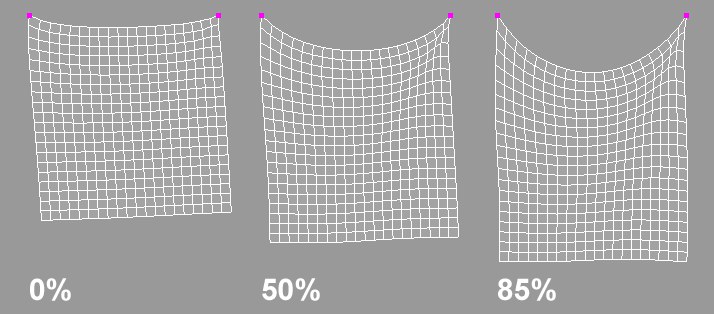
This will probably be most commonly used during the dressing state to fit the clothes to the character. Using a vertex map in this box will allow for certain areas on a garment to be shrunk or enlarged, tailoring the clothes to the character. As mentioned in the entry for the Size percentage setting at the top of the tab, a value of 100% is the original size of the object. With that, an area that has 50% weight painted in the vertex map will shrink to half the size of the original object.
A vertex map can only have a maximum value of 100%, so in order to enlarge an area the Size percentage value would need to be increased to a value greater than 100%. With a Size value of 200% an area with 50% weight will now be the original size of the object. An area with a weight value of 75% will now have a Size value of 150%.

In the image above different Vertex Maps where used to achieve different results when using Dress-O-matic. Note how the upper and lower t-shirt halves shrink depending on the weighting applied.
With this option enabled the cloth engine will allow for tearing to take place during the simulation. But in order for this tearing to work, the Cloth object to which the tag is assigned must be a Child of the Cloth Surface object. In other words, the Cloth object is the actual surface that will be torn, not the original cloth object. A tear is determined by the Stiffness of the cloth object. The lower the amount of Stiffness the easier it is for the cloth to be torn, with the exception that a maximum limit must be defined at which the tear will occur.
Tearing can also be controlled even further with vertex maps. As stated previously, tearing is based on the stiffness of the cloth; so using a vertex map in the Stiffness setting on the Effects tab will give you ultimate control over cloth tears.