Object Properties
These options define how LOD works (Criteria defines when it works), e.g., should objects be substituted or displayed as Null objects?
Each LOD mode has display properties that can be defined separately:
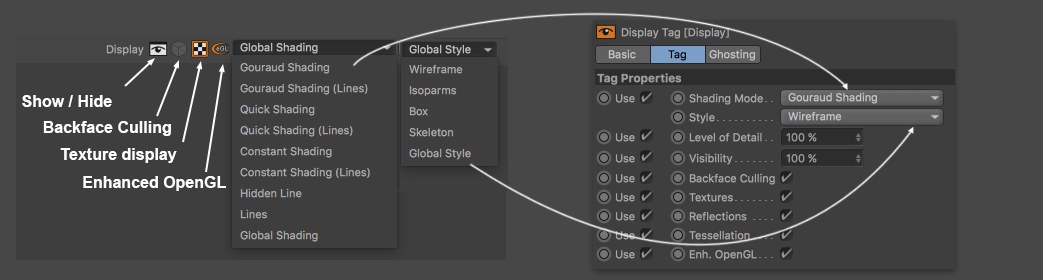
Here you will find the display settings and options that should be familiar from the Display tag. If an object has a Display tag assigned to it, this tag will be overridden by the LOD object’s settings. If Global Shading or Global Style are used, the Viewport or Display tag settings will be used.
The following options are available for the LOD Mode:
In this mode, Child objects will be displayed or hidden in accordance with the Criteria defined. The LOD level number is derived from the number of Children.
Arrange the objects to be substituted directly over one another. The object resolution should be arranged increasingly from top to bottom in the Object Manager.
This mode will display or hide a user-defined number of LOD levels in accordance with the defined Criterium. Further down in the dialog, a sub-tab will be displayed for each LOD level in which you can define objects that should be displayed in the respective level.
Objects can be dragged into this field that will be displayed or hidden, depending on the settings defined. Object hierarchies will be included if the hierarchy icon at the far right is enabled.
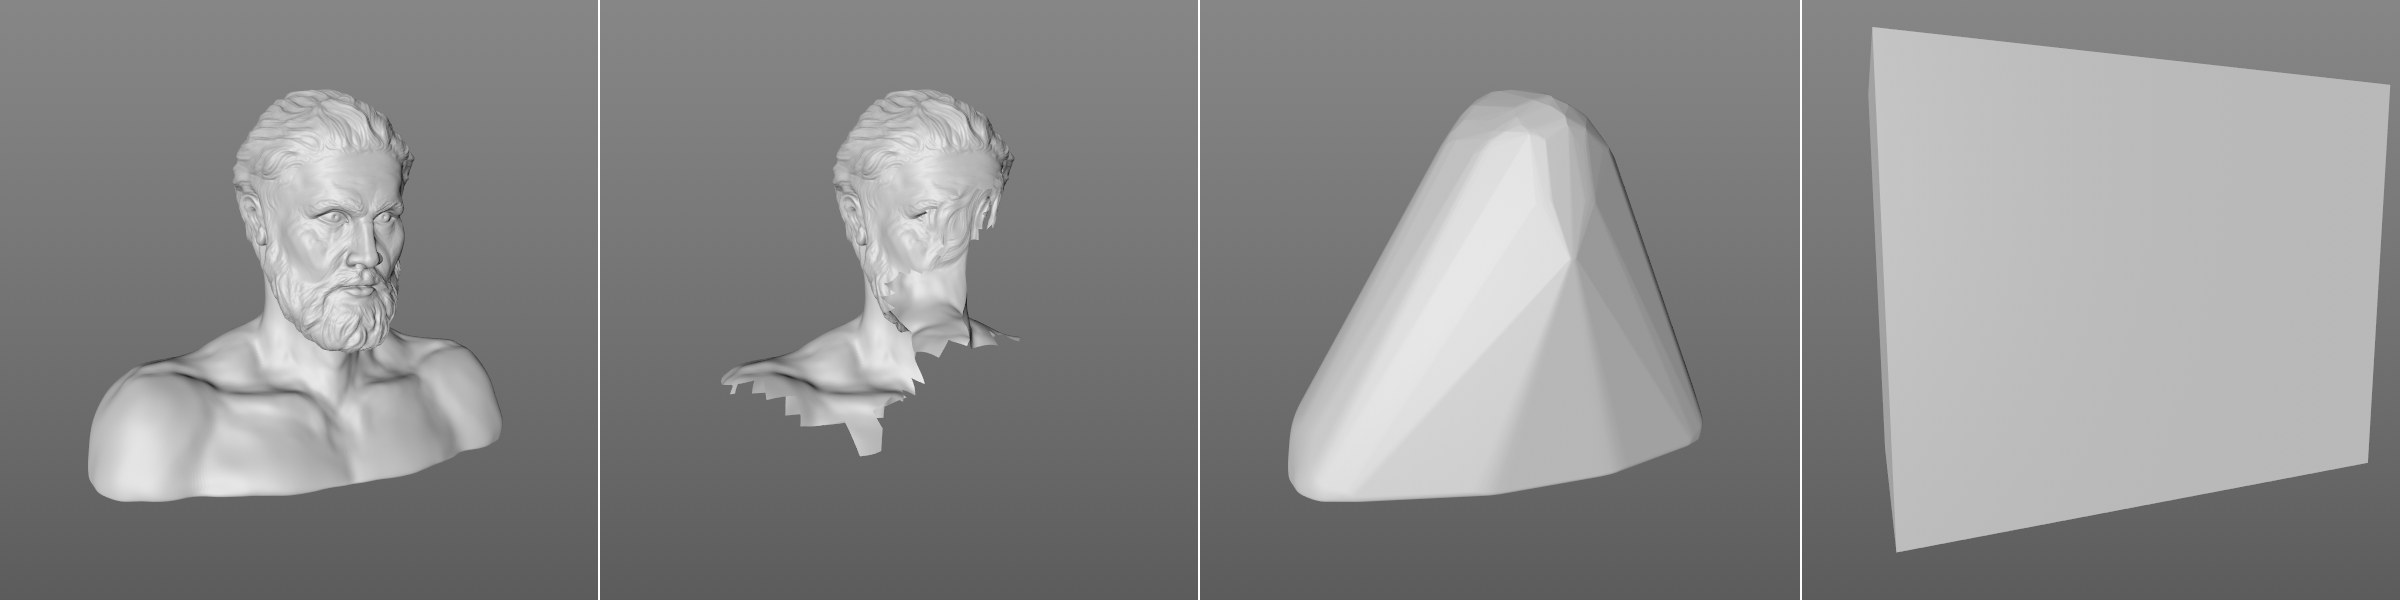
You can select from the following modes:
- Full Objects: Objects will be displayed normally
- Declinated: Object polygons will be hidden in conjunction with the Strength value
- Convex Hull: A type of rubber skin is placed on the object. Indentations or recesses and holes will be eliminated
- Bounding Box: A cube will be placed over the object as a whole
- Null: A Null object will be displayed at the object’s point of origin. How the Null object is displayed depends on the Null object settings.
For the modes Convex Hull or Bounding Box, this option defines, for example, if all Child objects of an LOD object should have a common bounding box (option disabled) or each an individual bounding box (option enabled).
This setting defines which properties should be used to fulfill the measures defined by the LOD Mode. The following criteria are available:
Here you can "manually" define, which LOD level should be used. This mode is well-suited for testing or defining LOD levels via the Take Manager.
If this option is enabled, the indicator (the black arrow under the LOD bar) can be used to manually change the LOD value (which can also be displayed by clicking on the small black arrow at the left of the LOD bar).
Normally, this LOD value will be linked with a property defined in the Criteria mode (e.g., Camera Distance and will be calculated automatically.
The current LOD value is represented by the black arrow (can be moved manually) or a small circle (automatically calculated) below the LOD bar
A value of 100% normally represents a region with maximum details (the object is the largest or nearest the camera in the Viewport).
In the perspective view (when the LOD object is selected in accordance with the colors defined in the LOD bar), a bounding box will be placed over all of the LOD object’s Child objects. Then a ratio of the horizontal/vertical bounding box size to the horizontal/vertical screen size will be generated in order to calculate an LOD value.
For example, if you zoom into an object, the LOD value will change accordingly.
A bounding box will be created here as well - as described above. The LOD value is generated based on the ration of bounding box to screen surface.
This means that the larger an object is in the image, the higher its resolution can be and if it’s far away at the horizon it can be represented by a Null object.
This mode uses the camera’s distance from the LOD object’s origin to ascertain an LOD value in consideration of the Min Dist and Max Dist settings. The camera distance is displayed in the view’s HUD.
This setting defines the LOD value using the Level of Detail settings (which can also be defined unter
Min Dist [0..+∞m]
Max Dist [0..+∞m]

These values can be used to define the left and right borders of the LOD. The corresponding LOD level will take effect, depending on the camera’s distance from the LOD object (camera icon under the bar).
You can also click and drag the camera icon temporarily in order to make the effect visible in the Viewport. This makes it possible to more precisely position the handles.
Here you can define which LOD level should be active. This option is enabled if Criterium is set to LOD Level Custom.
Here you can manually define an LOD level count. Normally, this count will be set automatically (the setting will then be grayed out) or can be defined interactively using the LOD bar.
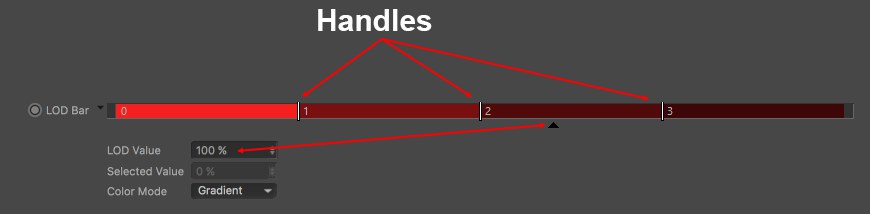
The LOD Bar displays the relation between LOD value and LOD level. The lOD levels are numbered. The corresponding LOD level will be displayed in the Viewport in accordance with how high the LOD value is. The LOD levels are separated by handles that you can slide with the mouse.
In doing so you can press:
- Shift to make the handle snap to an indicator or
- Alt to move the handle in steps of 10%.
If you click directly on the bar, the nearest handle (which was previously selected) will be set to the position at which you clicked. You can also double-click on a handle to enter a value directly.
Handles can be created by clicking just below the colored LOD levels or by
If you right-click on the LOD Bar, a menu will open with the following options:
- Invert: Inverts the arrangement of handles
- Distribute: Defines a uniform width for all LOD levels
- Reset: Resets the LOD Bar to a defined initial state (all LOD levels will be deleted in most modes)
- Choose Color: A color can be defined for the region on which you clicked or the first region (when Color Mode is set to Gradient)
The color of LOD levels can be modified. To do so, click on the small arrow at the left of the LOD Bar to open the corresponding menu.
The LOD Value can be modified manually if the respective Criteria option is selected (otherwise it will be grayed out). The Selected Value setting lets you manually define the numeric value of a selected handle.
The Color Mode offers the following options:
- Random: All colors will be assigned randomly
- Gradient: Originating from the color of the LOD level 0, a color gradient will be placed over all other levels
- Per Range: A color can be defined explicitly for a selected LOD range by right-clicking on the bar