![]() Path/Loop Cut
Path/Loop Cut
Path/Loop Cut
The Loop/Path Cut tool is primarily used to more finely subdivide edge loops interactively. An automatic loop recognition (Mode = Loop) or a manually created loop selection (Mode = Path) can be used.
The Loop/Path Cut tool cuts polygon objects in all three component modes (Use Point, Use Edge, Use Polygon).
The Loop mode will be used to describe the tool’s function (other modes will be explained elsewhere).
 The Loop/Path Cut tool has its own HUD element with which the number of cuts and position of the loop cuts can be adjusted.
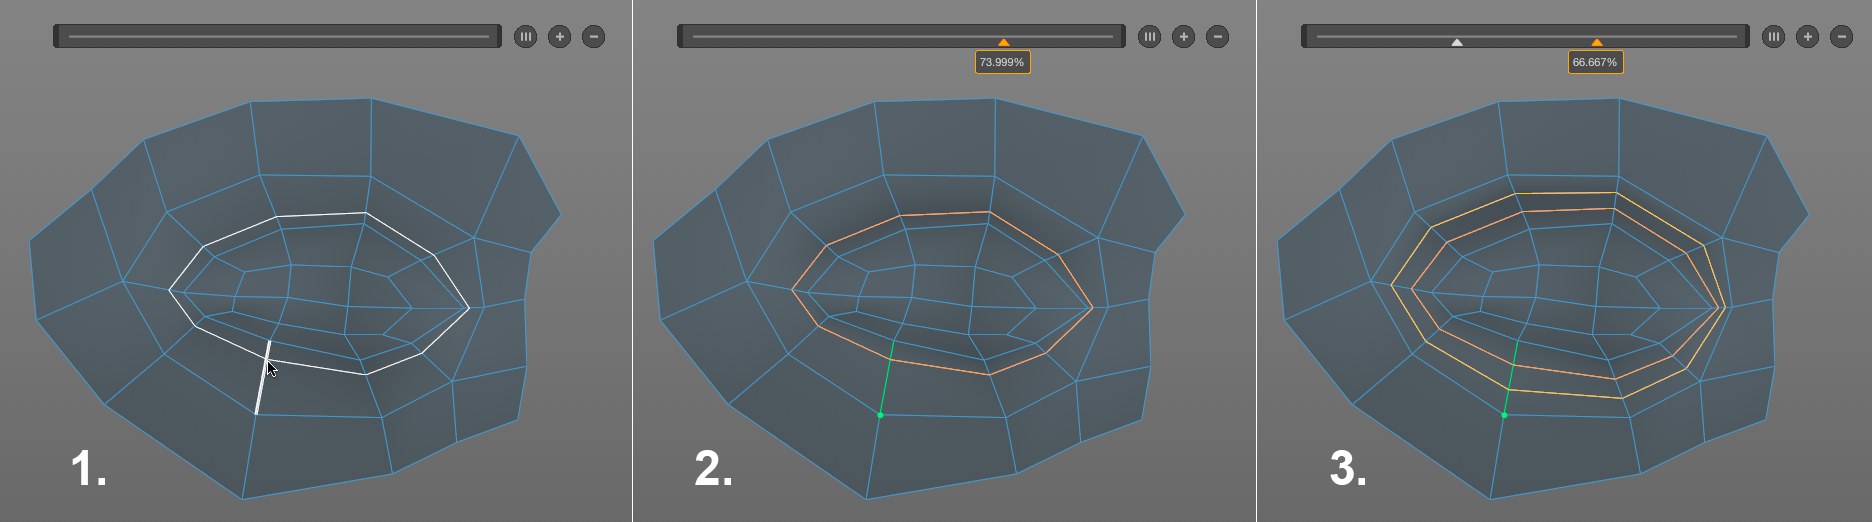
- First, move the cursor over the selected object’s mesh. The loop recognition will suggest a loop that lies perpendicular to and in the vicinity of a given edge.
- Click to cut the suggested loop. The cut is not yet final!
- The orange loop can now be adjusted in different ways (or duplicated):
- Interactively with the mouse
- Via the HUD element
- Using modifiable settings in the Attribute Manager
- Interactively with the mouse
The edge cut will remain visible - and adjustable - in all views until you switch tools or press the

As soon as a loop cut is defined - i.e., an edge was clicked on - the HUD element will be activated. The slider symbolizes the length of the edge that was clicked on, which is marked by a green line and point in the Viewport. The green reference point (if you want to set the reference point to the opposite edge, try clicking on another edge of the ring loop) represents the left side of the slider, i.e., the start of the edge.
The spacing for the loop cuts can be easily defined here. The small triangular handles on the slider each represent one loop cut. They can be selected either in the Viewport or on the slider by clicking on them. Their spacing will be displayed accordingly (100% = total edge length). Double-clicking on the value will let you enter this value manually. The selected handle can be moved. Drag the handle out of the slider to delete the corresponding loop cut.
The slider’s length can be adjusted by clicking and dragging the dark tip at the left or right end. The slider itself can be clicked and dragged to a different position.
At the right of the slider are three icons. These are from left to right: create a uniform loop spacing; add a loop cut; delete a loop cut.
The following hotkeys can be used for the HUD element:
-
Ctrl/Cmd +click on the slider: Creates a new loop cut -
Ctrl/Cmd +move a handle: Duplicates the corresponding loop cut -
Shift +move a handle: Snaps the handle to the fixed spacing (defined in the Quantize Step setting)
As soon as a cut has been selected and the cut edge has been colored orange it can be moved freely parallel in the Viewport.
The following hotkeys are available:
-
Ctrl/Cmd : Duplicates the loop cut -
Shift : The loop cut will snap to the fixed spacing defined by the Quantize Step setting -
MMB : Changes the cut count -
Ctrl/Cmd +Shift keys when creating the 1st loop cut (hold mouse button pressed and drag left/right): The loop cut’s length can be modified (note also the Bidirectional Cut option in conjunction with this).
If you want to apply this function to multiple cuts, this can be done using the Number of Cuts, Use Loop Range and Range settings in the Attribute Manager.