Intel Open Image Denoise
As you probably already know, the longer path tracers (ProRender being one) render, the clearer the noise effect gradually becomes (see also Noise and render times). The key word here is ,gradually’: it can take very long until noise is reduced enough to achieve a useable image. It would be great if this noise can be removed or at least reduce with a method that makes rendering faster.
This is where Denoiser comes in: this function attempts to reduce the noise via blurring. Blurring is an effect that generates an average color for an individual pixel using pixel colors that lie a certain distance away. This process is pretty fast, as you might know from Photoshop (Gaussian Blur). Does this make it ideal for reducing noise here? Not quite:
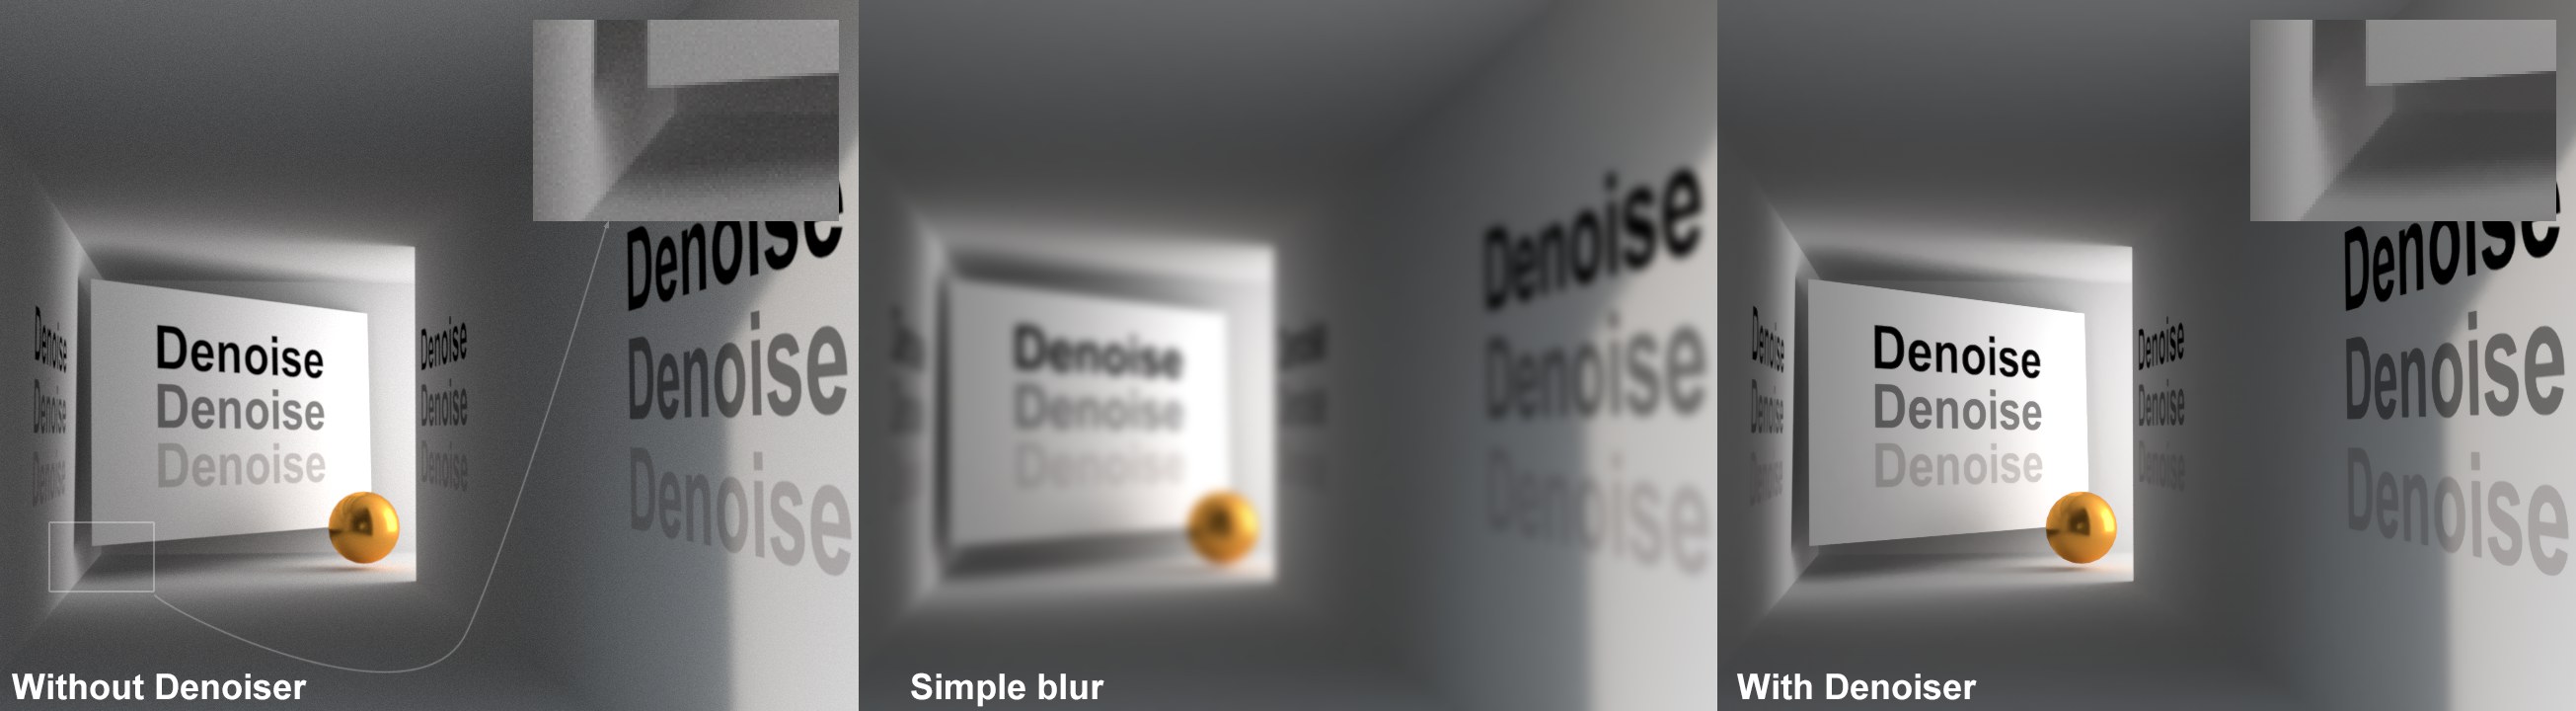
As you can see at the center of the image, this works on surfaces that are practically homogenous but not at all at spatial edges or on textures since these are also blurred. This is why a Denoiser must restrict its blurring: it has to stop at edges or where there are large differences in contrast (at right of image).
The Denoiser algorithms have to restrict their efforts to regions outside of any edges. Blur limits are openly visible edges, which can be geometry edges or texture edges.
Contrary to simple 2D filters, Denoiser can also use other criteria that can help it recognize edges. Multi-passes such as Albedo and normal shading, for example, can be evaluated, i.e., 3D information that is not necessarily visible in the final image.
The Denoiser effect works with Prorender as well as with the Standard and Physical renderers. For the latter, grainy results can be produced as is the case for the Physical renderer in general or Area shadows and Quasi Monte Carlo GI in particular.
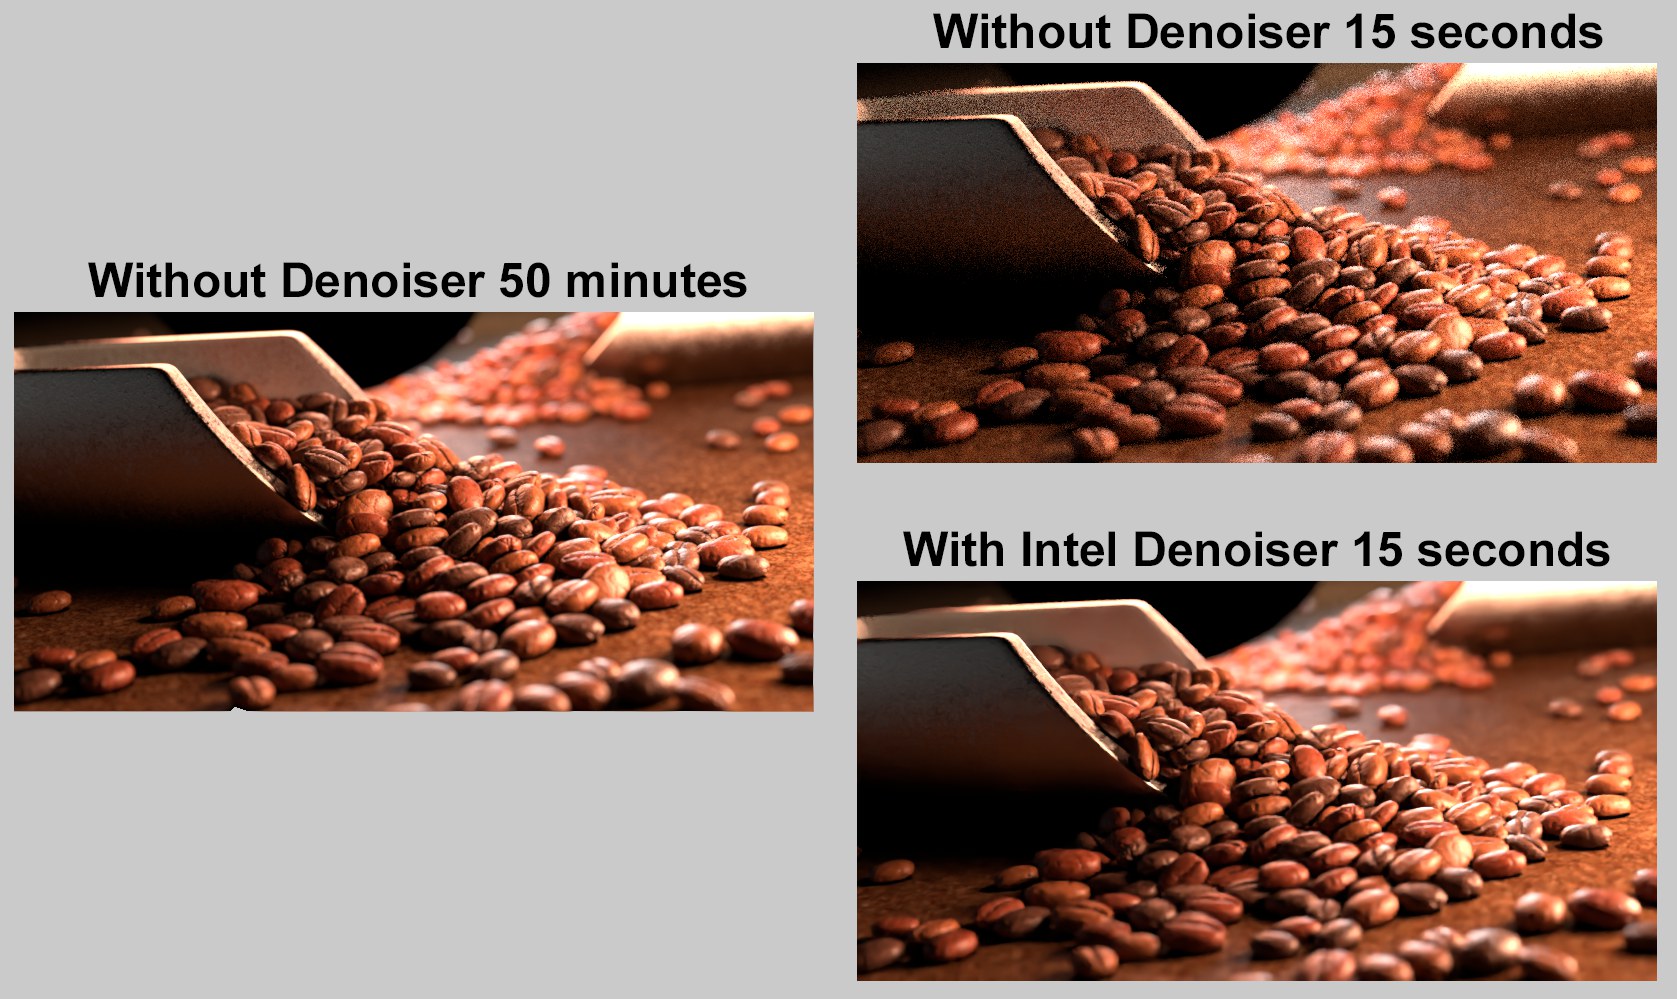 It’s surprising what the Intel Open Image Denoiser can do in conjunction with ProRender: compare the image on the left with the image bottom right.
When used with ProRender, rendering can be sped up quite a bit. Hour-long renderings are practically a thing of the past because the Intel Open Image Denoiser smoothes very dependably. It’s also easy to use because it hardly has any settings that need to be adjusted and works in the ProRender preview as well as in the Picture Viewer.
You will, however, see that the Intel Open Image Denoiser isn’t a miracle worker and, for example, will lose some details (e.g., fine bump/Normal effects). The only thing that can help here is to extend the render time.
Save the raw image on a separate layer
If the option is enabled, the un-smoothed images (as if no Denoiser is applied) will be output as a multi-pass Raw. Otherwise the un-smoothed image will be lost.
This setting is only available in conjunction with ProRender.
The Intel Open Image Denoiser itself works well without evaluating additional multi-passes. This option can be enabled, if necessary in order to edge out a little more quality. The Intel Open Image Denoiser will then internally evaluate the Albedo and Normal passes in order to find smoothing borders. These multi-passes do not have to be activated in the ProRender settings. However, poorer results can be produced in certain cases. For example:
- When rendering Volumes
- The Albedo multi-pass can produce a "rosy" result when stacked materials masked by alpha channels are rendered (check if the Albedo pass looks grainy). This is something the Intel Open Image Denoiser has difficulty compensating for.
In such cases, this option should not be enabled.

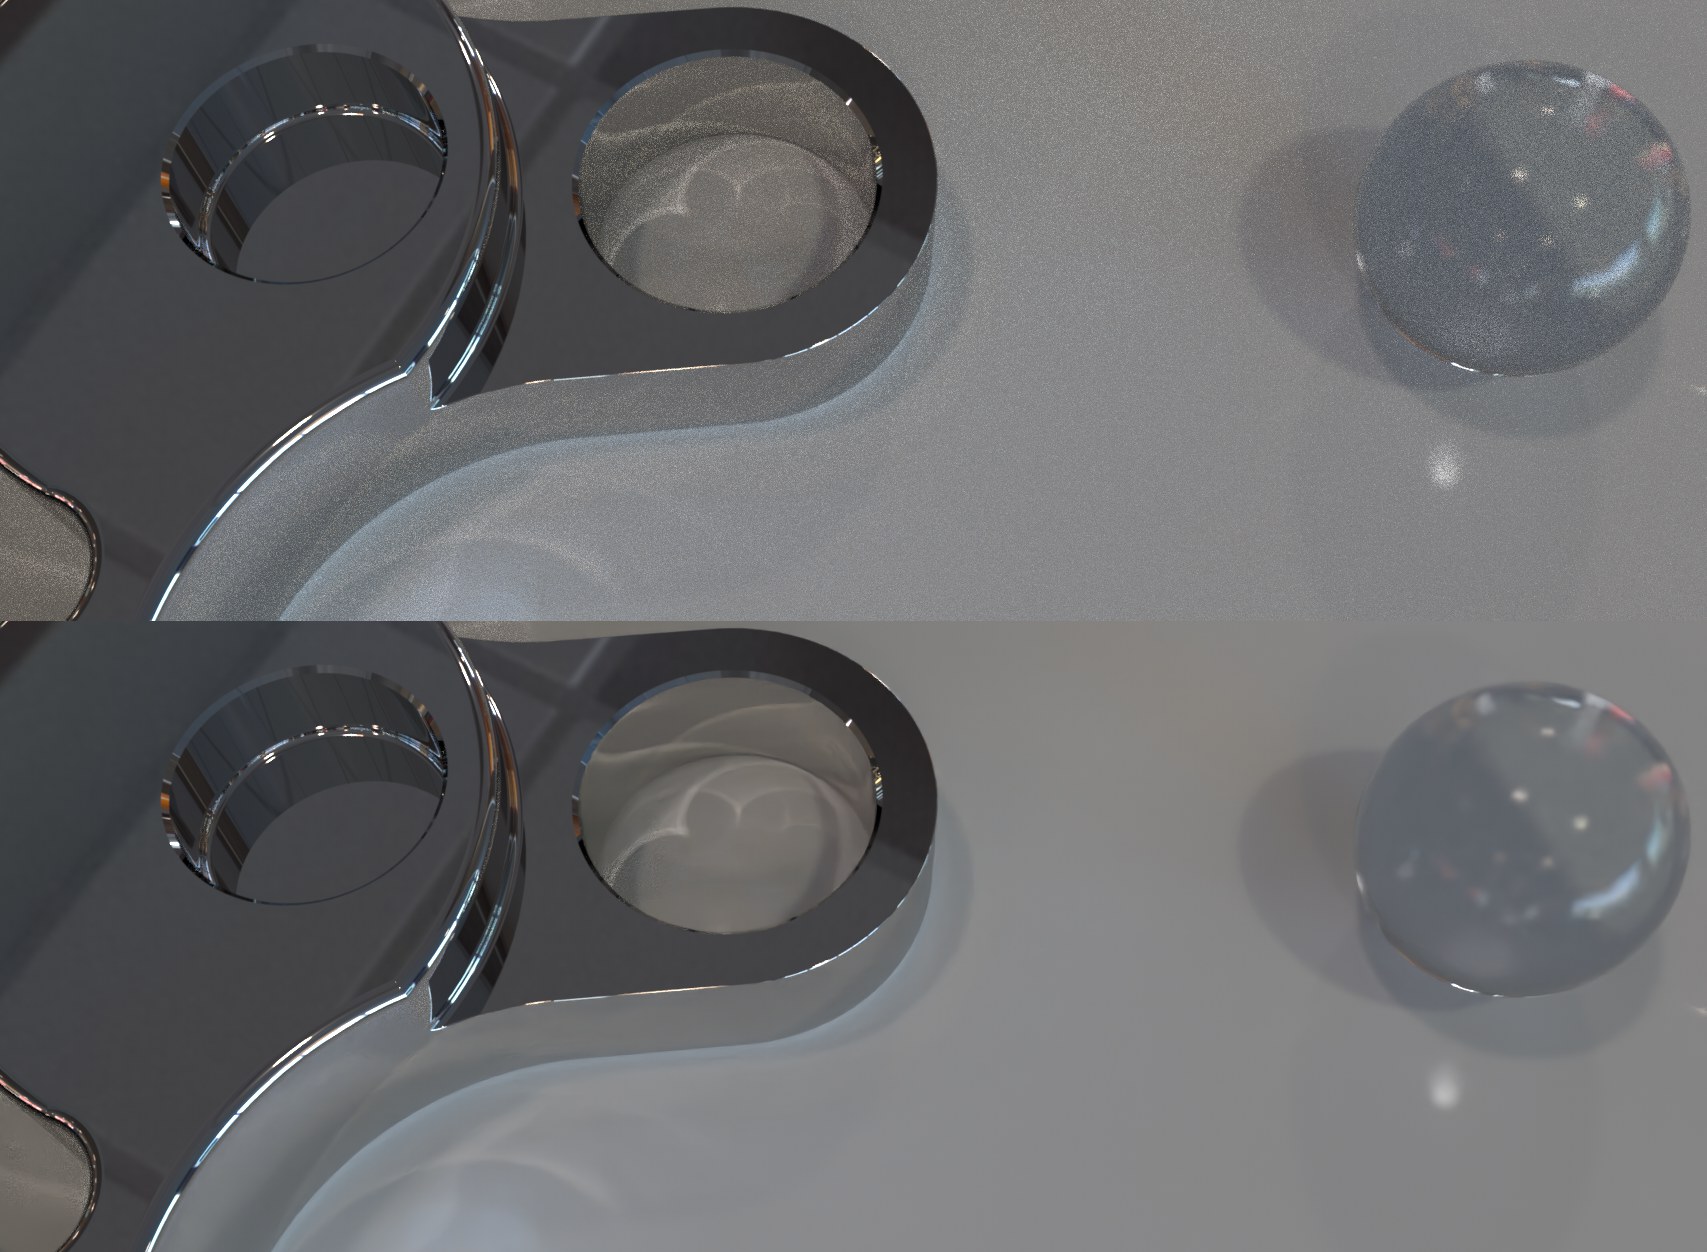
Note how Denoiser achieves an almost perfect smoothing on homogenous surfaces (left and right of the yellow surface) even on a very grainy surface. However, the structure of the yellow surface suffers. This can be seen particularly well at the top right where Denoiser can’t quite differentiate between the noise and surface structure and applies its effect a little too strongly and the structure has partially vanished. Denoiser does a better job at the bottom right (longer render times).
- The Intel Open Image Denoiser requires a certain amount of time to render - approx. 1-2 seconds - which is why it will only be re-calculated in certain intervals (initally shorter and progressively longer for the ProRender preview) or with each render update intreval (for offline rendering). For offline rendering you should therefore avoid very short update intervals. Otherwise you will waste too much time rendering. The Denoiser, which should actually take effect towards the end of the rendering, would take up far too much time from the actual render process.
- The ProRender preview never uses multi-passes in order to keep rendering fast (even if these are enabled).
- The Intel Open Image Denoiser works best with stills. Flickering can occur when used with animations, which can be compensated for by increasing the number of iterations (= less noise). It also helps to enable the Static Noise option (ProRender settings’ General menu).
- Caustics can also be rendered quite exquisitely.
 The image above rendered with ProRender and the result below after Denoise has worked its magic.
Use with the Standard / Physical renderer
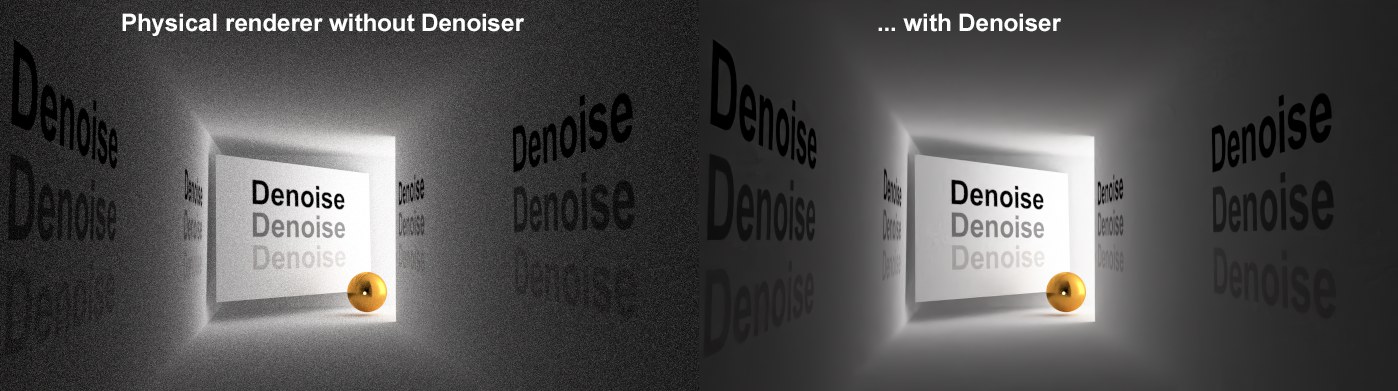 Denoiser also makes a world of difference if used with the Physical renderer.
Denoiser also works with the Standard and Physical renderers (albeit after the render process has been completed). Here, there are also functions that remove grainy results. For example, think about the Physical renderer with a low sample setting or QMC GI, or Area shadows, etc. Here, Denoiser can be of a lot of help as well. Please be aware of the fact that the results will not be as good as with ProRender. This is due to the fact that the Intel Open Image Denoiser expects a path tracer-typical noise, which older renderers cannot provide. Don’t let this scare you - very good results can be achieved here as well!
This setting is only available in conjunction with the Standard or Physical renderers.
Depending if you want to have physically correct results - also applies to node-based materials - or if you want to work with the old material channel (see PBR approach), you have to select either Abedo or Material Color and enable the corresponding multi-pass.
You should also select Material Color if you have enabled the Use Color Channel for Node Material option in the Project Settings menu.
Don’t forget the Material Normal pass, which will also be evaluated.
The Denoiser uses these multi-passes internally to ascertain where the borders limits are.
The Intel Open Image Denoiser requires a specific antialiasing filter type (Catmull 0.5 and Box 0.5 for Standard and Physical renderers, respectively). The antialiasing filters will therefore be grayed out and the corresponding settings will be used. If unwanted antialiasing artefacting should occur, it can help to render the image at a larger resolution using faster settings and then scale the image down.