ProRender
Note that in the following cases, shaders must be compiled for the graphics card that are then saved to your user directory:
- Render with a new version of Cinema 4D
- Render with a new graphics card
- After a graphics card or OpenCL driver have been updated
- Activate motion blur and modifications to the render settings
- Activate Subsurface Scattering, using different noises and shaders
Other than in Cinema 4D R19, this is not done for all shaders at once but as necessary, which speeds up the render workflow considerably.
This can take a while - during which Cinema 4D may appear to be frozen. All you have to do is have a little patience.
ProRender is a special physically correct renderer that runs on the graphics card (multiple graphics cards on a single machine can be used simultaneously). Since graphics cards are specialized for rendering, they often render much faster than most CPUs. If your graphics card is not compatible, ProRender can also run on the CPU - but slower (this is, however, still in experimental mode!).
ProRender can be selected in the Render Settings menu. If selected you can render to the Picture Viewer or in the Viewport via IRR.
ProRender can also be used as an interactive preview renderer (can be activated in the view’s ProRender menu).
Here are the advantages and disadvantages of a GPU renderer in short:
- Fast rendering compared to rendering with the CPU (for mostly complex scenes) with "integrated" Global Illumination. Rendering is physically correct, which makes it easier to achieve a photorealistic look.
- A rendering can be judged very quickly due to the comprehensive visibility at the start of rendering (see image below).
- If the graphics card is rendering, the CPU can work on other tasks
- The gain in render speed from one graphics card generation to the next is currently much greater compared to the new CPU generations, which promises even faster render speeds in the future.
- Currently not equipped with all possible features (ProRender is continuously being developed further)
- Current graphics cards are still behind CPUs with regard to RAM, which means that can easily be rendered per CPU with 32 GB memory cannot be rendered on a graphics card with 8 GB of memory. Always remember to, if possible, use render instances if you have several identical objects in the scene. ProRender can also render using the CPU, which is slower but makes use of all of the computer’s memory.
- Many common, specialized settings in Cinema 4D (e.g., many of the light settings) do not work due to the prioritizing of physically correct results. Details can be found under Limitations.
- A powerful graphics card (which is generally already build in) is required.
Compared to older Cinema 4D renderers, rendering will not be done in sequence bucket for bucket in the Viewport or Picture Viewer but as a complete image with the noise dissolving as the rendering progresses:
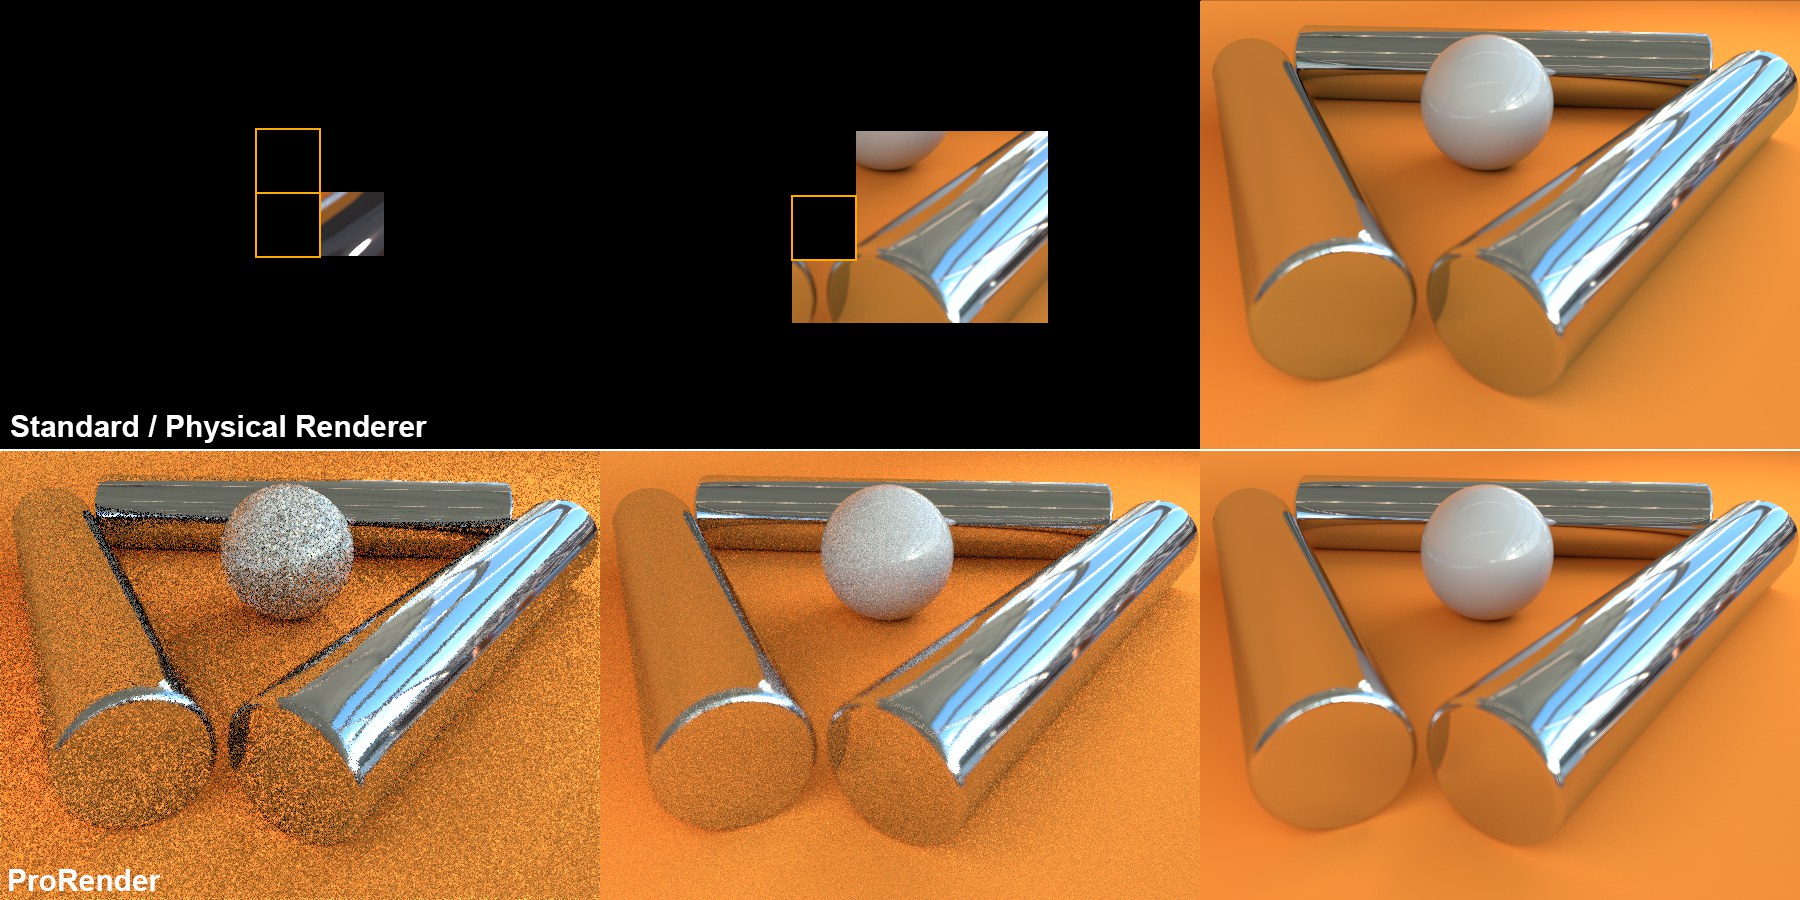 Render progression from left to right.
ProRender shoots numerous samples for each pixel into the scene. The result (= color) of each sample is continually taken into consideration for each pixel and added to the previous samples in the Picture Viewer and subsequently averaged. As the rendering progresses, more samples will be generated per pixel: the result constantly improves.
The fundamental difference between ProRender and older renderers lies in the theoretical "infinite" nature of this process. The render result constantly improves over time. The image’s grainy/noisy look will steadily be reduced until the noise has been removed entirely after an infinite amount of time.
Of course nobody had time to render indefinitely - and this is also not necessary. The render process can be aborted at any time, either manually (if you think the image looks good enough) or by definition (e.g., after a defined amount of time).
The human eye is accustomed to interpreting a certain amount of high-frequency noise in an image as looking realistic. The sensor in a digital camera also produces such noise. As such, noise is much less irritating than a lower-frequency noise (= larger, sometimes flickering regions), which can, for example, be produced when rendering with Irradiance Cache.
Note that it is possible, within certain limitations, to smooth noise using external software (e.g., Photoshop), which can also reduce image detail (the initial noise should not be too extreme). However, there is no real substitute for actual render time.
Physically correct rendering and Cinema 4D settings
ProRender does not support all Cinema 4D settings. Since it’s specialized on physically correct rendering, many settings and workflows that do not support this approach cannot be used.
For example, if you take a look at the various light settings: In reality there are no lights with a linear brightness falloff or hard shadows, or radial color falloff, etc. Also, several cameral functions (e.g., stereo rendering, lens distortion, etc.) as well as material functions (channels such as Diffuse, Environment, Fog, Glow and Luminance, etc.) won’t work. Multi-Passes and several objects (e.g., Floor, Background, Environment, etc.) will also not work, and the Compositing tag is only partially supported.
As you can see, the limitations primarily affect elements that are important for rendering such as lights, cameras and materials.
When ProRender is selected, all settings for materials, lights, cameras, tags and render settings that do not work with ProRender will be grayed out. Non-realistic settings such as negative light intensity can be defined but will have not effect.
Note also the Limitations.
On the other hand you don’t have to worry about numerous settings. For example:
- A newly created light source will automatically cast shadows (cannot be disabled)
- Global Illumination will be rendered by default, which means that no complicated GI settings have to be fine-tuned
- If you want to render caustics - which are actually a part of GI - you don’t have to enable or define any special functions. Simply activate the Reflectance and Transparency material channels. That’s it.
- There are no separate quality settings for area shadows, matte effects, etc.
Generally speaking, you should concentrate more on creating realistic-looking renders with ProRender and not worry about using effects or "tricks" to get the look you want. Note the following:
- Scaling should be as realistic as possible
- Use realistic-looking materials (e.g., only in the Reflectance channel as the
 New Node Material
 - Create light sources that are as realistic as possible (e.g.,
 PBR Light
 - Only use one sky.
Light sources are a very important element for renderers. Area lights (e.g., ![]() PBR Light
PBR Light
For rendering, ProRender does not differentiate between an Area light and an object that has a luminous material.
GI solutions when rendered using the Standard Renderer did not offer an equal sample depth for both light sources, which is no longer the case. With a sample depth of 1, for example, only surfaces that can be "seen" directly will be illuminated.
ProRender and the Physical Sky
ProRender works with the Physical Sky but not all functions are supported. Similar to shaders that are not natively supported by the graphics card, ProRender bakes a 2D sky internally (with the omission of all light sources, which the Physical Sky would otherwise use). The size of the baked texture can be defined in the Physical Sky’s Details tab (Texture Preview Size).
All Physical Sky effects that can’t be baked cannot be rendered by ProRender. In turn, the settings that apply to ProRender can be found in the following tabs:
- Time and Location
- Sky
- Clouds
- Details
Non-applicable settings will be grayed out.
Cinema 4D R20 supports display color shaders and the MoGraph Color shader
Other things you should know about light:
- (Physical) light sources have a brightness falloff that is inversely proportional to the square of the distance - as in reality
- A luminous material only emits light in the direction of the polygon side on which the surface Normals lie
- Area lights can have any shape (Details tab), except for spline
- Light sources basically cast a shadow that can be disabled. If you create realistic-looking lighting, there are no lights without shadows
- The Default Light generates a HDRI lighting if no light sources are present.
- If lights should create caustics, they have to be Area lights
- ProRender evaluates GI portals (see Portal). These are especially recommended for interior spaces (that are primarily illuminated by outside light shining through a window). Note, however, that polygon lights can, if possible, be used as glass. These will render much faster than portals.
The most important change regarding materials is the removal of the specular function. ProRender "only" offers reflections via the Reflectance channel (note in conjunction with this the ![]() New PBR Material
New PBR Material
A GPU renderer is a non-directional, unbiased path tracer. These types of renderers are best suited for the following scene types:
- Scenes under and open (HDRI)sky
- Product visualizations
- Interior scenes with large light sources
Scenes that are well-lit, with numerous regions that are illuminated directly are ideal. Noise will be reduced quickly in these images. Interior space scenes that are illuminated with a few small lights are more difficult to render correctly.
This doesn’t mean that scenes won’t be rendered well after a longer render time, but it will take longer for the noise to be eliminated.
Unbiased basically means that a physically correct render result can be achieved if the render time is long enough. On the other hand there are the other two older renderers, the Standard and Physical Renderers, which are biased renderers. These renderers often work with simplified tricks, e.g., to minimize render times and memory use. These renderers don’t always achieve physically correct results. However, experienced artists can still achieve excellent, convincing results.
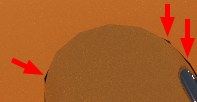
If such artefacting occurs in reflections and refractions (in this example on a low-res cylinder), increase the subdivision. The same issues - with the same solution - can occur where directly lit regions neighbor shadowed regions.
The following list does not necessarily include all points (individual elements that are not supported are grayed out or not available if ProRender is activated in the Render Settings).
- Team Render, stereoscopic rendering, Multi-Passes, volume rendering (Hair, Sketch and Toon, PyroCluster), Thinking Particles and Material Override are not supported.
- Only Cinema 4D standard materials are supported (i.e., no materials created using the Material Manager’s Create/Shader function).
- Material Nodes cannot be evaluated natively by ProRender (see also Hinweis).
- Anisotropic, Irawan (Woven Cloth) and the Legacy modes in the Reflectance channel are not supported. The Layer Sampling settings are not supported.
- Absorption in the Transparency channel is not supported.
- The Bump channel’s Parallax effect is not supported; in the Normal channel, only the Tangent Method is supported; only a portion of the Displacement channel’s SubPolygon Displacement settings is supported. Displacements can end up looking a little different from that of other renderers.
- The Illumination channel’s settings are not supported (these are the GI settings from the Standard Renderer).
- The Material tag’s Add Material option and assigning materials to only one side of a polygon (both sides will always be textured) is not supported. Texturing per Polygon Selection tag in conjunction with Render Instances is not supported. Camera and Frontal mapping are not supported and only one UVW tag (the first) per object will be evaluated.
- Only the most important Compositing tag options are supported, which let you make the camera invisible and add or remove transparency, refraction and reflection per object.
- In the Render Settings: Multi-Passes, like most Post Effects, are not supported. Field rendering does not work.
- ProRender has to convert very many 2D bitmaps (most shaders don’t run natively on graphics cards) in order to process them. This works better for some shaders than for others. Shaders that don’t use UVs (e.g., 3D noise), several that depend on the angle of view (e.g., Thinfilm), that require light (e.g., Chanlum, Subsurface Scattering), that require scene data (e.g., Variation and other MoGraph shaders) and those that are calculated during rendering (e.g., Ambient Occlusion) will not deliver satisfactory results (wee also Texture Size X in conjunction with settings for converting these shaders to bitmaps). Bitmaps are not cached, they are created new for each rendering, which can require a lot of time. These shaders are not affected because they are rendered using the graphics card: Color, Bitmap, Tile, Normal Direction, Noise (only 2D modes), Gradient (only 2D modes) and Fresnel.
- Noise shaders are rendered in detail differently than with the Standard or Physical Renderer. The various noise types still maintain their typical characteristics but are not identical when rendered.
- The material preview (e.g., in the Material Manager) is created by the Standard Renderer and can only be used as an approximation of the rendered result when using ProRender.
- Baking with ProRender is not supported.
- The camera doesn’t support the following: stereoscopy, lens distortion, vignetting, chromatic aberration or the older manual depth of field for depth passes.
- The light source does not support the following: Square Spot, Parallel Spot, Square Parallel Spot, the disabling of shadows per light, volumetric light, almost all settings in the Spot lights’ Details menu (except for the Area light size and several other settings specific to Area light settings), the Shadow tab’s settings, caustics, noise, lenses. In addition, the Ambient Illumination, material color, Specular, GI Illumination and Separate Pass options in the General menu have no function.
- Note that ProRender reacts somewhat more sensitive to polygon Normal rotation than the other renderers. If you experience unexplainable render results, double-check the Normal orientation.
- The following elements are not supported: Floor object, Background object, Foreground object, Environment object, Physical Sky and the rendering of certain Compositing tag settings.
- There are a series of limitations for the Sky object: Material tag settings for the sky (the sky itself can, of course be rotated), Compositing tag, stacking of materials, blend modes, and material channel combinations (except for the Layer shader) are not supported. Only 1 Sky object will be evaluated in a scene.
- The render results will not be identical to the Standard Renderer’s results. The basic working principles are simply too different.