Shader Properties

The properties outlined in the image above should already be familiar to you, as they have all been previously described. The functionality is also the same as previously described.
The following three properties / settings are new: Alpha Depth, Shadow Transparency and From Hair materials. The effect of Alpha Depth and Shadow Transparency will only be visible if the shader itself has been loaded into a Cinema 4D alpha channel. This will also allow you to render an alpha channel for the Polygon Hair.
This gradient defines the color of the hair along the entire length of the hair. The left end of the gradient represents the hair root, the right the tip.
The effect of this setting remains very understated and can best be seen when the hair tangents run in the direction of the line of sight, e.g., when looking at a parting in hair from the top. Diffuse hair shading does not function like Phong shading in that it utilizes surface Normals - diffuse shading of hair utilizes the hair tangents. If you look at a parting from the top, the hair tangents basically run towards you; this means the maximum amount of darkening at the base of the parting will be visible to you (this is the result of Diffuse shading of hair when a diffuse value greater than 0 is used). Use the Diffuse setting to adjust this effect.
Load the texture here that you want projected onto each individual hair. You can find more details regarding this here.
![]() Primary Specular
Primary Specular
Use this slider to adjust the strength, and therewith brightness, of the specular highlight. The lower the value, the more dull the hair will appear.
The Sharpness slider controls the spread of the specular highlight. Tip: You can enter a value greater than 100% for most Specular settings. Setting Strength and Sharpness to greater than 100% can be especially helpful in achieving really snappy specular highlights.
You can also get sharper specular highlights by deactivating Vertex Sampling in the Render Settings menu (Hair Render / Render Tab). This will, though, result in longer render times.
Here you can load a texture or shader to that will define the specular color along the length of the hair.
A good gradient to use is the 2D-V type – this gradient will run over the entire length of the hair.
![]() Secondary
Secondary
Strength [0..10000%]
Sharpness [0..+∞]
Texture
These are the settings for the secondary specular highlight. These settings behave just like the ones just described for the primary specular highlight.
![]() Illumination
Illumination
Roughness [0..100%]
Variation [0..100%]
Roughness has its strongest effect on specular highlights and reflections. The higher the Roughness setting, the more the light will be distributed amongst the hair and the more dull the hair will appear.
Use the Variation setting to randomly vary the amount of roughness within the Roughness channel.
Reflectiveness [0..100%]
Translucence [0..100%]
Although these are two separate settings, they actually belong together: Reflectiveness defines the intensity with which the hair is lit from the front; Translucence defines the intensity with which the hair is lit from behind, whereby you can determine how much light should pass through the hair from behind.
Each slider is basically a brightness regulator for its corresponding effect.
If Translucent is set to 0, the hair will appear very dark if lit only from behind.
Use this setting to define the degree of shadowing of the polygon hair.
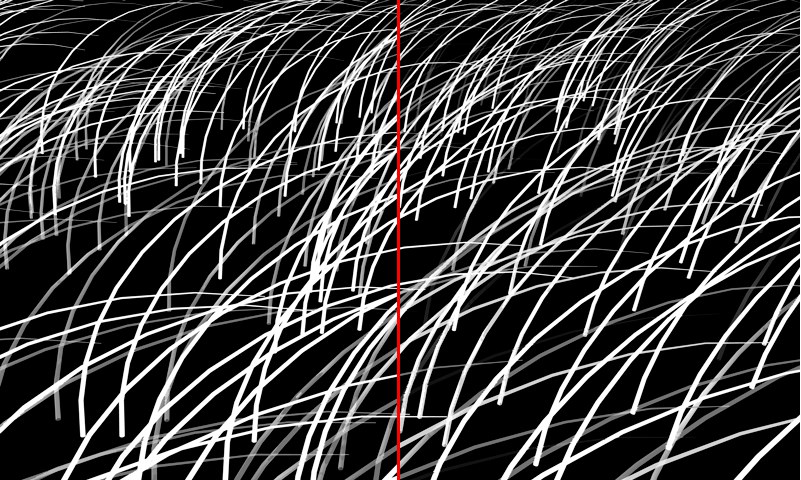 An alpha channel applied to Polygon Hair. Left: Alpha Depth = 2. Right: Alpha Depth = 4.
Alpha Depth partially simulates Polygon Hair transparency by varying the alpha values within the hair. If, for example, you enter a value of 3, the hair will be divided into thirds. Each third will have a different alpha value applied to it. Hence, a value of 4 will result in four equal parts, each with a different alpha value, and so on.
Use this slider to define the shadow strength of the more-or-less transparent Polygon Hair. The greater the value, the more transparent the hair will be.
If you should want to render Polygon Hair that should only be made polygonal during rendering (i.e. you don’t want to convert them with the c-key), you can apply the Hair shader to the Hair object. All relevant (real) Hair material properties will be assumed by the shader. Deactivate this option if you want to make additional changes.