Illumination
The Illumination tab controls how the illumination affects the rendering of the strokes.
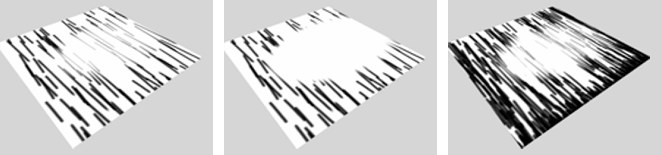 From left to right: Large threshold; small threshold; incl. several shading layers.
 Show Dark Strokes
Show Light Strokes
Enable these options to switch on dark stokes and light strokes.
In general, the higher you set this value, the more strokes you get in dark areas and the less faded the hatching looks. It works by overlaying layers of strokes (the Shade Levels value defines the number of layers), where each layer is more and more affected by the illumination.
The Threshold controls how quickly the strokes fade out. See the examples above.
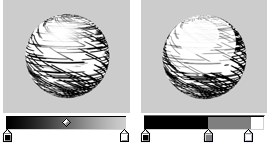
Enable the Shadows option to take shadows into account. The Shadow gradient affects the brightness of shadows, from areas of full shadow (left end of gradient) to areas of no shadow (right end of gradient).
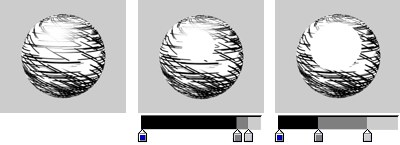
If Lights is enabled, the Diffuse gradient controls the brightness value of the hatches, from areas in total darkness (left end of gradient) to areas which are fully lit (right end of gradient).
If you want the lights to generate specular highlights, enable this option. The Specular gradient controls the color, width, height and falloff of the highlights, from areas of no specular (left end of gradient) to areas of full specular (right end of gradient).
To apply a bump map to the shader, enable this option and define the bump mapping on the material’s Bump tab as you would for a normal material.
Enable the Camera option to use the camera as a light source.
This makes the Hatch shader work in a similar way to the Spots shader. The strokes will have their contrast adjusted to give the impression of larger or smaller strokes depending on the brightness of the illumination.
Lights
Illumination
Use Lights
Lights
To use the lights in the scene as light sources, enable the Lights option. To use the illumination of each light (not just its direction), enable the Illumination option — the Illumination gradient remaps the illumination from no illumination (left end of gradient) to full illumination (right end of gradient).
By default, all lights in the scene will be used as light sources when Lights is enabled. To include or exclude specific lights, set Use Lights to Include or Exclude and Drag & drop the lights into the Lights box.