The Environment
In this area of the Scene Manager, you can control the physics-based sky simulation, which can be used to implement realistic sun positions and corresponding sky representations, including clouds. This also automatically calculates the corresponding lighting.
Here you will also find a control option for the intensity of conventional light sources in the scene.
Quick Navigation
Configuring the Environment
In this section, you will find an option for creating a sky simulation that not only displays the sky at a customizable time, but also provides the appropriate lighting for your scene (see 2 in Figure 1). There is also a Intensity master control for all light sources in the scene (see 1 in Figure 1). Values above 1 increase the overall brightness of the light sources beyond their actual settings. Values below 1 reduce the actual brightness of all light sources accordingly. This makes it easy to customize the overall brightness of your scene without having to edit all light sources individually.
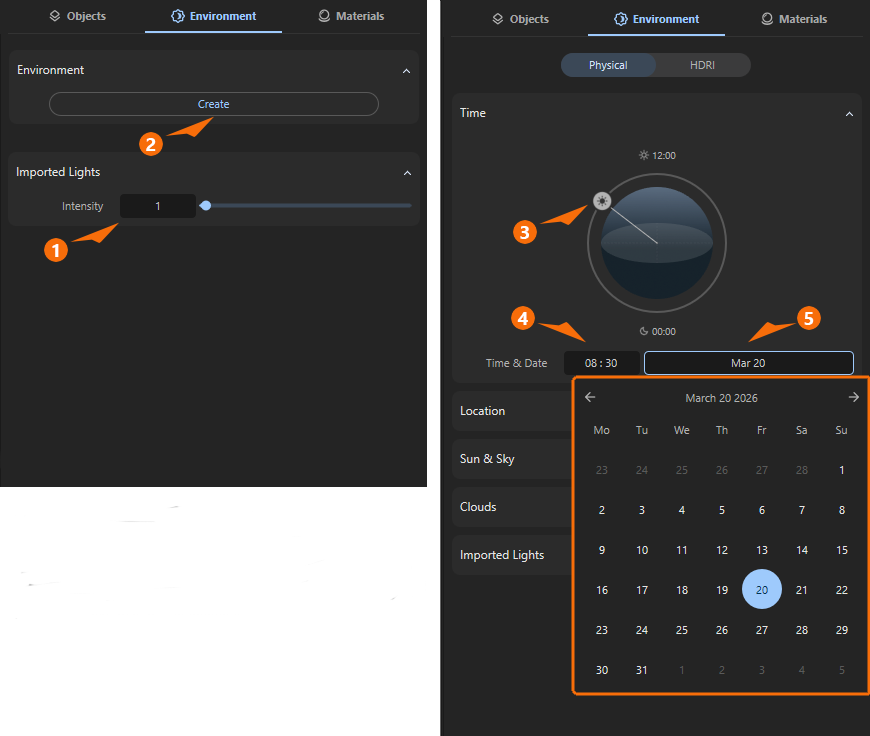
To add a sky to the scene or to illuminate the scene with a loaded HDR image and use it as the environment, use the Create button in the Environment category (see 2 in Figure 1). This will bring up the settings for configuring the sky display (see the right side of Figure 1).
Physical Environment
Let's first look at the configuration of a sky, which is done in the Physical setting (see option in the header area of the Environment category).
Time
The most basic setting for the sky is certainly the time of day to be displayed. The time can be selected either as a numerical value (see 4 in Figure 1) or directly by clicking on the symbolic representation of the sun's path (see 3 in Figure 1). Of course, the resulting position of the sun also depends on the season, which can also be selected by choosing a month and a day. Clicking on the field for day and month (see 5) opens a calendar (see colored frame in Figure 1), in which the desired month can be selected using the arrow icons and the day by clicking directly on the day number in the calendar sheet.

Location
By default, the sky is calculated so that North corresponds to the positive Z-axis of the world axes. This means that East lies in the direction of the positive X-axis of the world system. Depending on the orientation of your buildings, however, the North direction of the sky can also be customized so that the position of the sun perfectly matches the orientation of your buildings. Use the North Offset value for this correction. Positive values rotate the north direction clockwise, i.e., in the direction of the X-axis, or East. Negative values rotate the sky counterclockwise. The north direction can then be more westerly, for example.
The calculation of the Clouds is not based on the North Offset. They remain static even if North Offset is changed.
Since the position of the sun also depends on the location—at the same time, the sun is in a different position in the northern hemisphere than in the southern hemisphere, for example—the desired location can also be specified using Latitude and Longitude.
Some host applications offer their own input options for GPS data, which you can use to specify the desired location. In such cases, the input options for Latitude and Longitude remain grayed out here and cannot be configured independently of these specifications.
With Latitude you can enter the desired location for the geographical latitude on the Earth's surface. This would, for example, be 51,3° for London, 40,5° for New York or 35,4° for Tokyo. Latitude is the angular distance of a point north or south of the Earth’s equator, measured in degrees from 0° to 90°. Using the attached menu, you can select N or S to specify whether the value is desired from the equator towards the north or south. The three values offered represent Degrees, Minutes, and Seconds (0°, 0', 0'') from left to right, typical units used in navigation and for position information on maps.
Longitude is used according to the same principle, except that it refers to the position component in an easterly or westerly direction, depending on whether E or W has been selected. The starting line for this angle measurement runs through the London borough of Greenwich (United Kingdom) and its Royal Observatory.
Sun & Sky
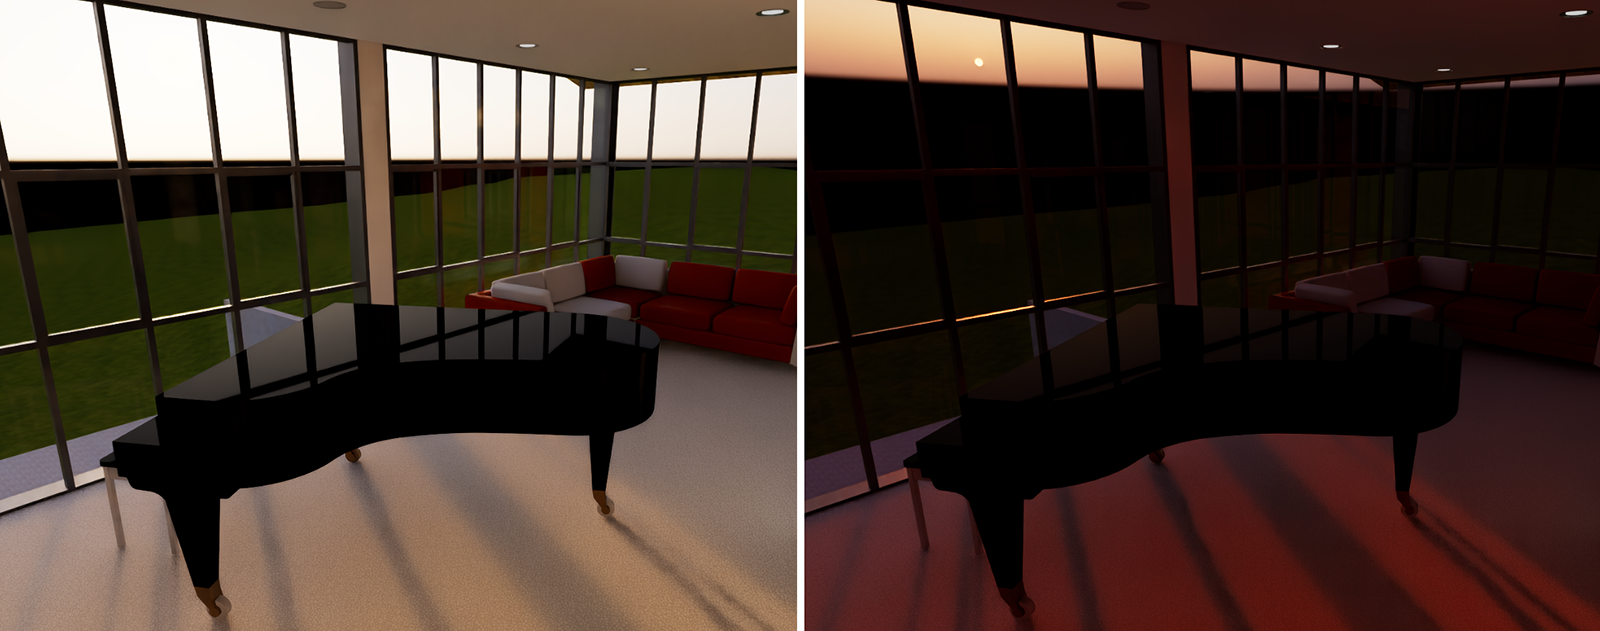
The sunlight source is already calculated realistically by default. You can only intervene here with the Sun Intensity value if you want to artificially intensify or weaken the sun.
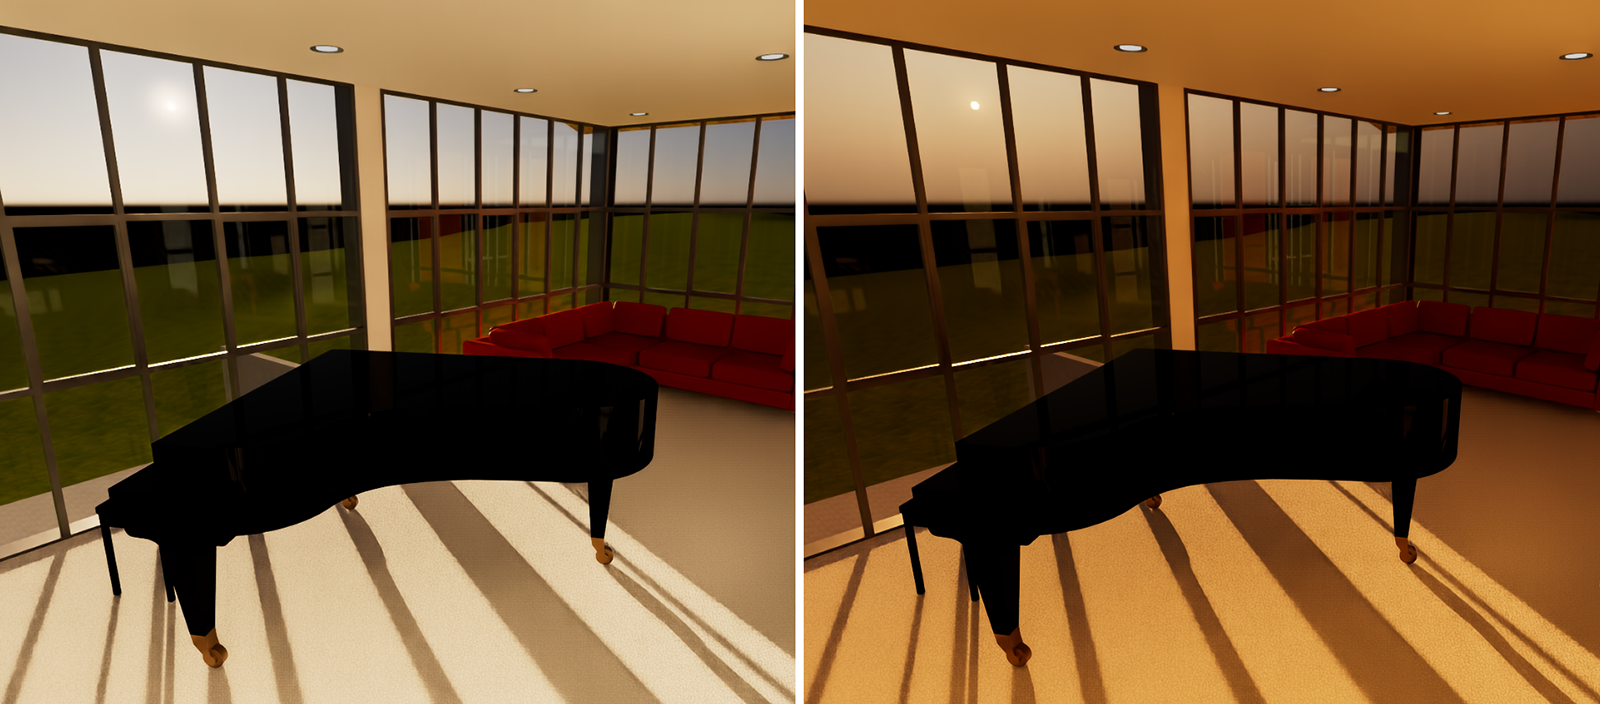
Part of the sunlight is automatically scattered in the simulated atmosphere and will therefore also hit your objects diffusely. This scattered light component can be adjusted using the Sky Intensity value. Please note, however, that the intensity of the sky lighting always depends on the intensity of the sunlight. If you increase the Sun Intensity, the light scattered in the atmosphere will automatically increase as well.
It should also be noted that sunlight generally has a warmer light color, which can appear yellowish. The light scattered in the atmosphere and reflected back onto the scene from the sky, on the other hand, is often cooler, i.e., bluer. Therefore, it is normal that when you increase the sunlight, the scene often appears in warmer colors. When you increase the sky light, however, the surfaces can appear cooler.
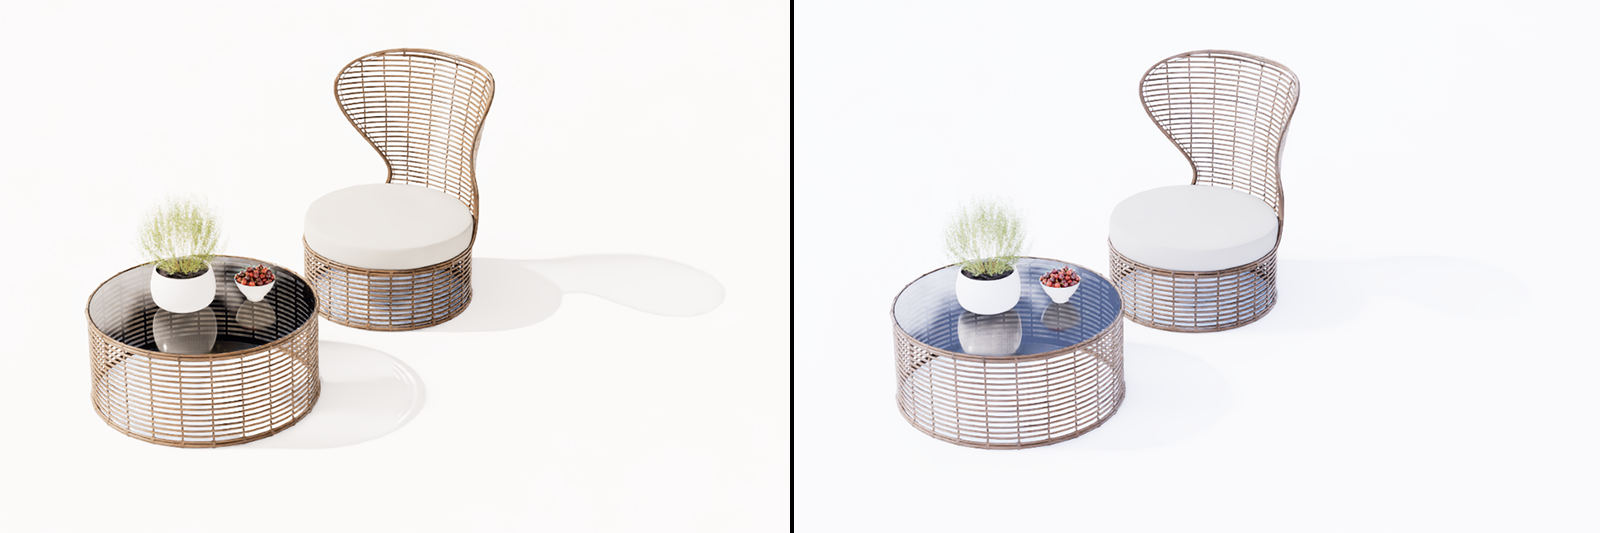
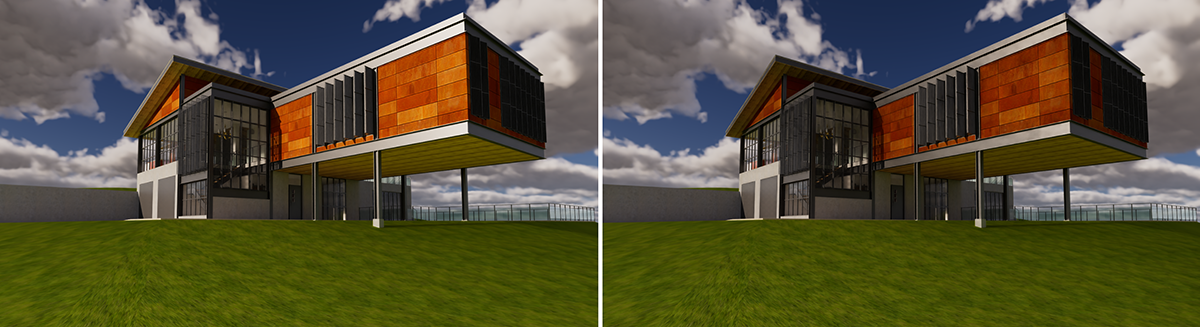
Note in Figure 4 how the stronger Sky Intensity also intensifies the sky reflections on the materials, especially on the glass tabletop in this scene.
Please note that exposure compensation is applied to the camera by default. This prevents the usually undesirable burning out of brightly lit areas. On the other hand, this also means that individual changes in the light intensities of the sun and sky may not be as visible as the pure numerical values suggest. If you want to take full control of the brightness in the scene lighting (and are willing to accept overexposure if necessary), turn off the Auto Exposure option in the Navigation & Camera settings.
More
In this subgroup, we find special settings for defining the atmosphere and its light scattering, as well as the night sky.
-
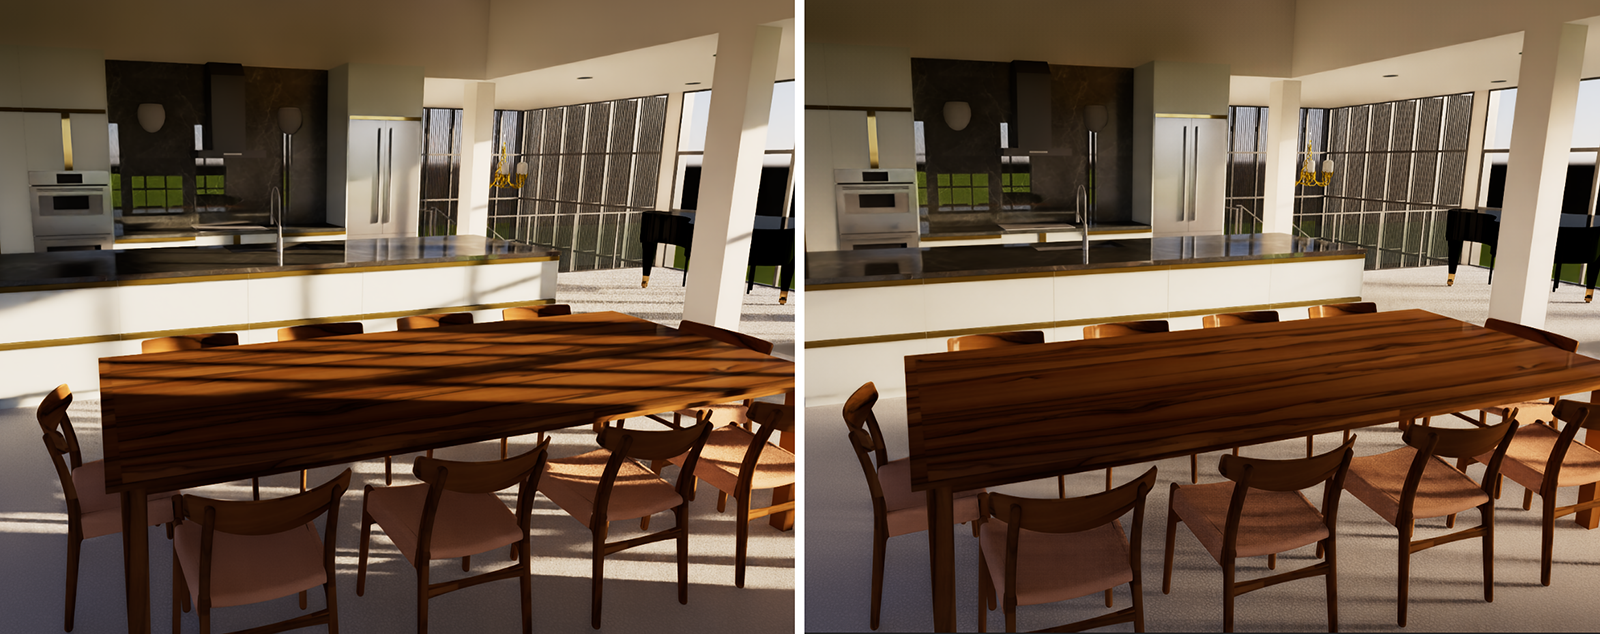
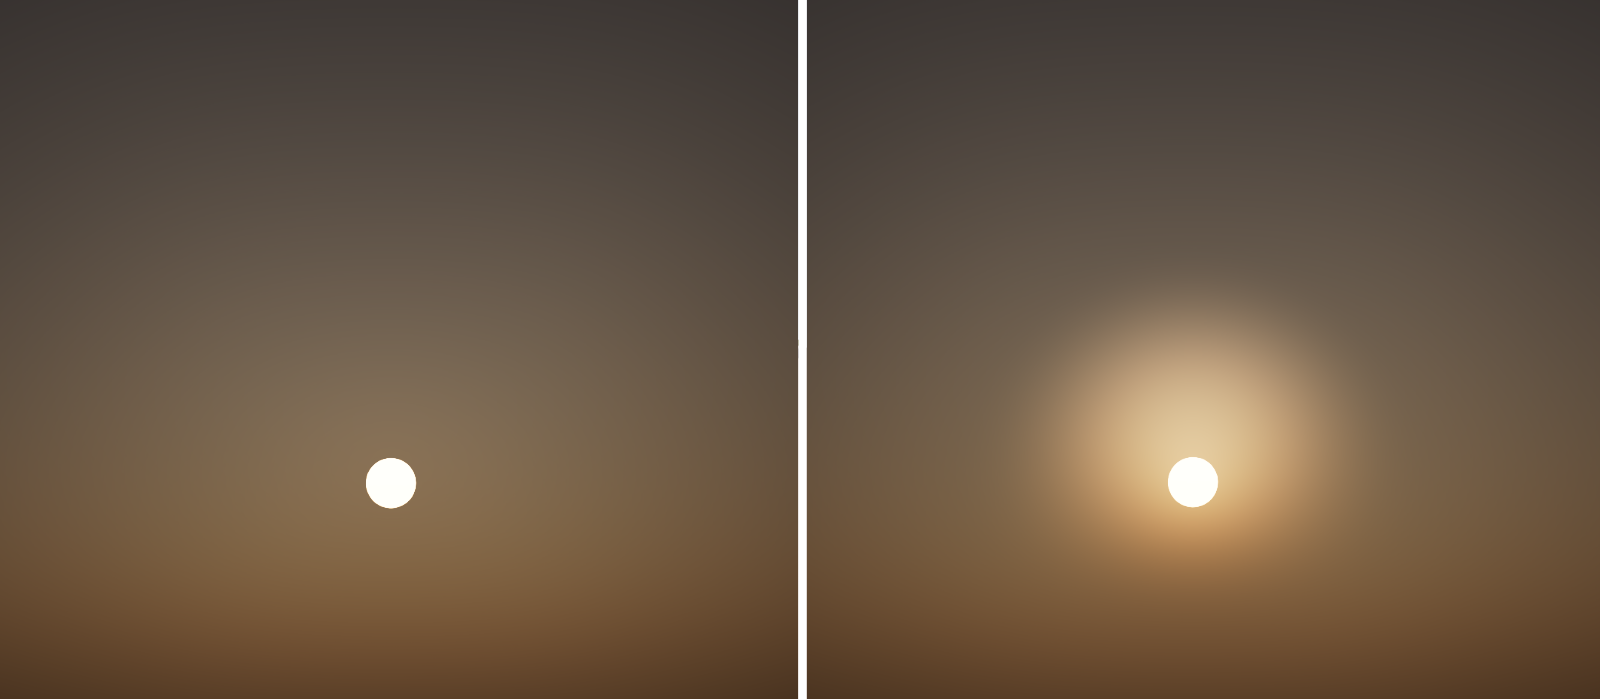
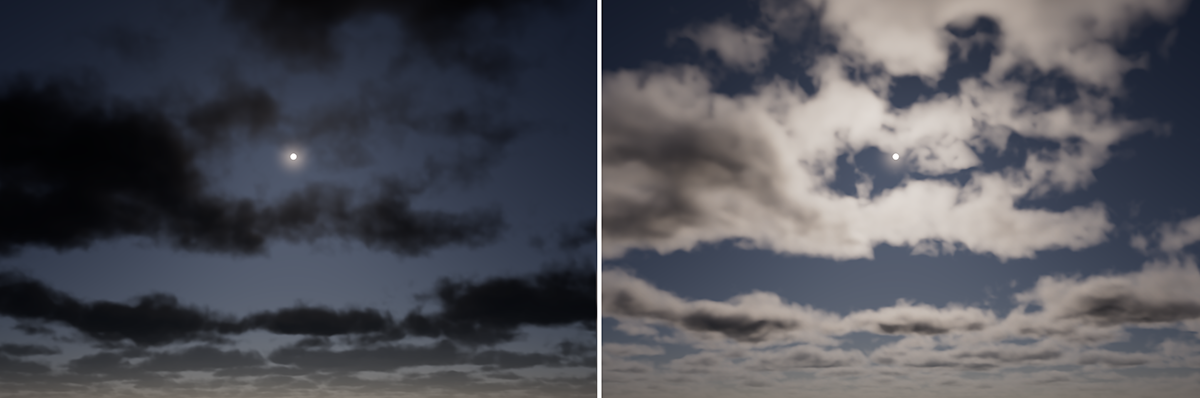
Disk Radius refers directly to the visible size of the sun. Its size also affects the quality of the shadow calculation of sunlight. A small sun can create very harsh and therefore natural shadows, while an enlarged sun surface creates soft shadows, as are typical on cloudy days (see Figure 5).
-
Glow simulates additional scattering of sunlight around the position of the sun. This visually enlarges the sun, which can also lead to softer shadows without having to change the actual sun disk. In addition, the effect simulates a slight haze or increased moisture content in the lower atmosphere..
-
Color is multiplied by the sun color calculated based on the position of the sun to individually color the sunlight. When using a white color, the originally calculated brightness and color remain unchanged. On this page you can learn about how to use this color field, the color picker and all available color adjustment settings.
Keep in mind that any color other than white will also reduce the brightness of the sunlight.
-
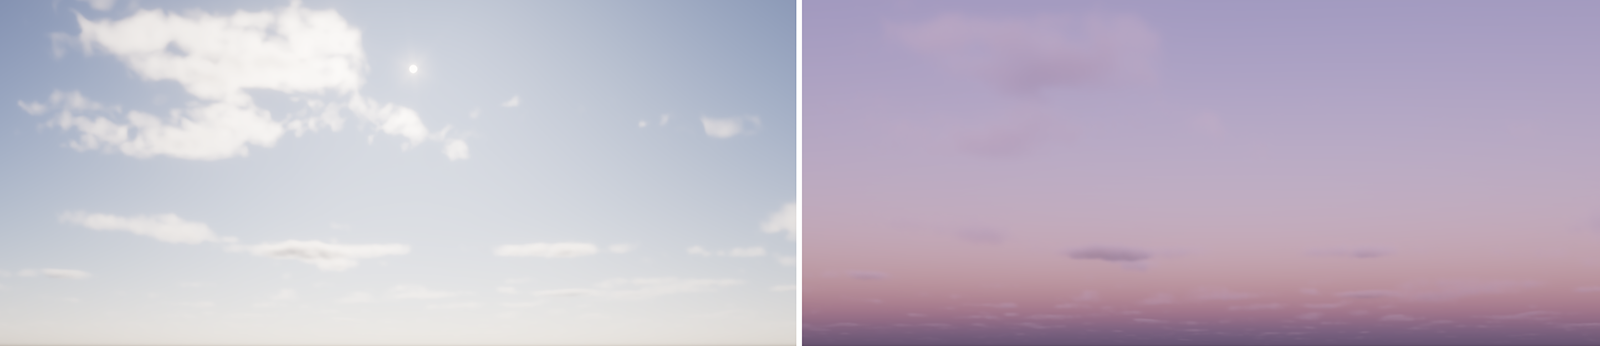
Turbidity describes the haziness of the air to simulate dust and pollution. Low values represents a clear, blue sky, while higher values make the sky a dirty, orange color.
-
Horizont Height allows you to individually correct the position of the horizon. With values above 0, the horizon can be shifted further upward, reducing the sky area accordingly. This allows sunsets to be visualized even when the sun is higher in the sky.
-
Ground Color specifies the uniform color to be used for the entire sky area below the horizon. Normally, the lower hemisphere of the sky is likely to be obscured by your ground plane or terrain, for example, but this color is still useful for filling any gaps between your ground elements and the horizon.
-
Saturation can be used to enhance or reduce the colors of the sky.
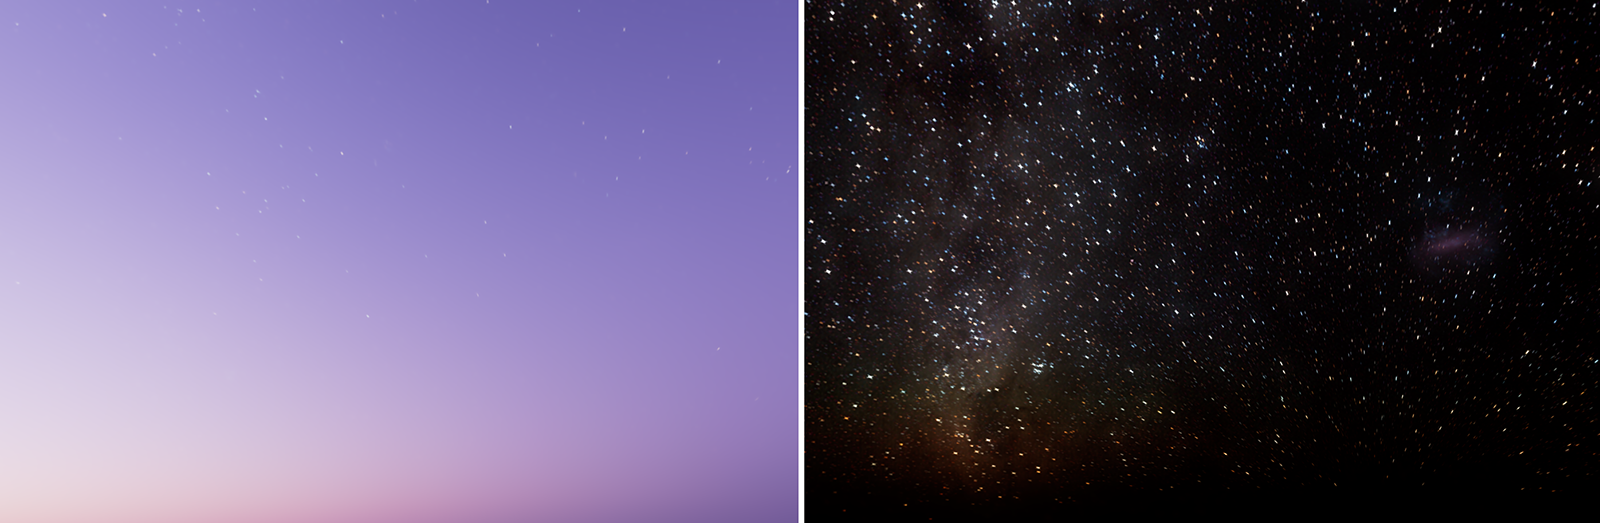
The following settings primarily affect the display of the sky after the sun has set. Even at night, the sky does not have to remain plain black and dark, but can be enhanced with realistic stars, a moon, or even a visualization of the Milky Way nebula, allowing for a realistic display even at these times of day.
Keep in mind that the representation of the moon in particular follows natural cycles, and its visible shape and position in the sky also depend on the date and time. In addition, stars and the moon can also be made visible during the day if their intensity is artificially increased or the intensity of the sky is artificially reduced.
-
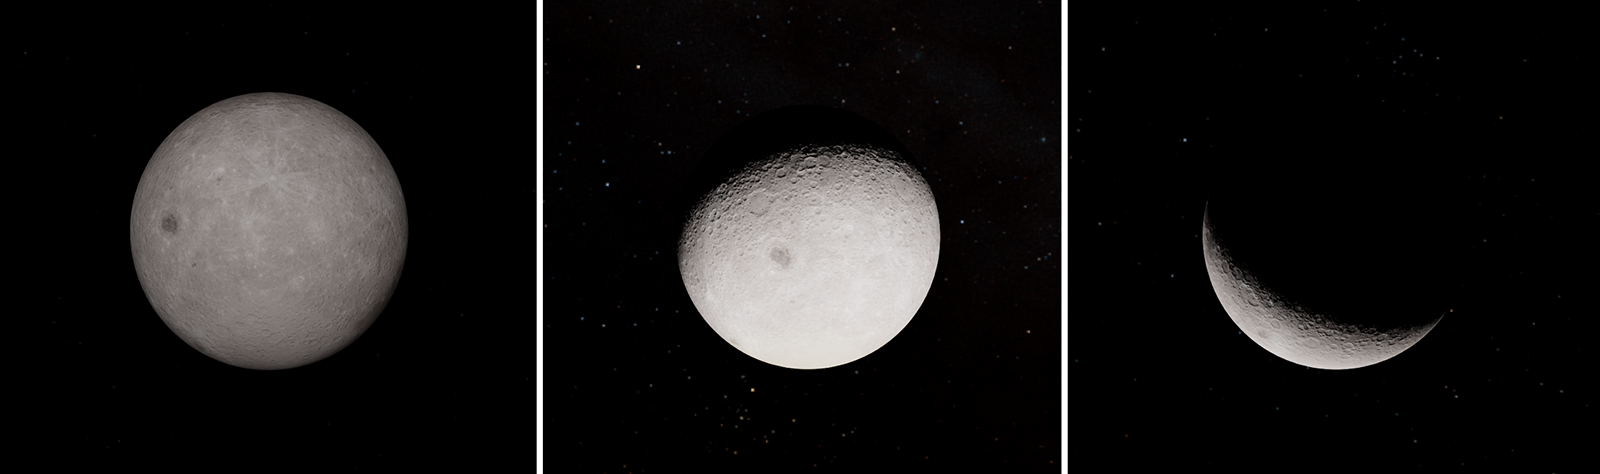
Moon Intensity scales the brightness of the moon. Keep in mind that the brightness of the moon depends on the luminosity of the sun and also on the phase of the moon. Since the calculation of the moon's illumination by the sun follows natural cycles, the moon may also appear only as a crescent or, in some cases, completely darkened by the Earth's shadow, regardless of the intensity selected here.
-
Moon Radius also allows you to scale the moon display individually. This allows you to view detailed craters on the moon even when zoomed in (see also the examples in Figure 9). Otherwise, simply leave the value at 1 for a realistic display.
-
Star Intensity scales the brightness of the stars. This can also be used, for example, to make stars visible in the sky at dusk by brightening them (see also Figure 10).
-
Milky Way Intensity enables an additional display of the colored nebulae of the Milky Way, as can be seen on extremely dark and clear nights. However, this view usually remains hidden from us and can therefore be left turned off with a value of 0.
Clouds
This section contains parameters for configuring, adding, and automatically animating clouds. These are automatically colored and illuminated to match the position of the sun, thus completing the realistic sky display.
When you use a Stored View within the Storyboard Manager, you can also configure the speed and direction of movement of the clouds in the sky for the animation output.
-
The Load and Save buttons can also be used to save the current settings for the clouds so that they can be quickly used in other projects, for example.
-
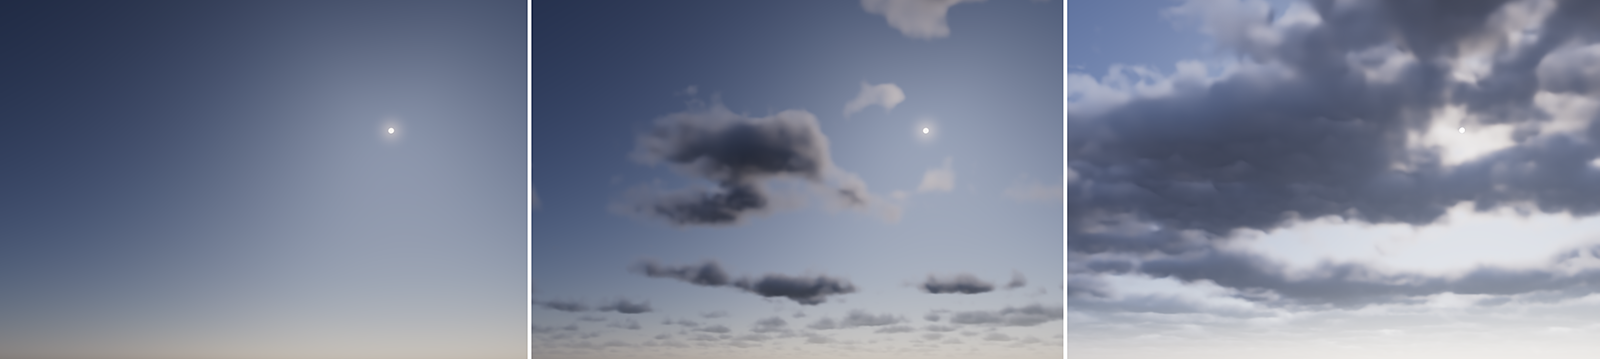
Coverage controls the amount of clouds in the sky. At 0%, we get a perfectly cloudless sky, whereas at higher values, the sun, moon, and stars can be completely hidden (see Figure 11). The lighting of the scene under this sky changes accordingly. For example, clouds can also cast shadows on their objects (see Cast Shadows option).
-
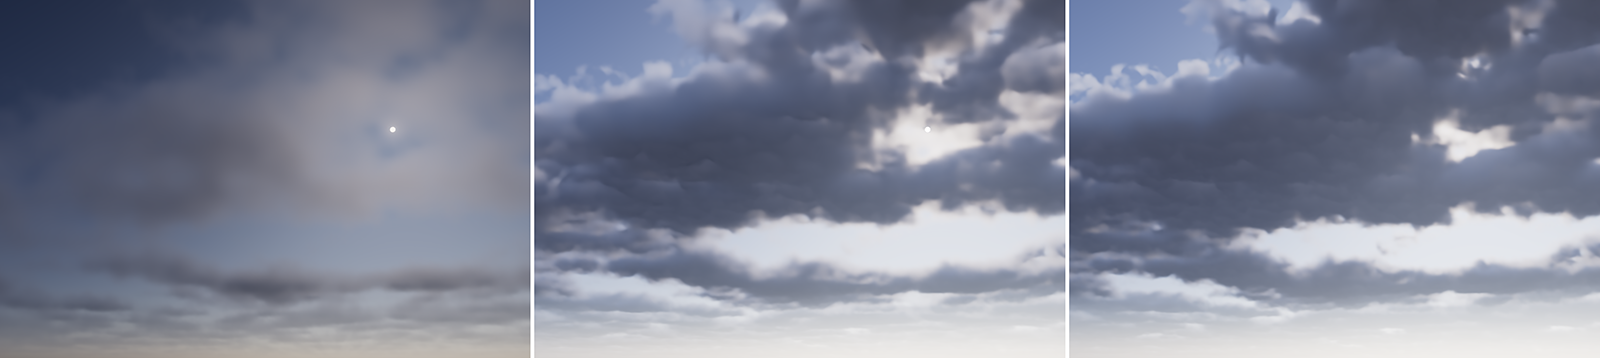
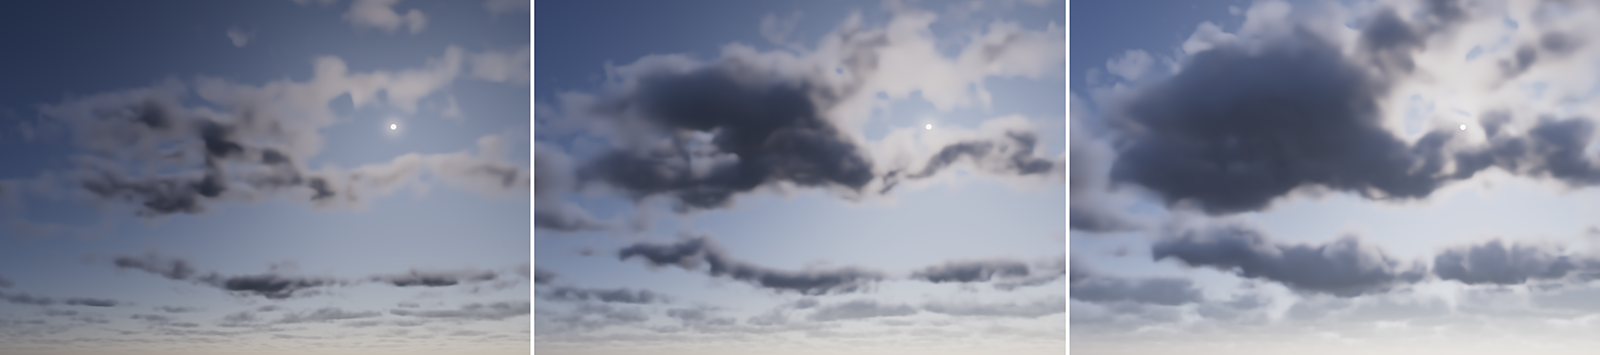
Density Density allows you to select the liquid content of clouds. This allows you to display foggy and translucent clouds or even massive storm clouds (see Figure 12). In this context, also note the Thickness value, which also affects the opacity of clouds.
-
Altitude can be used to set the desired height of the cloud cover. The video above gives an example of this effect. This allows you to adjust the distance of the clouds above the horizon or move a gap in the clouds above the sun without having to change the other settings.
-
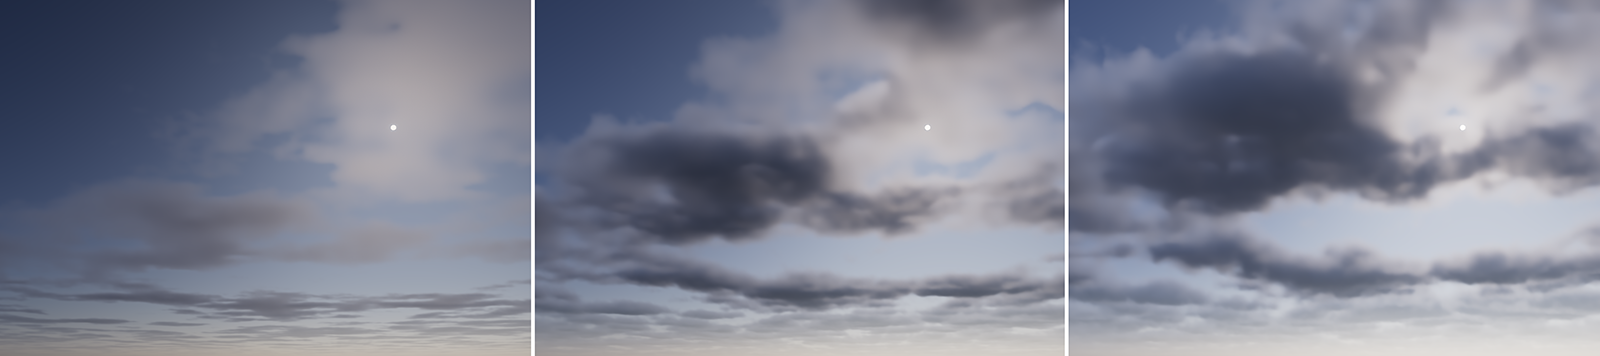
Thickness can be used to influence the volume of the clouds (see Figure 13). Simply imagine this as the height range above the set altitude in which the clouds can spread. A small thickness therefore generally makes the clouds look more like veil clouds. With larger values, more clouds become visible and become more opaque in their representation.
-
With Shape, you can individually reduce the size of the clouds and add additional gaps (see Figure 14).
More
By opening this category, additional settings become visible that can be used to influence the random calculation of the clouds. In addition, settings can also be found here to adjust the direct and indirect lighting of the clouds by the sun and the sky.
-
Like all random calculations, cloud calculations are based on a Seed value. Changing this value results in a new cloud distribution and also changes the shape of the clouds. So if you are not satisfied with the clouds, try a new Seed value to create a new variation. The same Seed always produces the same clouds if all other cloud parameters remain the same.
-
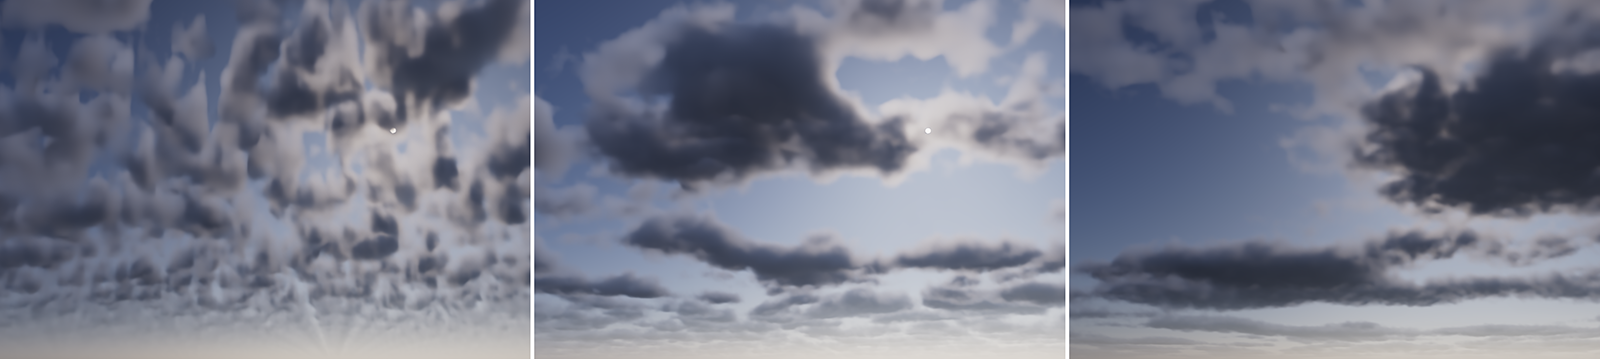
Scale refers to the noise pattern used to calculate the clouds. With a small Scale, all clouds become smaller and the underlying pattern becomes more prominent (see also the examples in Figure 15). Conversely, a larger Scale value leads to the scaling of individual cloud structures, which can result in individual, connected clouds covering larger sections of the sky.
The following Lighting settings determine how the clouds react to direct sunlight and to ambient light. There is also an option here to choose whether the clouds should cast shadows or allow light to pass through unhindered.
-
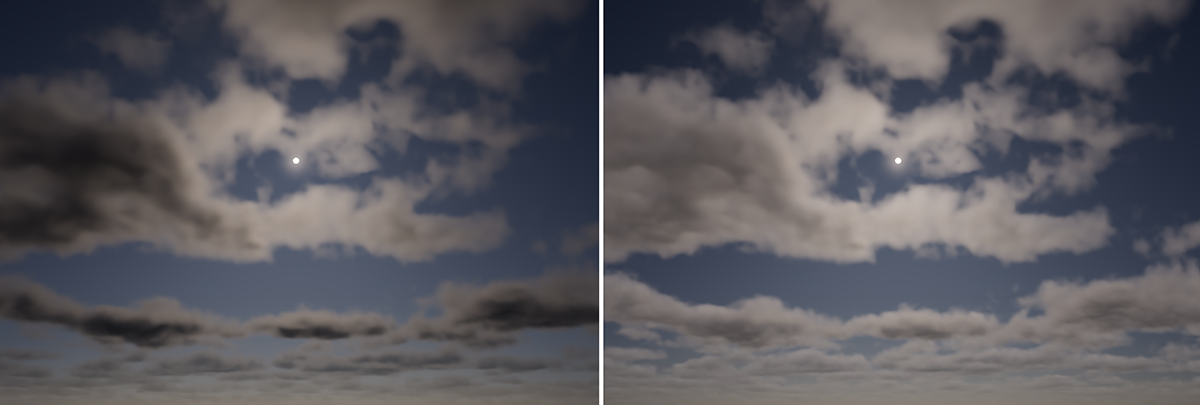
Direct controls how clouds react to sunlight. A higher Direct value allows sunlight to penetrate deeper into the clouds, making them appear less voluminous and brighter overall (see examples in Figure 16).
-
The Ambient light component simulates sunlight that is reflected by the Earth and then hits the clouds again from below (see Figure 17).
-
With Cast Shadows, you can determine whether sunlight can be blocked by clouds in front of it or whether the sun can also illuminate the scene through clouds. When this option is enabled, the clouds cast shadows on the objects in the scene.
HDRI Environment
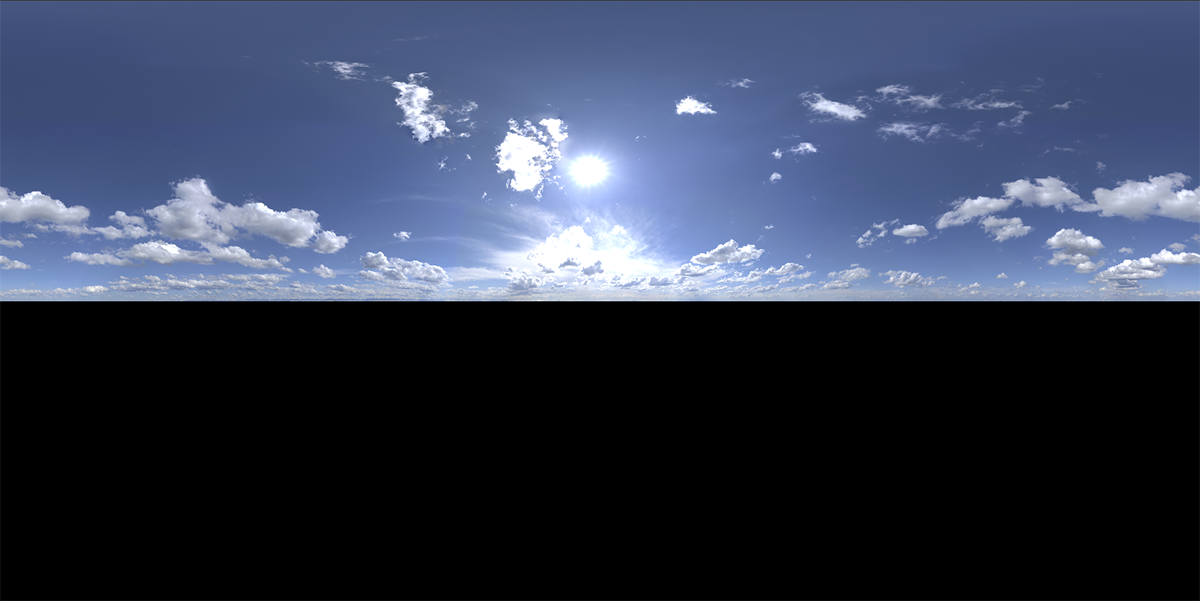
HDRI mode provides a second option for lighting and displaying environments by allowing HDRI files to be loaded. These files usually represent a spherical panorama. Since these files are often generated from real photographs, in principle any environment and its lighting conditions can be captured and used to illuminate 3D scenes. Sky panoramas are usually used for outdoor scenes, with the upper half of the image depicting the sky between the horizon and the zenith. The lower half of the image often remains black, as in this HDRI example.
HDRI files are available for direct access in the Library Browser, or you can use a file loaded from other sources that is already on your hard drive. As you can see in the following Figure 20, the button marked by 1 opens a filtered version of the Library Browser that shows all the HDRI assets that can be directly selected by double clicking on them. Using the button marked by 2 a file dialog allows to load any HDRI file from your computer.
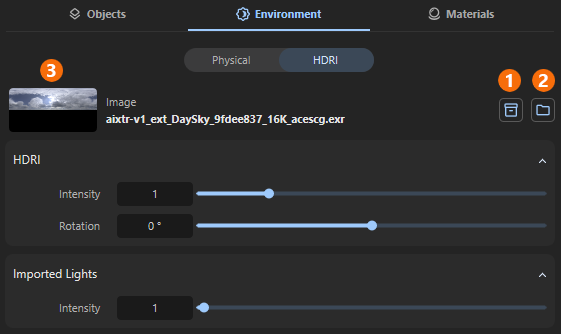
A preview image of the loaded HDRI will then be displayed on the left side along with the corresponding file name (see 3 in Figure 20). When loading HDRI files via the file dialog (see button 2), please note that you will be asked how you want to handle this file during the loading process (see Figure 21).
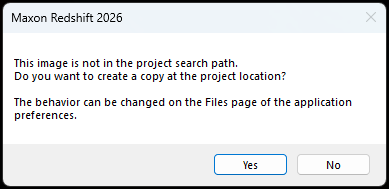
Optionally, an absolute path to the HDRI can be used (option No). However, this carries the risk that if the HDRI is later moved to another directory or even deleted, the environment in your scene will no longer be able to find the HDRI. It is safer to confirm the warning dialog with Yes. A copy of the selected file will then be automatically copied to the same directory where your project file is located. This also makes it easier to archive and share the entire project and minimizes the risk of losing files that are in use.
As already mentioned in this warning dialog, the general behavior when loading external files can be specified directly in the Preferences, e.g., if you generally want files to be copied to the project directory.
HDRI
-
Intensity simply controls the amount of light generated by the HDRI to illuminate the objects. It also controls the visual brightness of the HDRI for the camera to the same extent. You might have to disable Auto Exposure in the Navigation & Camera settings for more creative control.
-
Rotation allows you to rotate the HDRI horizontally. This is often useful, for example, to correct the position of the sun as desired or to move clouds to a different location for creative reasons. Keep in mind that, especially with HDRIs that contain a visible sun, Rotation also affects the shadows cast by sunlight (see video below).
Imported Lights
This section contains only a single slider for the Intensity of the regular light sources in the scene, as passed by the host application. The Intensity slider acts as a multiplier for the strengths of the scene's regular light sources. Values above 1 increase the brightness of these light sources, while values below 1 reduce their brightness accordingly.