The Add Tool
This tool makes it easier to add and place individual instances of an object selected in the Asset Library. Activating the Add Tool automatically opens the Asset Library on the left-hand side if it was still closed. Simply select the object you want to add to your scene from the Library by clicking once on its preview image, then move the mouse pointer over the viewport.
If the selected asset has never been used before, it must first be downloaded from the cloud, which may take a few seconds depending on the complexity of the element. The asset object will then appear directly at the mouse pointer and can be added with every left-click of the mouse.
If you just want to add one copy of an asset instead, you can simply double-click on the corresponding object in the Library and then use the Move Tool to place and it in the viewport.
Quick Navigation
- Add Tool Settings
- Adding one Asset Object to the Scene
- Adding multiple Object Instances to the Scene
Add Tool Settings
-
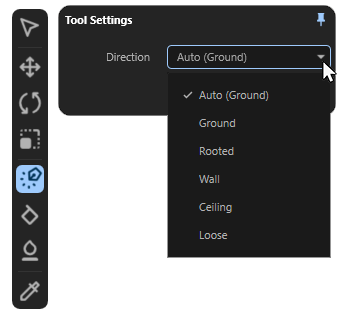
Placing the Asset instance: A preview of the selected asset automatically follows the movement of the mouse pointer and already takes into account the settings that can be viewed by right-clicking on the Add Tools icon (see the following illustration). However, the actual placement and creation of the asset instance in the scene only occurs when you left-click. Each subsequent left-click creates an additional asset instance at the current position of the mouse pointer.
The following settings can be selected to define the alignment of the placed object relative to the underlying surface or layer. -
Auto (...): In Auto mode, the tool automatically responds to the selected asset and its axis system alignment. In most cases, this results in an alignment relative to the underlying surface that matches the shape of the asset. You only need to switch to one of the following modes if you want to manually change this default alignment relative to the surface. The term in parentheses in the name of this mode indicates the mode automatically chosen for the selected asset.
-
Ground: The moving object automatically snaps to the XZ plane of the global axes system or to the surfaces that lie below the center point of the object axis system from the viewer's perspective. The object is automatically aligned so that its Z axis is always perpendicular to the surface or plane along which it is being moved.
-
Rooted: As in Ground mode, the moved object remains on the XZ plane of the global axis system or on the surface of the object that lies below it from the viewer's perspective. The moved object is aligned so that its Y-axis always points vertically upwards, i.e., parallel to the Y-axis of the global axis system. This mode is therefore well suited for placing street lamps or trees, for example, which are usually perpendicular to the horizon and not perpendicular to the terrain on which they stand.
-
Wall: As in Ground mode, the moving object remains on the XZ plane of the global axis system or on the surface of the object that lies beneath it from the viewer's perspective. The orientation of the moving object is corrected so that its XZ axes remain parallel to the underlying plane or surface. The Z axis points in the direction of the surface beneath the axis system.
-
Ceiling: As in Ground mode, the moving object remains on the XZ plane of the global axis system or on the surface of the object that lies beneath it from the viewer's perspective. The orientation of the moving object is corrected so that its Y axis is always pointing upwards, parallel to the Y axis of the world system.
-
Loose: This mode differs fundamentally from the modes above. While in the other modes the position of the axis system plays a role, as it is used directly as a reference system for snapping to surfaces, in this mode a bounding box around the geometry of the moved object is evaluated and then snapped to its base surface. This makes it possible to place objects even if the axis system is unfavorable, and it also compensates for minor unevenness on the surface where snapping occurs.
-
The Ignore Scatter option is useful if you want to add an object to a surface where other objects have already been scattered using one of the scatter functions. When Ignore Scatter is enabled, these scattered objects are ignored and the added object snaps only to the underlying surface. When this option is disabled, the added object can snap to all objects.
-
Correct the rotation of the placed object: As can also be seen in the video above, the rotation of the placed assets around their Y-axis can also be influenced by the Add Tool. To do this, hold down the left mouse button (to set the position of the object) and then move the mouse left/right or up/down. Please note, however, that after releasing the left mouse button, the tool is already preparing for the next placement. Subsequent corrections to the position or rotation of a placed asset should therefore be made by switching to the Move Tool. If only the rotation of a placed asset should be edited, use the Rotate Tool. FIxing the scale of a placed asset, use the Scale Tool.
Adding one Asset Object to the Scene
If you only want to place a single instance of an asset from the Library in the scene, simply double-click on the corresponding preview image in the Assets Library. The currently active tool is irrelevant. By default, the loaded asset appears at the origin of the global world system, i.e., at position 0,0,0. The final placement can then be made using the Move Tool, for example. This tool also offers automatic placement and alignment relative to other elements in the scene.
Adding multiple Object Instances to the Scene
If you need to quickly create and place many copies of an asset, the Scatter Brush Tool or Surface Scatter Tool is ideal. These tools allow you to cover large areas with individual pebbles or tufts of grass, for example, without having to place each element individually.
You can even select multiple assets at the same time and place them in random variations.