The Command Manager
![]()
All Cinema 4D commands, including all installed plug-ins, are listed in the Command Manager. From here, they can be integrated into your own command palettes, menus or directly as HUD commands in the editor. The keyboard shortcuts can also be assigned here.
In addition to all commands, tags can also be found in the Command Manager. This means that a specific tag can also be created using a keyboard shortcut or an icon in the layout. The same applies to the various export formats, e.g., FBX or Wavefront OBJ, which can also be called up directly.
In the following video you can see how commands are found via the search and dragged into a newly created palette. Existing commands in the layout can also be transferred. Finally, the pallet is docked.
- Keyboard shortcut: A key combination to quickly call up any command.
- Hotkey: A key that must be held down while moving the mouse (e.g., 1 to move the camera).
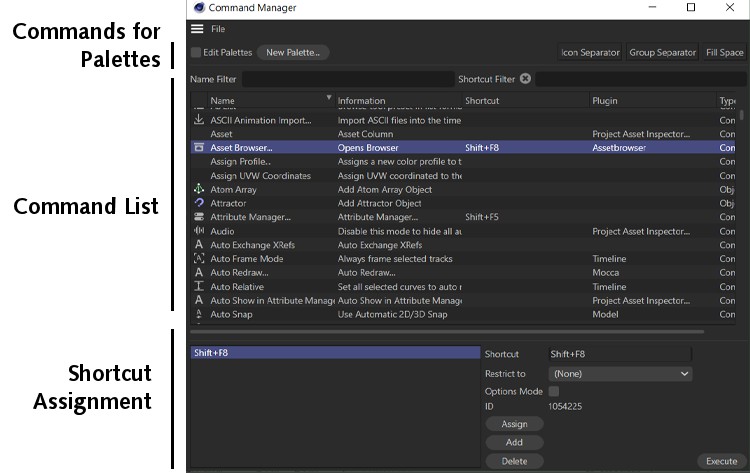
The Command Manager consists of three parts:
- The elements required to insert commands in palettes.
- The list of all commands, including two filters to keep the multitude of commands in check.
- The elements required for assigning keyboard shortcuts.
If you want to assign a command to a palette, simply drag and drop the corresponding command into the palette.
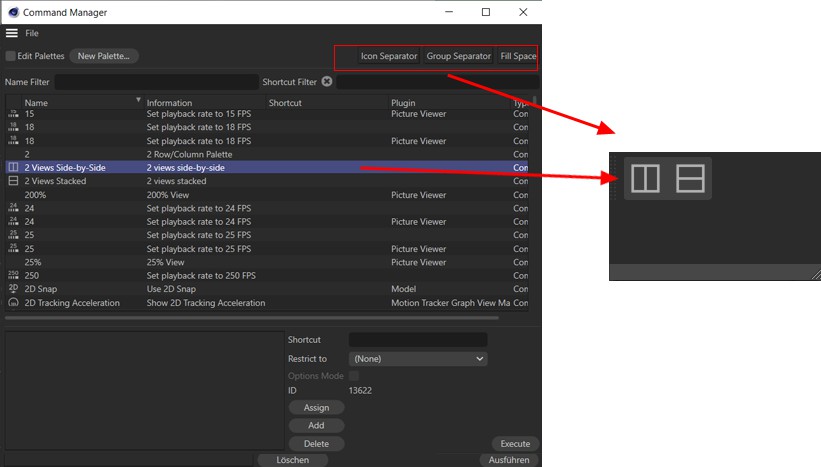
To visually separate commands, there are three buttons: Icon separator, Group separator and White space, which can also be dragged and dropped between palette commands.
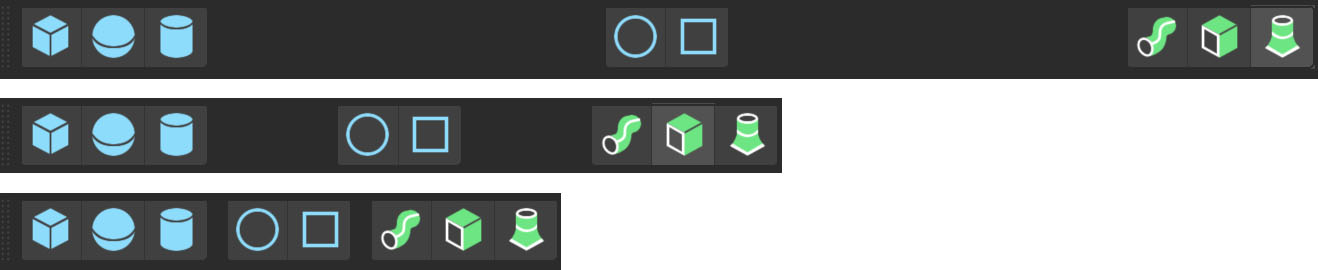
With Empty Space you create such a space (both in horizontal and vertical pallets), which automatically adapts to the pallet size, but is at least as large as Group separator. This allows you to create left and right-aligned icon groups, for example:
You must activate the Edit Palettes option if you want to rearrange or delete palette commands or separators using drag & drop (double-click on them).
Use the New Palette button to create a new empty palette.
The command list includes 2 filters that use an entered character string to display all commands or keyboard shortcuts that consist at least partially of this character string and hide the rest. In this way, you can quickly find all commands and all keyboard shortcuts that have already been assigned. The small button to the left of each filter deletes the entered character string and all commands or keyboard shortcuts are displayed, provided they are not prevented from being displayed by the other filter.
In the command list itself, in addition to the command name and icon, you will also find the plug-in or function complex to which the command belongs as well as any assigned keyboard shortcuts, the command type and the associated help text. Apart from the keyboard shortcut, nothing can be changed here, as these list entries are for general information only. You can click on the column headings to sort the items alphabetically.
As soon as you have selected a command, all assigned keyboard shortcuts are listed in the left-hand field at the bottom of the keyboard shortcut assignment.
Commands as HUD elements
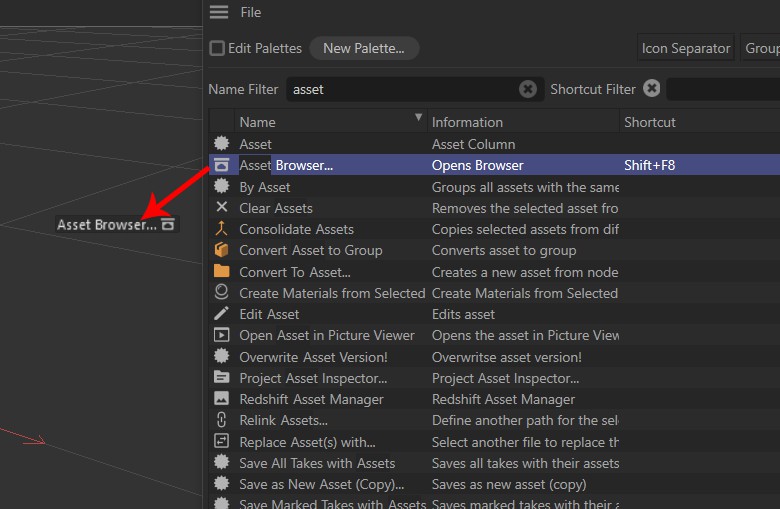
You can also drag commands directly into the view. The command is displayed there as a HUD command, including an icon (which can be switched off). Click on the HUD command to call it up.
The concept of keyboard shortcuts in Cinema 4D
You can assign any number of keyboard shortcuts to each command or assign the same keyboard shortcut to different commands, which are then called up depending on the cursor position (note that the Keyboard Shortcuts option must be activated in the Interface tab of the Preferences settings) or the active window, depending on the manager.
Distinguish:
- Global commands that have the same effect everywhere in Cinema 4D (e.g. creating a cube).
- Local commands that only apply to one manager, e.g., the Timeline (e.g., Remove Unused Tracks in the Timeline, this command is pointless in the Material Manager , for example).
The point of all this is that you can assign a separate set of shortcuts for each manager that is completely independent of other managers or global shortcuts (for example, Ctrl/Cmd+P can call up one command globally, but a completely different one in the Timeline).
Global keyboard shortcuts can therefore be restricted in their globality by restricting keyboard shortcuts with the same name to one manager using the Restrict to selection menu. These restricted abbreviations then have priority over global abbreviations with the same name, provided the cursor is positioned over the corresponding window.
If you are now confused, consider the following example:
The global Move Camera command is assigned to button 1 by default. How about if button 1 also does something in the Material Manager and creates a new material? Nothing could be easier:
- Search for the New Material command and click on the list entry.
- Click in the Keyboard Shortcuts field and press 1. In the Restricted to field you will find the grayed out entry Material Manager , which means that this is a local command.
- Click on the Add button. Done.
As soon as you place the cursor over the Material Manager and press 1, the camera is not moved, but the local keyboard shortcut for creating a new material is executed.
You will find the following controls in the Keyboard shortcut assignment area:
The keyboard shortcuts defined for the currently selected command are listed here. Select an abbreviation if you want to change or delete it.
Click in this field and press a key combination on your keyboard, which will then be displayed in the field. However, it is not yet assigned (this is done using the Assign or Add buttons). Keyboard shortcuts can be formed from single or multiple keystrokes (hierarchical shortcuts, e.g., A~A when the A key is pressed in quick succession, see below) or a combination of a key and either Ctrl/Cmd, Shift, Alt or a combination of these.
Please note that global keyboard shortcuts with the same name that are not restricted to one manager or global shortcuts with the same name that are restricted to the same manager can only be assigned once. In this case, you will receive an error message (if you click Yes, the existing abbreviation will be overwritten).
These abbreviations are entered for the corresponding mouse buttons:
Middle mouse button MMB
4. mouse button MX1
5. mouse button MX2
In addition, keyboard shortcuts that apply when calling up objects(Shift, Ctrl/Cmd, Alt) are used to categorize the newly created object in the hierarchy. S. Keyboard shortcuts when working in the Object Manager) are still evaluated. If you create an Extrude object using the keyboard shortcut ALT+U, for example, the newly created Extrude object is inserted as a parent object of the currently selected object (e.g., a spline).
If an otherwise global command is to be restricted to a specific manager, you can select the relevant manager here. Select None here if the command should actually have a global effect for the defined keyboard combination. If menu items are grayed out here, this means that it is a local command that only works for this manager anyway.
You will find an Overwrite tool option here. This allows a hotkey to overwrite an existing keyboard shortcut. This is less interesting for you as a user. The option is used here at Maxon to perfectly match existing keyboard shortcuts and hotkeys.
There are some commands (mainly from the Mesh menus) that have several options. Here you can define whether the corresponding command displays these options in a small window each time it is called or executes the command with the current settings (see also command options).
This allows you to change the existing keyboard shortcut selected on the left by overwriting it with the current shortcut.
This button adds the current abbreviation to the existing abbreviations without overwriting the selected one.
This deletes the abbreviation selected on the left.
Clicking on this button calls up the selected command. You can use this to test whether you have selected the correct command from thousands.
Hierarchical keyboard shortcuts
Hierarchical keyboard shortcuts are called up by pressing 2 (or more) keys in succession. After the first keystroke, a window opens with the corresponding keyboard shortcut list. Now press the second button to call up the desired command.
Hierarchical keyboard shortcuts are completely freely configurable. They are defined as follows:
 Hierarchical keyboard shortcuts in the Command Manager and later when calling up
In the lower keyboard shortcut field, press the two (or more) keys in quick succession. A tilde is displayed between the buttons. Done. Do not forget to click on the Assign button.
In this way, you can build complex keyboard shortcut hierarchies.
The commands described below can be used to create and manage various short command sets. A self-created shortcut set is saved in the prefs/shortcuts directory (on Windows, for example, in Users\Username\AppData\Roaming\Maxon\C4D-Version\prefs\shortcuts) in the Preferences menu.
For example, it is possible for different users to work with their own shortcuts.
The default set of shortcuts that is always available cannot be deleted or renamed.
This duplicates the short command set currently selected under Presets, activates it and saves it in the directory specified above.
You can use this to load short command sets that you have created yourself. These are files with the file extension *.res (these are located in the directory specified above). This means that you can load short command sets you have created yourself from old Cinema 4D versions, for example.
Here you will find all short command sets of the current version. Choose the one that suits you best. The currently effective short command set is marked with a tick. Most of the commands described here refer to the currently selected record.
This command can be used to rename the currently selected short command set - the *.res file mentioned above is then also given this name.
This can be used to delete the currently selected short command set.