File Menu
Opens all Image and Video (including those with sound) formats readable by Cinema 4D in the Picture Viewer.
Alternatively image or video files can be dragged & dropped from other locations such as the Asset Browser.
When selecting an image from a sequence of images (i.e. from a sequence of images that are sequentially numbered) via the Open Image command, the following dialog window will appear:
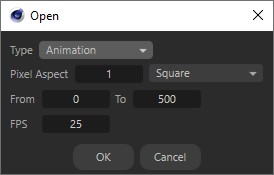
Type
Here you can decide whether to load an entire sequence of images or part of one (Animation), or merely a single (Still image) image.
From/to
If you select Animation as Type you can define exactly which frame range should be loaded.
FPS
If you select Animation as Type you can use this value to define the frame rate with which the sequence should be played in the Picture Viewer.
Lets you save individual frames or a complete sequence of frames (depending on what is selected in the History tab). The Picture Viewer can also be used as a video conversion tool to save videos in other resolutions, codes and formats. Anamorphe videos are also supported.
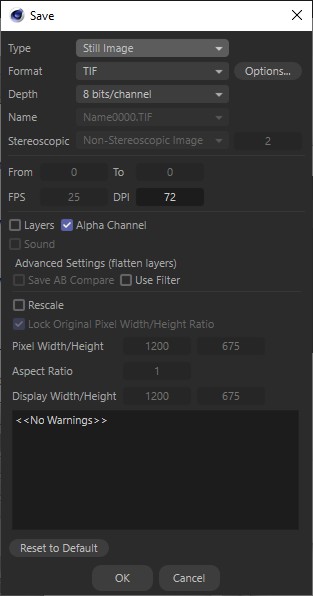
When the command is called up a dialog window will open in which additional parameters are made available:
Note that when saving videos they will be compressed using Codecs (e.g., H.264) which will cause the image quality to diminish. This is why professionally created animations are almost always rendered in an uncompressed format (e.g., TIFF) as a basis for use in video editing or compression applications (e.g., Adobe After Effects, etc.). These applications generally use sophisticated video compression techniques (e.g., "2 pass encoding") to ensure optimal video quality (notwithstanding the far-reaching possibilities offered by Multi-Pass rendering for creating various render effects such as shadows and depth of field.
This type of workflow bears the advantage that it outputs the rendered sequence uncompressed and in the best possible qualitative state. Furthermore, various Codecs can be tested using the original images (applying additional Codecs to already compressed videos is not recommended since the image quality would further be reduced).
Rules of thumb:
- If an animation is to be edited using an external application it should be saved in the form of an uncompressed sequence of images (or as an uncompressed video - which will result in very large video files).
- For test purposes or if no subsequent editing will take place, a video compression Codec that lessens image quality can be applied.
Type
Depending on what is selected in the History tab's list, the following parameters will be made available:
Still Image
Only a single image will be saved (regardless of how many images or sequences are selected in the History tab's list).
Animation
This option is made available if more than one image is selected in the History tab's list. The From and To values can then be used to define the frame range that should be saved as an animation.
Selected Frames
Selecting this option will save the selected frames (regardless of whether individual images, complete sequences or images within a given directory are selected) as an animation (i.e. sequentially numbered).
Format/Options
Here you can select an image or video format. Details about these formats and their respective settings can be found here.
Depth
See Depth.
Name
See Name.
Stereo
The following images can be rendered using the Render Settings’ Stereoscopic tab:
- left camera view (Single Channel = 4)
- right camera view (Single Channel = 2)
- the resulting stereoscopic image (Merged Stereoscopic Image)
- non-stereoscopic image (Non-Stereoscopic Image)
- any number of camera views between the left and right camera views (Single Channel X)
- the Stereoscopic tab also offers the Individual Channels and Merged Image option]
This is a large range of views, which can, of course, be applied to each animation frame. Depending on the view chosen, different options can be modified.
Layers
This option should only be selected if layers exist or if saving to an image format capable of working with layers (e.g., PSD, B3D or TIFF, etc.). If enabled, all existing layers (Multi-Pass, alpha channels, etc.) will be saved. If disabled, the result will reflect the options selected in the Layer tab:
- Image or Multi-Pass: The image will be reduced to a single layer and saved.
- Single-Pass: Only the selected layer will be saved.
Alpha Channel
If the image being saved contains an alpha channel, this option will determine whether or not it will be used.
Use Filter (flatten layer)
If a filter is activated in the Filter tab, enabling this option will ensure that the filter will affect the image to be saved. If this option is not enabled, filters will be ignored (i.e. have no effect).
Note that the filter will only affect the original rendered image and will not affect Multi-Passes. Since the Multi-Passes will then no longer match the original image, they will be omitted.
Sound
When saving to a video format, this option defines whether or not an existing soundtrack should be included. This can work in one of two ways:
- A complete video, including sound, can be loaded into the Picture Viewer.
- An animation, including Sound, can be rendered out.
The frame rate must match the original frame rate exactly. Otherwise no sound can be saved.
Save AB Compare
If ![]() AB Compare is enabled and you've selected two images to compare, this comparison image can be saved as an image file as it is shown in the Picture Viewer. Images with multiple layers will be reduced to a single layer.
AB Compare is enabled and you've selected two images to compare, this comparison image can be saved as an image file as it is shown in the Picture Viewer. Images with multiple layers will be reduced to a single layer.
From/To
If Animation is selected as Type the frame range that should be saved can be defined using these values.
FPS
Defines the frame rate of the sequence of images to be saved in video format.
Bake View Transformation
If you like what you see in the Picture Viewer you can activate this option and terminate the color management pipeline at this point. The view transformation will be applied to the rendering.
For maximum flexibility in post-production, this option should, however, be disabled to allow for a larger color space (e.g., ACEScg) for compositing or visual design before optimizing the result of a view transform for a particular display device at the end of the pipeline.
Reset to Default
Sets the Format, Depth and FPS parameters back to the state of the images in the History tab's list. As a result, no conversion will take place when the images are saved because the images will be saved with unaltered parameters.
DPI
See Resolution.
Rescale
Enable this option if you want to save images in a different resolution or pixel ratio.
Lock Original Pixel Width/Height Ratio
If this option is enabled, the hight and width will be modified proportionally.
Pixel Width/Height
Enter the desired resolution in pixels for the image to be saved here.
Aspect Ratio
Display Width/Height
Normally, the aspect ratio is 1, which shows the image or video in its original resolution. A different value can, for example, be entered for anamorph videos. If a value of 2 is entered, for example, a video with an original resolution of 800 x 600 pixels will be distorted and play at 1600 x 600 pixels (this information will be shown in the Display Width/Height setting).
Notification field
In this field, warnings will be displayed, e.g., if a video format is not compatible with the defined aspect ratio (in this case an export will fail or Cinema 4D will automatically change the pixel scale to the next valid value, which will also be displayed).
This will halt the current image/animation rendering process. Although partial renderings will be saved the rendering cannot be resumed at exactly this location - all images must be rendered in their entirety. Closing the Picture Viewer will not necessarily halt the rendering process. You will be prompted to proceed or not and the render process can be left to continue in the background without having the Picture Viewer open or having it docked somewhere within the layout.
A list of previously opened images will be displayed in the Picture Viewer.