Output
All settings on the Output page only affect the calculation in the separate Picture Viewer. As only single images or parts of a single image are calculated in the Viewport, these settings have no effect there.
This button hides the most important output resolutions that you can select for all common applications relating to screen, print and video.
These presets then set the values for resolution, pixel ratio and frame rate correctly. In the case of video output, you then only need to take care of the last five parameters shown here, which primarily relate to the output duration.
Also note the default Screen/Viewport Resolution, which renders exactly with the size of the view (the one where "Use as Render View" is activated). Please note that this preset must be called up again if the Viewport size is changed.
Here you set the two most important dimensions for the output width and height. These values are based on the unit that you select in the drop-down menu directly below the Height value. The default setting here is Pixels, which means that the Width and Height entries are used directly as the resolution of the calculated bitmap or video. Especially for the creation of images to be printed, you can also select cm or mm as units in the drop-down menu, for example, which allows you to work with real dimensions for Width and Height. However, the appropriate Resolution must also be entered so that the actual pixel resolution for the rendering can be calculated. Manual conversion from dpi to pixels is therefore not necessary
For standard print formats, such as DIN A4, the Width, Height and Resolution can also be entered automatically if you select the appropriate entry from the Print (portrait) or Print (landscape) categories in the Presets menu.
All you really need to know is: what is the image/video to be output to be used for? Accordingly, select the appropriate ratio using the preset button.
Small Widths/Heights are preferable for test renderings.
If this option is activated, the Width and Height will be adjusted when you change one of them, taking the aspect ratio into account . The aspect ratio of the output image therefore always remains constant, which is particularly helpful for reducing the render resolution in order to carry out quick test calculations.
If the rendering should be saved as a video, you can define a data rate for the video compression in the Save tab. If Adapt Data Rate is activated and then the value for Width is doubled, for example, the data rate is also doubled. This automatically adjusts in proportion to the number of pixels.
Here you can define a DPI or pixel/cm value that is taken into account for the image formats (not video!) when printing (i.e., output on non-screens). However, this only applies if you have not already defined the Width and Height directly in pixels, e.g., with the unit millimeters (mm). The advantage of defineing the correct resolution is that you can directly define the desired dimensions, e.g., of a poster or banner in terms of Width and Height, and the required number of pixels is automatically used for rendering.
Example
You calculate an image with a resolution of 700x1000 pixels. If you save the image at 72 DPI, this corresponds to a print size of 24.7 cm x 35.3 cm. If you save the image at 300 DPI, the image will be printed 5.9 cm x 8.5 cm at the same resolution.
Here you can see the actual calculated pixel resolution when using real dimensions for Width and Height.
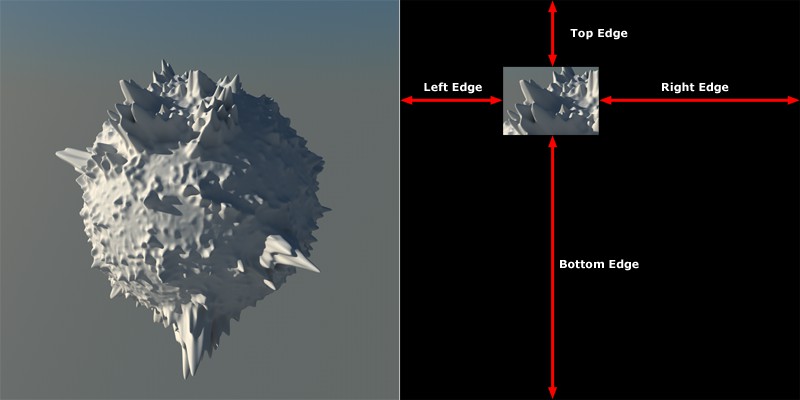 Area rendering deactivated on the left, activated on the right.
Surely you know the problem: You have rendered an elaborate image. Unfortunately, something is changing in a small area of the scene. Normally you have to re-render the entire scene. You no longer have to do this with Render Region.
By covering irrelevant areas of the image (which are then rendered in black), only a small part of the scene needs to be recalculated, which is of course much faster. The small, newly rendered part can then simply be copied into the previously rendered image.
This is used to set the black bars in pixels, starting from the edges of the image. Please note that if you enter invalid values (e.g., margins larger than the image to be rendered), no margins will be rendered.
Instead of setting the margins as numerical values directly using the four parameters described above, this can be done even more conveniently using the Interactive Render Region in the Viewport. After calling up the Interactive Render Region, e.g., in the Render menu, simply adjust its frame directly with the mouse in the render view so that only the area to be rendered is within the Interactive Render Region. Clicking on Copy from IRR then converts the margins to the final output size depending on the output size.
The aspect ratio corresponds to the Width/Height ratio of an image/video to be calculated. However, you can also enter a ratio of your choice here. Otherwise, you can choose from a range of predefined aspect ratios.
Height and Film Aspect are directly dependent on each other. If the aspect ratio changes, the Height is automatically adjusted.
Example
For example, you select a Width/Height of 320 x 240, which corresponds to Film Aspect ratio of 4:3 (or 1.333:1). This is preset with the Standard 4:3 aspect ratio, for example. Now change the Film Aspect to HDTV 16:9. Cinema 4D immediately selects 320 x 180 as the effective image resolution.
This image size is also displayed in the Viewport. You will see two boundary areas at the top and bottom or on the left or right (the so-called Safe Frames marking). Only the area in between is actually calculated. You therefore have optimum control over both the entire scene and the area that is actually visible afterwards.
The Pixel Aspect is important for some output devices. It indicates the ratio of visible width to visible height of an individual pixel. Normally it is 1:1 (square).
Below this you will find a selection menu with which you can set the standard pixel ratios. You can also enter your own pixel ratios.
If the aspect ratio is not taken into account, circles, for example, are output as ellipses on the output device. Some monitors, for example, have stripes on the right and left edges, so that the aspect ratio of 1:1 is no longer correct. Once this value has been set correctly, there will be no more distortions of this kind on the output device.
The pixel ratio is written into the common output formats.
If this option is activated, the frame rate defined in the scene settings (FPS) is used for rendering. Otherwise, set the frame rate to be rendered using the Frame Rate setting described below.
In most cases, it is advisable to use identical frame rates everywhere.
Here you can enter any frame rate at which the animation is to be rendered, regardless of the frame rate set in the project (see FPS). For a test calculation, you can, for example, lower the rate of 25 frames/sec. to 5 frames/sec. so that only every fifth frame is calculated, which saves computing time.
Above the Annotations field, you will find the effective number of frames to be calculated displayed under Frames:.
If you only want to calculate a contiguous part of the animation, you can define the screen numbers to be calculated under From and To. The Manual option is displayed automatically. You can use this to resume an interrupted animation calculation, for example. The image is only saved if you have also defined a Path on the Save page.
With this option, only the currently set image, e.g., of an animation, is calculated and saved as a single image (only if you have also defined a Path on the Save page).
All images of an animation are calculated and saved as individual images or videos (only if you have also defined a Path on the Save page).
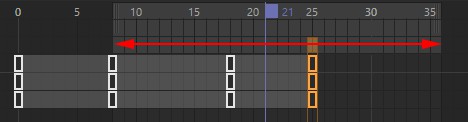 Arrow marks the preview area
Only the preview area defined in the timeline (see here) is calculated and saved as a single image or video (only if you have also defined a path on the Save page).
You can use this option to define exactly which frames or frame ranges - separated by a comma or minus sign ("-") - should be calculated.
Example: 1-4, 43, 23-45, 94-95
It is not necessary to sort frames here, Cinema 4D does this for you: 3, 10-12 gives the same result as 10-12, 3. And the frame 43 (also included in the 23-45 range) at the top of the example is only calculated once.
In addition, a step sequence can be defined with ":" or "x":
Example: 0-10:2 renders the frames 0, 2, 4, 6, 8, 10.
Please note that the rendering is always done in ascending order (e.g., 98, 12 renders the 12th frame first).
Frames that have already been calculated and saved can be taken into account (see also Save).
the images to be calculated are listed under Images below).
If you have defined Manual for Duration, enter the time animation range to be rendered here.
When rendering animations, you can set here whether all animation images (1) or only every second (2) or fifth (5) etc. should be output.
Imagine you have an animation 1500 frames long. If you now want to calculate a test animation, set the value here to 10, for example, which then only renders every 10th frame. This gives you a quick overview of the animation.
In older video technology in particular, much smoother animations can be achieved when field rendering is used. An image of an animation is divided into two fields. One contains all odd-numbered picture lines, the other all even-numbered picture lines.
Before using field rendering, you should make sure which system your video hardware uses.
Field rendering only makes sense if the generated images are saved with a lossless compressor or completely uncompressed. All other compressors (e.g., JPEG, M-JPEG etc.) smear the fields and the result is anything but satisfactory.
You should also test whether your hardware requires even lines or odd lines first, otherwise the animation will flicker a lot.
Only full frames are calculated. This option should always be activated if, for example, you want to calculate individual frames or films that are not to be played back via a video system.
For the animation, the even lines of one image are now always mixed with the odd lines of the other.
For the animation, the odd lines of one image are now always mixed with the even lines of the other.
Certain effects within Cinema 4D are based on calculations of the scene status at previous points in time. This means that the scene must be played in order to create a valid, current state. Think of a Rigid Body simulation, for example, which - if the cache is deactivated - must be calculated frame by frame.
Now imagine you want to render the single frame 485 - or a Team Render Client the frames 310-330. In order to be able to render this frame or frame range correctly, all previous scene states must be calculated (not rendered!) internally, animation frame by animation frame.
This process is called "Pre-Roll". Such a pre-roll can be forced here (option activated). If the option is deactivated, the built-in automatic pre-roll detection is used, which in exceptional cases - e.g., when using plug-ins - does not work correctly, which manifests itself in problems with rendering (especially Team Render, but also in the Picture Viewer) if the animation is not started from animation frame 0, but at later points in time.
You should therefore activate this option - which requires more computing time - if you notice that simulations (including effects such as Jiggle deformer) produce incorrect results.
A rule of thumb: If you jump back and forth in the timeline/animation palette with the time slider and the scene behaves correctly (continuous movements), then activating this option will do nothing.
The actual number of rendered frames is displayed here.
If you would like to store an explanatory text for the current Render Settings (e.g., "Final format customer A (frame rate 24)") or any comments, this can be done here.