2D Tracking
The 2D Tracking tab's settings are used to define all Track properties used to track positions of distinctive regions in the footage.
A successful reconstruction of a 3D camera or an object depends for the most part on proper creation of Tracks. For the most part, Cinema 4D selects these automatically so you won't even have to worry about this yourself in most cases. However, you will always have situations that will require you to manually set Tracks - often in addition to those that were created automatically.
It is also possible to only set and track Tracks manually.
What are Tracks?
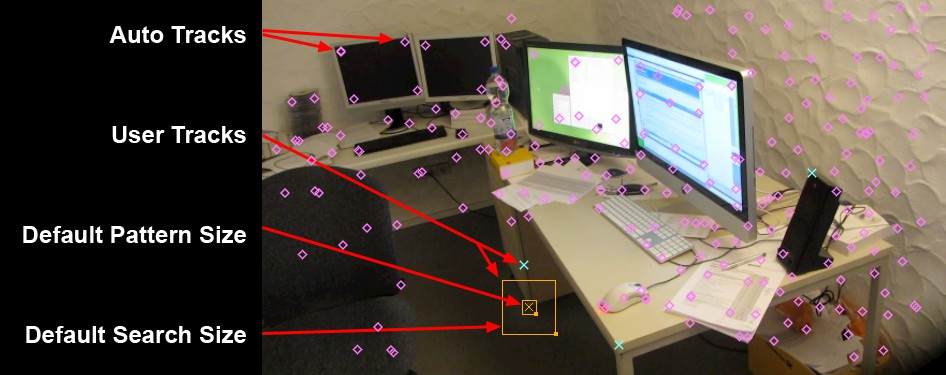 Various Tracks. Selected user Tracks will be displayed with Default Pattern Size and Default Search Size (Options tab).
Tracks are small regions of footage that can be found again in the previous or following frames of the footage. The regions are marked by the small squares in the image above. These are saved as keys and will then be searched for in the neighboring frames within the square associated with them (Default Search Size). The aim is to follow and save the 2D position change of a Track as long as possible in order to reconstruct the three-dimensional scenery in a subsequent step.
Tracks can be created automatically and/or manually at any point within the footage.
Each Track is assigned to either a camera reconstruction or an object reconstruction. The assignment is made according to the Object Tracker's list of Tracks (Tracker tab). There, Auto or User Tracks will only be used for object reconstructions and not for camera reconstructions.
Working interactively with Tracks
Why Tracks have to be fine-tuned is explained under What are good and bad Tracks?. Note that a reconstruction must be reconstructed after Tracks have been modified!
Creating Tracks
Tracks can be created as follows:
- Automatically: In the Automatic Tracking menu by clicking on the Create Auto Tracks or Auto Track button with the subsequent automatic tracking.
- Manually: Ctrl/Cmd+click on the desired position in the Viewport. If Alt is also pressed, a magnifying glass will be displayed. Subsequently click on Manual Track to track your user Tracks.
Changing pattern and search size
Selected user Tracks will normally be displayed using pattern and search size (the differently-sized squares). These can be scaled individually using the handles at the bottom right corner (Tracks that were already tracked will be tracked again).
Selecting/Deleting

Tracks can be selected by:
- Clicking on them, whereby the usual keys (Shift, Cmd/Ctrl) can be used to add or remove items.
- Using the Lasso Selection tool: click and drag around the Tracks you want to select. The Shift key can be used as well.
Selected Tracks can be deleted by pressing the Del key (to be exact, they will only be hidden and ignored during reconstruction; they can be recalled at any time using the ![]() Restore Deleted command).
Restore Deleted command).
Adjusting existing Tracks
Shifted Tracks
Slipped Tracks (e.g., if the Track jumps and has to be returned to the correct position) can be corrected as follows:
- Move the footage in the Motion Tracker view
- Move the Track directly in the view with the mouse. If the Show Rekey Magnifier option is enabled in the Options tab, a small magnifying glass will open.
If the Shift key is pressed simultaneously, the key will snap as precisely as possible to the neighboring key's position:
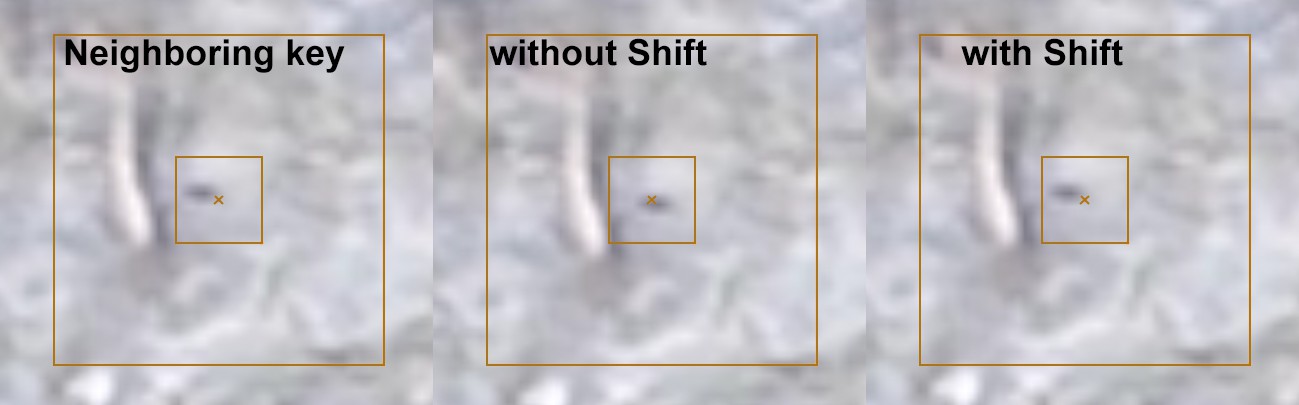
In the image above, the key lies on the bottom right corner of the black area. If the Track is moved to a different time, it will again be placed on the bottom right corner of the area if the Shift key is used (at least if you move it to the general vicinity). Without Shift, you have to place it manually.
Lost Tracks: Tracks selected at a different time in the animation that cannot currently be tracked are colored dark red in 2D mode (see image above) and can be selected with the LMB and moved to the correct location. This principally has the same effect as the context menu command Insert Key Here but is faster in most cases. If no correct position is available because the segment, for example, has been removed from the footage, no further action must be taken.
If a Track was already tracked, it will be re-tracked (if the Auto Update Tracks mode is enabled) after being repositioned (including key generation). If an Auto Track subsequently disappears it means that it was filtered (see Filter).
This is one of the most important Motion Tracking functions. During practical application you might have to adjust individual Tracks frame-by-frame in order to help the algorithm do its job.
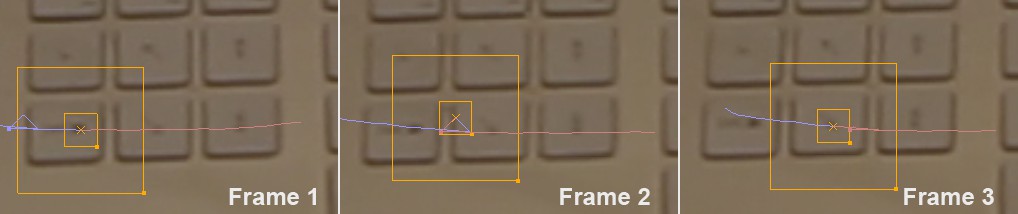
In the image above, the Track was positioned on the left key and tracked. As you can see, the Track starts to shift at frame 2 and finally comes to rest over the center key. This has to be corrected, of course. The solution in this case: simply drag the Track back over the left key in frame 2. With a little luck, the Motion Tracker will now follow this key. If not, the Track must be adjusted frame-by-frame until the tracking is correct or the left key is no longer seen in the footage. Use a Track ONLY for a single pixel pattern (the Track can, of course, use multiple keys for a specific range of footage)!
Interrupted/terminating/incorrect Tracks
If a track is temporarily covered or briefly slips out of view, the Track path can be trimmed just before this happens (main menu ) in case its quality should be too poor just before it ends (i.e., if the filters fail). However, this is not necessary if the quality is o.k. With the Track still selected, drag the Timeslider to the point at which the respective pixel region appears again, right-click at that location and select Insert Key Here from the menu that appears.
The Track will then be continued (you may have to trim again right before this key if a faulty path was tracked). This is also important information for the Motion Tracker - it was able to automatically recognize both Tracks and successfully track them but did not realize that they were identical.
If the pixel region belonging to one Track ends, e.g., if it moves out of view, but the Track still jumps to a similar location, you have to trim the Track in the last frame, as described above.
If the Track is of no use at all, simply delete it entirely.
Scaling/moving the footage in the Viewport
You can zoom in or out of the footage view by pressing Alt+RMB and dragging in the Viewport. The footage can be moved by pressing Alt+MMB and dragging.
What are good and bad Tracks?
Tracks prior to 2D tracking
Generally speaking, the best Tracks are those that can be precisely followed (tracked) over a long period of time and also represent a definite position in 3D space. If enough of these types of Tracks are present and cover a large area, the algorithm can create a correspondingly more precise camera reconstruction.
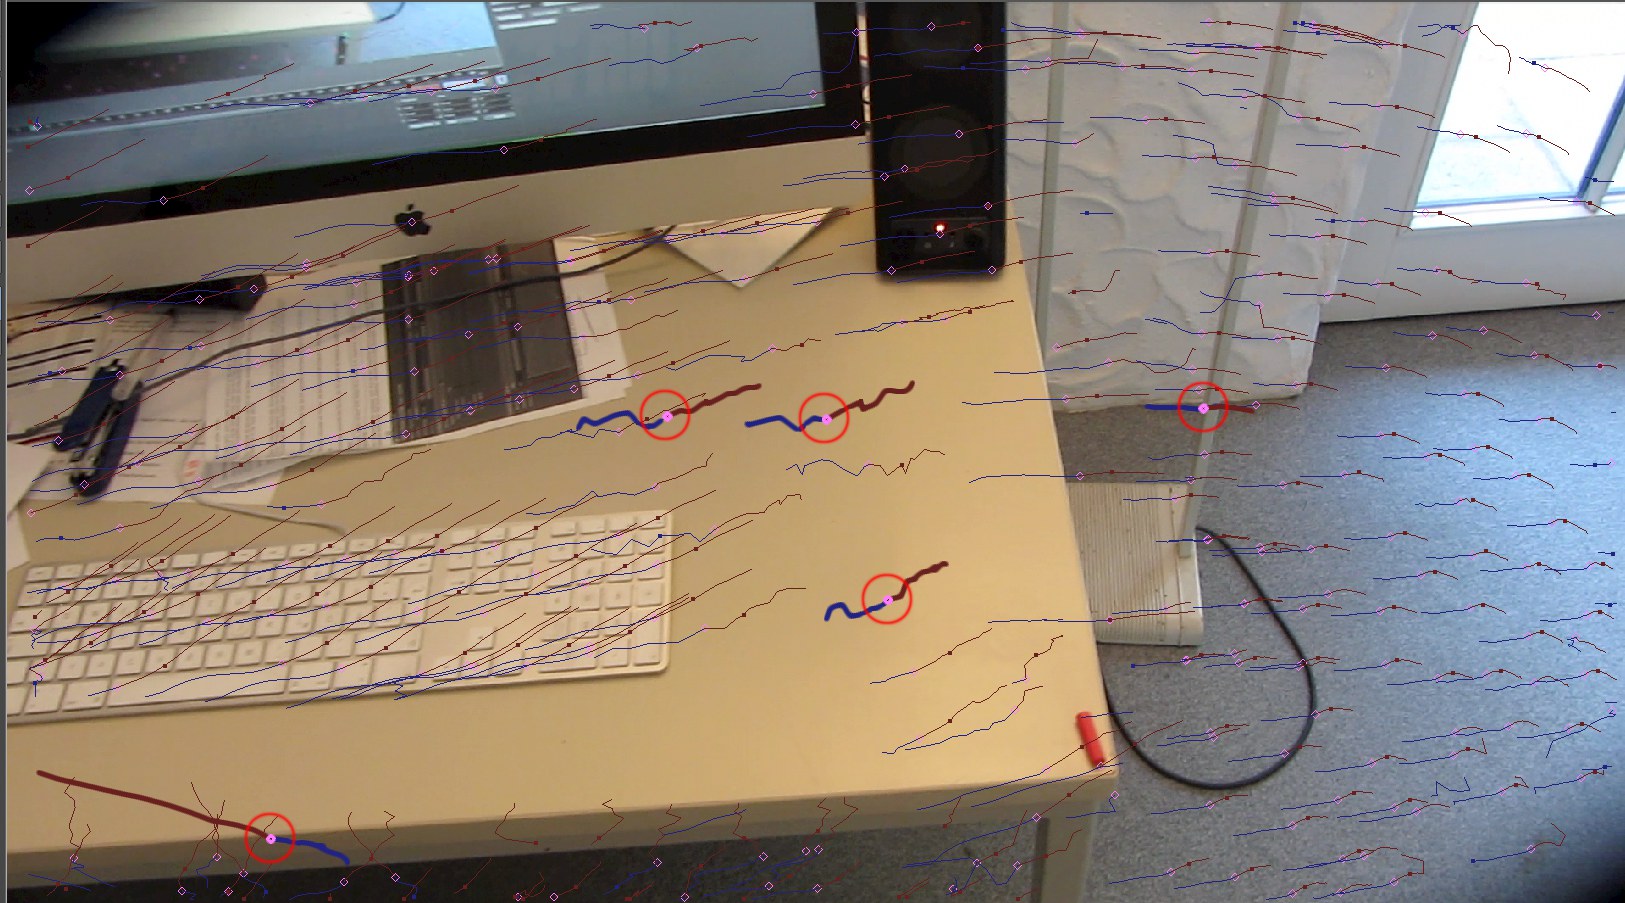
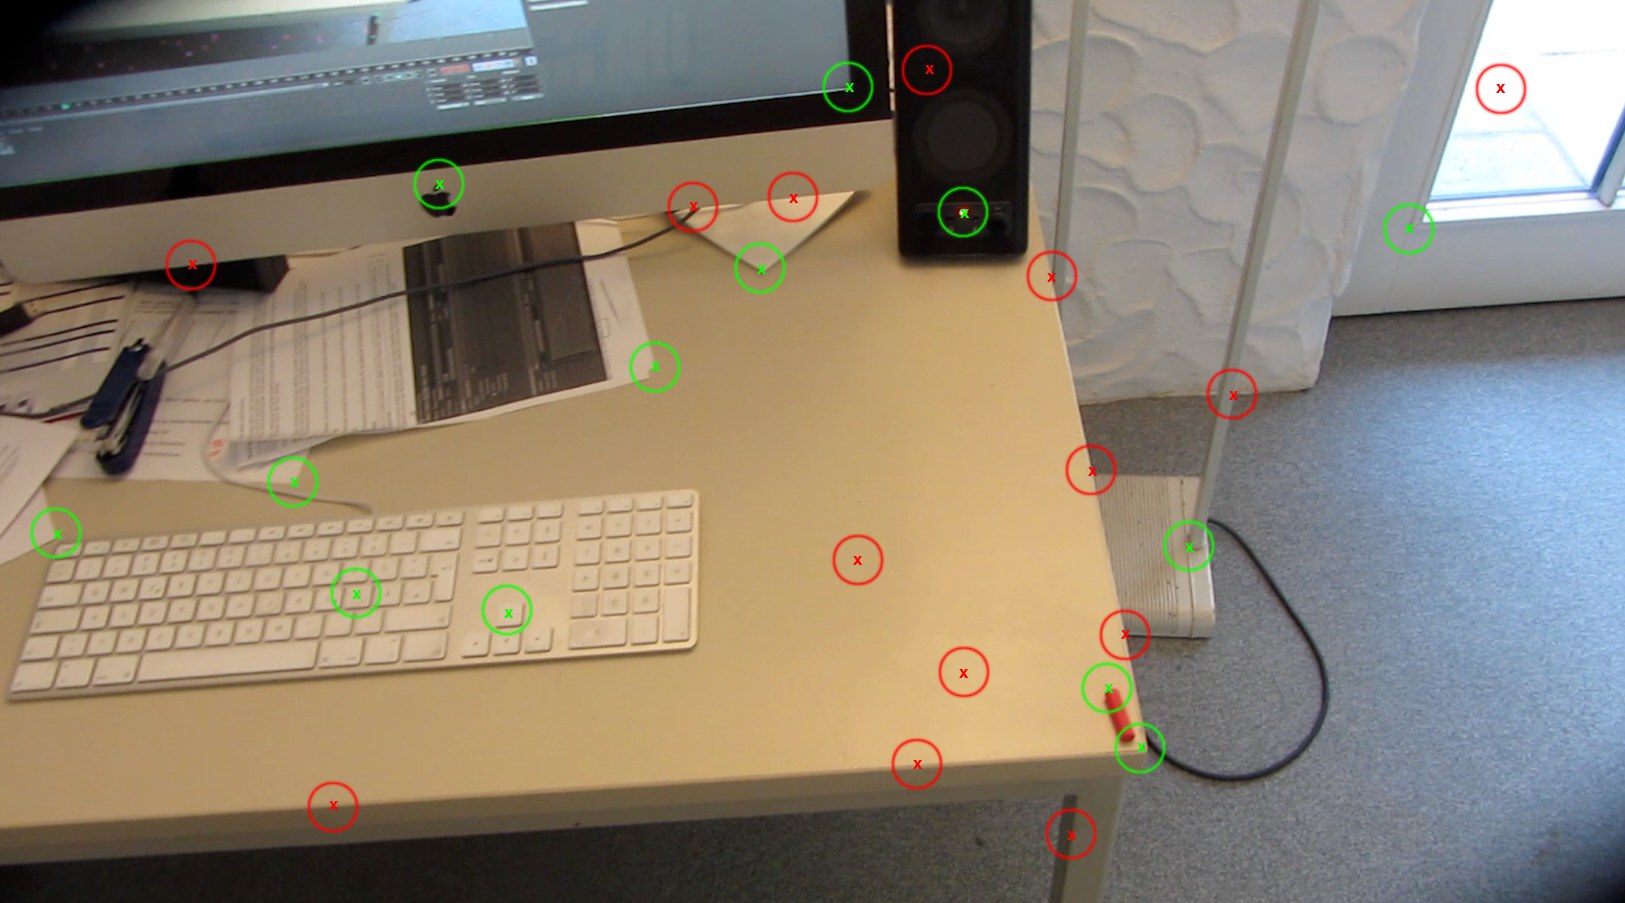 Good (green) and bad (red) tracks.
In the example above, the red Tracks are bad tracks that the algorithm cannot use to generate a good result. Why not? Take a look at both Tracks in the front at the table's edge and both Tracks above them on the table top: continuous edges do not offer clearly distinctive points of reference that can be followed. The same is true for the Tracks on the table top - you have a homogenous surface without any structure, which doesn't offer any points of reference for the algorithm.
Now take a look at the red Tracks on the lamp at the right of the desk. They give the impression that they are clearly defined visual corner points that Cinema 4D can easily track. These are, however, crossing points. Imagine the camera moving to the right: these points do not define a definite point of reference in 3D space - they change according to the perspective and are therefore useless.
Now let's look at the green Tracks: you will see that these lie at clearly definable, high-contrast positions - such as corners - that remain constant in 3D space. Furthermore, they also represent easily identifiable objects that can be tracked manually at other times in the footage, if necessary (if the algorithm fails to do so itself).
In addition, the following applies:
- Tracks that do not lie exclusively on a single plane are important (e.g., not all on the table top). Otherwise, no parallaxes and in turn no 3D points can be created (see In Brief: How does motion tracking work).
- Avoid using Camera Tracking Tracks that lie on moving objects (mask or delete the respective Tracks). Tracks should lie on fixed, non-modifiable positions in 3D space. For example, branches or leaves swaying in the wind will be problematic.
- The same applies to reflexions (a.k.a. lens reflexes), specular highlights, etc. These are not non-modifiable points in 3D space but are effects that change according to the perspective from which they are viewed.
- Tracks that lie at a great distance from the camera (horizon, sky, etc.) are rarely useful because no useful parallaxes can be observed. You can delete these tracks to avoid unnecessary confusion for the camera reconstruction.
- When working with a small number of manually created tracks, make sure that these do not start and end simultaneously. Use as many as possible that also overlap temporally.
- Tracks should also be present at those locations at which you want to insert 3D objects. Among other things, this will help you position the objects more precisely.
- Cross-shaped pixel regions are well-suited for tracking because they offer many, easily tracked corner points.
Tracks after 2D Tracking
After 2D tracking has been completed, each Track's path through the animation will be displayed. They will be filtered before they are displayed (see Filter Tracks), which means that imprecise, bad paths and their corresponding Tracks will be hidden. This doesn't always work completely, which means you will have to delete these Tracks and their paths manually.
 Singled out examples of bad Track paths (the filtering was purposely reduced for this example). Track paths that are similar and lie parallel to neighboring paths are generally better paths.
Visible paths make it easy to identify bad paths. Generally speaking, Tracks that lie close together often have similar paths. Those that go entirely astray, like the one at the bottom left in the image above, are faulty and should be deleted.
Paths that are extremely shaky like the ones at the center are often faulty (but not always, e.g., if the camera's movement is shaky, the paths will also be shaky; however, very shaky camera movements are generally quite rare). In particular if most other Tracks’ paths are more harmonious, like the ones on the keyboard in our example. The right Track on the floor lamp was tracked perfectly by Cinema 4D but, as already mentioned above, this is a crossing point that changes according to the perpsective from which it is viewed and should therefore not be used.
Tracks that jump to other positions or shift in relation to the underlying footage are also faulty.
Track paths that are only faulty starting at or up to a certain time in the animation do not have to be deleted completely. Their Track paths only have to be trimmed starting at or to the faulty point.
General tips and tricks
- Tracks/paths that are faulty should be deleted. These can be made visible by setting Brightness to 0%. Tracks that behave completely differently from all others should also be deleted.
- If strong motion blur is used, it may be necessary to increase the Default Pattern Size and/or Default Search Size values. In extreme cases, a key can be set manually for Tracks on a frame-by-frame basis. The following also applies for motion blur and user Tracks: be consistent in positioning the Tracks only at the start, center OR at the end of the blurred section, for example.
- Tracks on objects that are obscured temporarily in the footage can be continued when they reappear (if the Track is selected prior to the object being obscured, right-click on the position and select Insert Key Here from the menu that appears).
Parameters
Automatic Tracking tab
A brief description about the differences between Automatic Tracking and Manual Tracking:
- Automatic Tracking: Tracks will be created, tracked and filtered automatically. The quality of automatic tracks can vary.
- Manual Tracking: You create individual Tracks and make sure that these are correctly tracked (in extreme cases you can create keyframes for each frame).Tip:The Motion Tracker will assume that these are high quality and will give them priority over those created automatically. Manually created Tracks will not be filtered.
You can use Automatic Tracking and Manual Tracking individually or simultaneously.
Try using Automatic Tracking first and if a good camera re-construction is produced, fine. Otherwise you will have to do some fine-tuning by adding Tracks manually or by deleting bad Tracks that were created automatically (see also What are good and bad Tracks?).
Here you can define the number of Tracks that the algorithm should create per frame. The total number of Tracks that are created can differ from this value. Hence, this value serves as a reference value. The Minimum Spacing value or an insufficient number of pixel regions found by the algorithm that are good for creating Tracks can, for example, result in fewer Tracks being created. However, under other circumstances more Tracks can also be created (e.g., if a very low Number of Tracks value is entered).
Generally speaking, it makes sense to generate a high number of tracks but if these lie too closely together they will require an unnecessarily large amount of render time without offering noticeably better results for the camera reconstruction. Therefore, it doesn't make sense to create thousands of tightly clustered Tracks. Fewer but good Tracks offer better results.
This setting defines the minimum distance (in pixels) that Tracks should have to neighboring Tracks (some Tracks might end up being placed closer together during 2D Tracking). This setting restricts the Number of Tracks setting because the minimum spacing will be maintained regardless of the number of Tracks entered.
Let's say you have a Track that was created at the edge of an image and the region of the image used to create it moves out of sight at frame 20 (because the camera no longer has it in view or because the Motion Tracker simply lost sight of it). This means that more and more Tracks will be missing in the course of the footage, which is not exactly conducive to a successful camera reconstruction. If the Auto Replace Lost Tracks option is enabled, lost Tracks will be replaced with new ones that were generated at other positions in the footage and tracked. This means that the number of Tracks can be kept fairly constant.
For longer sequences in which you only want to track at the beginning or end, for example, it can help to disable this option to prevent everything between these two points from being tracked (you can then use the Create Auto Tracks button to add Tracks at specific locations.
Clicking on this button will create a series of Tracks that are dispersed as evenly as possible, including a keyframe at the current point in the animation. The number of Tracks created and their dispersion can be controlled using the Number of Tracks and Minimum Spacing settings described above. Sets of Tracks can be created at different points in the animation, which are independent of one another.
This button's functionality is included in the buttons below it but these buttons do not do any tracking. This is useful, for example, if you want to create Tracks at specific location. After these have been created, the superfluous Tracks can be deleted manually or via the Mask function.
The newly created Tracks will not be selected by default. If you want to track them, select the ones you want to track and click on the Auto Track button (or select the corresponding command from the context menu).
Use these three buttons to track the selected Auto Tracks (or it will create some, if none have been created, yet). If no selection has been made, all Tracks will be tracked. This is done as follows within the temporal range defined in the Footage tab's menu:
- <: In reverse (temporally)
- Auto Track: All
- >: Forwards
Normally, it is recommended that the Auto Track button be used because it tracks in both directions (temporally). However, it can sometimes be useful to track in only one direction, for example if you have created Tracks at frame 76 because the pattern on which they are based doesn't appear until this point. In this case, tracking in reverse wouldn't make any sense.
After tracking is completed, several elements will be displayed in the Viewport:
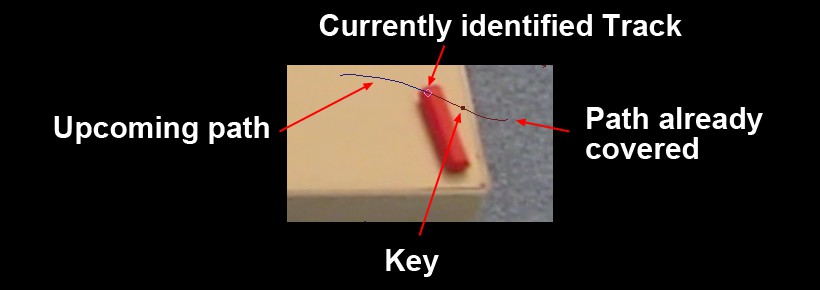
Each tracked Track contains a key that looks like a point in the Viewport that will be tracked (followed). This Track's position throughout the animation will be displayed as a path 10 frames before and after the short hash mark (the currently identified Track).
Now bad Tracks/paths can be corrected or deleted (see also Working interactively with Tracks) before camera reconstruction is started.
This button can be used to either delete all (nothing selected) or individual Auto Tracks, including their paths.

During the automatic tracking process, numerous Auto Tracks are created to which paths are added. Inevitably, many faulty paths will be created that can produce correspondingly faulty results when the camera or object is reconstructed. The settings in this menu can be used to filter out or trim faulty paths, which in turn helps produce better results for the reconstruction.
The default filters and their values are already optimized for best results. However, obviously faulty Tracks can occasionally be overlooked. These can be selected and deleted prior to starting reconstruction.
On the other hand, and depending on the footage, the filters can be too aggressive and filter out too many Tracks so that barely any are left. If this happens, adjust the filter settings accordingly.
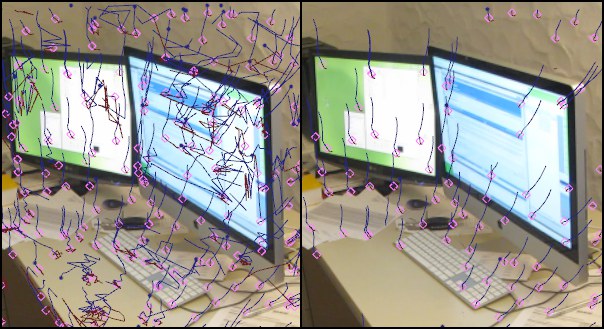 The Filter Track settings filter out faulty Tracks: left unfiltered (all filters disabled), right filtered.
Minimum Length (Frames)[2..200]
This filter waits until all other filters have been run and then filters the Tracks that are shorter than the defined length in frames. As you know, the longer the Track paths the better. Tracks that are too short are of less use for the reconstruction.
Maximum Acceleration[0.00..10.00]
Tracks whose position jumps wildly from frame to frame have a greater velocity and are often (but not always - see below) faulty. The smaller the Maximum Acceleration value is, the more the Track paths will be trimmed, i.e., the more they will be cut of with increasing velocity.
This value is also shown as an interactive slider in the Motion Tracker graph (for which the 2D Tracking Acceleration mode must be enabled).
During tracking, an attempt is made to locate the tiny image elements saved to keyframes in the following frame of footage within the range defined by the Default Search Size values. Since the camera movement and the graininess of the footage make it almost impossible to locate the exact pixel values, this threshold value can be used to allow for a certain deviation within which search patterns will be viewed as being identical. The larger the value, the greater the tolerance.
Very low Error Threshold values will result in Tracks remaining only on homogenous, monotone surfaces, which is no surprise since these types remain practically the same from one frame to the next. These types of Tracks are also the most faulty and the tend to jump around, without "latching on" to specific definitive elements.
This value is also shown as an interactive slider in the Motion Tracker graph (for which the 2D Tracking Acceleration mode must be enabled).
Smart Acceleration[0.00..5.00]
This filter is similar to the Maximum Acceleration filter described above but it does not view each individual Track separately but in conjunction with neighboring Tracks. Let's say you have a bump in the camera's motion: The Tracks accelerate quickly but since all Tracks have more or less the same increase in velocity, the Motion Tracker will recognize this bump and leave the Tracks as they are.
The larger the value defined here, the less that will be filtered out.
This filter offers the best results when used in conjunction with the Minimum Length (Frames) filter.
Manual Tracking tab
A brief description about the differences between Automatic Tracking and Manual Tracking:
- Automatic Tracking: Tracks will be created, tracked and filtered automatically. The quality of automatic tracks can vary.
- Manual Tracking: You create individual Tracks and make sure that these are correctly tracked (in extreme cases you can create keyframes for each frame).Tip:The Motion Tracker will assume that these are high quality and will give them priority over those created automatically. Manually created Tracks will not be filtered.
You can use Automatic Tracking and Manual Tracking individually or simultaneously.
Try using Automatic Tracking first and if a good camera re-construction is produced, fine. Otherwise you will have to do some fine-tuning by adding Tracks manually or by deleting bad Tracks that were created automatically (see also What are good and bad Tracks?).
How to create Tracks manually:
- Ctrl/Cmd+click on the desired position in the Viewport (the Move tool should be enabled).
- Right-click on the desired position in the Viewport and select Insert User Track Here from the context menu that appears, or
- Select the Create User Tracks tool (main menu: ) and click on the desired points.
After reconstruction, manually created Tracks will be displayed as separate Null objects in the Object Manager.
These three buttons are used to track the selected User Tracks. If nothing is selected, all User Tracks will be tracked. They will be tracked as follows for the duration defined in the Footage tab:
- <: temporally backwards
- Manual Tracking: complete
- >: temporally forwards
Using Manual Tracking is usually recommended, which will track the Track forwards and backwards. However, it can sometimes be useful to only track in one direction, e.g., if you know that the pixel pattern for a particular User Track can't be seen until frame 98, for example. Then it wouldn't make any sense to track in the opposite direction. You would then set the Track at frame 98 and track forwards.
User Tracks
The Tracks list contains a list of all User Tracks that were created (multiple selection possible) that correspond to Tracks selected in the Viewport. A Track can be assigned a unique name by double-clicking on it. This name will also appear in the Attribute Manager for the 3D feature associated with it after the 3D reconstruction. Folders can be created to organize the User Tracks.
These three buttons are used to track the User Tracks. If nothing is selected, all User This is done as follows within the temporal range defined in the Footage tab's menu:
- <: In reverse (temporally)
- Manual Track: All
- >: Forwards
Normally, it is recommended that the Manual Track button be used because it tracks in both directions (temporally). However, it can sometimes be useful to track in only one direction, for example if you have a User Tracks whose pixel pattern doesn't appear until frame 98. You would then create the Track at frame 98 and track forwards from this point on.
Each tracked Track contains a key that looks like a point in the Viewport that will be tracked (followed). This Track's position throughout the animation will be displayed as a path 10 frames before and after the short hash mark (the currently identified Track).
Now bad Tracks/paths can be corrected or deleted (see also Working interactively with Tracks) before camera reconstruction is started.
Tracks selected in the list can be deleted by pressing the Del/ Backspace key.
The following properties are shown in the list for each Track. These can be modified by clicking/ double-clicking
Track
The Track name will be listed here.
Size
Search
These settings represent the pattern and search size of the Tracks and can be modified interactively in the Attribute Manager or in the Viewport. When a user track is created, the sizes defined in the Options tab will initially be used.
 The collection of pixels encompassed by the Pattern Size (here O) must be found again in neighboring footage frames.
Again, a brief statement about how 2D Tracking works: The 2D pattern of definitive points in the footage are tracked (followed) over a long time. The next question that arises is: "How large are these definitive points and where should they be searched for in the footage?"
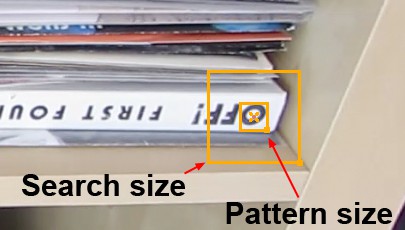
This is exactly what these two settings define. Around each User Track you will see 2 squares - one small, one large. The small square represents the pattern size: a tiny piece of bitmap saved to a given key. With this key as a starting point, an attempt will be made during the tracking process to find this pattern in neighboring frames. Of course the entire footage will not be searched, which would be too time-consuming and senseless (in most footage, each frame is only slightly offset from the previous frame). Instead, a search will be conducted only within the area defined by the Default Search Size value, i.e., within this square. If the pattern is not found in the neighboring frame, the Track will end at that point.
Once Tracks have been created, they can be modified interactively and individually at any time using the handles at the bottom right of the squares (if they were already tracked they will be re-tracked automatically after being modified). When should pattern and search size be modified?
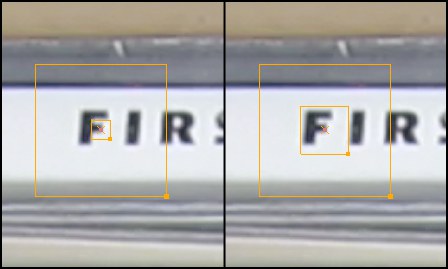 A larger Default Pattern Size value produces a more precise Track identification.
If you take a look at the image above you will see that the pattern size encompasses the small horizontal line of the letter F. If the algorithm tries to locate this pattern in the next frame it can happen that it erroneously identifies the large horizontal line as the Track. If you adjust the pattern size to include the entire letter F, the identification process will be made easier for the algorithm.
The search size should, for example, be increased if the camera moves quickly and the Track in the neighboring frame is too far away to be located.
Default Pattern and Search Size measure the scaled footage in pixels. This can be slightly irritating because the search and pattern sizes will be displayed with different sizes, depending on the Resampling value defined.
To clarify: If your perspective view is set to the size of the original footage and Resampling is set to 100%, both sizes will display the monitor's actual pixel dimensions. If Resampling is set to 50%, both search sizes will be twice as large as the monitor's pixel dimensions.
Listed user tracks can also appear in the Object Tracker's Tracker tab menu. These belong to an object tracking and must be specifically assigned there. The Motion Tracker object saves and manages all existing Auto and User Tracks, regardless of which Tracker Object it belongs to.
Filter
Here the Track with the color of the Color Filter selected below will be marked.
Lock
Enable this option if you are happy with a User Track and want to protect it from being accidentally modified (moved, deleted, etc.). Disable this option to make the Track modifiable again.
Circle
Here the pattern shape can be modified. Enabled=circular; disabled=quadratic.
Here you can switch between Square and Round User Tracks. New Tracking will be created for the selected Tracks (see also Default Pattern Shape).
Context Menu
Right-clicking on the list will open a context menu with the following commands (not yet described elsewhere):
New Folder
Creates a new folder (double-click to rename) in which you can place any number of Tracks.
Select/ Deselect All
Selects/ deselects all Tracks.
Lock/ Lock All
Locks all or selected Tracks.
Unlock/ Unlock All
Unlocks all or selected Tracks.
This option enables or disables virtual keyframes for selected Tracks.
Normally, a User Track is created by creating a key and tracking it. This tracking uses the key saved to the pixel pattern, which, of course, changes over the course of the video as it moves farther from the frame. If the change is too great, the tracking will fail and you have to make adjustments manually. Virtual keyframes help with tracking by automatically adding new keys to the tracked section according to the settings below (contrary to manually-created keyframes - which are permanent - these virtual keyframes are dependent on the virtual keyframe settings, among other things, and can therefore change).
This will produce better tracking in most cases since changing pixel patterns can be compensated for by the virtual keyframes. However, it can happen that the virtual keyframes can shift from their original, manually defined footage position. If this happens, keys can be added manually.
Virtual keyframes are colored light blue in the Motion Tracker graph.
Here you can define the rules according to which virtual keyframes should be created. The following options are available:
- Frame Spacing: this creates virtual keyframes at regular intervals.
- Overwrite Error Threshold: a virtual keyframe will be created after the Error Threshold is exceeded (the Motion Tracker graph’s
 2D Tracking Errors mode will assist in the normal value range).
- Preemptive Error Threshold: a virtual keyframe will be created before the Error Threshold is exceeded. This is the more precise method compared to the previous method and offers the best quality.
- Multi: this will be displayed if multiple tracks with different virtual keyframe settings have been selected.
Internally, the difference to the previous key (corresponding to the Tracking direction) will be ascertained for each Track at each frame. If this difference is greater than the threshold value defined here, a virtual keyframe will be created. The smaller the value, the less modification that will be allowed compared to the previous frame and the more virtual keyframes will be created and vice-versa.
Frame Interval[-2147483648..2147483647]
Use this setting to define the temporal interval in which virtual keyframes should be created.
This setting can be used to change the color weighting of selected Tracks. A new Tracking will be created immediately. Details about color weighting can be found under Preferences: Weighting Red/Green/Blue.
In the Color Filter selection menu you can select from the following options:
- Luminance: The luminance from pre-R19 versions of Cinema 4D
- Red/Green/Blue: Use this option to emphasize a specific color channel
- Red/Green/Blue Expanded: These settings take the Red/Green/Blue a step further and set the color channels to negative values, e.g., so red can create an even higher contrast in front of a white background (see also Preferences: Weighting Red/Green/Blue). Colored markers will be enhanced in front of a background that contains a high amount of the marker color.
- Default: Sets the values in the Options menu to the defined color weighting.
- Use as Default: Sets the currently defined colors as default color weights (Options menu). Can be called up for the current footage after the first User Track has been created in order to make an optimized color filter available for additional User Tracks.
- Custom: Is available if you use custom values and sets corresponding color weights for the individual color filters (they can be opened by clicking on the small arrow next to Color Filter).
Options tab
Default Pattern Size[3..10001]
Here you can modify the default values for these settings, which are applied when Tracks are created automatically or manually (the latter can also be modified after creation).
Details for both sizes can be found here.
Normally, the Square option would be the correct choice here. However, if you have footage that, for example, has a round marker (or small spheres), the Circle option should be selected. If the pattern size lies exactly on the circular shape, it doesn't matter if the background changes (which would on the other hand be the case with a square pattern size, meaning that the pattern might not be found). Depending on what you define here, newly created Tracks will use the respective shape. Individual, selectable User Tracks can subsequently be modified (Manual Tracking tab).
- Show Tracks with Path: Auto Tracks and User Tracks, including their paths, will be shown.
- Show Tracks: Automatically created and User Tracks will be shown without their paths. This is useful if you want to compare the tracked Tracks with the underlying footage when searching for bad Tracks.
- None: Neither Tracks nor paths will be shown.
Select Original to display the footage as usual.
Select Tracker View if the a selected User Track's footage should be displayed in consideration of the color channel weighting described below. The footage will then be shown as a grayscale: Tracks can be best followed in regions with large contrast, e.g., black-to-white transitions (see next image). Regions with no contrast cannot be tracked.
Use these options to switch the pattern and search size representations for User Tracks on or off in the Viewport.
A magnifier can be used when moving keys in the view. Since the Motion Tracker Track View was introduced it has become less important and can therefore be turned off here.
Default Red Weight[-200..200%]
Default Green Weight[-200..200%]
Default Blue Weight[-200..200%]
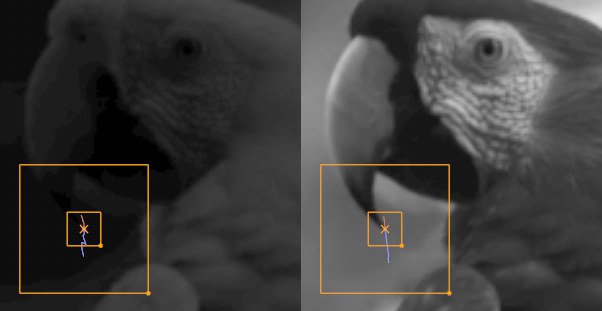 At left poor contrast, at right good contrast for the Track.
Color channels in the footage can be weighted differently for each User Track (not Auto Track!). In previous versions of Cinema 4D, only the combined brightness of all 3 color channels was taken into consideration. The default percentages of 29.9%, 58.7% and 11.4% for red, green and blue, respectively, reflected the human eye's ability to perceive brightness. For example, red is perceived three times brighter than blue for a constant light. With these settings, Cinema 4D behaves as earlier.
Note also the Footage Display and Tracker Display options (see above), which can be used to see what a Track sees in conjunction with the defined color weighting.
Note that you can define negative values. Imagine you want to track a red marker on a white background. The optimal setting for red, green and blue would be 100%, -100% and -100%, respectively. Why not 100%, 0%, 0%? Because the white background has a large red component. The -100% values greatly increase the contrast. Hence, the color weighting can be used to define the color contrast for the Track very precisely.
With the color weighting here you can define the weighting for newly created Auto and User Tracks. Existing User Tracks can also be given a new weighting (Manual Tracking tab).
If this option is enabled, the region encompassed by the Default Search Size will be moved slightly forward to its expected position in accordance with the Track's (past) direction of movement. This can make it easier for the algorithm to identify Tracks for fast and smooth camera movements since the search region will most likely lie somewhat closer to the next assumed Track position. The search size can also be reduced somewhat (=faster calculation). However, this is of little use for Tracks that jump around quickly.
If the Tracks listed in the Manual Tracking menu are assigned to an Object Tracker object, its name will be displayed in the list (and only here) next to each respective Track, if this option is enabled.