Motion Tracker
What is motion tracking?
Motion tracking - also known as ,match moving’ or ,camera tracking’ - is the reconstruction of the original recording camera (position, orientation, focal length) based on a video, i.e., 3D objects are inserted into live footage with their position, orientation, scale and motion matched to the original footage.
For example, if you have original footage in which you want to place a rendered object, the footage must be correctly analyzed and the 3D environment (the recording camera itself as well as distinctive points with their positions in three-dimensional space) must be reconstructed so the perspective and all camera movements are matched precisely.
The Object Tracking function can be seen as a Motion Tracking function. Detailed information can be found under Object Tracker.
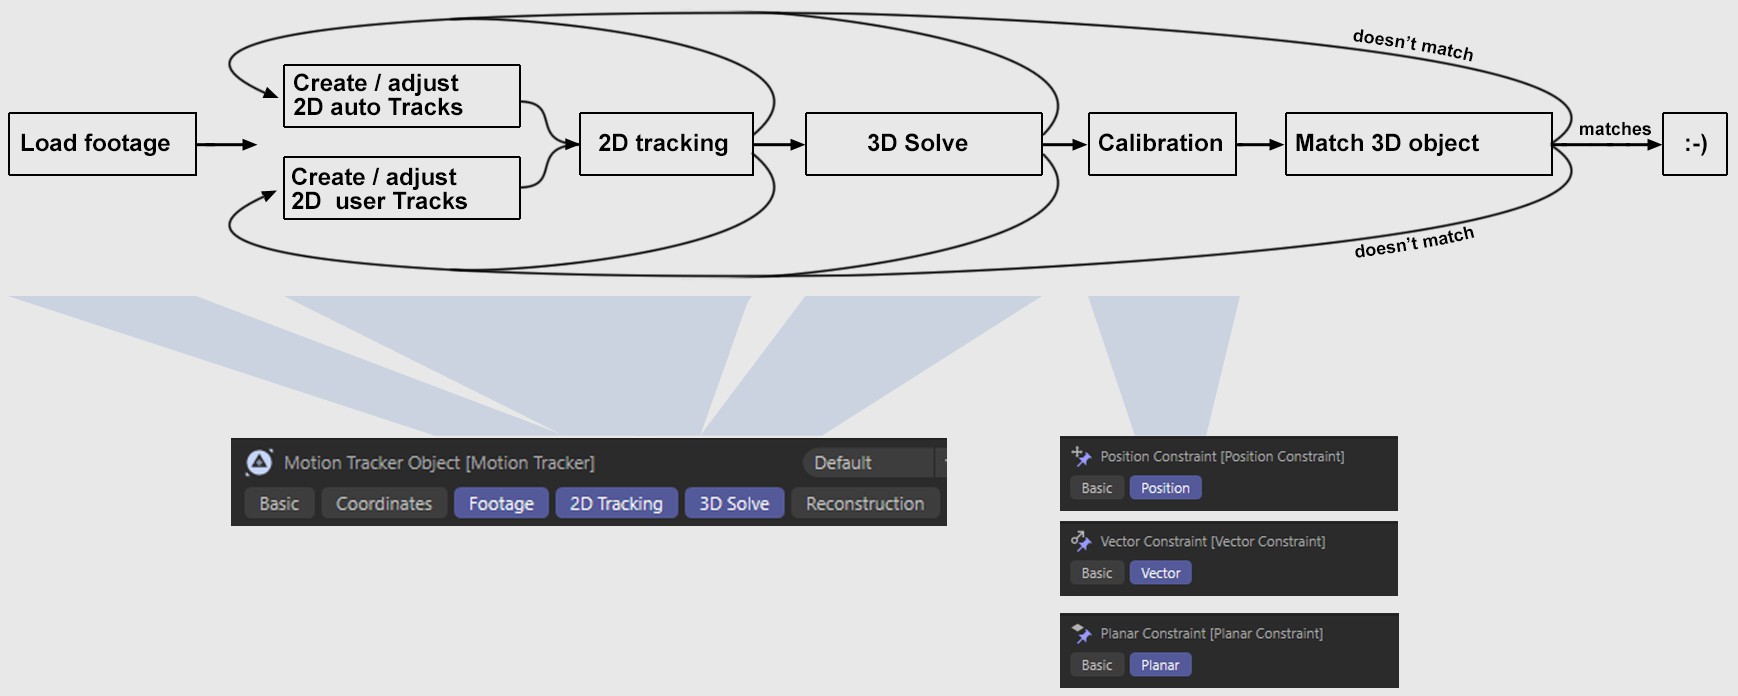
This is a complex process and must therefore be completed in several steps:
-
Distinctive, easy to follow points (referred to as Tracks) will be ascertained in the footage and their movement followed. This can be done automatically, manually or as a combination of both and is called 2D Tracking.
-
Using these Tracks, a representative, spatial vertex cluster (that consist of Features) will be created, and the camera parameters will be reconstructed.
- Several helper tags (Constraint tags) can now be used to calibrate the Scene, i.e., the more or less disoriented vertex cluster in 3D space (of course, including the comparatively clearly defined camera) will be oriented according to the world coordinate system.
In Brief: How does Motion Tracking work?
Motion Tracking is based on the analysis and tracking of marked points (Tracks) in the original footage. Positions in 3D space can be calculated based on the different speeds with which these Tracks move depending on their distance from the camera (this effect is known as parallax scrolling).
 Horizontal camera movement from left to right.
Note the difference between footage 1 and 2 in the image above. The camera moves horizontally from left to right. The red vase at the rear appears to move a shorter distance (arrow length) than the blue vase. These differences between parallaxes can be used to define a corresponding location in 3D space (from here on referred to as Track) relative to the camera.
Logically, Motion Tracking is made easier if the footage contains several parallaxes, i.e., regions with different parallax scroll speeds due to their distance from the camera.
Imagine you have footage of a flight over a city with a lot of skyscrapers: a perfect scenario for Motion Tracking in Cinema 4D with clearly separated buildings, streets in a grid pattern and clearly defined contours.
Wide open spaces or nodal pans (the camera rotates on the spot) on the other hand are much more difficult to analyze because the former lacks distinctive points of reference and the latter doesn't offer any parallaxes. You must then select a specific Solve Mode in the Reconstruction tab to define which type of Motion Tracking should take place.
Motion Tracking workflow for camera tracking
 Simplified Motion Tracking workflow.
Proceed as follows if you want to reconstruct the camera using a video sequence:
- In the main menu: Select and select the footage you want to solve. The workflow in the image above will now take place up to and including 3D Solve.
- All went well i if a Motion Tracker object, a reconstructed camera and Auto features were created in the Object Manager (see also 3D Reconstruction). Now use the Constraint-Tags to calibrate the 3D reconstruction, then make a test render to see if it's good enough. If not, the 2D Tracks have to be fine-tuned (see What are good and bad Tracks?) and then the reconstruction and calibration must be repeated.
- If the status bar contains a message other than Deferred Solve Finished you can move straight to fine-tuning the 2D Tracks (see What are good and bad Tracks?) and then repeat the reconstruction and calibration until the 3D reconstruction was successful.
This is a simplified representation of the workflow. Of course flawed reconstructions can result if you select the wrong Solve Mode or if you define an incorrect Focal Length / Sensor Size for the Motion Tracker object (Reconstruction tab). However, the most important - but also the most time-consuming - work is fine-tuning the 2D Tracks.
General
There is only one way of checking if the process was successful. This is at the very end when you see whether or not the 3D objects added to the footage look realistic, i.e., if they don't jump or move unnaturally.
If this is not the case you will most likely have to fine-tune or create the 2D Tracks again. You can modify a few settings but Motion Tracking depends largely on the quality of the Tracks. Motion Tracker offers as much support as possible with its Auto Track function but in the end you will have to judge for yourself which Tracks are good and which are bad - and how many new Tracks you will have to create yourself (see also What are good and bad Tracks?).
Scene setup example
After successfully creating a camera reconstruction, objects will have to be positioned correctly and equipped with the correct tags.
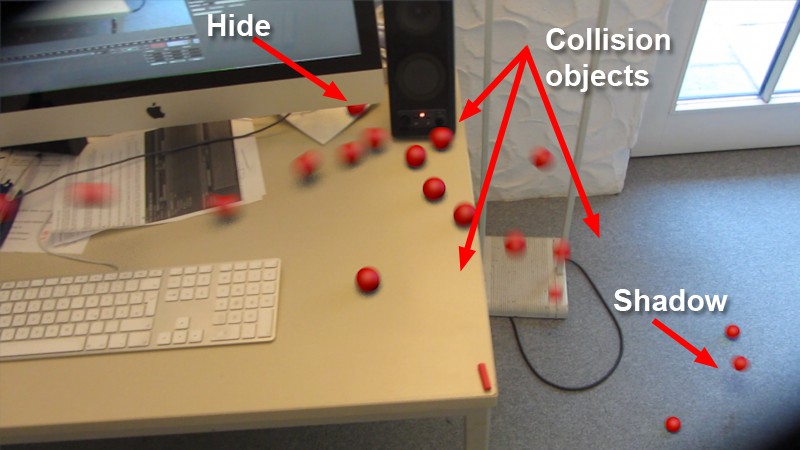
 An invasion of red spheres.
In this example, an Emitter tosses spheres onto a table that roll over the table's edge, collide with the speaker and fall to the floor. This scene uses (invisible!) proxy objects that serve as Dynamics collision objects and, in the case of the monitor, conceal the spheres behind it:
 Several simple, effectively placed proxy object are used to generate correct shadows and collisions.
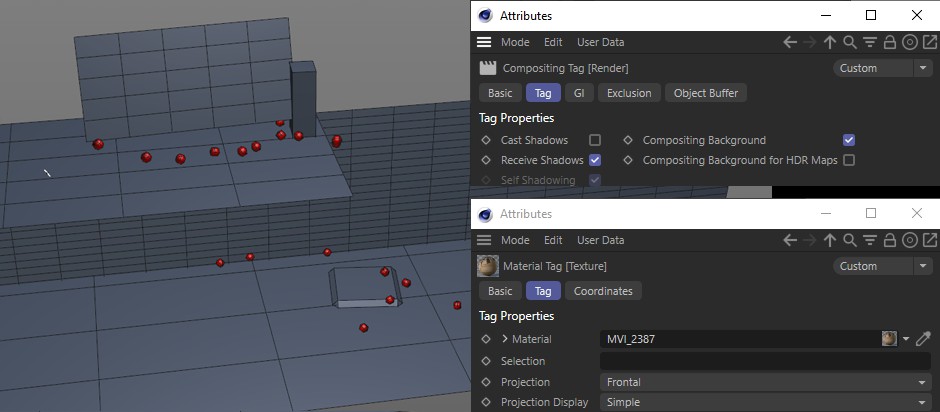
Each plane was oriented using a Planar Constraint tag's Create Plane function (however, the Polygon Pen is perfectly suited for this; enable the Snap function and activate ![]() 3D Snap and
3D Snap and ![]() Axis Snap). Each of these proxy objects have the following tags:
Axis Snap). Each of these proxy objects have the following tags:
- Compositing tag with Compositing Background enabled and Cast Shadow disabled.
- Material tag with the footage set to Frontal Mapping.
- A Rigid Body tag, if necessary, to define the object as a collision partner.
As a result of these settings, the proxy objects are not visible for rendering, except for the shadows(of course separate light sources have to be created and positioned correctly for the shadows).