Object Properties
Here you will find a list of options representing individual properties and components of the Pyro simulation. All properties activated at the Pyro Emitter tag are always simulated internally, but these options allow you to define which of the Pyro properties should be marked for storage in RAM cache or as cache files. The three possible options On, On Export and Off have the following functions:
- On: Here, a complete cache of the currently displayed simulation frame is stored in memory (RAM cache). A simulation frame in memory can also be rendered by assigning a Redshift Volume, or Pyro Volume material to the Pyro Output object directly in the viewports or also in the Picture Viewer or Redshift RenderView (see description of the Pyro workflow). However, the memory requirement as well as the preparation time during rendering is increased compared to rendering a saved cache file.
In this mode, Volume Builders and Volume Meshers can also be used to calculate geometry from the Pyro simulation. In addition, properties marked with On are also included when cache files are saved. The main difference to the On Export mode is that On keeps even more information of the current simulation frame directly in memory to allow interaction with generators in the scene already without prior caching. If you can do without it, the On Export setting can therefore save some memory.
- On Export: As well as the On setting, marks the Pyro properties to be saved in cache files. Press the Cache button in the Cache tab of the Pyro Output object to save the simulation. During the playback of the simulation, no RAM cache of these properties will be created. Therefore, the simulation cannot be processed directly by a Volume Builder in this mode. However, even in this mode, a RAM cache is created when the simulation is rendered. However, this requires more memory compared to rendering a simulation loaded as a .vdb sequence.
For loading and replaying a saved simulation, for example, an RS Volume object or even the Pyro Output object itself can be used.
- Off: These properties are also included in the simulation calculation. Off does not mean that there is no simulation of these properties, but only that the simulation is not marked for export or storage in RAM in the process. So if you don't want to simulate temperatures, for example, leave Temperature Enabled turned off in the Pyro Emitter Tag settings instead. Properties marked Off cannot be rendered unless you read a vdb sequence (see the Cache tab of the Pyro Output object).
If the Pyro Output object is used to read a .vdb cache sequence, the properties marked Off are also read, displayed and rendered. When creating a Volume Set object via the Set Initial State button in the Pyro Scene settings of the Pyro Output object, all Pyro properties that have been activated on the Pyro Emitter tag are always taken into account. This then also affects properties that may have been marked Off here.
The final rendering should be done with a .vdb cache sequence if possible, as this uses the least amount of memory.
The following options are available for display in the Viewports and storage as RAM or file cache:
The density simulation, which can, for example, be used for the representation of smoke, haze or fog. Stored, this information is given the name density and can thus be used, for example, in the Scatter Channel of a Redshift Volume material. When using a Pyro Volume material, 'density' is automatically entered.
The density component of a simulation is also suitable in combination with Volume Builder and Volume Mesher objects to create geometry from a Pyro simulation. The following image shows an example of this.
 On the left is the original simulation, with smoke generated by two animated cubes. On the right side, the Pyro Output object of this simulation was grouped below a Volume Builder and a Volume Mesher in order to convert the density first into voxels and then into polygons, which can be covered with any materials, among others.
These are the color values from the simulation. This property is not absolutely necessary, since simple colors for density and temperatures can also be defined, for example, using a Redshift Volume material. However, color information can also be assigned individually with the Pyro Emitter tag and then stored with it. This can be very helpful, because the colors of neighboring Pyro simulations can also mix to form new colors. Another particularly practical feature is that, in addition to the actual color of the Pyro Emitter tag, a Weight value can also be set to adjust the opacity of the colored density. As a result, the smoke can not only be colored as desired, but its transparency can also be individually controlled, as shown in the figure below. The Redshift Volume or Pyro Volume material allows you to evaluate the simulated colors within the shader if you enter the name color there.
When using MoGraph Matrix objects or Thinking Particles, the color assignments of these elements can be taken over directly by the Pyro simulation. In addition, the Pyro Scene settings also provide dissipation functions for color values, through which colorful smoke can be recolored to black smoke over time.
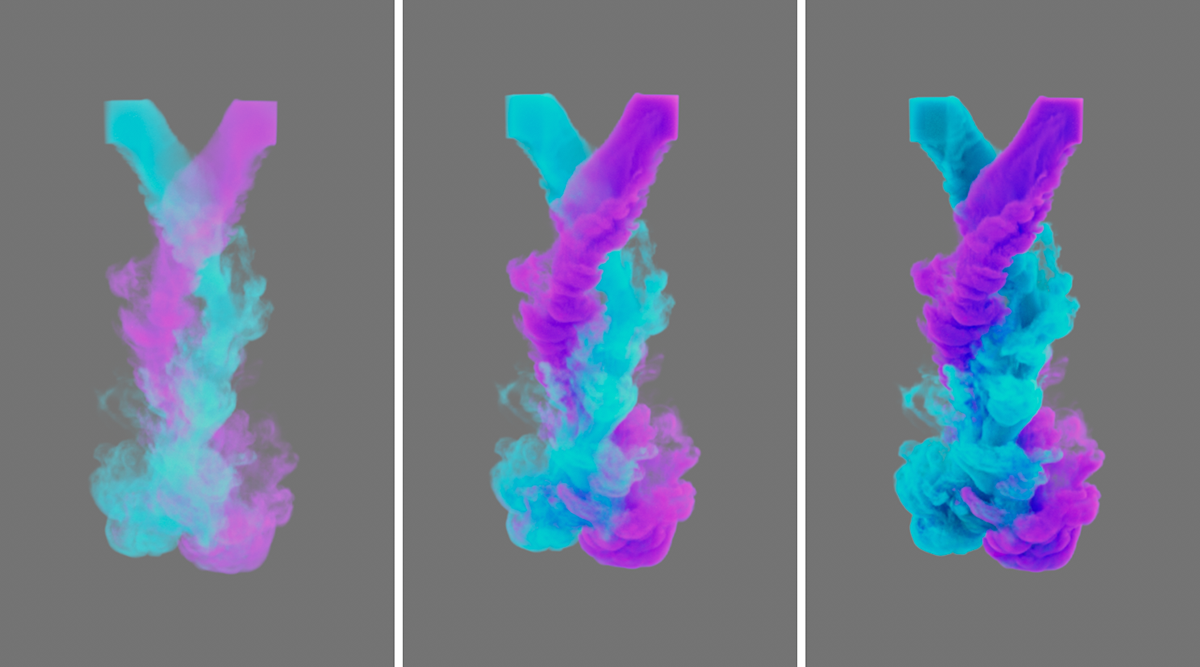 The desired opacity of the density simulation can also be set as desired via the Weight setting of the color. Both the color and the weighting can be stored with the color component of the simulation and used, for example, within the Redshift Pyro Volume material.
The simulation of the temperature. This information is needed to render flames or explosions, to define typical color gradients in the fire and the emission of light at the hot gas. The use of these data can be done in the Redshift Volume material by entering temperature e.g., in the Emission Channel. When using the Pyro Volume material, this name is already entered correctly. This information can also be used for individual coloring of the simulation. As the temperature decreases over time, natural gradients in glow and colorations automatically result. The following figure also gives an example of this.
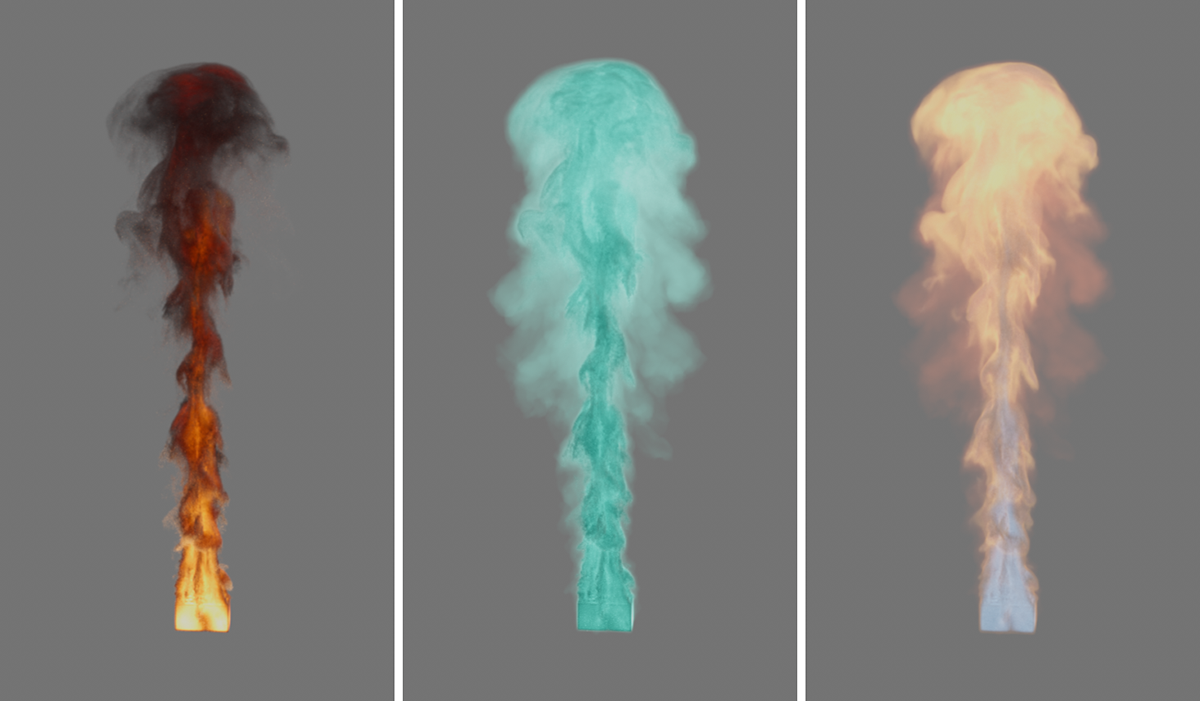 This sequence of images shows predominantly the effect of the rendered temperature and differs only in the coloring of the temperature due to the Pyro Volume material. On the left, Blackbody coloring has been activated in the material, which allows natural colors to be automatically assigned to match the existing temperatures. In the center, a simple color was used in the material for the temperature and an individual color gradient was used on the right, through which abstract colorings of the temperature are then also possible.
The fuel simulation. Since fuel is often already ignited very close to the Emitter and converted into density, pressure and temperature there, this information is not needed for rendering in most cases. The fuel information is stored in the cache under the name fuel. However, since fuel can also be generated, for example, via individually created variables within Thinking Particles setups or via a separate Pyro Emitter object, admixture at a later stage of the simulation is still possible.
This property describes the direction of motion and the amount of velocity within e.g., a flame or cloud. This information can be used to calculate Motion Blur on the RS Volume object or on the Redshift Object tag. In addition, the velocities are needed for subsequent up-scaling of the simulation, i.e., subsequent refinement of the simulation and addition of further turbulence (see example in the following figure).
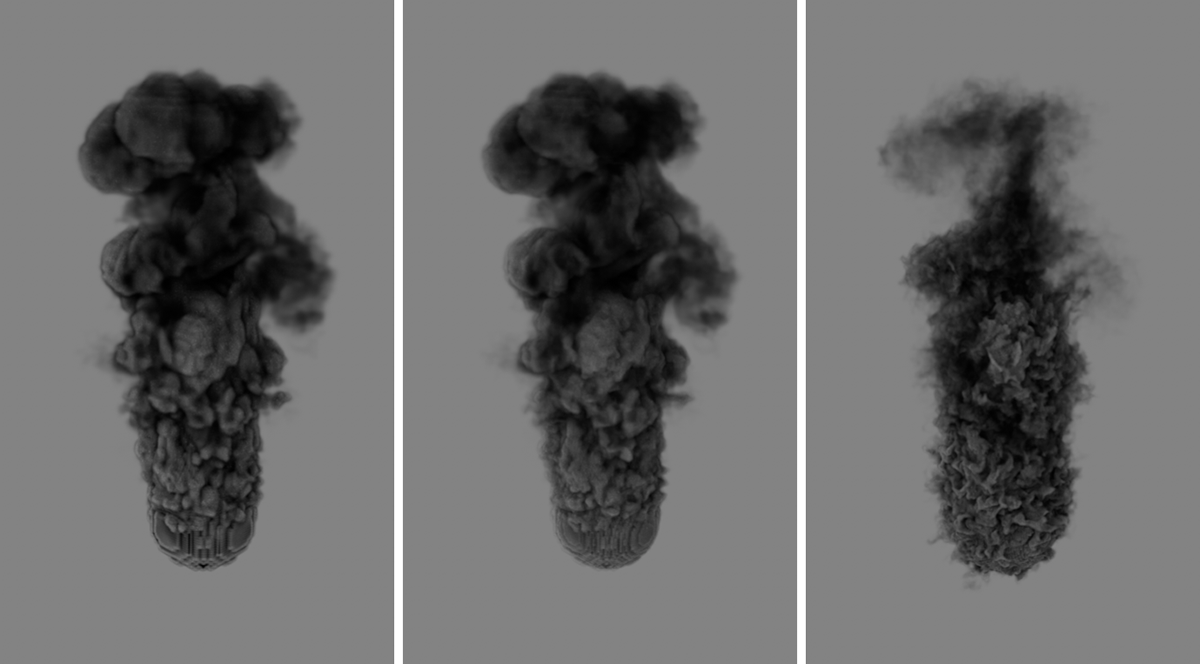 On the left of the image is the original simulation, which was calculated with relatively large Voxels. While this speeds up the calculation, it can make the simulation appear blurred and less detailed. If the basic shape of such a simulation is to be preserved, using up-scaling with the simulation saved as a cache is a good option to add swirls and details afterwards. The two renderings on the right show variants that were thus created from the low-resolution simulation.
Another benefit is the evaluation for controlling e.g., particles, which can then be animated synchronously to the simulation. The velocities are generally stored under the velocity name in memory or in the .vdb files.
Since velocities are calculated within each cell of the voxel tree, a relatively large amount of memory is required to store a velocity cache. This amount of data can be reduced considerably in some cases by activating Mask Velocity.
As already indicated in the description of the Velocity setting, the storage of velocity vectors within the Voxel tree requires a relatively large amount of memory. By activating this option, the storage of vectors can be limited to the areas where density, colors, temperatures or fuel are present. As a result, no more velocities are stored for the "empty" areas in the Voxel tree. The following figure shows an example of this.
However, if the use of the stored velocities is to be done together with other simulations or to be used for up-scaling the simulation (see Upres options in the Cache settings), this option should be left off to keep the entire simulation volume filled with velocity vectors.
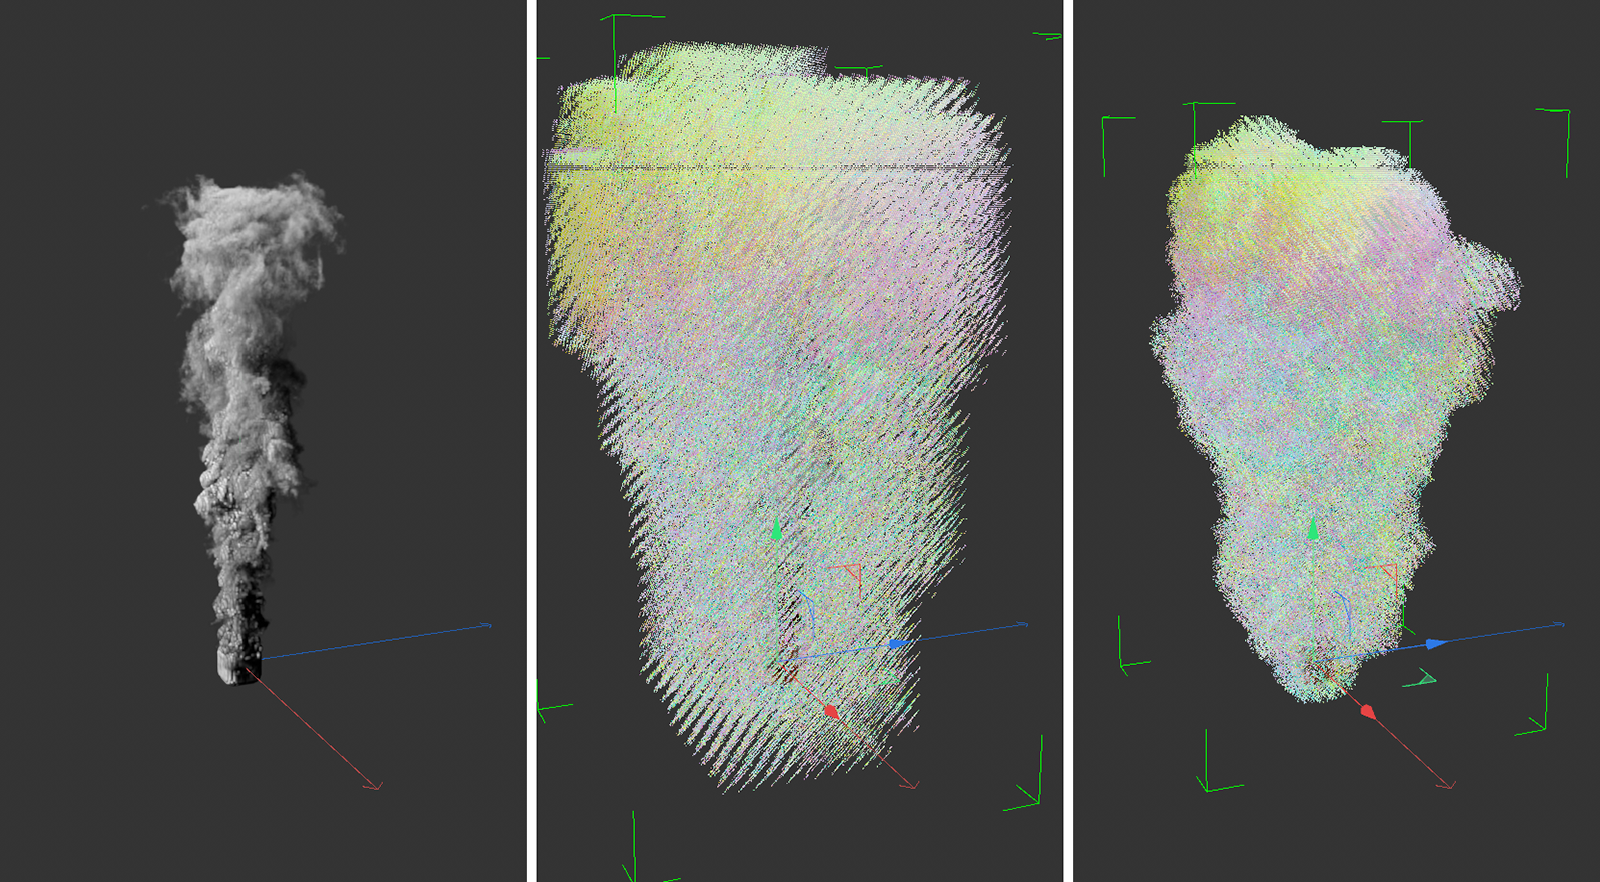 On the left is the simulation of a rising density smoke plume. If you display the calculated velocity vectors for this simulation (Velocity: On) , they fill the entire Voxel tree. This can be seen in the middle. By activating Mask Velocity, the velocity vectors remain only in the areas where density, colors, temperatures or fuel were registered. This reduces the number of velocity vectors enormously in some cases.
Pressure changes occur in the simulation due to temperature differences and the conversion of fuel to temperature and density. This information is not needed for rendering the simulation, but may be useful for special effects or analysis purposes. The pressure information is stored in the cache under the name pressure.
This describes how the simulation expands or contracts at each point. This information is not needed for a normal rendering of the simulation. The Divergence can be found in the cache under the name divergence.
This setting is only available if you activate the Rest grid in the pyro scene settings. A Rest Grid structure contains vectors that are comparable with UVW coordinates and move with the simulation. This additional information can be used by the renderer, for example, to place shaders or deformations on the simulation and thus add details to it.
The term Dual Rest Grid describes the internal calculation of the rest grid structure. This consists of two separate vector structures that are calculated at a time interval from each other. The final structure then results from an interpolation between these two Rest grid states. The time interval used for this can be influenced via the Pyro Scene Settings with the Rest Grid Reset Cycle value.
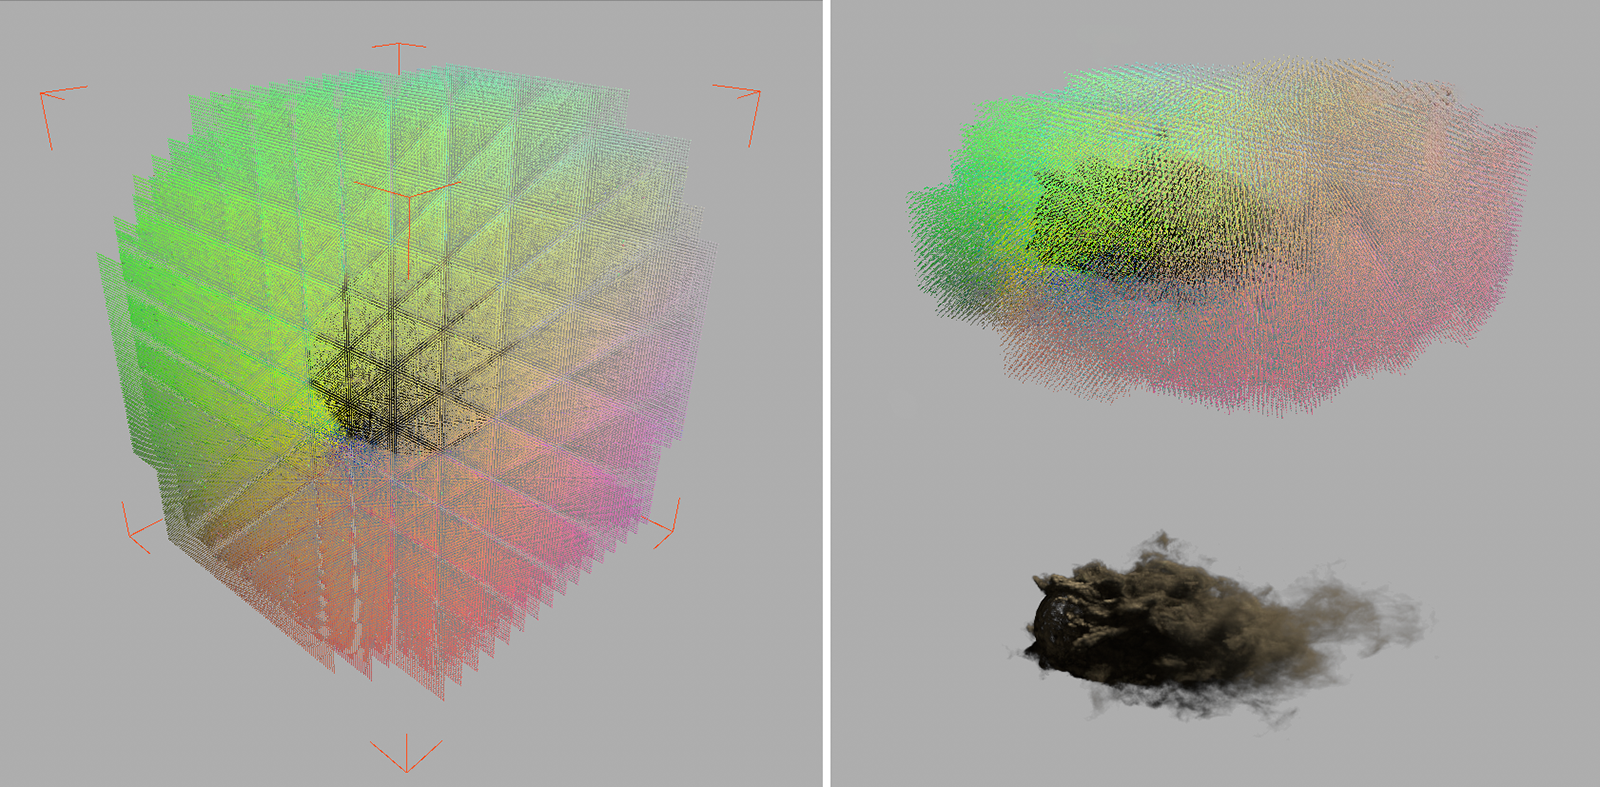 On the left you can see a simple ball that emits smoke. The colored structure represents the X, Y and Z values of the Rest grid vectors as red, green and blue values. You can see the typical 0 to 1 values for the three vector components, which clearly describe the spatial structure of the simulation volume in a similar way to UVW values. As can be seen on the right-hand side of the illustration, the Rest Grid always adapts to the simulation and updates itself in a predefined time cycle. This is particularly necessary when a simulation changes significantly in a short period of time.
Please also note the following Pre-Blend Rest Grids option. This was introduced with Cinema 4D 2026.0 and, when activated, corresponds to the calculation of older versions in which only the resulting rest grid structure is exported (under the name restgrid).
If Pre-Blend Rest Grids remains switched off, the two internal rest grid structures are exported under the names restgrid1 and restgrid2. This allows you to individually interpolate between these structures.
The following video shows an example of the restgrid1 structure on the left and the restgrid2 structure of a simulation on the right. The restgrid structures in the color channel of the Pyro material were used to make their value changes and differences optically visible.
You control the updating of the Rest Grid structure by defineing a time period in the Pyro Scene Settings. You can find more information here.