Import/Export
In the following export filters, wherever you can define a maximum texture format, the maximum will apply to the longest side of a texture. The shorter side will be scaled proportionally.
Data can be opened in the following way for all import formats:
- Main menu:Open File/Project
- Main menu: Add File/Project
- Drag & drop the file onto the program interface
Whenever a foreign format is opened in one of these ways, the corresponding import dialog will appear automatically. Its default settings can be predefined via the various entries in the Import/Export group of the Preferences menu.
Import
When importing external scenes, you can decide globally for which renderer they should be loaded into Cinema 4D.
In addition to switching the render presets to the corresponding renderer, these scene elements will then be loaded or converted specifically for the renderer - provided the corresponding formats also support this. This applies in particular to:
- Materials
- Light sources
- Cameras
By default, Cinema 4D supports the old renderers (standard/physical renderer) and, of course, the preset Redshift renderer.
Cinema generates the following for the following selections:
- Standard/physical: Standard materials with the usual material channels and corresponding textures.
- Redshift: Redshift standard Node Materials with corresponding linked Nodes/textures of the common material properties. This can look like this, for example:
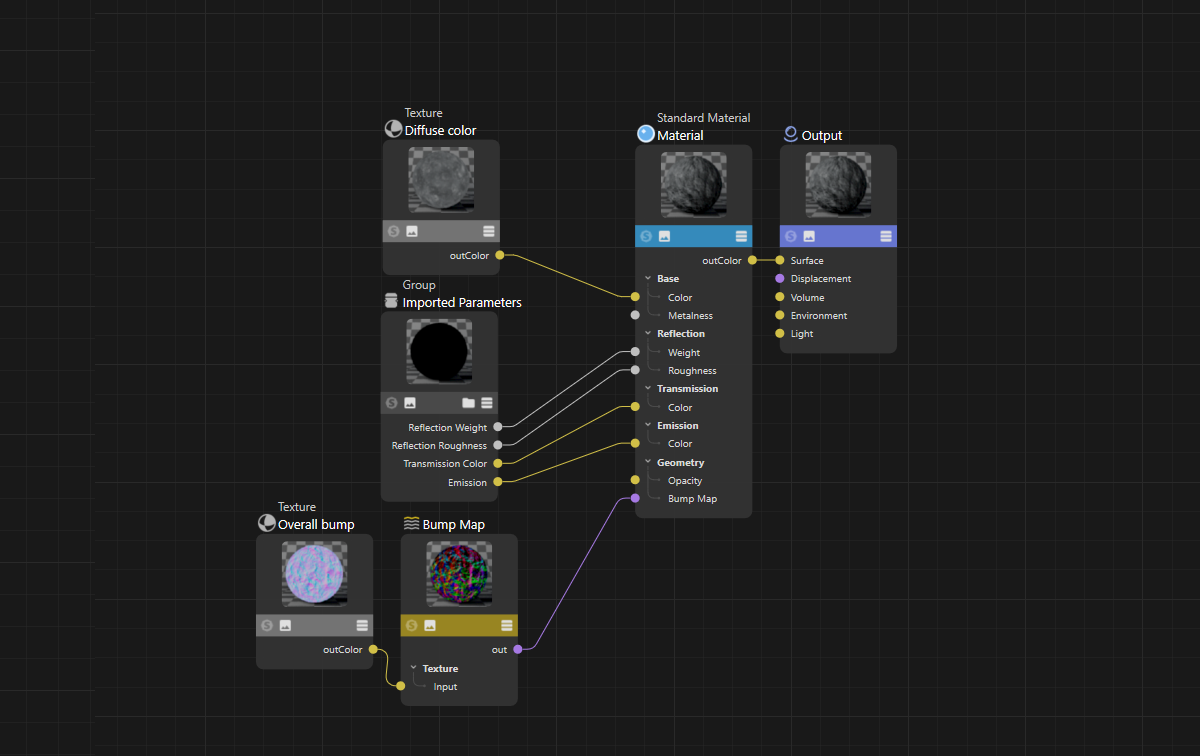 Here is an import from an FBX file in which textures and material settings (via the Imported parameters Node) are fed into a Redshift standard material.
If you have installed other renderers, these can also be listed here.
The handling of the color values from the various sources during display in the viewport, rendering and saving is influenced by the Color Management that you can specify in the Scene Presets. You can find the relevant information here. A basic introduction to the topic can also be found here.
When importing external data, various presettings for this Color Management can be made automatically.
The imported color values are then automatically interpreted in the color space selected here before they are converted into the Render Color Space and also saved in this. As a rule, the sRGB color space should be the right choice here, unless you know that the imported file uses color values that are available in a larger color space. In this case, you can also switch to one of the larger color spaces.
Simple color values that are available as color selectors in Cinema 4D can still be switched after import and converted to a larger or smaller color space. Further information on the use of different color spaces on color selectors can be found on this page.
If you always want the corresponding dialog to be displayed when importing, activate this option. Any changes made in the dialog will always be adopted as the default setting.
If this option is deactivated, the dialog will be suppressed and will use the properties defined in the default settings.
The described behavior can be temporarily reversed by pressing the Alt key(while clicking on the open button of the file selection dialog).
This option allows you to define what happens to files that you drag and drop into Cinema 4D:
- Option activated: The file content will be added to the scene currently displayed in Cinema 4D.
- Option deactivated: The file will be loaded normally.
If you press the Shift key when you drop the file (i.e., release the mouse button), the behavior just described will be temporarily reversed.
Some minor innovations in R2024
The following minor innovations were made in R2024:
- glTF: The glTF importer can now import *.glb files and materials. The glTF exporter can also export instances as instances.
- USD: USD can now import materials as Redshift materials.
- GoZ: Cinema 4D now imports dynamic subdivision levels from ZBrush and ZBrush materials as Redshift Node Material.
- Forger: Selection transfer from Forger to Cinema 4D, support for Area light sources. Spline types (e.g., linear, Bezier) can be transferred.
Imported files can also contain Python code that can be executed in the form of a Python tag or Python Generator object, for example. If such scripts come from sources that you do not know, they could theoretically also conceal faulty or - in the worst case - destructive functions. This setting gives you the option of searching for Python elements when loading a file and then aborting the loading process if necessary, thus preventing the code from being executed.
The following options are available:
- Never: There will be no check for Python elements. The file will always be loaded completely and any Python code it contains will be executed automatically. This is the default setting for older Cinema 4D versions.
- Once; When loading the file, you will be asked whether a check for Python elements should be carried out or not. Your selection will automatically be saved as the default setting for this file. This default setting will be used when this file is reloaded. The list with the settings made for the various files can also be deleted again by pressing the Flush Data button. The selection dialog will appear again in any case, even if a file has already been loaded with the Once setting.
- Always: This will always check whether Python elements are contained in the file. If Python code is included that does not correspond to the standard code as it is used when creating new Python tags or generator objects, you will be asked whether the loading process should be continued or canceled.
Flush data
If you use Verify Scripts Once, a list of open files will be created in which it is noted whether a file should be opened normally or prevented from loading. If you want to clear this list, press this button.
Export
Color Space[-2147483648..2147483647]
Here you can select the color space into which the color values used in the project are to be converted and saved. All color values are always available in the - usually - very large render color space and can be converted from there to the common sRGB color space, for example. This is also the default setting.
Further information on color management in Cinema 4D (see Scene Presets) can be found below. a at this point.
If you always want the corresponding dialog to be displayed when exporting, activate this option. Any changes made in the dialog will always be adopted as the default setting.
If this option is deactivated, the dialog will be suppressed and will use the properties defined in the default settings.
The described behavior can be temporarily reversed by pressing the Alt key(while clicking the Save button of the file selection dialog).