OCIO Color Management Basics
In recent years, advances have been made in the standardization of the color management in different applications. Two of the most popular technologies and standards are ACES and OpenColorIO. Both are open standards.
ACES offers color spaces and transformations that reflect the demands of a high-quality rendering for Hollywood films and is used by many renderers.
OCIO offers a color management pipeline for applying these color spaces and transformations but is not restricted to ACES. In fact, a developer can create their own color spaces and transformations and make a configuration file available that defines how these spaces and transformations work together.
When describing the functions of a color management system, we encounter some technical terms, the meaning of which you can read here.
If you are already familiar with the OCIO/ACES concept, you will find the section for Project/Color Management under Edit>Project Preferences. There you will find a summary of all color management settings for your project. Additional details for all applicable color management components can be found here:
- Configuration of the color management in the Preferences menu.
- Interpretation of colors on the Color Picker:
- Interpretation of colors in Bitmap shader:
- Interpretation of colors in Redshift Texture Sampler:
- Interpretation of colors in the vertex map shader
- Interpretation of colors in MoGraph color shader
- Overwrite the display transformation in the Picture Viewer.
- Override display transformation in Redshift RenderView.
- Overwrite the display transformation in the 3D views.
Make sure you don't bake the view transforms into the saved OpenEXR files to keep your renders in ACES for a post-production pipeline.
Introduction OCIO
The number of different image display devices (and their color spaces) that you may need to support has undoubtedly increased in recent years. Working with real cameras offers you the ability to add an even wider range of images to Cinema 4D, whether its HDR or film material, , which also increases the number of color spaces accordingly. As an artist you are often caught in the middle and have to work with several different input and output formats for a single project - but you would rather spend your time on more creative ventures.
The answer is OCIO as a central color management platform that unites a considerable number of recording and playback devices around Cinema 4D. OCIO has highly developed tools designed for use in the film industry that are easy to access.
OpenColorIO offers a color management workflow that is based on multiple teams at various studios working together on a given project. It includes all elements needed for professional production and you can focus on being creative instead of worrying about color profiles and other issues.
This can be used for your workspace as well as for an entire production environment; only one central installation is required. The idea is that the entire color management stems from a single source, which ensures that it works well with all other sources. If improvements are made in the future, all OCIO sources can be adapted immediately. For more information visit https://opencolorio.org.
Advantages
If your entire color management system is based on the same set of rules you can easily create a working color pipeline. In Cinema 4D you are used to bringing the outside world into a project in the form of 360° HDRI panoramas or bitmap textures. When you use a unifying system like OCIO, you'll quickly find that with a little care, your production can run more efficiently. Receiving projects or forwarding your work to the next step in the pipeline will require less communicative effort since the color management framework used makes a more efficient workflow possible.
The best part is that Cinema 4D is delivered with OCIO pre-configured and ready to use. This is good news for everyone who has not worked with color management until now. If you already have OCIO installed, no problem. In Cinema 4D you can easily use your own OCIO configuration. Getting started with a new color management system has probably never been easier. More information can be found at https://opencolorio.org.
ACES (Academy Color Encoding System)
Introduction
The Academy Color Encoding System (ACES) allows you to create image content without the limitations of small color spaces. In Cinema 4D you will find a comprehensive ACES implementation so that your content can easily be made available for the big screen. The driving force behind ACES was the necessity to combine numerous image sources such as from the camera systems RED, ARRI, Sony, Canon, BMD, etc., into a large color space. With the increasing number of digital cameras and options for digitizing film, adapting all of these sources posed a major problems. ACES is designed to solve these problems.
If OCIO is installed on your system, all components needed for production in ACES are already available to you in the current or future version of Cinema 4D. ACES was conceived as a future-safe system that can work with just about any camera source and can harmonize these. Cinema 4D can be seen within this system as a virtual camera whose contents can be produced in an ACES environment from the very start - from the creation of a rendering to outputting a file.
The most important requirement for fitting your projects into an ACES-based production: keep your average gray value as close to 18% (or at 0.18) as possible, as you might do anyway to get appealing images. ACES works by simply defining an optimal digital camera and an optimal monitor. Both will be presented as the best possible camera and best possible display device. A point of reference will be created for all other cameras and the monitors (projectors) will be evaluated and be transformed accordingly for the respective input devices (Input Device Transform (IDT)) or output devices (Output Device Transform (ODT)).
A full production pipeline requires a few more elements but with Cinema 4D we can produce the ACES content we need directly, using OpenEXR as the defined exchange format within ACES. Maxon wants to provide the greatest degree of flexibility in Cinema 4D for the production of content at the studio level without requiring you to be an expert in color management. To consolidate all of these high-performance cameras, a huge color space was defined that can manage all colors that can be seen by the human eye. This color space makes it possible to save all recorded or rendered image values. When display devices and projectors are improved in the future they will be able to use the same image material without having to rerender the project. Laser projectors can, for example, always cover a greater part of the visible spectrum and considering the fact that HDR (High Dynamic Range) productions are becoming the norm, it's a good idea to make the original work future-proof.
ACES is not a new look
The concept of ACES is to be as true as possible to the filmed or rendered image values. Adapting cameras without losing the properties of the individual recording devices was an important focus of the ACES team from the very beginning (hundreds of experts have been working on its development since 2008).
The Export (defined in the Reference Render Transfer RRT, including the Individual Output Device Transform, "ODT") shows a more cinematic rendering by finer grading highlights and better handling blacks. This often looks better compared with renderings for which the image values were not converted. The goal should always be to maintain the rendered images values as precisely as possible. As tempting as it may be to have this look, such an output should first take place in the end when outputting to a specific device. The originally saved ACES-based content should remain unchanged; otherwise a separate adaption to a given output device will no longer be possible.
Areas of application
The color science and technical efforts embodied in OCIO and ACES functionality are aimed at producing content of the highest quality. The beauty lies in the term "open standard". You don't have to invest any money to achieve the best teamwork or an optimized pipeline experience during production. Here you have the best of what the production world has to offer with its costly Blockbusters, and you have it available for your project at the click (or two) of a button. Is this all restricted to working on movies? Absolutely not! The line between film and TV/streaming providers is becoming increasingly blurred. What consumers expected from film productions in the past is now standard for TV and video productions as well. This means that you can use the advantages OCIO offers for your own projects. The color space that is saved in the OpenEXR float comma format makes it possible for you to produce a wide variety of formats, basically without limitations.
Advantages
Rendering with OCIO and ACES does not take more time compared to "normal" rendering without this color management. Correctly created and saved renderings can be made available in any desired format. This includes all past limitations when working with smaller color spaces (e.g., sRGB Gamma) and integer 8 or 16-bits/channel images or film material. The quality that this system can deliver is flawless and is on par with any Hollywood film production.
The Academy chose to use a dependable display format that was developed primarily by ILM (Industrial Light and Magic):
OpenEXR (see also here https://www.openexr.com).
This is THE industry standard for storing visuals and you can also use it directly in Cinema 4D. This standard offers all options to meet the needs of ACES. The three main components OCIO, ACES and OpenEXR provide powerful options for creating great-looking, professional results. Every part of the production pipeline is supported. This trio can also be used to bring real-world image material into your 3D scene.
In post-production, changes are often made to your delivered footage to get closer to the desired image style. Most operations such as blurring or color correction lead to different results in different color spaces, even if they were executed using the same parameters. This is even more obvious when working on identical operations in a float comma or inter-based pipeline. With ACES, all parts will remain in the same color space within the entire pipeline and will not be modified in order to remain display-compatible (see below: Scene Referred and Display Referred).
OCIO formats in Cinema 4D
Any exchange format for images, defines how the colors should be generated from the stored values. The color spaces used by ACES are simply defined as AP-0 AND AP-1, whereby AP stands for Academy Primaries (Primaries are, simply put, the three corners of the color triangle through which the three primary colors red, green and blue are defined. Since this is not a flat system, primary values are similar to vectors).
Simply put, AP-0 (reflects ACES 2065-1) is the largest possible color space in which all colors visible to the human eye can be saved. Since this color space is larger than the area of all colors (chromaticity, see CIE 1931) it can lead to problems for older applications since there negative color values can also be created. For this reason, the Academy also created a somewhat smaller color space (gamut) with the designation AP-1, which only contains positive values.
This was an industry-wide agreement to overcome problems. However, this is not the suggested save format nor should it be seen as an exchange format. There are different variations that are based on AP-1. The preferred format for working in 3D is ACEScg. This is a color space derived from AP-1 that contains the colors that are based on reflected light, i.e., on wave lengths that are reflected back by the surface. These are also referred to Pointer's Gamut / Colors.
This color space cannot handle pure and fully saturated colors, such as completely saturated red light (laser light), for example. This is somewhat easier to simulate for 3D renderings than for real-world footage. The AP-1-based space will primarily be used with the ACES 1.3 gamut compression in post-production.
You now know why numerous Cinema 4D color sources are not displayed in post-production. This is in fact rare, e.g., the bright red or deep blue police lights and other pure colors. Please note that limitations for small color spaces can be circumvented by using the Scene Linear format by increasing the intensities of color components to greater then 1.0, even if the original value lies below 1.0. Within OCIO or ACES, this will not cause any problems as long as you're working with float comma values. Whether or not all applications in a given pipeline can convert these values internally is not covered in this documentation.
Each time you select an ACES format the 32-bit/Float-OpenEXR image will be saved in this color space. This also applies to the 16-bit/Float version until you overwrite this with a color profile. With the OCIO color space library you have access to three additional options in the Cinema 4D setup:
scene linear DCI P3 65
scene linear sRGB Rec. 709
scene linear Rec. 2020
The term "scene-linear" refers to the topic Scene Referred / Display Referred (see below).
What's most important for understanding color spaces is the fact that the colors along the color space borders are more pure the larger the color space is. In a horse shoe diagram for all colors visible for the human eye, the purest colors will lie at the arc with the colors' nanometer entries (wave lengths). The farther towards the center, the fewer saturated colors there will be. A laser, for example, has a pure color but light reflected from colored surfaces cannot achieve his level of color brilliance. This was discussed in the description of ACEScg and Pointer's Gamut.
Below you will learn more about this, because it is important to know how many colors can be reproduced with a certain gamut. The scene-linear-based values offer more options for overcoming smaller color spaces but this is quite a complex process. The scene-linear DCI P3 65 format is based on the Digital Cinema Initiatives from 2005. Judging by the size of the color space, it lies between the small sRGB triangle in the CIE 1931 diagram and the large Rec. 2020. In short, it has greater capacity for red and green and can save more pure color definitions.
More and more consumer screens offer the possibility to display all possible colors. Imagine that this color space covers 86.9% of the Pointer's Gamut, i.e., almost all colors will be visible when light appears. Also, if not all of these colors can be displayed on a given device, it is very important that as many as possible can be differentiated. This way a colorist can work with these values and move them to a color space that can show a structure that might otherwise be lost by color jumps.
The following entry is Scene Linear sRGB - Rec. 709, the smallest gamut of the currently available OCIO settings In Scene Linear, values can exceed 100% or 1.0 per primary value, which can produce a better color display to a certain degree than the Integer sRGB color space, which is used to create the jpg format, for example. The gamut that sRBG shares with Rec. 709 has no gamma in linear space, which means that these are exchangeable. One reason why they are available as combined options.
Rec. 709 has a different gamma definition than integer and the direct comparability with sRGB is no longer given. Rec. 709/sRGB only covers 69.4% of the Pointers colors, which results in clearly visible colors being clipped. The complete name for Rec. 709 is Recommendation ITU-R BT 709. This is made up of [Rec.] Recommendation, [ITU] International Union Radio, [BT] Broadcasting Service (television) and the number is only the sequential number.
The Sene Linear Rec. 2020 describes an even larger color space that, for example, can be reproduced with laser projectors. Pointer's Gammut can be displayed almost completely in comparison to both predecessors. This color space is nominally smaller than AP-1, the ACEScg color space. With the increasing use of UHD it's becoming clear that it is undoubtedly seen as a replacement for Rec. 709, as Rec. 709 was further developed from Rec. 601.
Now the question certainly arises, which format to choose. The first thought would be to use ACES 2065-1 as the save format. From there , all other color spaces can be converted. For internal CG work, the ACEScg format is often recommended. If the post-production application is able to process ACES 2065-1, this should be used instead, whereby most productions will be able to work with ACEScg. The three other scene linear formats should also be taken into consideration from time to time. Cinema 4D renders in a large color space. So why should the results be restricted if this is not necessary?
Not all OCIO formats are ACES formats
It's easy to forget that OCIO offers a comprehensive color management toolbox that includes more than just ACES components. Only the explicitly named ACES color spaces are ACES. Scene linear formats such as sRGB, Rec. 709, Rec. 2020 and DCI P3 are also ACES formats.
In accordance with the suggestion made by ACES, a marker must only be placed in the file for ACES 2065-1 in order to recognize it. All other formats that are saved as OpenEXR are not marked and will, for example, often not be recognized as Rec. 709 or Rec. 2020 even though they were saved in float comma format. You can quickly test this by importing renderings into Photoshop.
Archiving / working files
According to ACES, the advantage of a file that stores unclipped colors in a color space that covers all visible colors is that this file is also well-equipped for future evaluations and is therefore future-proof. This should be the archived version that remains as an unmodified backup. In the past the post-production workflow included archiving the deliverable file, which often resulted in a reduction of the original material's quality. Of course this is not optimal for future use of the original material.
After saving and backing up the source file, the appropriate format for subsequent post-production still needs to be determined. If the subsequent post-production steps do not support ACES 2065-1, ACEScg would be the next smallest work space. This makes working on visual effects (VFX) and compositing steps possible, whereby often a ACES 1.3-based compression of the color space (gamut) is used. This should, however, be documented. Please note that you should also save as ACES 2065-1 as a backup since ACEScg is officially not recommended as a format as a small color space for further processing in post-production. The next step for ACEScc/cct would be the color grading. This format is only recommended in certain cases for additional steps in relation to ACES but since the color grading and the definition of the final look of the image are the last steps in the post-production process, it is commonly used.
Labeling of the file components?
Naming conventions and other standards help avoid misinterpretation when taking over files in the course of a production pipeline. This applies even more so for formats that were saved for a specific color space. False assumptions for the interpretation of the files delivered might result to the use of a default color space, which can cause a lot of problems if it's noticed too late
. Animations will be saved with OpenEXR as image sequences. Naming the frame rate per second is also important information that should be part of a file name.
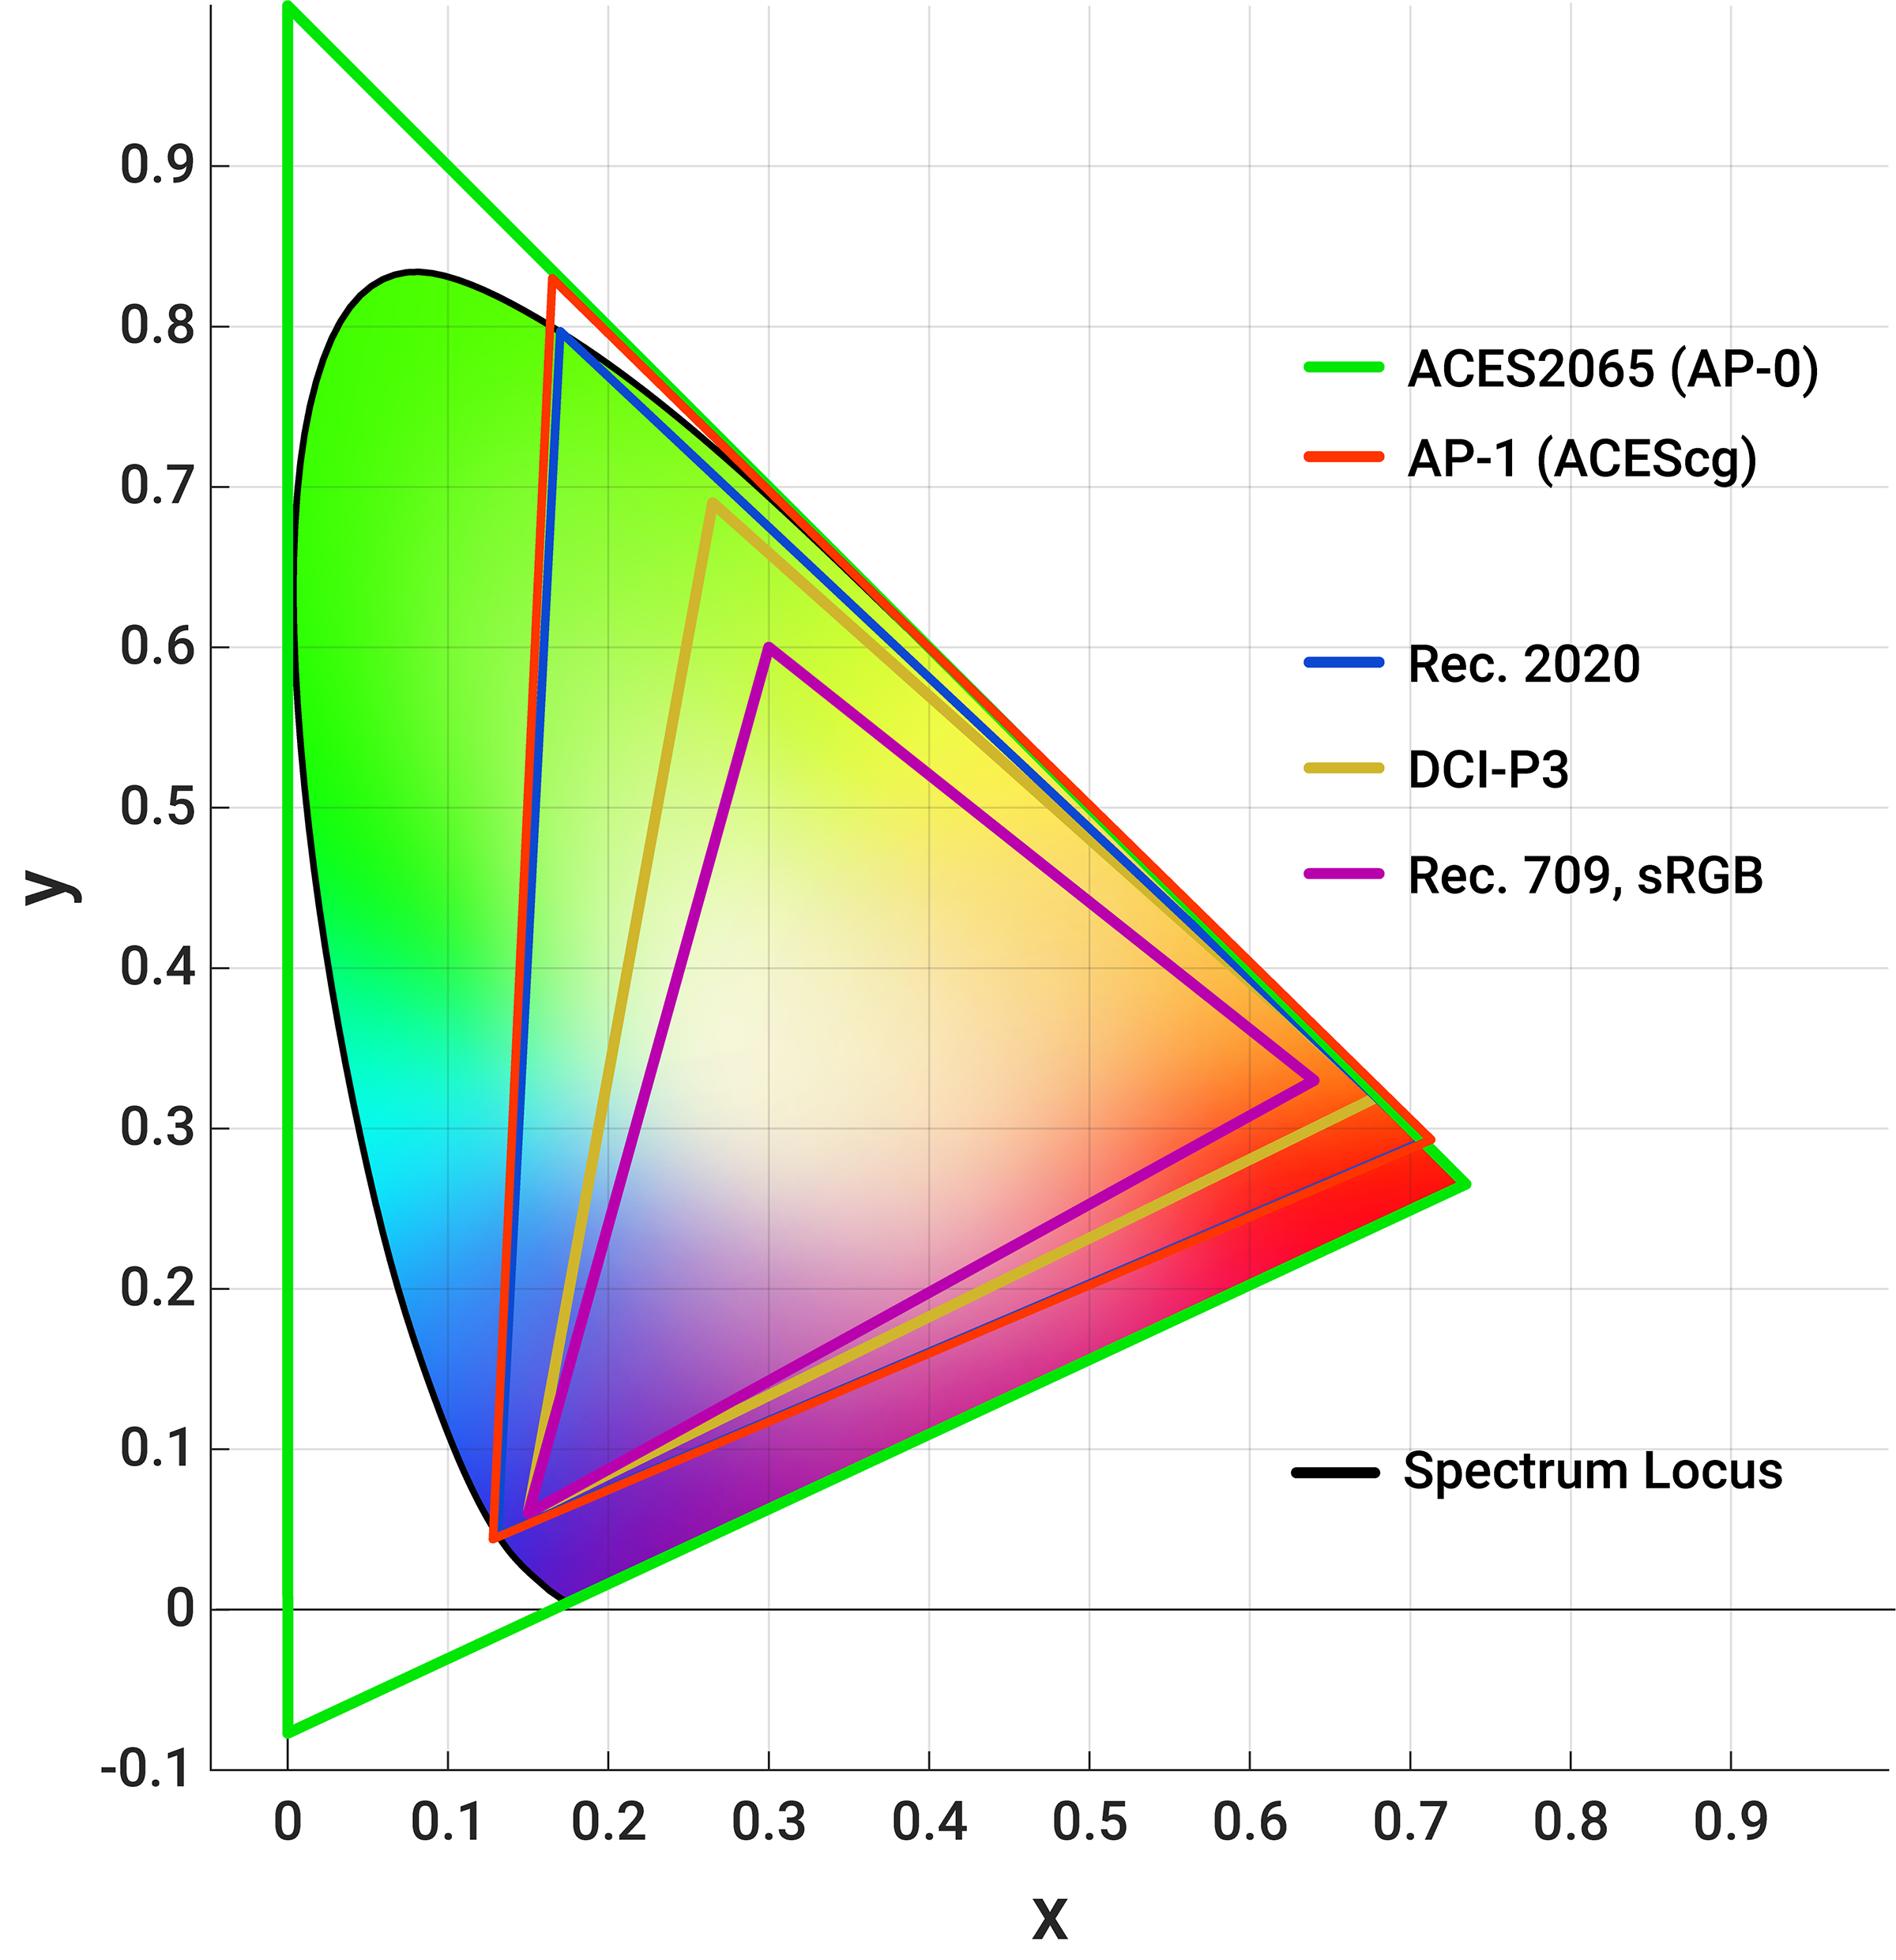 Schematic representation of some ACES color spaces compared to common display device color spaces, such as Rec.709/sRGB. The colors contained in the ACES color spaces supply far more colors than the sRGB colors are able to display, which is why the display of colors should only be seen as symbolic.
What are color spaces?
When you have rendered your project, expect the colors to appear as intended. The intention may have been to have fixed red, green and blue values for each pixel, which should suffice to create an image for display on your monitor. In reality, the colors will be displayed differently depending on the options defined. Even a different paper quality can affect how an image looks when printed.
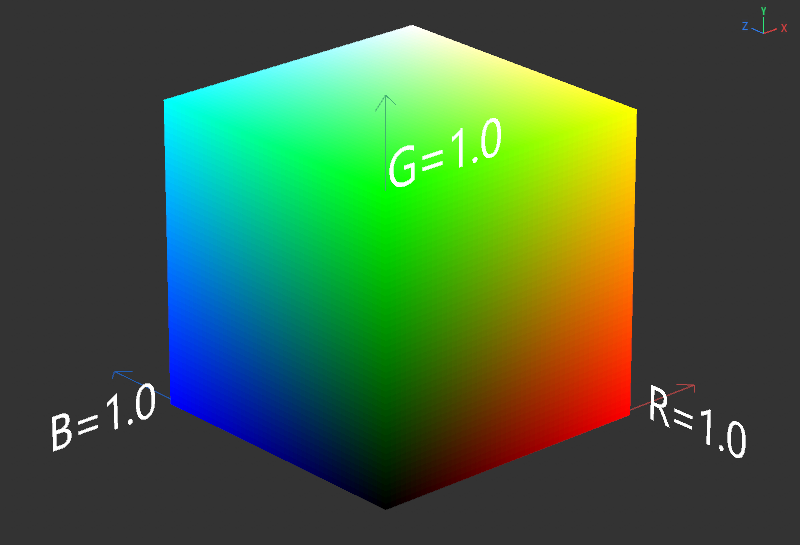 Visualization of a simple RGB color space as supported by many display devices. The maximum value for red, green and blue color parts will be applied here along the X, Y and Z axes. Correspondingly, a cube with a mix of all of these primary colors will be created. The color values visible to the human eye in part far exceed the colors of this cube.
For a more predictable result, each device must use color management to achieve the desired result. This way, the values received will be interpreted better and the result will reflect the intended result the creator wanted to achieve. Color management is a system for converting color spaces so the receiving application can work optimally with its properties and possible shortcomings. A color space can be seen as the result of a system that uses precise definitions for measuring a color space and in doing so defines the entire spectrum of attainable colors and luminance values. In other words a color space is a defined virtual three-dimensional object.
As in Cinema 4D, where you can place an object in space in three dimensions and possibly shape it, a color space also has a reference system comparable to the X, Y, and Z coordinate directions. It can be most easily described as red, green and blue being seen as vectors here. All of this is based on the idea of colors that are visible to the human eye.
In 1931 the Commission Internationale de l'eclairage (International Lighting Commission, CIE) defined the basis on which we still today create our color spaces. The CIE-RGB color space of 1931 as well as the CIT-XYZ color space of 1931 are the work of the Commission International de l'eclairage. Often, the representation of a color space is also referred to as horse shoe diagram. A newer version is also available but for the most part the version from 1931 is used.
This definition of colors and their relationships in spaces is relatively fine-tuned, and the transition from one color space to another is often done using a simple 3x3 matrix (conversion factors for the primary colors red, green, and blue). There are also more complex operations, e.g., when the white point is different, but in most cases is can remain "simple" with the few color spaces that we have.
If you want to imagine this, think of a PoseMorph between two deformed cubes or a MoGraph Cloner object set to Grid with many clones in the resulting cube. Now use the Inherit effector and "morph" this arrangement to a different cube. This makes it possible for all cubes to maintain a certain relationship to their neighbor. This would be a rough estimation of how you could transform one color space into another. In order to handle this appropriately, please read the section below about Color Space Elements.
Color Space Elements
The CIE color chart 1931 contains several elements whose meaning you have to understand so you can recognize how different color spaces can restrict or enhance your work. The space is similar to a 3D volume in Cinema 4D with X, Y and Z. Here, however, the axes are restricted to zero to one. The typical depiction, which we see here as a horse shoe shape, is a triangle whose corner points are set to the value 1.0 for each axis.
The typical view is flat, projected onto the XY plane. The horse shoe shape is based on the spectral focus. This means that each light wave length that we interpret as color is marked on this chart between 400 to 700 nanometers. There are several reasons for this shape but its primary function is that all pure and - for us - visible colors lie on this arch. Also, any two color points on this line or within the arc curve blend in the middle between two colors.
When mixing, the color purity always decreases. In other words: 100% saturation is only at the spectral locus. Everything that lies within this line loses its purity in the direction of the white point. Scene Linear values will soften this behavior somewhat and makes it more flexible to handle. Images that were delivered with integer values will, however, adhere to this definition of purity.
The following examples are based on the old method, whereby images created will be optimized for a specific display device (Display Referred) before they are modified and will restrict the work to the specifications of the display profile in integers. Now think about the Rec. 709 triangle: it's relatively small in this setup. The three corner points of the triangle are markers for print colors. They lie in an area with the least amount of purity of all available color spaces in Cinema 4D.
The reason for this is simple: modern televisions can display red, green and blue in better quality than the old CRT tubes in old televisions and monitors a laser's color would have a small but prominent point on this diagram. In contrast, the colors of the CRT tubes would appear more like a mixture, each containing some of the other two colors.
Since Rec. 709 was defined based on TV quality, the sRGB version is basically a copy of this but for computer graphics. The gamma definition is different here since it's based on integer values. Based on this example you might be able to understand the necessity of larger color spaces in order to achieve better results with a color space that is optimized for a specific display device. Aside from the fact that sRGB is a simplified color management system there are at least a dozen different variations, which is not really ideal. Otherwise, a Scene Referred workflow and using float comma values and even a scene linear sRGB space can manage an enormous color differentiation.
With values well above 1.0, the typical idea of white point has disappeared, and more color fidelity has been achieved. The red line, i.e., the straight line, that "closes" the horse shoe chart at the bottom is a color line that displays neither pure colors nor any colors available in the light spectrum when assuming individual frequencies. It's always a mix of blue and red values. The black curve is a virtual and theoretical modification of an object that is black in its cold state and becomes increasingly orange the warmer it gets, and turns blue-white at its highest temperature. In other words, it starts cold with a long wave length that shortens the warmer the temperature gets (the opposite of what you can expect when running cold and warm water).
The ascertainment of the white point can be tricky because it's not defined physically. In order to create colors precisely, the color value for white must also be determined. The integer white point has long been assumed to be the overlap of all three color channels at 100% (100% intensity for red, green, and blue color components), but this has not proven to be a good definition for HDRIs (High Dynamic Range Images) and floating point color definitions. The white point often orients itself to daylight such as D65, which generally is a good value that you can keep as long as there is no special reason not to. Note that daylight changes constantly throughout the day. D65 is defined differently in the U.S. than in Japan, for example. Check your target market so you can choose the correct setting.
What happens during the conversion?
The color spaces used in Cinema 4D are based on a triangular shape whose vertices also represent the primary colors. These end points lie in the flat part of the CIE 1931 diagram. You have to be very careful when converting all values of a given color space to another color space in order to achieve similar results for a smaller or larger color space. For integer formats, this can lead to values being clipped and the values having to be modified dramatically in order to maintain the desired color relationships.
As a rule, this happens with a 3x3 matrix that is multiplied with the input R, G and B values. In order to achieve acceptable results, additional inputs are necessary. Here you have to define if the input is objective or mathematical since the target space can be smaller and restricted. All these decisions can be avoided with ACES in the pipeline, where large color spaces with sufficient bit depth for precise transformations are offered. The change to ACEScc/cct will, however, result in loss. This is one reason why cc/cct is not offered in Cinema 4D and must be applied separately after the material has been saved. As already mentioned, it is vital to inform the color space on which the image is based. If the image is decoded using a default color space that is not fitting, colors will be offset.
Why bit depth is important
Small color spaces allow for less perceptible color value gradations, so a less precise "container" must be stored. With the ability of laser projectors to display Rec. 2020, the number of values that can be restricted to a barely noticeable difference (Just Noticeable Difference, JND) in the color space is increased. In other words: It's necessary to save these larger color spaces in file formats that can differentiate these values. Not only to avoid banding (visible jumps within a color or brightness gradient) but also to prevent different color values from being modified to such a degree by rounding that they show the same color.
Integer and floating point (float)
The way in which these values are saved affects the quality of your work. Of course, it depends on what color values are present in the scene but even with only few colors used, numerous tints, shades and brightnesses can be created by the different object surfaces and slopes and the lights "reacting" to them.
Typically, integer formats cannot save negative values. An exception is the TIFF format from Adobe, for which a 16 bits/channel is interpreted as a format with +/- 15 bits per channel, whereby a great number of available positive values are halved. Integer formats are generally 8 bits/channel and are made up of a fixed number of predefined values. If a rendered color value lies exactly between two predefined values, it has to be rounded up or down, which can result in a loss of differentiation. This will restrict the density of the color steps.
By using float values (floating point) we become more flexible. The OpenEXR format supports float comma numbers and is recommended for capturing the large color space that is covered by ACES 2065-1. In practice, the use of 16 bits/channel float version has proven to be effective. This can record 18 lighting blend steps, whereby each one can contain 1024 different values in addition to about 12 blend steps with low precision.
The 32 bits/channel float version should generally be the preferred version for all data-based files.
The ACES specification requires OpenEXR as a non-compressed format. In short, to be future-proof, you should avoid integer files within your pipeline. OpenEXR is only a container; saving a legacy integer file in an OpenEXR will only cover up the deficiencies and will make it more difficult to locate problems.
Any imported HDR material should be based on ACES 2065-1, with the color temperature of the shot (Kelvin) and the changes made clearly indicated to allow for proper processing. Your color pipeline should in the end make sense.
Generally speaking, integer-based content also works with OCIO within an ACES color pipeline that has been adapted accordingly. Ideally, each non-ACES part should be converted before it can be seen as part of the pipeline. This ensures that you have a good overview of the project and makes it easier to modify.
Raw data
The values specified in the numeric fields are used. Please note that you have to know which color space you're working in and the specifications of the delivery format. The raw data saved in the defined color space will not be frozen or protected when a color spaced is transformed.
Display-based (Display Referred) / Scene-based (Scene Referred)
Display Referred
Introduction
For a long time, the workflow on the chart was the preferred method for working with images and film material. The processing of this image material is based on the possibilities of a specific reference monitor, display, projector or beamer. Simply put, this means that the size of the monitor profile creates a bottleneck. Each decision made in relation to the color steps must be made within this small color space that normally lies in Rec. 709 or a variation of sRGB.
Color values are available in integer format and will as a rule be clipped to a maximum value of 1 per channel. Since an increasing number of HDR workflows are being used, the modification on the display hardware will undoubtedly also be affected, which points to "display-based" for the future. The color values in the file itself are changed with each iteration and display change, while the quality slowly decreases.
Why is this problematic for a VFX pipeline?
The color values of images are often fundamentally shifted in a VFX environment. The fact that, for example, brightness or saturation values will be clipped at the edge of the color space and can be irretrievably lost is not an attractive option. Here, the linear workflow and an alternative workflow idea come into play: The Scene Referred workflow.
Scene Referred
Introduction
If images or films are introduced to the pipeline, image information will be passed on unchanged. No adaption to a display device will take place. In such a setup, a display device merely serves as a control device. No decisions are made about pixel changes to the visual based on screen requirements, nor are changes made to more closely match the capabilities of a display device.
Color changes will only made in the color space of the pipeline, which should always be larger than the color space of the display device (e.g., the monitor). The modifications made to this "flow of information" will only then be displayed on a monitor for control purposes. If the same color changes would be made for a data stream adapted to the end display device, the result would be very different.
In short, when working scene-by-scene, color adjustments are made based only on artistic intent and not on device-related requirements.
Advantages
The Scene Referred workflow, which is part of the ACES philosophy, only changes what is part of the final output and limits all changes that are not target-related. For a long pipeline, this avoids having to go through many different display-related sections. Each modification made to the color space, even if they are based on float comma values and are normally loss-free, will change the behavior of the tools used in the pipeline, even for a simple blur command.
This means that, if you remain in the same color space as long as possible, you will receive the identical results for identical modifications and you won't have to constantly double-check these. Modified color values will also remain linear and are not restricted by any display device. The advantage is that in the end you will get what you wanted - the cleanest possible result of your creative editing. The aforementioned topic is even more expansive but for more detailed information, please read the following PDF: http://github.com/jeremyselan/cinematiccolor/raw/master/ves/Cinematic_Color_VES.pdf.
The Render Space in Cinema 4D
Internally, Cinema 4D works with double precision values and performs rendering natively in 32-bit floating point/channel. The values will not be clipped, which ensures the optimal use within any ACES workflow. The color management settings from the Project Settings will be applies.
Merging materials and projects
Often scenes are not created completely from scratch, but are completed by already existing materials or objects. It's therefore important to know how to work with assets that have not yet been adapted to the OCIO color management system.
First, open the scenes with the assets separately and check if they fit into the color space of your master project. If not, create a copy of the asset file and convert the contents accordingly. After the color space has been adapted, save the scene with an appropriate name and note the color space used. Then add the scene to the main scene.
You also have to be careful when using XRefs. It may first appear as if the XRef contents were converted after the conversion to OCIO. But when the external scene is updated or reloaded the original color management will be visible. Here, you also have to first adapt the external scene to the desired color space before you integrate it via XRef into your project. Preferences such as color gradients are often only available in a single color space. If the color space of the content does not fit properly, problems can occur. As with other content, a conversion within a new project file can be helpful.
Asset Browser
There are many Radiance [.hdr] files in the Asset Browser. These are popular because they have a smaller file size. If you use them you should note that they have no color management and are seen as Raw files. Raw files are excluded from conversion. The colors will remain unchanged; even the new color space would require new values to reproduce the colors from prior to the conversion.
Remember that these files are only 8-bit/channel files, with a fourth channel multiplying the first three at once. This can result in very large values but banding issues can occur on the basis of the 8 bits/channel color information. Instead you can use the ACEScg content available in the Asset Browser. These are high-quality and are well-suited for any ACES-based project.
Potential problems and pitfalls in the transition to OCIO
The Convert to OCIO command in the Color Management menu in the Project Settings is a very powerful command. However, it cannot know whether a color should be used to control a parameter or as a visible color. Think of an alpha channel, for example, that should be controlled by color gradients or Noise shaders.
The same applies for Displacement, Normal and Bump channels, a reflection's roughness and much more. Or imagine a Node material for which a color gradient should control both the surface color as well as the roughness of the diffuse shading. It's not possible to separate these applications. The conversion will convert all colors equally.
The conversion should be performed only once. The command can be applied any number of times but this might modify numerous values. The values can also change if the render space and input color space is let to linear sRGB when the command is executed again.
Dealing with takes
Values stored in takes are converted only for the currently active take. Since only one conversion can be executed, all Takes have to adapted manually.
Using shaders
Conversion will change the color values but not curve elements such as Filter shaders. Therefore, the result after applying the curves changes.
The Colorizer shader will modify neither the positions or the interpolation of the color fields in its gradients. Color changes are unavoidable if the input color changes. This change can be especially dramatic if a color gradient is also combined with the colorizer.
Field colors in MoGraph that are saved in the MoGraph cache will not be converted. The colors will change if the cache is deleted and a new cache is created. (MoGraph Color shader)
The Variation shader does not change colors during conversions.
The Posterizer shader calculates deviating color layers if, for example, a color serves as a source.
Any blending mode (e.g., in the Layer shader) that uses midpoint definitions (overlay) will have a different result after conversion.
Other blend modes can react differently.
For questions about Redshift, please refer to the Redshift documentation.
For more info on OCIO: https://opencolorio.org/
Additional information about ACES: https://acescentral.com/user-guides