Tag Properties
By clicking on the button to the right of the Filename text field, a dialog window will open. Here you can choose where you want to save your baked files. By default, the name of the object to which the material is assigned is placed in the text field.
If several options have been selected and should be output separately, the name of the option will automatically be attached to the file's prefix (you can also integrate all channels into a Photoshop file as layers using the Single File option).
The following rules apply:
- No path selected: The baked textures will be saved in the scene's project path.
- No name (Filename empty): The baked texture will be displayed in the Picture Viewer.
Select the file format in which the baked textures should be saved. If additional options are available for the format you happen to be using, they can be found by clicking on the Options … button (see Save Options).
When a number of effects (Options tag) are to be baked, they can either be saved individually as separate layers (deactivate Single File), or as a single file (activate Single File). The latter works only for the following formats:
- BodyPaint 3D (*.b3d)
- Photoshop (*.psd)
With this setting you can define which color profile should be embedded in the image/texture. In versions prior to R12, Cinema 4D automatically saved using the sRGB color profile. This can now be set to any color profile desired. However, you should only make changes to this setting if absolutely necessary.
Note that many programs cannot read color profiles (for example, Windows 7 can only partially read color profiles).
When using Linear Workflow in conjunction with Multi-Passes we recommend that you render with at least 16-bit color depth. If this is not possible, disable the Linear Workflow option to restore the normal Cinema 4D R12 properties (reason: Multi-Passes are saved with a linear profile.
More information regarding color management can be found here.
Generally speaking, the default sRGB profile will be the correct profile.
Clicking the button at the right will make the following menu items available for selection:
Color Management Disabled
No color profile will be embedded (will be read in accordance with the Project Settings or bitmap shader settings when the file is opened).
Load/Save
Here you can load a color profile or save an existing one. These files have the extension *.icc. If an image is loaded here, its color profile will be assumed.
Load From Monitor
You can use monitor(hardware) profiles. However, this is not recommended since your monitor’s color profile will almost never match that of another monitor.
sRGB
Saves the image with sRGB color profile.
Linear
Saves the image in a linear color profile.
Here you can define if the baked texture should be rendered with 8, 16, or 32-bits / channel. When working with displacement you should use 16 or 32-bit color depth to avoid stepping.
When this option is activated, three new settings will be made available with which you can define a texture's size limits via the Minimal Size and Maximal Size settings.
This is the size in which a texture will be rendered when the Automatic Size option is deactivated. Bear in mind that the size of the texture has to be very big, depending on how close the camera will be to the object to be rendered, in order to get good results. For you game developers: Stick to the requirements of your game engine.
A square texture will have at least this size, dependent upon pixel size.
The maximum size a square texture will have, dependent upon pixel size.
This setting defines the size of a pixel in square meters. Seriously! In order to automatically ascertain a texture's size, the algorithm will calculate the geometry surface to be textured and, using the pixel size, calculates the size of the texture.
Example:
You have a plane, 200m x 200m, i.e., 40,000sq. meters. Pixel Size is set to 0.5. This means the texture will have a total size of 40,000 / 0.5, i.e., 80,000 pixels. Since the texture is square, you simply take the square root and you will have a texture size of 283 x 283 pixels. Since this lies within the defined minimal and maximal settings, the texture will be output in this size.
 Enlarged selection of a baked shadow. Left: Supersampling set to 0; right: Supersampling set to 1.
Supersampling is necessary since Cinema 4D anti-aliasing has no effect on the baking of textures. Depending on the settings you selected, a corresponding number of sub-pixels will be calculated that will be needed for the depiction of a particular pixel upon output.
The following sub-pixel ratios apply:
0: 1x1 (no effect)
1: 3x3
2: 5x5
3: 7x7 and so on …
Render times increase greatly with higher Supersampling values. You can compensate for this by setting a low Supersampling value and adjusting the texture interpolation (MIP, Sat Mapping, Blur Parameters) of the mapped texture.
Use this setting to define a border in pixels. A corresponding edge will be rendered around each UV polygon on the texture. This prevents visible seams at the edges of UV polygons. This value should be set to at least 1.
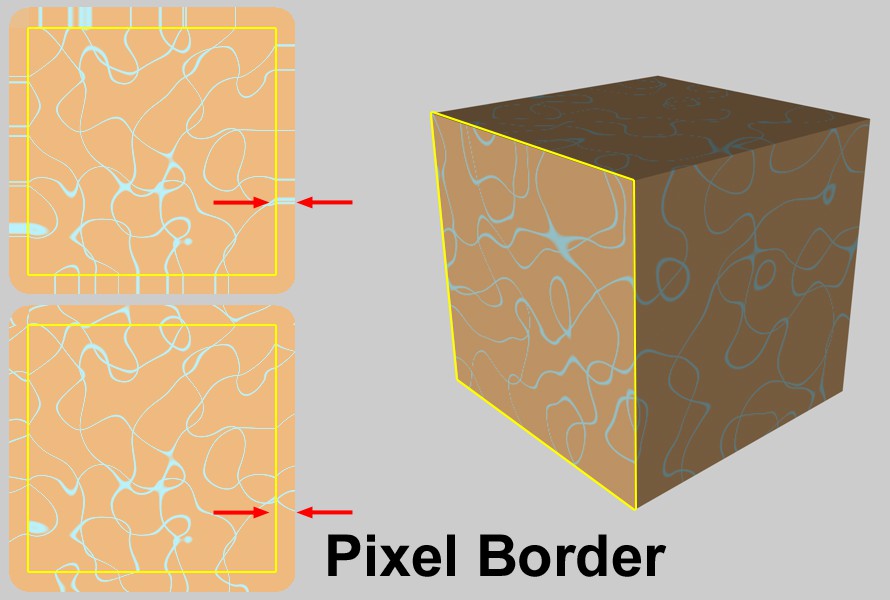 At top Continue UVs activated, at bottom deactivated.
If you have defined a pixel border, this option determines how the texture will continue outside of the UV polygon. When this option is active, it will alert you to visible seams on the object.
This is the color given to areas of the texture that are not covered by UV polygons.