Object Properties
Within the Object tab, you can build, adjust, bind and animate the components of the Character object. These actions are grouped into four sub-tabs that are centered around each action, which also affect the display of the Character object within the view.
Within this tab you can add components from the template to the Character object.
This drop-down menu lists each of the template files currently stored in your library and available to be built. Choose a template file in order to build components from the template.
The Components group includes a dynamic list of buttons, which can be pressed to build components from the template. The template may contain rules that limit which components appear based on the currently selected component (components are added as Child objects of the selected components and in many cases the template enforces a particular hierarchy).
By default, the newly-created component is automatically selected - holding the
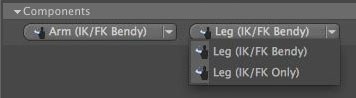
In some cases, multiple components of the same type may be stored under a single button. In this case, you will see a drop-down arrow on the right side of the button. Clicking on the button will add the displayed component. If you click and hold the button, a drop-down list of available component will be displayed. Choosing a component will immediately insert it into the Character object. The component selected last from the group will be displayed by default.
Don’t be surprised if the components have English names. These names were taken directly from the files provided, which are all created in English.
Activating the Adjust tab switches the display and interaction of the Character object, allowing you to easily adjust the positions of components within the rig to match a specific mesh. In Adjust mode, the display of the Character object in the view is simplified and items that can be adjusted are displayed as large circular handles. You can manipulate these handles in the same way as regular objects using the Move and Rotate tools.
This drop-down menu controls which handles will be displayed.
When set to Components, it will display all the handles defined in the Component tag's Adjustment tab.
Controller mode will make adjustment handles for all visible controllers. This allows you to easily adjust the placement and size of your controllers. It does not move the axis of the controllers, just the points and their size.
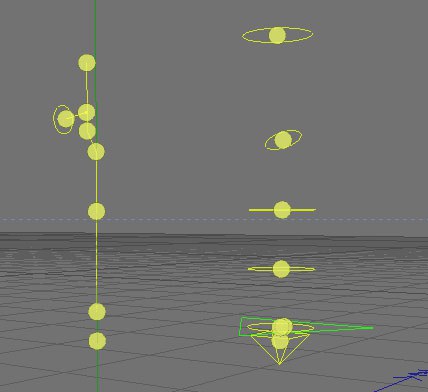 The image shows Components type on the left and Controllers on the right while in adjust mode.
If enabled, adjustments you make to one side of the mesh will be mirrored to the other side, e.g., you can adjust the left arm and the right arm will be adjusted to match. To work properly, the symmetry must first be defined in the Component tag’s Mirroring tab within the template file.
The Character object internally stores all the symmetry data, so if you switch back and forth from Adjust mode it will make sure you can always adjust with symmetry. If you wish to update the symmetry map press
When the Binding tab is active you can easily bind the rig to a character mesh by simply dropping objects into the list.
When an object is added to this list, weights will automatically be calculated and stored within a Weight tag on the object. A Skin deformer will automatically be created as a Child of the object so that the object will be deformed based on joints and weighting. If your mesh is made of multiple polygon objects grouped in a null, the Character object will only add one Skin Deformer as a Child of the null but still continue to add Weight tags to each object. If you have your mesh selected when you create your Character object it will automatically add your mesh into the Objects list for you when you switch to the Bind tab.
Activate this tab when you are ready to animate your character. The additional Hotspots and Controls tabs will appear on the Character object, enabling you to begin animating the character.
This options allows you to specify a password to protect your Character object from modification. When you click the check box a dialog will appear asking you to specify and confirm a password. To unlock the Character, simply click the check box again and specify the same password in the resulting dialog.
When the Character object is locked it cannot be made editable (converted to actual objects), and does not allow components to be built or adjusted.
This can be useful if you need to provide the Character object to a client or animator but want to ensure they do not make any modifications to the rig.
Reset Pose will reset the character and all of its controllers back to the default pose. If you press
Pressing this button will update the default pose of the character to the current pose.
Add Walk will automatically generate a CMotion object based on the settings specified in the template.