Joints
Use the Filter field to filter your joint list based on specific names. Note that only joints will be filtered from the list. Partial filtering is available when using the Filter field. For example, you could type L_ to isolate all joints whose name include this prefix.
This option is used to lock the current joints list filtering, so you can switch selection without affecting the joints list display. It only pertains to Object Manager selections if your joint filters use the Link List to OM Selection option, all sorting modes and the search filter will still affect the joints list.
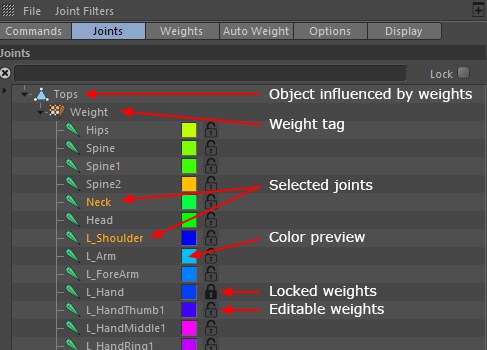
The Joints List window now displays a hierarchy of joints grouped under each object they are affecting, providing you with a clear list of what Joint is assigned to which object.
Only Joints assigned to a Weight tag will be displayed in this window. It is possible for the same Joint to be displayed several times, depending on how many times it is linked to a different Weight tag. You can either select one or several Joints in the Object Manager to have them displayed in this list, or directly one or several objects that have a Weight tag assigned for the same result (selecting an object that has no Weight tag, or no Joint assigned to its Weight tag will result in an empty list).
Each Joint has a color thumbnail which reflects the color of the weights assigned to this Joint. Double-clicking this thumbnail allows you to change the color of the Joint, for easier editing.
The color of the Joints will only affect the color of their weights if the Weight Color is set to Object in the Display tab of the Weight tool. Failing to switch to this mode will only change the color of the Joint, since Cinema 4D will generate a random color if the display mode is set to Multi or a grayscale color if the display mode is set to Single.
Click this icon to protect weights from accidental change. Choose the joint whose weights you want to protect in the Object Manager or in the Joints list and click on this button.
If you paint weights for another joint, the locked joint’s weights will not be affected. Locked Joints are now protected from any changes, no matter which Joint you select, be it from the Object Manager, or the Weight Manager Joints list. To unlock a Joints weights, simply click the Lock icon again.
Right-clicking on a Joint or Object of the list will display a contextual menu.
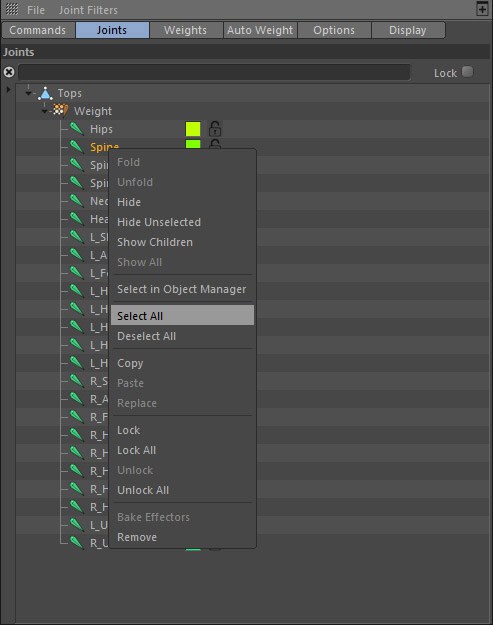
Select joints, objects or weight tags and use this command to fold their hierarchy. This option is greyed out if no hierarchy is available for that object. You can also fold items using the little arrows to the left of each icon within the list, but the Fold command is useful to use on multiple selections, to fold everything at one.
Similar to the Fold command, this command is used to unfold hierarchies of selected objects, joints or weight tags.
Use this command to hide selected objects, weight tags and joints from the list. Keep in mind that hierarchies will also be taken into consideration, so if the selected object, weight tag or joint is hidden, their children will be as well.
Use this command to hide all unselected objects. Hierarchies come into effect, so if you hide the parent of your currently selected object, it will hide the selected object as well. This means this mode is most useful when used in conjunction with filtering modes other than Hierarchical Sort, or with flat hierarchies. When using this command, make sure you select both objects and weight tags along with the joints you wish to isolate, since they are always parented to the joints in the list.
Use this command to unhide the children joints or weight tags of your current selection. The whole subsequent hierarchy will be unhidden.
This command is used to reset the joints list and show all objects.
Use this command to select objects, weight tags and joints in the Object Manager as well. Note that if the joint filter Link List to OM Selection is active, the joint list displayed will reflect the new selection.
Selects all objects displayed in the Joints list.
Deselects all objects displayed in the Joints list.
Will copy the Joint object or weight values of the selected Joint object (this option is only active when right-clicking on joints).
Will paste the previously copied Joint to a different object's Weight tag (select the joint from a first object, then copy it. Now select a second object and paste the joint in its list - the new joint will now appear as a child of the second object).
Alternatively, you can also select a Joint from one list and drag it to a second list to copy and paste it automatically.
Will replace the current weights of the Joint by the weights of the Joint copied previously. Note that normal weighting will not be done automatically, i.e., weights with values in excess of 100% can result.
Will lock/protect the weights of the Joint (alternatively, you can left-click on the opened lock icon for the same result).
This option can be used to lock/protect all joing weights (alternatively you can click on the lock icon in the list).
Unlocks the weights of the Joint (alternatively, you can left-click on the closed lock icon for the same result).
Unlocks the weights of all locked Joints.
Joints selected from the list will now be highlighted in the viewport as well, making it easier to identify which Joint's influence you are editing.
Allows you to bake the influence of a weight Falloff object directly into the weighting of the joint. This changes the weighting for the joint in such a way that it behaves as if the weight falloff is still being applied. Once a Falloff object is applied to a joint in the Weight tag of the object, the Bake Falloff command will become active in the Weights Manager. Simply select the joint and select the Bake Falloff command to bake the influence to the joint.
Note that after running the command, the Falloff object will be removed from the Weight tag but not from the object manager hierarchy, in case you need to reuse it (in which case, you’ll have to reassign it to a joint in the Weight tag). If you wish to start over, just select the joint in the Weights Manager joints list, then click on the Zero button (Tab commands) to reset its weights. Now reassign the Falloff object to the joint in order to reapply its influence to the object.
Bake Falloff can also be used to bake the Joint falloff (Joint setting: tab falloff). After calling up the command, the falloff weighting will be assumed in the normal weighting after being normalized and assigned to the corresponding Joints. The Joint falloff will then be deactivated automatically.
This command will remove the selected joint(s) from both the Joints List and Weight tag it is assigned to. Alternatively, you can use the Delete key.