Weights
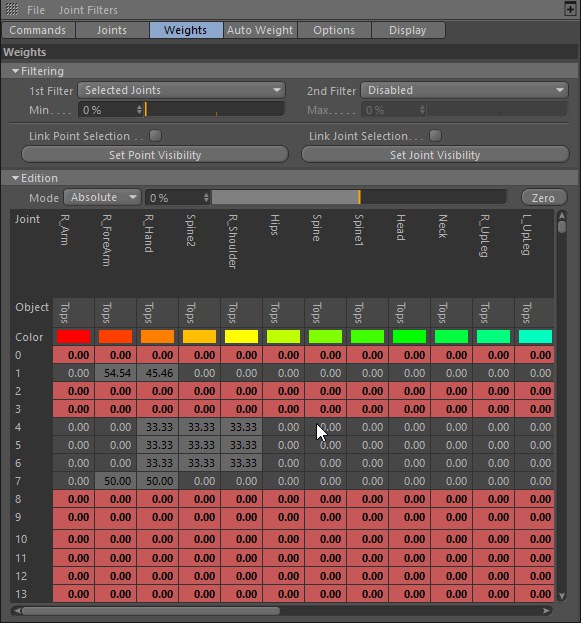
The Weights tab displays weight values using a spreadsheet of all the points of the mesh associated to the joints influencing them.
It gives a great overview of your influences and allows you to manipulate weight values in batch or in a very targeted manner.
![]() Filtering
Filtering
Here you define the mode in which the weighting should be displayed in the table below.
All weights values are shown in the Weights table, no filter is applied.
Only weight values below the value set in the Min strength parameter will be shown in the weights table. Note that this filter does not apply to the total weight value of each point, it will only filter individual weight values for each joint.
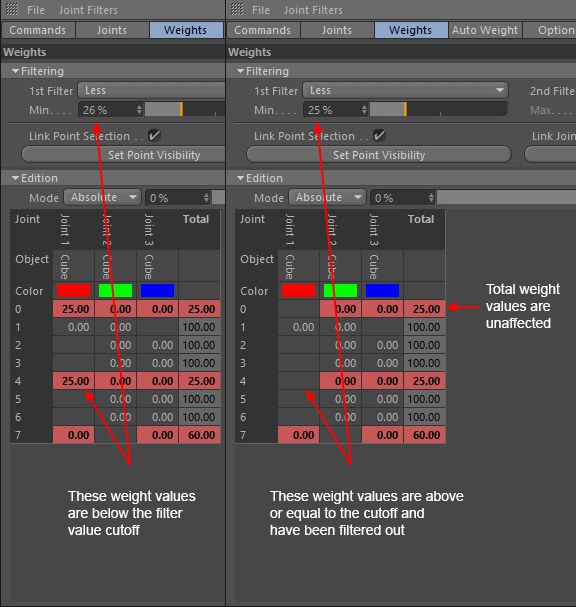
Only weight values greater or equal to the Min strength parameter will be displayed in the weights table. Note that this filter does not apply to the total weight value of each point, it will only filter individual weight values for each joint.
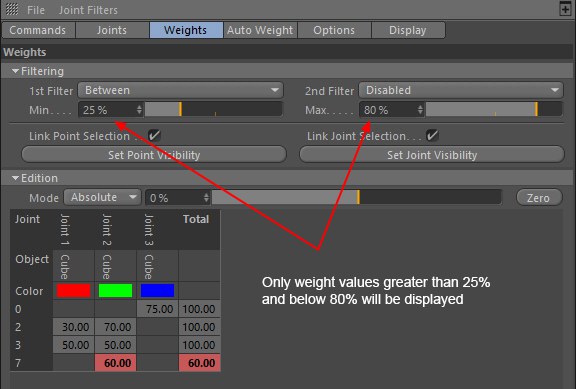
Only weight values greater than or equal to the Min strength parameter and lesser than the Max strength parameter value will be displayed in the weight table. Note that this filter does not apply to the total weight value of each point, it will only filter individual weight values for each joint.
This filter will only show weight values for points that do not have normalized total weight values. This means that it will filter out all points that have a total weight value of exactly 100%, but any total weight below or exceeding 100% will be displayed. This is a useful mode to identify points that still need weighting work for your mesh to deform properly.
Will restrict the spreadsheet display to the currently selected points of the mesh only, so you can focus on the weights of these specific points.
Will restrict the spreadsheet display to currently selected joints only. This applies to joints selected from the Weight Manager’s Joints list, or joints selected from the Object Manager’s hierarchies.
Here you can set a second filtering criteria to control what is displayed in the Weights spreadsheet.
This way you can, for example, only display weight values for selected joints that have unnormalized values.
Disables the second filter.
Unnormalized
Viewport Points
Selected Joints
See parameter described above in the 1st Filter section.
Depending on the Filter type used, either filters out weights greater or smaller than the value set in this parameter. See the Less, Greater and Between Filter types for more information.
Sets the maximum value above which weights will not be displayed in the weights table.
Enabling this option will synchronize point selection between the spreadsheet and the viewport. Selecting points in the weight table will highlight and select the corresponding points in the viewport, and vice-versa (make sure Point Mode is activated and your mesh selected in the Object Manager).
This option is especially useful when combined with the Viewport Points filter, as it allows to focus the weight table dynamically on your current selection, making for a much easier spreadsheet to digest.
Enable this option to synchronize joint selection between the Joints list and the weight table. Note that joints will not be selected in the Object Manager/Viewport but will be synchronized with selections made from the right-click menu of the Weight tool.
This command will filter the weight table display to only show the current point selection. This allows you to quickly select in the viewport the points you wish to focus on, and isolate them in the Weight table for non-cluttered spreadsheet. You can reset the weight table display by right-clicking on any cell of the spreadsheet and use the Show All command.
Use this command to restrict the weight table to the currently selected joint(s). Note that this only affects joint selection found in the Joints list, not the Object Manager’s selection.
![]() Edition
Edition
This provides you with a quick way to increase or decrease the selected values in the Weights table by a percentage (or to enter exact values into the corresponding parameter field). As soon as you set the percentage, the selected value is increased or decreased taking the percentage into account. The percentage is then returned to its original value.
Exactly how the percentage affects the selected value depends on the Mode setting on the Options tab. For example, if Mode is set to Abs, the percentage sets absolute values, in other words, the value in the table is set to exactly the same value as the percentage. Or, if you drag the percentage slider fully to the left, the table entry is set to 0% (not less than zero, because weights cannot be set to negative values).
If Mode is set to Add, drag the slider to the right to increase the selected value, or drag to the left to decrease the value. In the Erase mode, the opposite applies.
Note that the calculation can be affected by the Auto Normalize option. If Auto Normalize is enabled, any weight added to the selected value is automatically subtracted from the other joint weights affecting the point in order to maintain the point's total weight at 100%. Likewise, weight subtracted from the selected value is added to the weights of the point’s other joints to maintain a total weight of 100%.
A description of the various modes can be found under Mode.
Defines the increments to use when rounding the selected weights in the weights table.
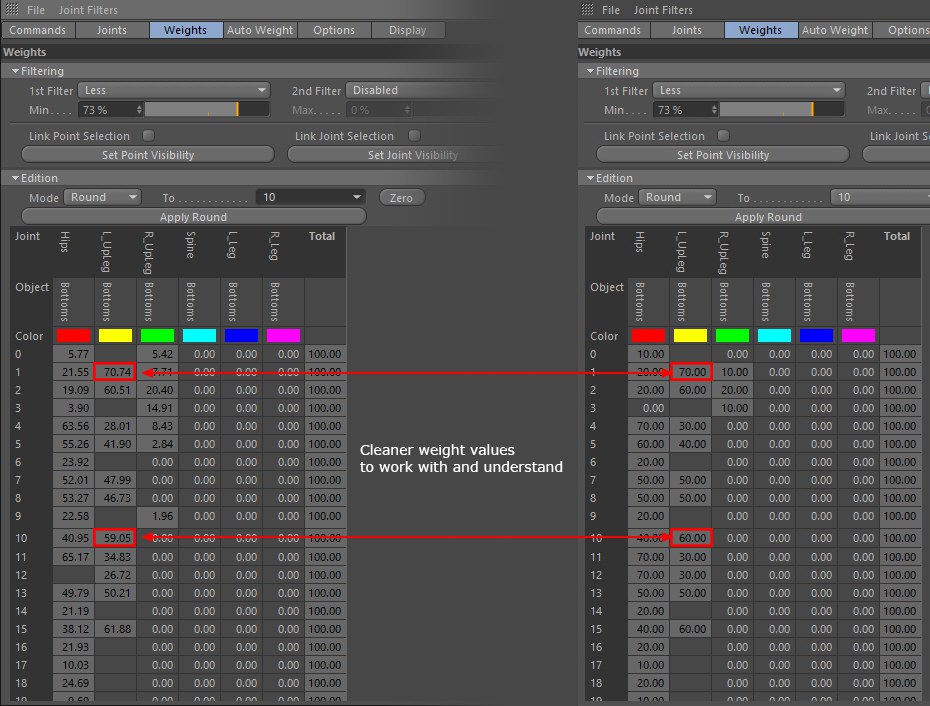
Applies rounding parameters to your current selection.
Use this command to reset the weight values of your current selection. Note that if Auto Normalize (Tan Commands) is enabled, or if joints influences are locked, this option will either have no effect, or cause weights to be redistributed to the other joints affecting your point selection.
Here you'll find a list of weights for the selected joints.
The first row in the list is the joint’s name. The second row is the name of the object it influences. The third row is the color used to display the weights (as defined by the settings on the Display tab).
The other rows represent each point, where the first column gives the point’s index number.
You can select values by clicking their cells. Double-clicking allows you to enter a numerical value directly. As usual, you can multiple select a range of cells by using the Shift key, or selecting non-adjacent cells by using the
Click on the top-left corner of the table (Joint) to select all.
Each joint has a colored icon that represents the weight color assigned to the joint. If you double-click on the icon you can change the color.
The color of the Joints will only affect the color of their weights if the Weight Color mode is set to
Right-clicking in a cell will display a contextual menu that gives you a few useful commands.
Will copy the selected weight. Does not work on multiple selections.
Paste the previously copied weight into one or multiple selected cells.
If a multiple selection was copied, the elements will be pasted in the identical order, even if the number of selected cells is not the same. If additional cells were selected during the paste process, these will remain unaffected. If fewer cells are selected during the paste process, all subsequent (unselected) cells will nevertheless be filled with values in the corresponding order.
Will select all cells containing zeroes.
Selects all rows that are assigned an unnormalized overall weight.
Will select all rows and columns.
Will select the current selection's row.
Will select the current selection's column.
Inverts the current selection.
Deselects any current selection.
Will hide all cell values containing zero weight.
Hides all normalized values (all joints whose total weight is 100%). The entire row will be hidden.
Will hide the value contained in the selected cell. Works on multiple selections as well.
Hides the current selection's row.
Hides the current selection's column
Will focus the displayed cells based on the current selection. This is a great command to isolate specific cells you need to work on.
If cell values have been previously hidden (using the various Hide commands), you can show them all again using this command.
Will lock the selected weights values. Locked weights will be displayed in bold characters.
Unlocks the selected weights.
Unlocks all weight values, regardless of what is selected.