Options
If this option is enabled, the weight tool’s cursor projects the weighting planar to your computer screen onto the mesh.
If, on the other hand, you disable this option, the weight tool’s cursor follows the surface of the mesh, starting from the point where you begin to paint. This can make it easier to weight points that would otherwise be difficult to reach. It also reduces the risk of weighting points by mistake that are behind the points you want to weight.
Defines whether only the visible points of the mesh can be painted or whether the weights should be projected through the mesh to also paint points that are behind surfaces. This option is only available when Projection is enabled.
Restricts the painting of weights to the selected points.
This option attempts to keep the total weight of each point at 100% while you paint. For example, if you reduce a joint's influence on a point using the Erase mode, the erased weighting is added back to the other joints that influence the point to keep the point’s total weight at 100%. However, if there are no other joints that influence the point, then the weighting cannot be added back and the joint’s total weight cannot be kept at 100%.
If the option is enabled and a joint influences a point with 100%, then no other joints are allowed to influence the point. This ensures that any point with 100% weighting for a joint really is only influenced by this joint. This helps to avoid the traditional search for points that have been weighted by mistake.
Defines the strength of weighting used when you paint the mesh with the weight tool.
Defines which mode is used for painting the weights.
Adds the weighting defined by Strength to the existing weights. Hold down
Adds the weighting defined by Strength to the existing weights. To remove weighting, set the Strength parameter to a negative value.
Adds weight gradually each time you move the Weight tool while applying weights. The Strength parameter of the Weight tool will dictate how much weight gets added gradually (for example, a strength of 100% will add weights by increments of 1%, while a strength of 10% will add weights by increments of 0.1%).
Subtracts the weighting defined by Strength from the existing weights. Hold down
Lets you paint using an exact, absolute value. Hold down
Allows you to smooth out hard edges in the weights.
You can access the Smooth mode in any mode by holding the
Use Apply All to tighten the weighting as a whole.
Lets you enlarge weighted areas. Simply paint over the edges of weighted areas to enlarge them interactively - similar to the way ink spreads as it is soaked up by a napkin.
Allows a relative increase of the value of existing Weighting.
Lets you reassign the values of existing Weighting. A curve will be displayed with which the assignment can be defined. It’s similar to a gradation curve in Photoshop: If the curve dips slightly, a value initially set at 50% will only be weighted with 40% after being painted. The values for 100% and 0% will remain unchanged.
Sets unwanted weighting back to 0%. Paint over the areas whose value is equal to or smaller than the defined Strength value.
Allows you to set a Strength value for the Weight tool, by picking the Strength value directly from the mesh you are currently weighting. Similar to using a color picker to set the color of a tool. Note that only the active weights will be picked up by this tool.
You can access the Dropper mode by holding the
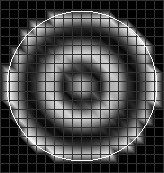
Defines how the strength of the weight tool falls off from the center of its cursor to its edge. The following types of falloff are available (in each case, an example picture shows a click with the weight tool using the corresponding option - all other settings are identical). A preview of the falloff shape will be visible when hovering the brush over your mesh.
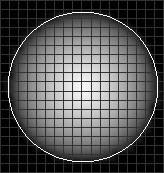
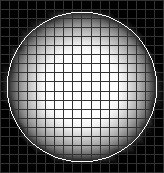
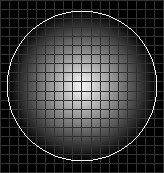
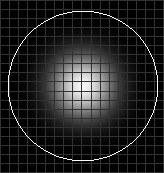
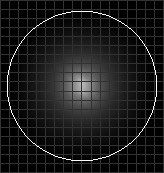
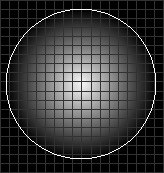
A Hardness parameter appears when you select this option. The pictures below show the results for Hardness values of 0%, 50% and 100%.
Disables the falloff completely. Any point encompassed by the brush preview will be influenced evenly across the brush stroke. Removing the falloff is especially useful when painting using Absolute mode, for example, where you want to apply specific weight values to your points, without any type of smoothing or gradation applied.
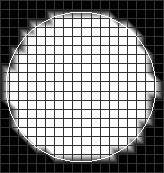
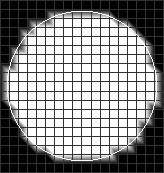
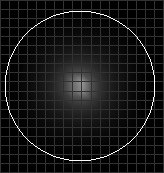
A Width parameter appears when you select this option. The pictures below show the results for Width values of 0%, 50% and 100%.

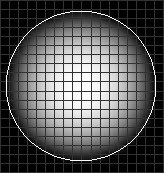
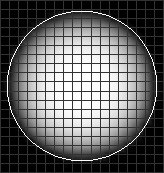
A Width parameter appears when you select this option. The pictures below show the results for Width values of 0%, 50% and 100%.
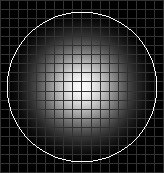
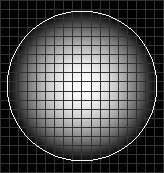
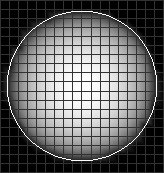
A Width parameter appears when you select this option. The pictures below show the results for Width values of 0%, 50% and 100%.
Allows you to create your own custom profile for the falloff using a spline graph, as shown in the example below.

See Falloff modes Dome, Bell, or Needle above.
See Falloff mode Hardness above.
See Falloff mode Curve above.
If you're using a graphics tablet, here you can choose how the pen pressure is evaluated. The following options are available:
Switches off pen pressure evaluation.
Makes the weight tool’s cursor bigger the harder you press, from a radius of 0 up to the value defined by Radius.
Behaves in a similar way to Radius, except in this case the strength of weighting increases the harder you press.
Lets you control the hardness of the weight tool’s cursor using the pen pressure.
If Clamp is enabled, you can use the Lower setting to specify the minimum amount of weight that can be painted, regardless of the Strength value or, for example, how often you paint over a point in Erase mode.
If Clamp is enabled, you can use the Upper setting to specify the maximum amount of weight that can be painted, regardless of the Strength value or, for example, how often you paint over a point in Add mode.
The curve editor will appear when the Curve mode is selected. Define the shape of your curve to apply a specific falloff shape to your brush strokes.