Offline
Settings for the Offline menu apply to final rendering in the Picture Viewer.
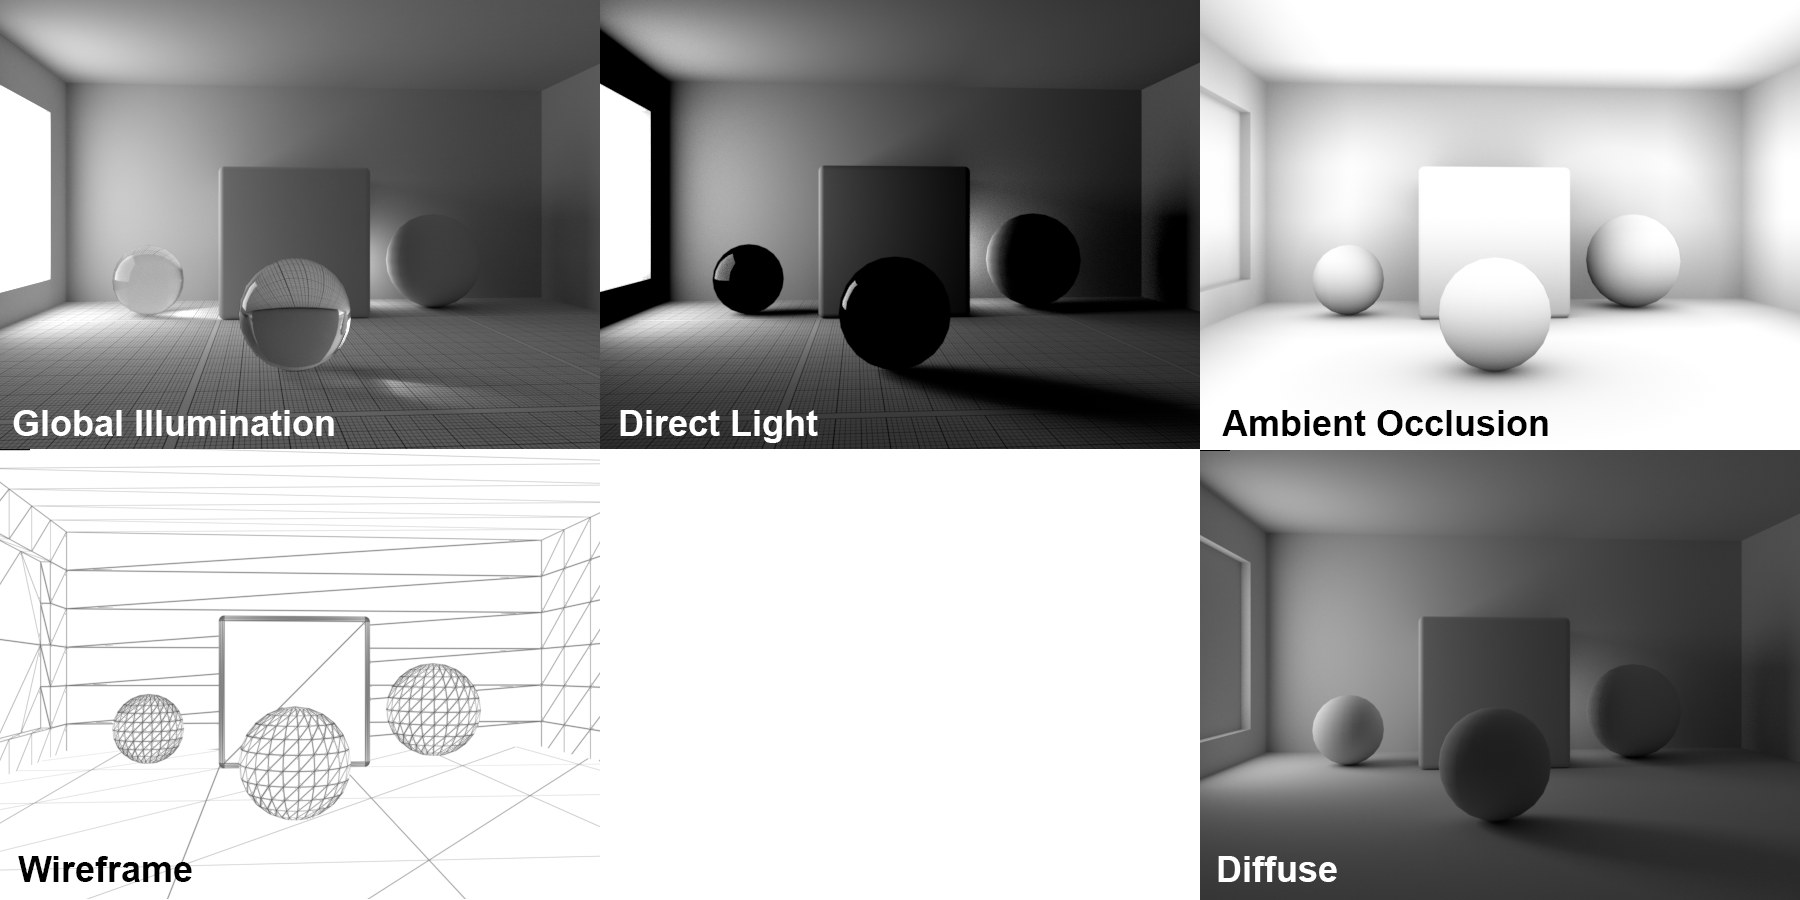 The various render modes.
Here you can define various render modes:
The default and most important render mode. Global Illumination is used for ProRender to create GI, shadows, reflections, refractions in transparencies, i.e., all functions that have to do with samples being sent back and forth or is reflected or refracted.
Ambient Occlusion will be rendered (the more occluded a region the darker; see also Ambient Occlusion).
In this mode, there is no other light that is reflected from other objects - i.e., no GI. Only the direct illumination, including shadows. Reflections (exception: reflections of light sources) and transparencies are also disabled.
This mode renders the triangle edges (quads will be broken down into triangles internally) of the scene geometry gray on a white background. This can be useful, for example, if you want to display the polygon topology.
Sometimes it’s advisable to render only the untextured scene for lighting purposes. This is what this mode is for: it assigns a gray, diffuse material to all objects. The scene renders much faster without textures and the homogenous shading makes it possible to judge how light sources work together with the blank geometry.
Use this option to enable or disable the depth of field (incl. any Bokehs, see also Diaphragm Shape for the Physical Renderer). Note that the renderer will most often be pushed to its limits in its efforts to remove noise. However, the depth of field is a key element for creating a photorealistic look.
General information about this function can be found under Depth Of Field.
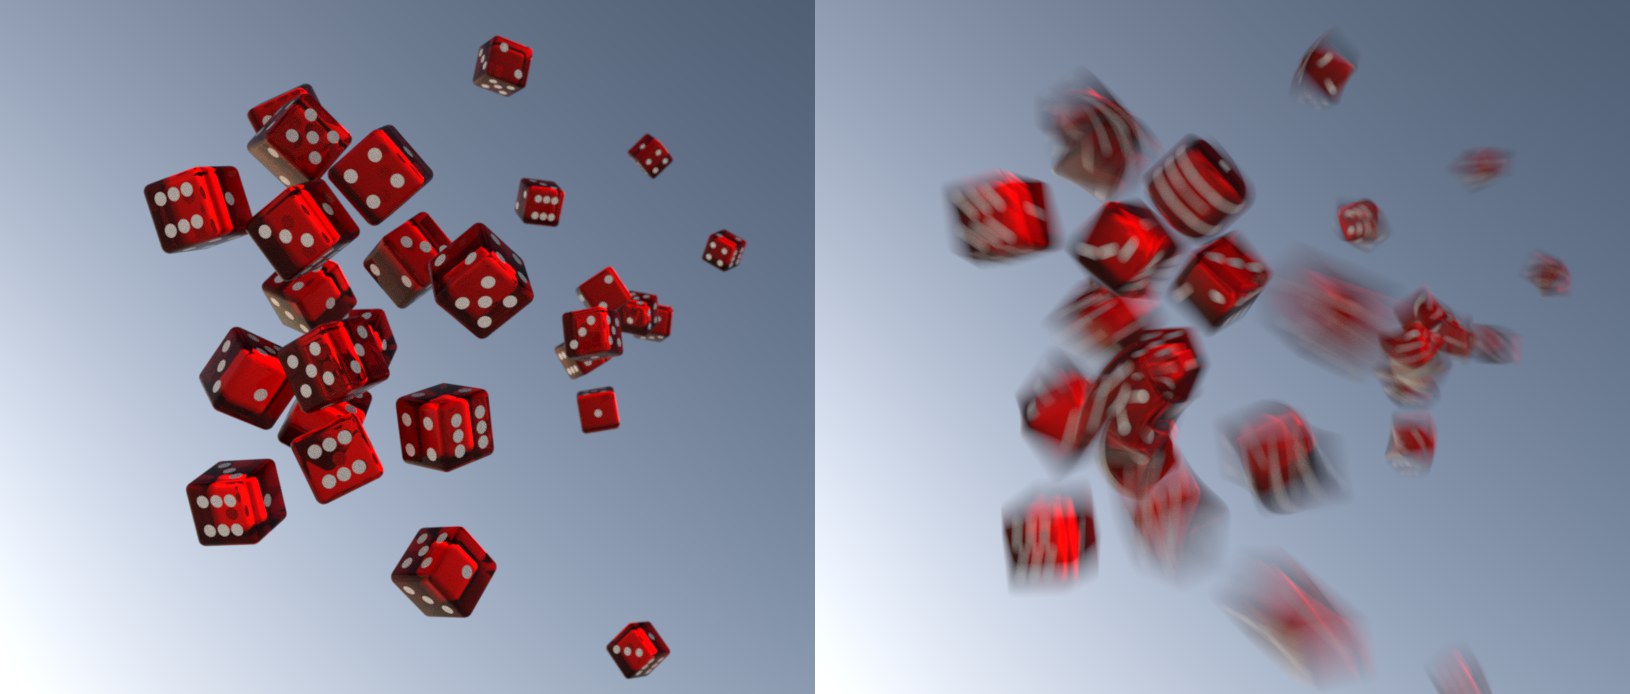 Motion Blur disabled on left, enabled on right.
This is where you select the type of motion blur that ProRender should use. Note that motion blur will not be rendered in the Viewport but in the Picture Viewer.
Similar to when Depth of Field is enabled, ProRender has to work hard to rid the rendering of noise. However, motion blur plays an important role in the creation of realistic-looking animations The strength of the motion blur depends on the camera’s Shutter Speed (s) and the speed with which the objects being filmed move.
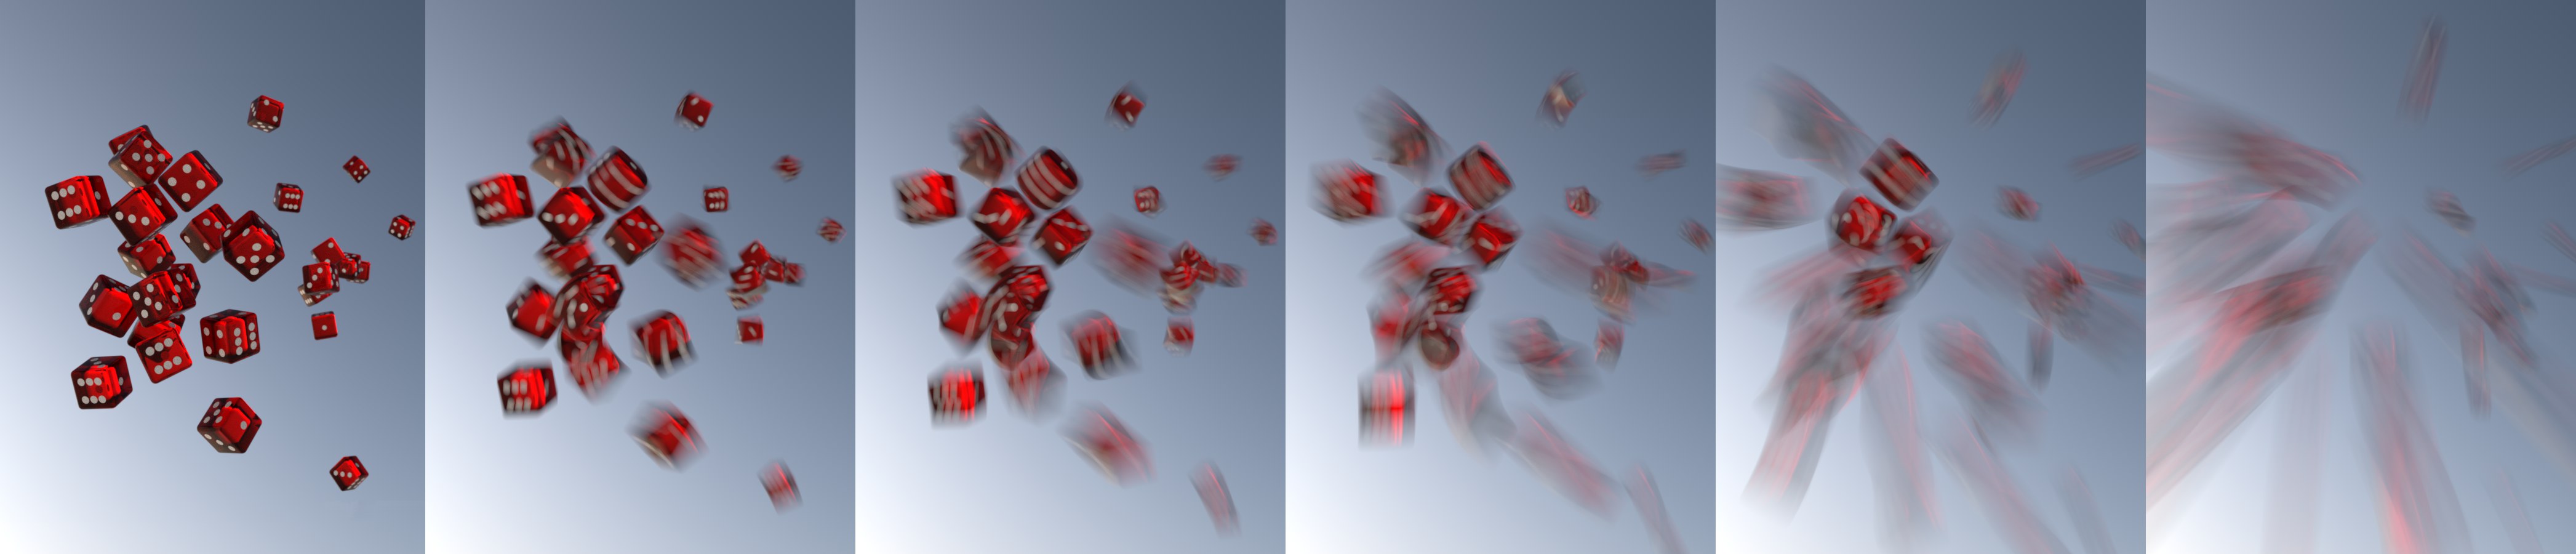 Increasingly slower shutter speeds from left to right and the resulting motion blur.
No motion blur will be calculated.
Linear motion blur only works in conjunction with object animations in which position, angle and/ or size properties change.
Texture Deformer animations, for example, don’t work with this motion blur. For these types of motion blur, use the Sub-Frame Motion Blur option below.
Contrary to Cinema 4D R20, the camera animation blur now works (in relation to its movement).
Note also that the motion blur movements will be interpolated linearly from frame to frame, i.e., for extremely fast, complex movements, artefacting will occur (see top left of image under Motion Subdivisions.
The Sub-Frame Motion Blur should already be familiar to you from the Standard renderer (see here). Here, multiple in-between frames are calculated and combined from one animation frame to the next. This motion blur takes all effects into consideration (incl. camera and Deformer animations).
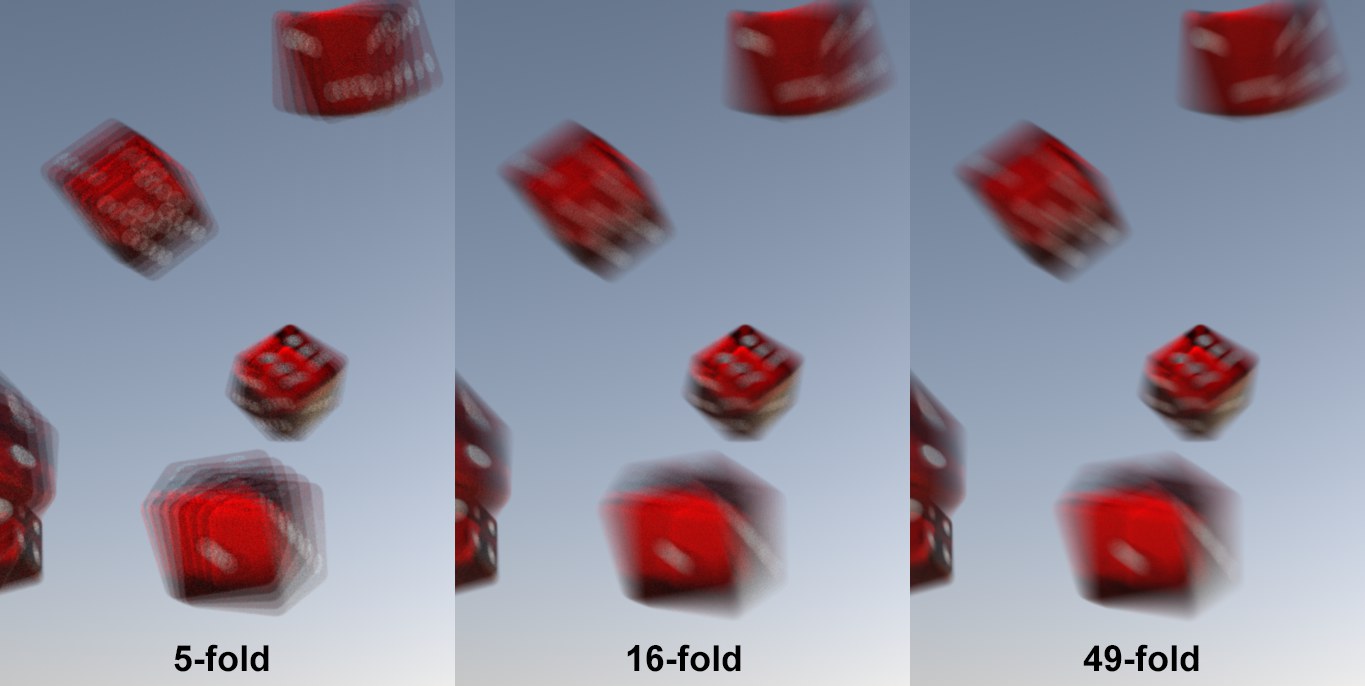 Different Samples values: note also how the noise lessens with increasing values.
Use this setting to define the number of sub-frames should be calculated for each animation frame to achieve the final result. The render time will increase with increasing values. The value must be increased for fast movement to prevent strobe-like effects from occurring.
Note that you can reduce the quality settings (e.g., Stop Condition) as the number of Samples for Sub-Frame Motion Blur increases. The reason: A different noise distribution is calculated for each sub-frame, which is in turn partially removed when combined. Each sub-frame abides by the Stop Condition setting.
Use this setting to reduce the strobe-effect somewhat. Increasing values will add more noise to the blur, which reduces hard transitions between sub-frames.
During rendering, very many rays are emitted into the scene through each output pixel. Depending on the type of surface a ray hits it will be split: this way it can, for example, be reflected and/ or refracted; for matte or diffuse surfaces, a great number of rays from different angles can be reflected or refracted:
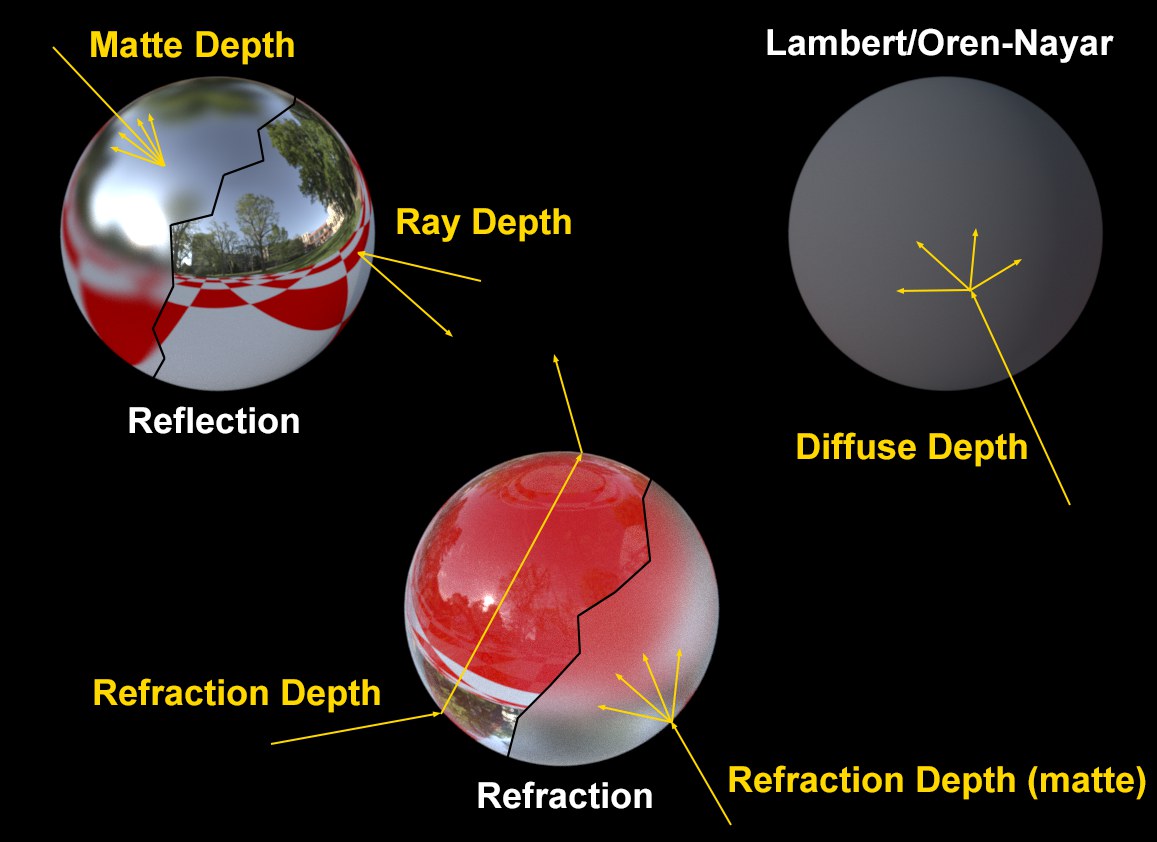 This is how ray types are defined. The depth settings define the number of reflections/ refractions per ray type (exception: Max Ray Depth).
Rays pass back-and-forth through the scene millions of times collecting color and brightness information (samples). In the real world, this happens infinitely but in Cinema 4D this has to end at some point, otherwise calculating each pixel would also be an infinite undertaking. Therefore, the number of reflections and refractions has to be limited.
Each of these ray types can be defined separately to optimize render times. The values can be reduced specifically to reduce render times.
Generally speaking, the following can be said: The differences in rendering for values of 1, 2 or 3 are large; the higher the values, the less difference there is between them. This is not surprising since, for example, the 7th reflection of a bright light source is so dark that it barely makes a difference - but still requires render time.
In general, for all depth settings, the larger the value the longer the render time will be. The smaller the shorter. However, with small values - from around 0-3 - artefacting will increase correspondingly.
The Max Ray Depth defines the number of reflections that a ray can take for reflective surfaces (Roughness = 0, i.e., sharp reflections).
It also defines a maximum value fur the following 4 depth settings (even if, for example, Refraction Depth is set to 12, the Max Ray Depth defined here will be valid as long as it’s lower).
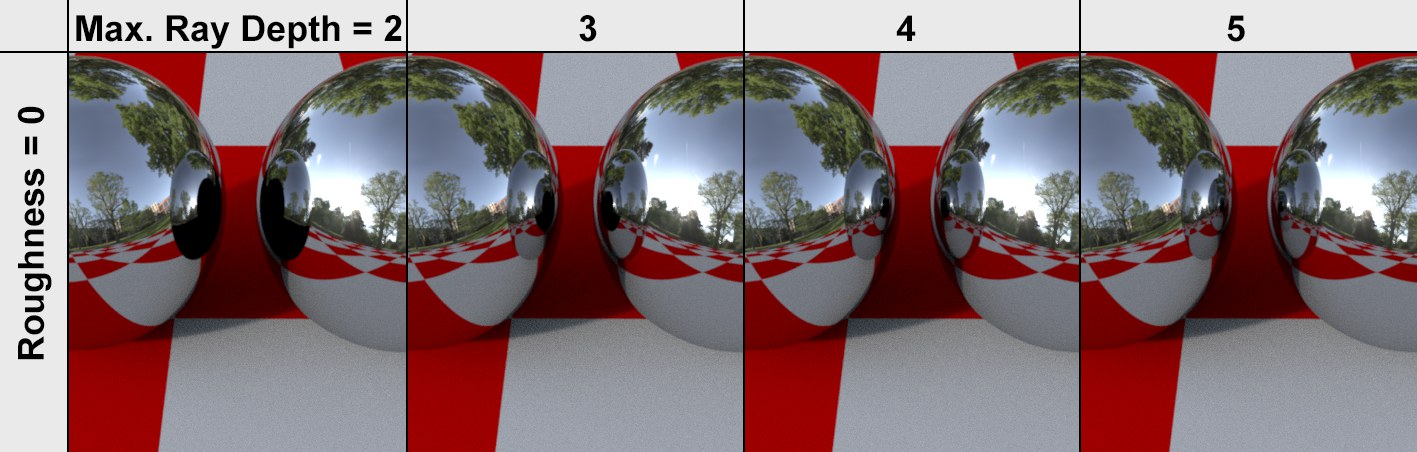
Note that caustics can first appear at a Max Ray Depth of 2 or greater.

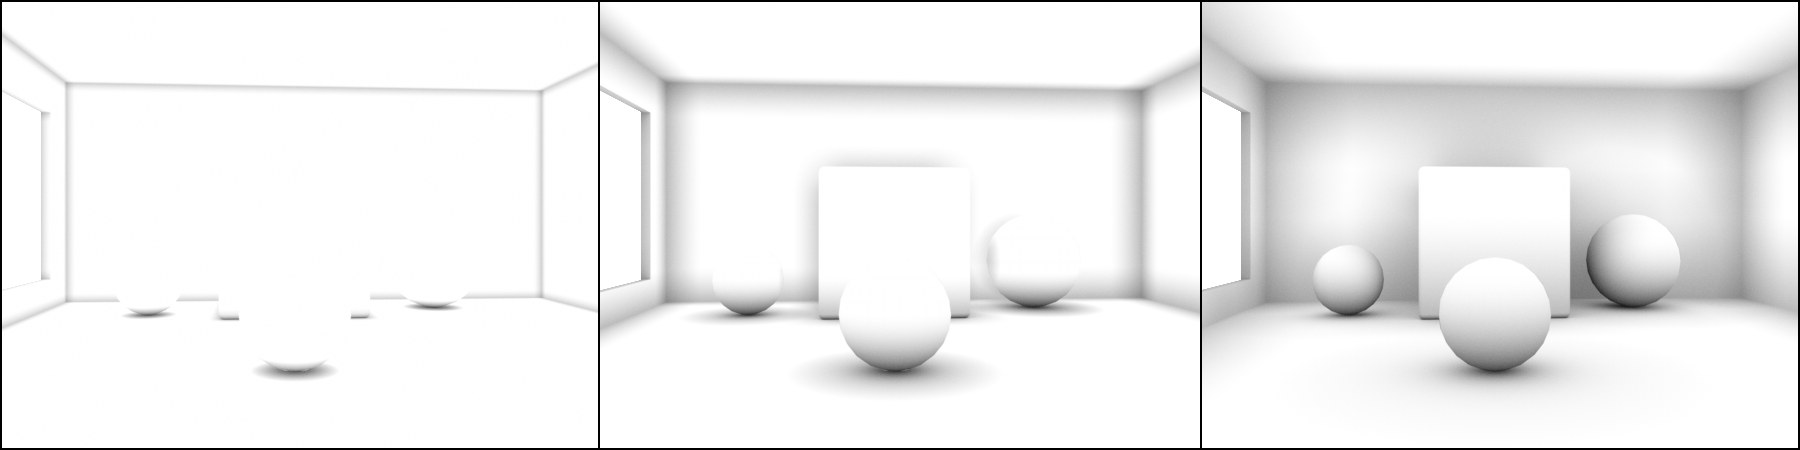
This setting defines the number of reflections that a ray can accept for a diffuse surface (Lambert, Oren-Nayer). This effect can, in essence, be described as Global Illumination.
The higher the value, the brighter the scene will be. However, with a Diffuse Depth of 4 or higher you will barely notice a difference because the increasing number of reflections will not brighten the overall scene any stronger. If the rendering is too dark, it’s better to work with Tone Mapping instead of constantly increasing the Diffuse Depth value.
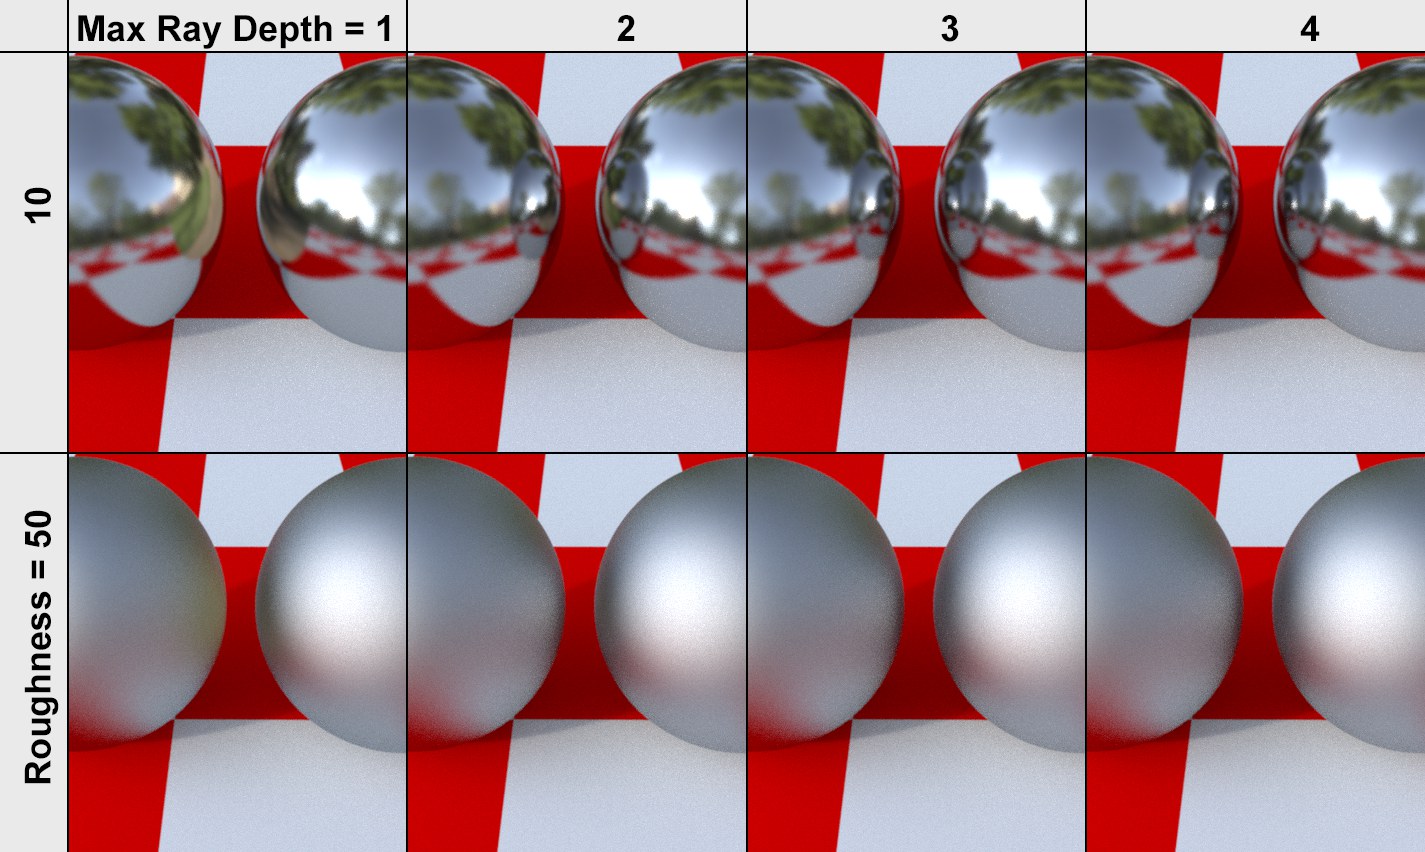
This setting defines the number of reflections a matte reflection (Roughness > 0) can take.
The higher the roughness, the smaller the Max Ray Depth can be, without artefacts being created.
Smaller values result in correspondingly shorter render times (and more iterations).
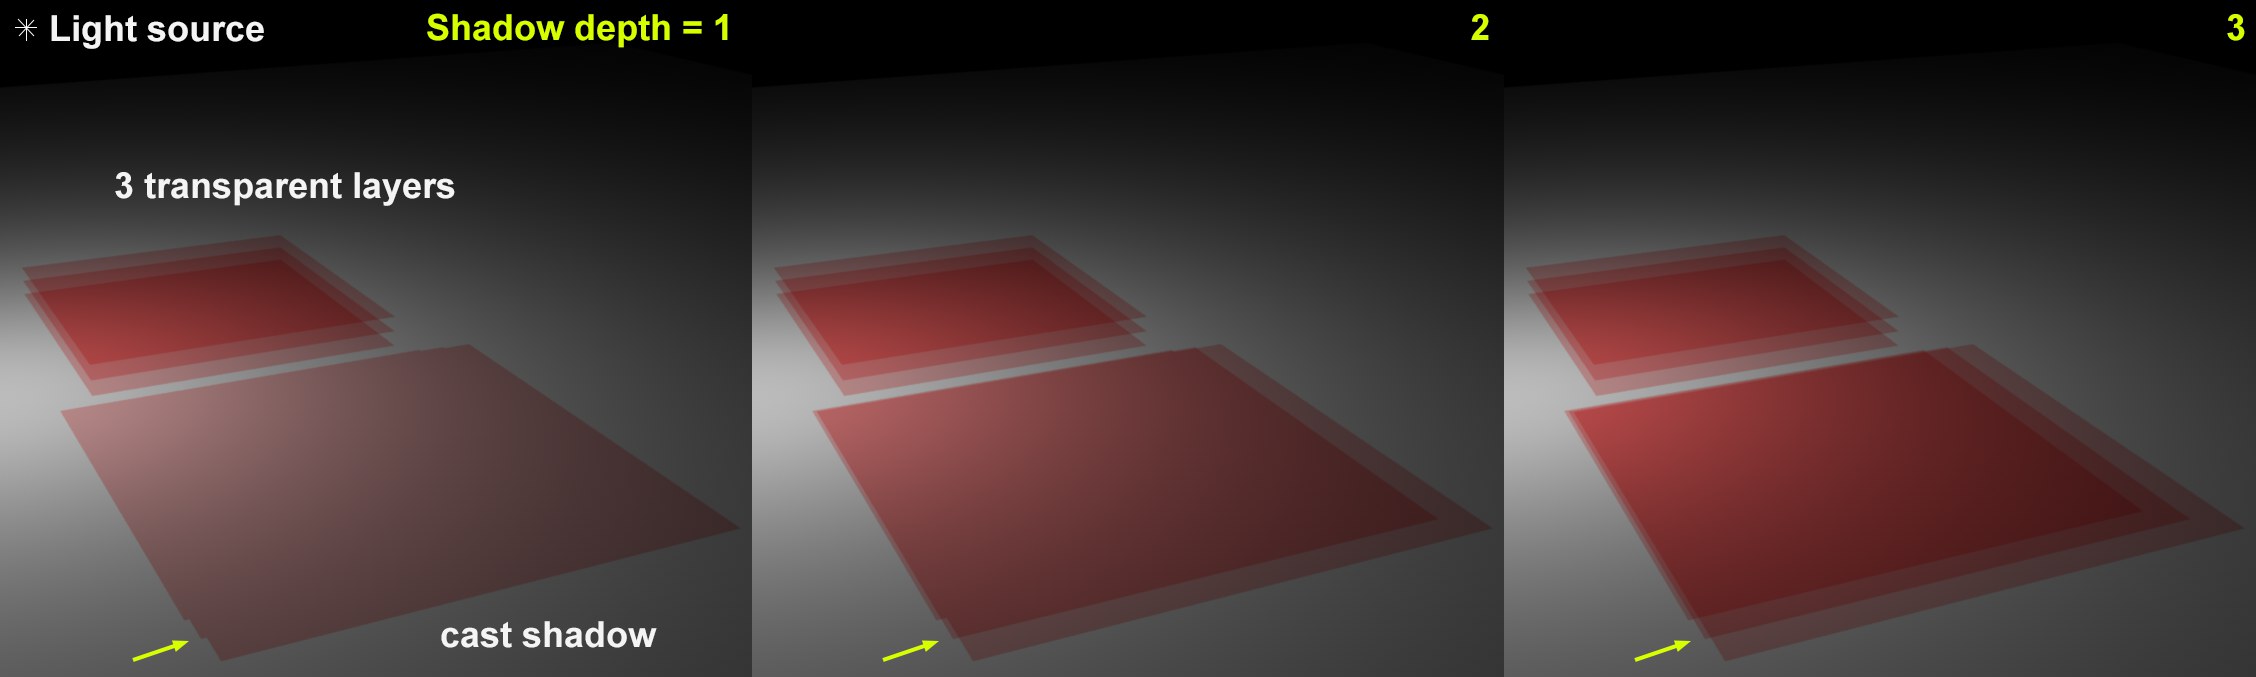
Refraction Depth [0..2147483647]
 3 transparent layers rendered with different Refraction Depth settings. For voluminous objects (shown here without thickness for demonstration purposes), the Refraction Depth must be doubled to achieve the desired effect.
The Refraction Depth defines the number of refractions allowed for clear, transparent glass. If the value is too low, the ray tracing will be stopped at the color black.
The Refraction Depth also works with Subsurface Scattering (Transparency option enabled) and must have a value of at least 2. However, the depth only applies to the entry and exit from the refracting object (refraction within the object is dependent on this).
Glossy Refraction Depth [0..2147483647]
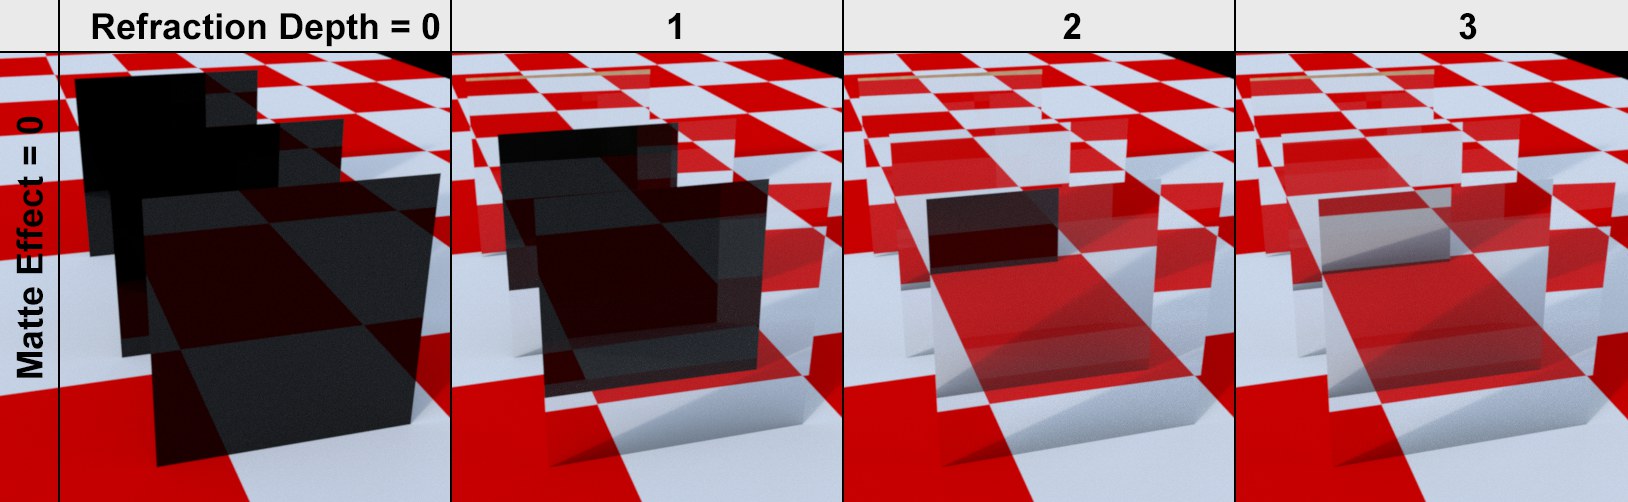
 3 matte transparent layers rendered with different Refraction Depths. For voluminous objects (shown here without thickness for demonstration purposes), the Refraction Depth must be doubled to achieve the desired effect.
The Refraction Depth (Depth) defines the number of refractions allowed for matte glass. If the value is too low, the ray tracing will end at the color black.
The Refraction Depth also works with Subsurface Scattering (Transparency option disabled) and must have a value of at least 2. However, the depth only applies to the entry and exit from the refracting object (refraction within the object is dependent on this).
This setting affects transparent materials or those with alpha channels assigned to them: to calculate shadows, ProRender emits shadow rays to the light sources (for all light-reflecting objects) for each visible surface. Refraction Depth is used for each transparent / alpha material that lies between the surface and a light source:
 Different Shadow Depth values and the rendered results with various transparencies.
This setting defines the number of transparencies/alphas that the shadow ray should take into account on its way to the light source.
Note that refracting transparencies (i.e., Refraction not equal to 1) are not included in the shadow rays (this is what refraction rays, which can create caustics, are for).
For voluminous objects, both the front and back sides are each seen as a transparency.
Ambient Occlusion Ray Length [0.001..+∞m]
 Increasing Ambient Occlusion Ray Length values from left to right.
Use this value to define the distance at which surfaces can "see" each other and thus be darkened. Smaller values will only color regions in close proximity of touching surfaces and larger values will produce an effect similar to that of diffused lighting.
During rendering, the scene - from the camera’s angle of view - is divided into a grid (= output resolution) consisting of pixels. For each pixel and each iteration, a number of samples (Samples per Iteration) are shot into the scene. To prevent stepping at edges from occurring (imagine the angled edge of a cube that runs through the grid, see also How antialiasing works (for the Standard Renderer)), the samples will be dispersed across the entire pixel surface and the samples gathered per pixel combined (= pixel color).
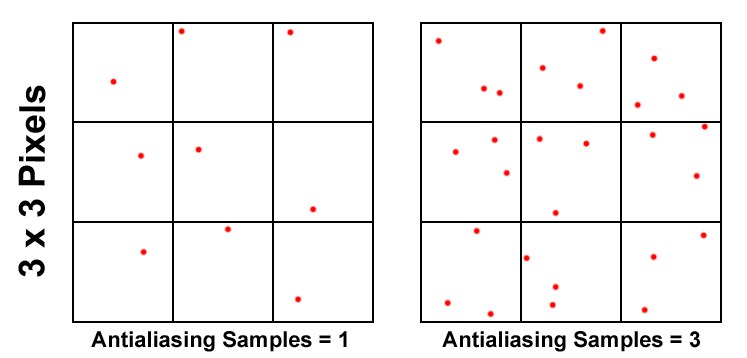 An example of a sample dispersion of a 3x3 pixel rendering per iteration.
This setting can be used to define the sample count per iteration:
This setting has no impact for longer renderings: the result will be the same.
What is this setting good for? You can use it to affect the jumps in quality between iterations in addition to the iteration length in the Picture Viewer - many Samples per Iteration produce a greater difference between iterations, whereby each iteration will take longer, and vice-versa.
Whether you have a low number of iterations and many samples or a hight number of iterations with few samples, basically the same render quality will be achieved with pretty much equal render times.
If you ignore the filters described in the next section, all of a pixel’s samples will be combined and the pixel will be rendered accordingly.
In the previous section we described how samples are dispersed across a pixel surface. The Filter settings can be used to define how these samples affect each pixel for rendering in the area of Filter Size.
In the example below, a section was enlarged so the filter can be seen more clearly.
In the example below you can zoom in to see more detail.
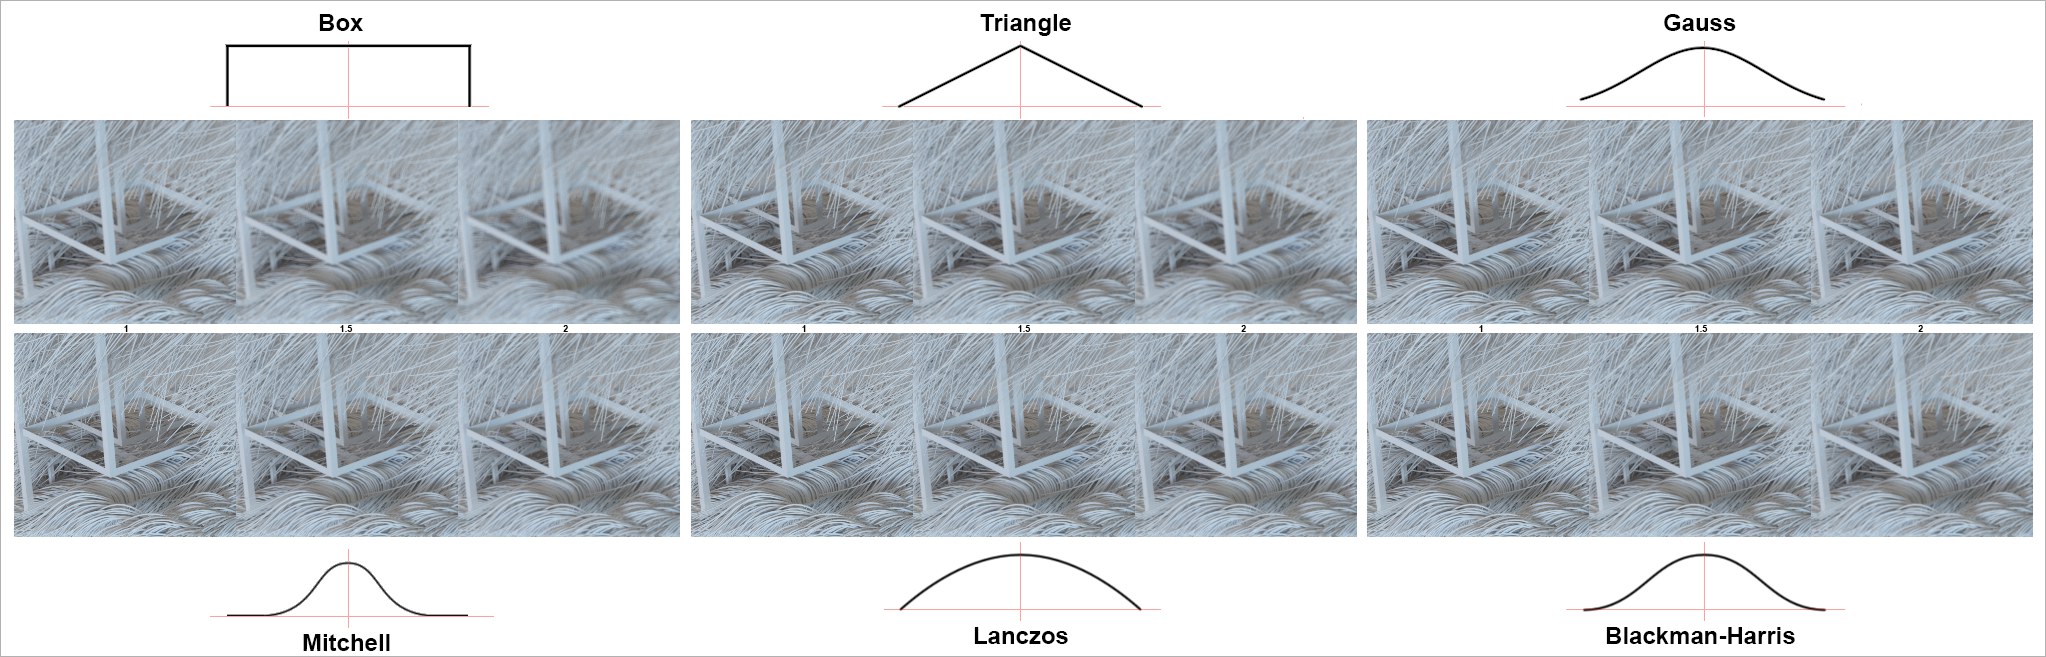 This is how the samples are weighted per pixel color starting from the pixel center (Filter Size 1, 1.5 and 2, respectively).
The filter curves obey different functions for which the X axis is the pixel center and the Y axis is the weighting for each sample.
The Filter Size (in pixels) defines how many neighboring pixel surfaces around the pixel should be used to combine all respective samples. The larger the value, the more blurred details will be. A value of 0.5 will only affect the surface of the current pixel.
Radiance Clamp
Radiance Clamp Value [1..+∞]
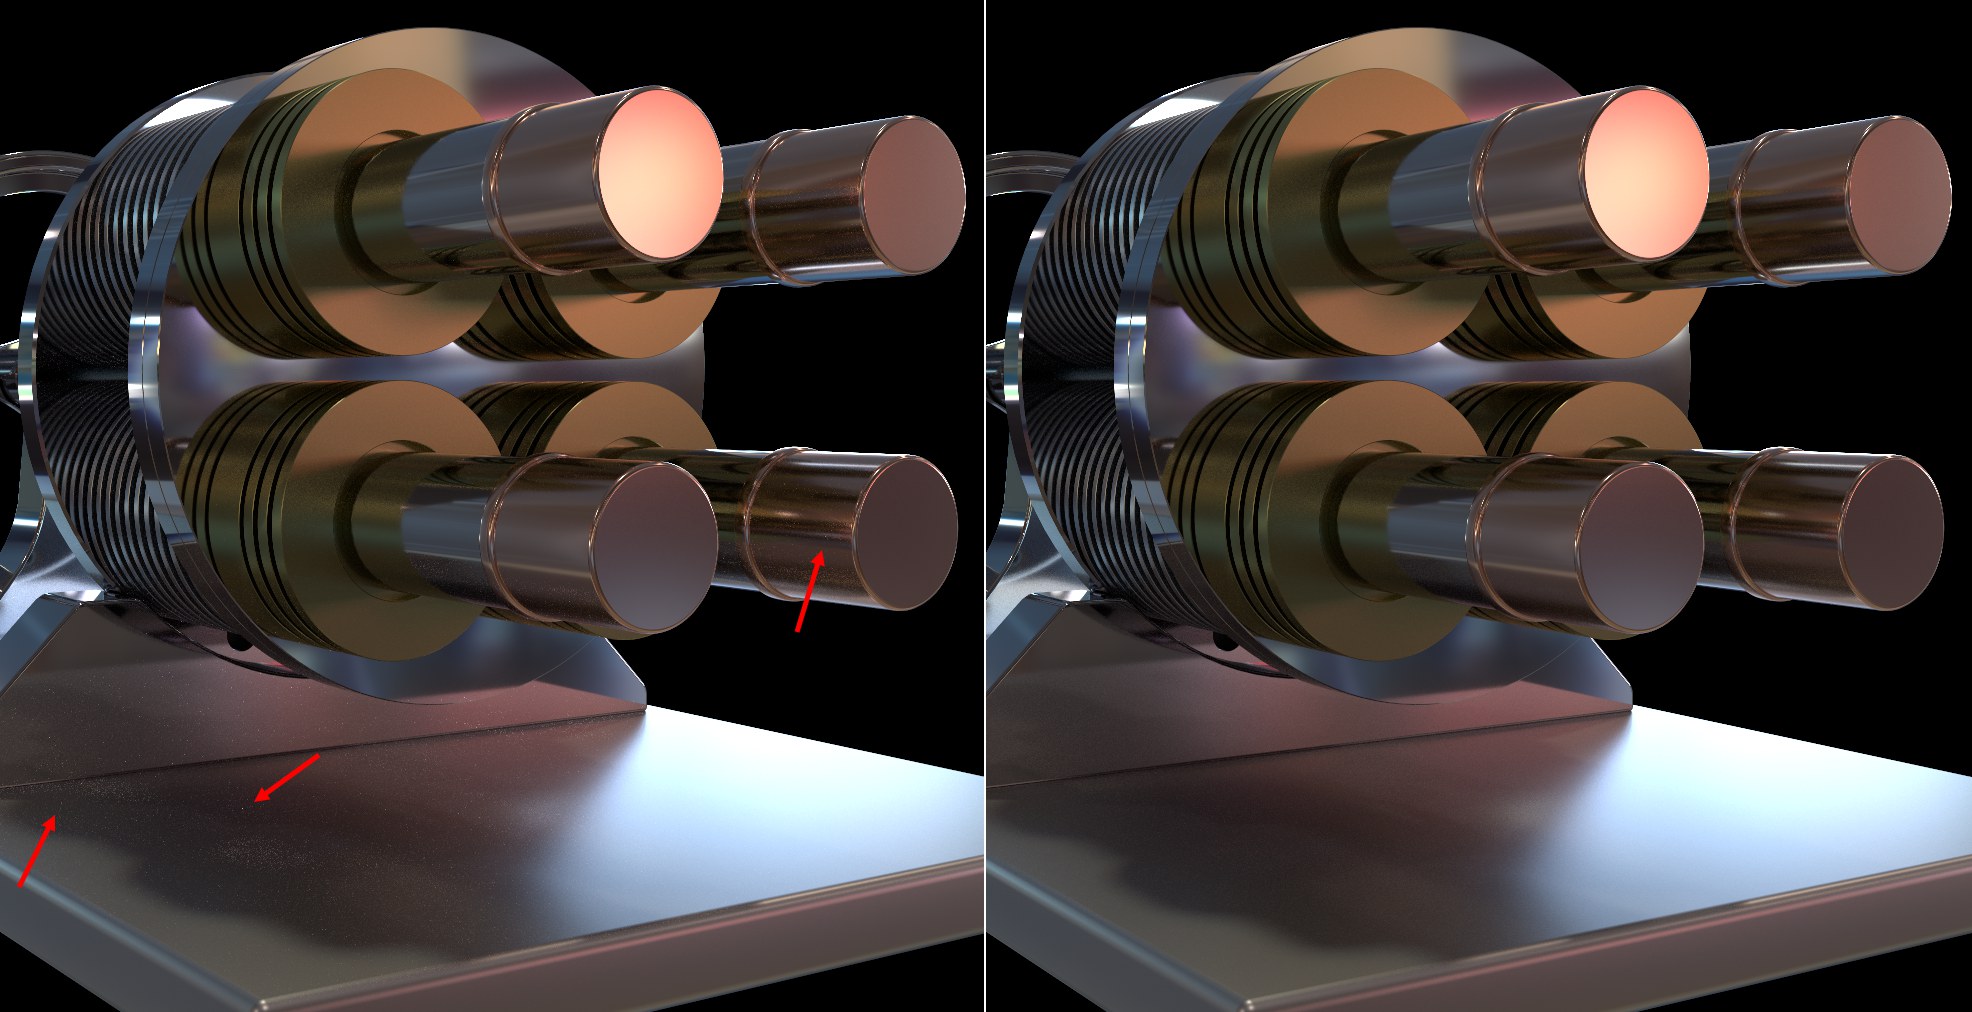 At left without Radiance Clamp, at right with (fireflies and caustics are gone).
The Radiance Clamp setting can be used to restrict the sample density (or put simply: the brightness) of reflected/refracted samples. The smaller the value, the greater the restriction and larger values will allow correspondingly more brightness. Direct reflections (i.e., a value of 1) are not affected. Crisp HDRI reflections remain unaffected.
This setting can also be used to restrict fireflies (see also Firefly Threshold).
Attention: These settings have a major effect on caustics. Their brightness is reduced. A physically correct rendering is no longer possible. If you look at the image above you will see a hint of caustics on the left, which is not present on the right.
The impact of the sample density setting and the Firefly filter described below is reduced greatly if the Denoisers is applied. The Denoiser filters firefly effects very effectively!
Enable Firefly Filter
Firefly Threshold [-∞..+∞]
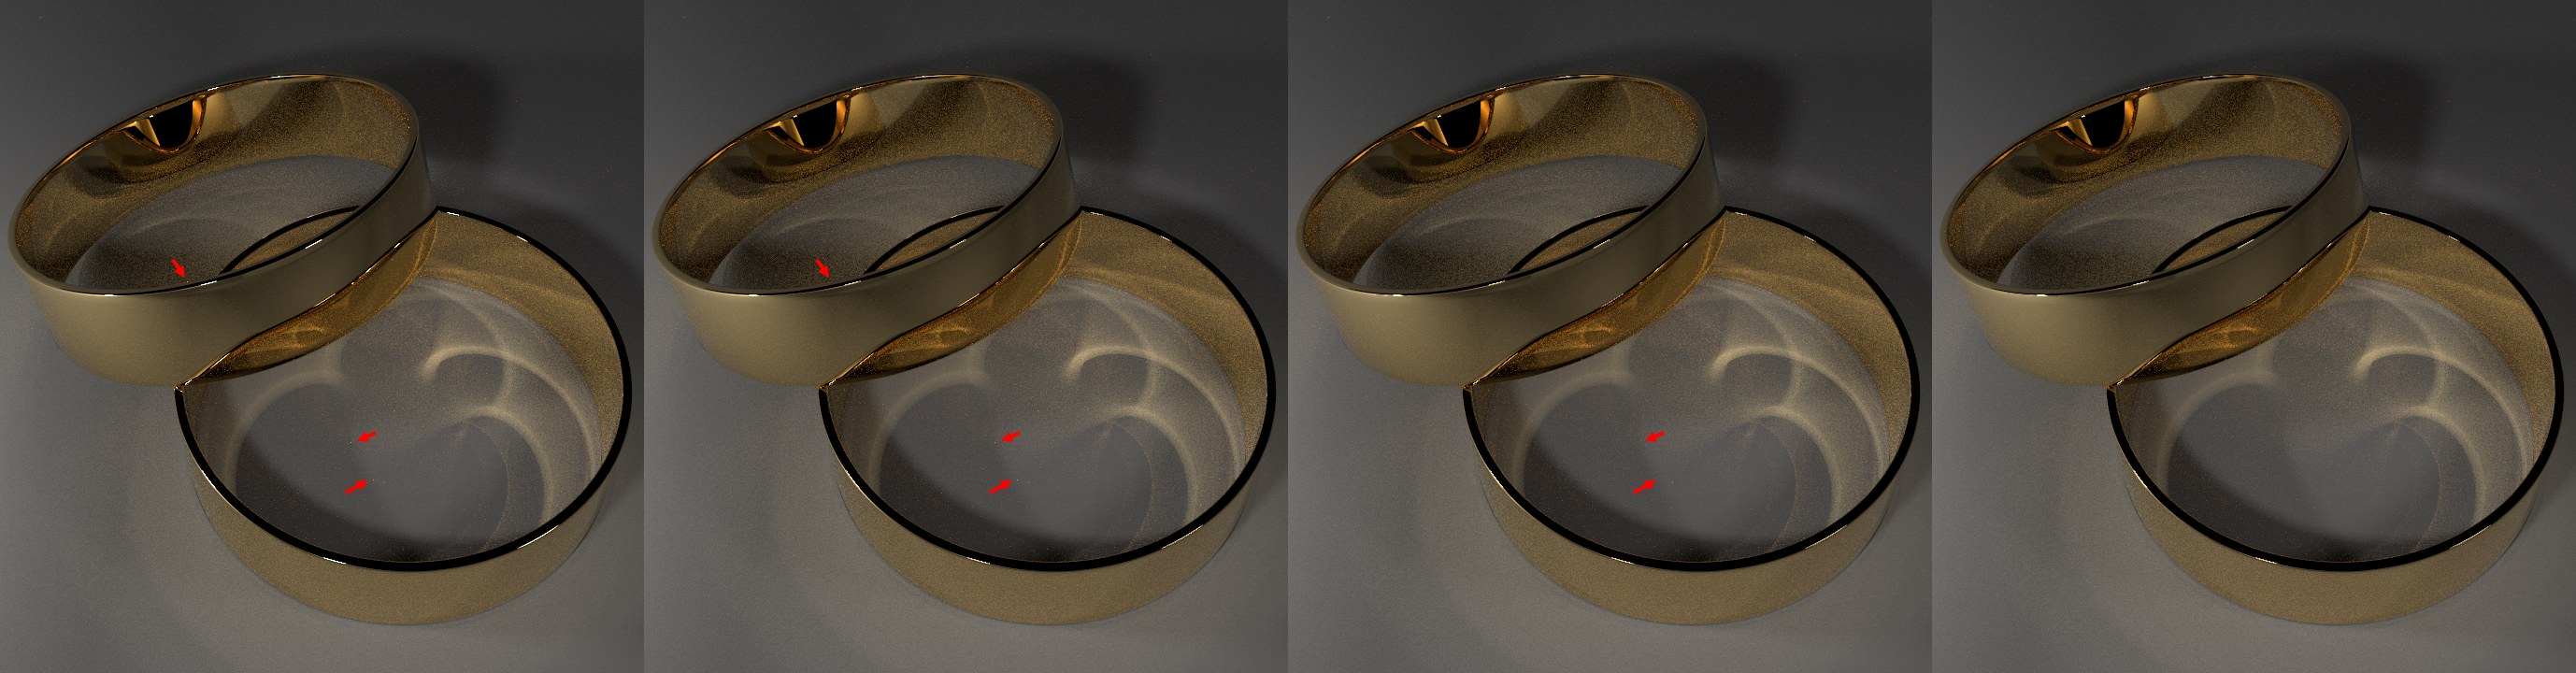 Left without Firefly Filter, to the right with falling Firefly Threshold values. If you look closely you will see that the tiny reflections at the rings’ edges suffer somewhat.
This setting serves to restrict the so-called "fireflies" (also known as hotpixels). Fireflies are individual pixels that are very bright and thus stand out right away. These pixels occur if the scene has very small but very bright regions that are rarely hit by samples (these include bright HDRI regions or also caustics).
Normally, these fireflies can only be eliminated by implementing long render times.
If the Firefly Filter is enabled, these pixels are targeted with the help of the Firefly Threshold value. This function (which is a Post Effect) recognizes pixels that are surrounded by neighboring pixels with the same brightness. How great the difference can be is defined by this threshold value. The larger the value, the greater the difference can be without the pixel being adapted to its surrounding pixels. Smaller values will result in fewer fireflies but can also negatively affect small and tiny reflections. Values that are too low will produce a spotty result.
Note that very fine details, like the effects produced by the Reflectance channel or tiny reflections, can also be eliminated by the Firefly Filter - so apply the filter carefully.
This function is not designed to reduce noise in general (see image above) but to eliminate individual fireflies. Clusters of hotpixels will also be removed.
Note also the Radiance Clamp function, which can also be used to eliminate fireflies.
See Level of Detail.
You can also define the level of detail at object level using the Display tags. Whether or not this should be taken into consideration can be defined here.
If desired, the complete HUD can be displayed in the image or animation to be rendered (see also HUD / Settings). It will be displayed once ProRender has reached its Stop Condition.
Use this setting to define if the Doodle function (sketching in the Viewport) should also be taken into consideration for rendering. It will be displayed once ProRender has reached its Stop Condition.
For Cinema 4D R20, the scene cache in the graphics card was optimized. This means that the complete scene doesn’t have to be reloaded for each animation frame. However, issues such as the following can occur.
Enable this option if faulty effects occur (e.g., the Flame shader is rendered non-animated; this and other shaders that are animated without Timeline keys can be affected). The scene will then be completely reloaded for each animation frame, which eliminates such errors.
![]() Progressive Rendering
Progressive Rendering
ProRender renders progressively and - if not told to do so - indefinitely. However, since all renderings must come to an end, these options can be used to define how this should be done:
- Iteration Count: Rendering will end when the defined number of samples per pixel has been reached.
- Time Limit (s): Rendering will end after the defined period of time.
- Threshold: The noise in the rendering will be "measured" and if the defined Threshold value is exceeded (see below), the rendering will end (this option is not available for the preview).
- Never: Rendering will never end (this option should never be used to render animations.
Iteration Count [1..2147483647]
First, an explanation of the meaning of Iterations for ProRender.
An iteration means that the renderer has calculated each pixel once - or if antialiasing is disabled, a sample has been gathered for each pixel. Higher antlialiasing settings means that correspondingly more samples will be gathered per pixel for each iteration. The larger the image and more complex the scene (e.g., numerous reflections and refractions), the fewer iterations a graphics card can complete within the same frame of time (the current number of iterations is continuously displayed in the Picture Viewer’s status bar).
For example, if the quality of your rendering is satisfactory with an Iteration Count of 1,000, this value can be entered here so the animation is rendered in the corresponding quality.
Time Limit (s) [0..2147483647]
Enter the time in seconds that the renderer should render per frame. Note that this time should not be seen as absolute because the renderer still has to fully complete an iteration before continuing to the next frame or before it stops rendering. In reality, slightly more time per frame or image will be required.
 Smaller noise will cause render times to lengthen correspondingly.
A high amount of noise mostly means that there are major changes to the pixels from one iteration to the next. This is why the renderer compares the luminance value of each pixel with that of the previous iteration. Depending on the value defined here (low values = less noise/longer render times; larger values = more noise/shorter render times), the rendering will be completed with less or more noise.
Avoid using values such as 0.01 or 0.001 because it will take an eternity for the rendering to end. Render times will rise enormously, even for very simple scenes - e.g., one with an illuminated cube.
Note in conjunction with this the Radiance Clamp setting (especially when using numerous reflective/refractive materials), which can have a strong effect on noise.
Contrary to the other Stop Conditions, a measure of quality can be defined here, which can, for example, be coupled with the image size. For the same scene, the same values will produce the same noise (at least if nothing else is changed; a modified antialiasing value will produce a deviating result). This cannot be transferred to other scenes, i.e., identical threshold values will not necessarily produce an identical result (but they will at least be similar).
It’s not recommended that the Stop Condition Threshold be used in conjunction with the Refresh Mode Time Interval (s). A comparison with the previous state will only take place when the rendering is refreshed. This can result in major deviations in render results for itentical Threshold values.
Iteration Count Limit [1..2147483647]
Imagine you have Stop Condition set to Never and render using a Cinema 4D version with no GUI (e.g., with a Command Line Render Client). This version would render indefinitely because you have no Picture Viewer with which you can abort the rendering. The rendering for the current image/frame will be stopped after the number of iterations defined here has been reached. For bucket rendering (see below), this setting takes effect for normal rendering and defines the number of iterations per bucket.
![]() Refresh Rendering Interval
Refresh Rendering Interval
The image can be updated in the Picture Viewer after each iteration. This is not recommended because this is a computationally intensive process. An update should therefore not be done in short intervals: for an example scene with a 4k resolution, ther renderer can complete 30 iterations if Iteration Interval is set to 50 but only 22 iterations if Iteration Interval is set to 1.
Avoid updating altogether if a rendering is unsupervised: simply define a very large interval (larger than what is defined for Stop Condition) so the update takes place after the image/frame is rendered.
Time Interval (s) [0..2147483647]
An update will be made after the time in seconds defined here. Here, the current iteration will also first be completed, which will postpone the update accordingly.
Iteration Interval [1..2147483647]
An update will be made according to the iteration defined here.
![]() Bucket Rendering
Bucket Rendering
Rendering extremely large images can exceed the graphics card’s memory capacity. If your graphics card shows an error prompt because of this, enable the Bucket Rendering option. Small buckets will be rendered (small square regions) instead of the entire image at once. This is the only way a render output of 128,000*128,000 pixels can be rendered using ProRender in Cinema 4D. Note that the graphics card’s memory requirements for the scene geometry are not affected by these settings (the complete scene will still have to be handled by the memory).
The Stop Conditions defined above apply per bucket.
Use this setting to define the sequence in which the buckets should be rendered. These settings have no effect on render times or render results.
Bucket Width [64..4096]
Bucket Height [64..4096]
Use these settings to define the size of the buckets in pixels. The smaller the buckets the less memory that is required and vice-versa. Buckets that are too small will generate their own overhead, which will not make full use of the graphics card’s capability.
You can define much larger buckets here than you normally would with the Standard Renderer.
![]() Default Texture Resolution
Default Texture Resolution
ProRender currently has the limitation that not all shaders can be rendered natively on the graphics card (see also Limitations). These shaders must be converted to bitmaps that can then be read by the graphics card. This is why you can define the texture size for respective shaders globally (note that the texture size can be defined at shader level in the Basic menu).
All shaders will be converted to bitmaps before rendering starts, which can take quite some time.
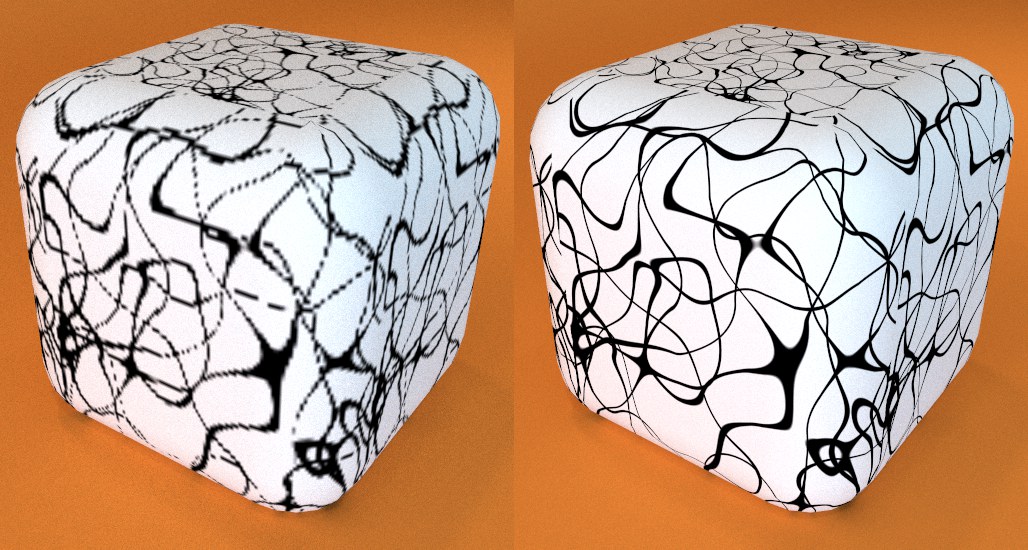 A small texture on the left (128*128) and a large texture on the right (1280*1280).
 Texture Size X [1..8192]
Texture Size Y [1..8192]
Enter the texture size in pixels here. Remember that the graphics card’s memory is limited and some will simply crash if too much memory is required.
Here you can select between 8-bit and 32-bit (in case you use shaders with color values that exceed 8 bits).