Coordinates
This value represents the position of the object in relation to the world coordinate system, or the parent coordinate system if the object lies within a hierarchy (see also Coordinate Manager).
Note also the Expanded Formula Entry by Multiple Selections section (you can enter forumulas in ANY value field, e.g., to position multiple objects accordingly).
This value represents the scale of the object in relation to the world coordinate system, or the parent coordinate system if the object lies within a hierarchy (see also Coordinate Manager).
Modifying the scale of the object using this value equates to scaling in Use Object Axis mode, i.e., the object’s axis system will be modified (see also The difference between the Use Object Tool and Use Model Tool modes).
This value represents the angle of the object in relation to the world coordinate system, or the parent coordinate system if the object lies within a hierarchy (see also Coordinate Manager).
This selection menu is only relevant for animators. The options in this menu can minimize the feared "gimbal locks".
Take a look at the following example problem:
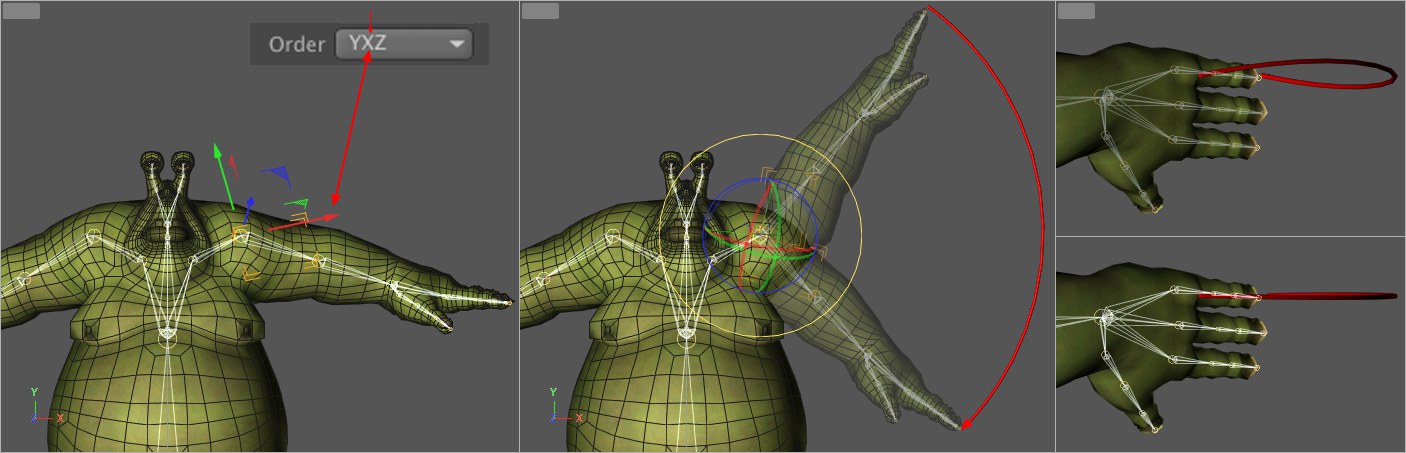
We have a character set up for animation with complex hierarchies. Let’s say you want to animate the shoulder joint of the right arm in the front view with a presumably simple downward rotation. So we create keyframes for the fingertips in the up position and in the down position. If we now play the animation back and view it from the top, we will see that, instead of the expected downward movement only, the arm swerves slightly as well (at the top right of the image above). This is an example of the "gimbal lock" effect. Here it is relatively weak; but in extreme cases it can result in completely abnormal, corkscrew-type movements.
How can the proper rotation order help reduce this effect? All you have to do is have a look at the joint axes PRIOR to animating to determine which of the axes will rotate the least during the planned animation. In our example it’s the X axis marked on the left. Now select one of the Order options in which the X axis is on 2nd place. A very minimal and barely noticeable swerve still takes place but the result is far better than before.
Another option that helps determine which rotation order is correct is the Gimballing Rotation option. Enable this option and activate the Rotate tool:
 Sequence set to HPB at left and to XYZ at right.
Using the rotation bands you can see directly (PRIOR to animating) whether or not the planned animation will work in a given direction. At the left of the image above you can see red, green and blue rotation bands arranged in a manner that appears to make a rotation (red arrow) impossible (none of the bands lies on the rotation plane). This animation will have problems with gimbal lock.
Simply flip through the various Order options until one of the bands lies on or near the rotational plane (in the image above: blue). When you create the animation now you will have very few problems with gimbal lock.
A few additional comments regarding gimbal lock:
It’s always risky if you set the 2nd (center value in marked range below) value to approx. 90° (or 270°) in correlation with the rotation order:
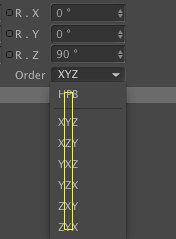
It’s best to always set the corresponding value at or near 0°.
Traditionally, this problem can also be circumvented by animating a Parent Null Object.
Frozen selections, which can be found farther down in the dialog window, can also be helpful.
![]() Quaternion
Quaternion
The functionality of the Quaternion tag (which now only appears when older scenes are loaded (prior to R18) and can no longer be generated as a new tag) has not been integrated as an object property.
Surely you’ve heard of the feared Gimbal Lock in conjunction with character animation, for example - or have even experienced it personally!
Gimbal lock occurs when the rotational value has P +/- 90°, at which point heading H and banking B have the same effect. The result is that one of these dimensions is lost altogether and large rotational jumps occur even with the smallest of rotations.
The Quaternion function, which works only on rotation animations, can help.
By default, Cinema 4D uses the Euler Rotation to interpolate objects’ rotations (Euler: gyro-system for decoupled rotation (HPB), interpolation in Euclidian (right-angle) 3D space).
The Euler rotation’s individual components are interpolated individually, which means that the mean value from HPB (0, 0, 0) and HPB (60, 60, 60) would, for example, be HPB (30, 30, 30). The fact that a swing from 0, 0, 0 over 30, 30, 30 to 60, 60, 60 is not necessarily the shortest path can be tested in the Viewport.
What is needed is an interpolation that takes the shortest path from A to B, which is also what the user would do if the path had to be animated manually.
This is exactly what Quaternions do. A Quaternion will take the path from 0, 0, 0 to 60, 60, 60 via 35.104 °, 22.83 °, 35.104 °.
The Quaternion creates no unnecessary motion and thus avoids Gimbal Lock.
You might wonder why a Quaternion animation is not in principle applied to all objects. The reason is that Quaternion interpolation also bears disadvantages. The Quaternion works fine as long as the change in rotation is less than 180°. Beyond this, problems can occur due to the fact that the Quaternion will always look for the shortest possible path.
The shortest path for a Quaternion Expression is always on a 3D sphere. This can be imagined as a rotation by the Quaternion interpolation around a fixed axis - the axis around which it can rotate with the smallest possible rotation. As a rule, this has nothing to do with the object axes and is different for each rotation.
Take a look at the following example:
- An object needs to be rotated more than 180° around a given axis.
- A keyframe is set for the initial state, the Timeslider is moved to the frame at which the rotation will end and the object is rotated and the motion is set with keyframes. So far so good.
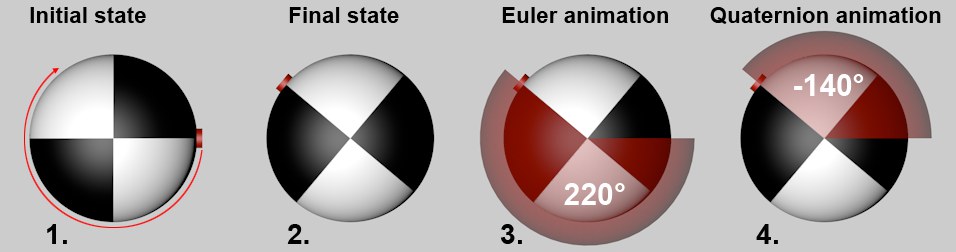
Regardless of whether or not the Quaternion function is used, nothing will change for the initial and final states. The Quaternion interpolation will only use a different method for reaching the same goal. - First, let’s look at the traditional Euler rotation method in Cinema 4D:
An object was rotated using keyframes (e.g., B (bank) rotated 220°, which rotates the objects clockwise by 220°): - Now for the Quaternion method. As was already stated, this interpolation method will always look for the shortest possible path to the final state. The shortest path in this example, however, is not (from the viewer’s angle of view) the clockwise rotation of 220° but a rotation of 140° in the exact opposite direction.
Enabling the Quaternion Rotation option activates the Quaternion animation for that object (the keyframe values will be identical Euler values and only the interpolation between the values will change accordingly). If this option is disabled, the Euler animation method will be used.
Note that Quaternion interpolation only works on local rotation tracks and not on frozen coordinates (see Freeze All).
A separate Quaternion Interpolation option is available in the keyframe properties that can be used to affect the interpolation temporally.
The following differences to Euler animations will result:
- In the Timeline, the names of the rotation tracks will be supplemented by a (Q), i.e., Rotation.P (Q)
- In the Timeline, the three rotation tracks (Rotation.H/P/B) will be seen as a single unit, i.e., if one keyframe is moved to a different location in the animation (or created/deleted), the others will follow
- Keyframe tangents are not supported by Quaternions
- The display of Quaternions as FCurves is often not feasible from a technical point of view (especially for animations greater than 180° between two keyframes) and therefore bears little importance
When should Quaternion animations be used, and when not?
Quaternion animations should be used if:
- you have problems with Gimbal Lock and jumping axes.
Quaternion animations should not be used if:
- the difference in rotation between 2 keyframes exceeds 180° (the rotation will be made along the shortest path)
- you want to fine-tune FCurves (i.e., modify timing)
![]() Freeze Transformation
Freeze Transformation
This function will primarily be used for animations only.
In 3D, the freezing of objects is also referred to as "zeroing out" (or also "dual transformation") because the local coordinates Position and Rotation will each be set to 0 and Scale to 1 without changing the object’s position or orientation (in the following we will only refer to Position and Rotation). The same is achieved when you create a Null Object, position and orient it exactly as the object and make the object a Child object of the Null Object. This is the method that was used prior to R12 as a workaround.
You can picture the freezing of objects as follows: Internally, a Null Object with the coordinates of the selected object will be created. These coordinates will be copied to the Freeze Transformation tab and will function as an offset to the null coordinates, i.e., any modifications made to the primary coordinates will be taken into account by the frozen coordinates.
So what can this be used for? To explain we have to begin with the basics:
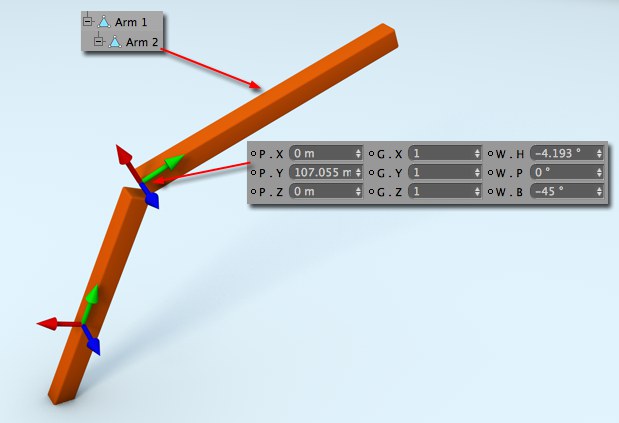
This scene contains two objects: Arm 2 has the local coodinates shown in the image above and is a Child object of Arm 1. The coordinates shown in the Attribute Manager are always local coordinates (they reflect the coordinate system of the Parent object in the hierarchy). So far so good.
We now want to animate Arm 2 so it rotates 45° around the X axis. Normally we would rotate the object using the rotation bands and set two keyframes:
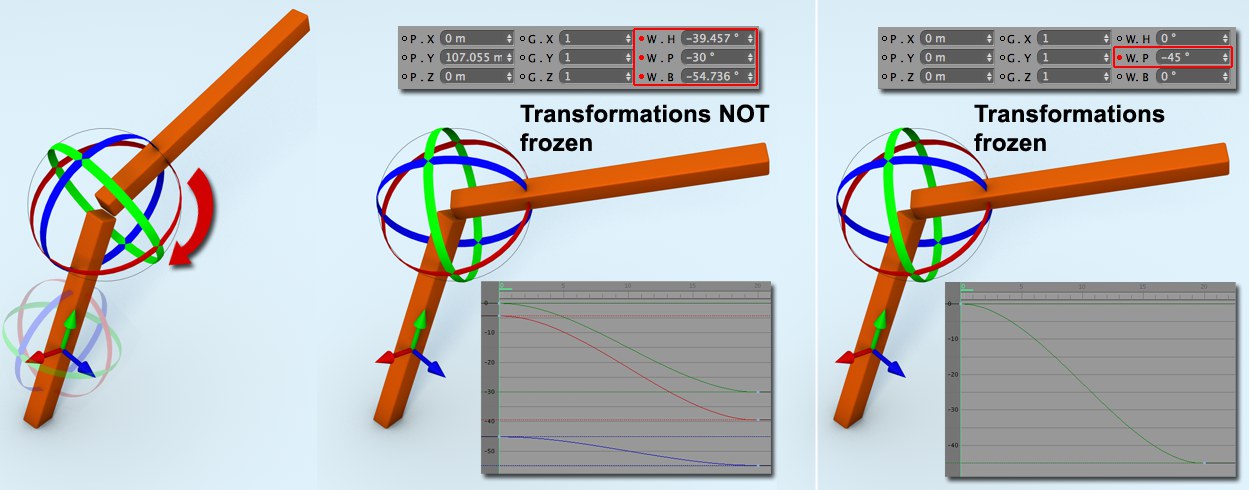
The result can be seen at the center of the image above. Even though the rotation took place around a single axis all three axes were modified. This is due to the fact that the Parent object’s coordinate system (Arm 1) has a different orientation from the local coordinates. Often, this behavior cannot be avoided. And in the Timeline, three F-Curves, that may have to be modified, don’t make things any easier. In addition, our example also suffers from animation Gimbal lock (see Quaternion Rotation), which results in a subsequent rotation of the arm.
All of these adverse effects can be avoided by freezing the transformation PRIOR to animating. This will copy the Position, Scale and Rotation values to the subordinate values of the same name and set the initial values back to 0 and 1, respectively.
This bears the following advantages:
- Coordinate values that are awry will be zeroed out, which lets them be easily set back to their initial values. It is also easier to control parameters such as rotation via XPresso or sliders.
- All animation F-Curves start at 0.
- Gimbal lock can be prevented for one-dimensional rotations.
The Freeze All command will freeze all coordinates (Position, Scale, Rotation), i.e., all primary coordinates will be set to 0.
The Freeze Transformation command (Modes / Coordinates menu) does the same for all selected objects.
The main coordinates will be offset with the frozen coordinates. Subsequently all frozen coordinates will be reset to 0.
This can be done for all objects using a separate command (main menu: Modes / Coordinates / Unfreeze Transformation).
These are the frozen coordinates that are taken over from the parent hierarchy.
The values for these frozen coordinates can be found in the XPresso Editor (Coordinates / Frozen Transformation) in the Input and Output Port menus. These coordinates can be modified here after being frozen, whereby the primary coordinates will remain set to 0.
These buttons can each be used to individually freeze the three primary coordinates:
- Position
- Scale
- Rotation
Note that the frozen position coordinates can be modified as a result of freezing the rotation values, which is a normal effect. For example, if a Child object is rotated (comparable to freezing), the position of the Child object must change accordingly if it is to stay in the same relative position.