Object Properties
If this setting is active, the Displace Deformer will attempt to emulate a displacement created by the Displacement material channel. Naturally, this can only work if a material with an active Deformation channel is applied to the object to be deformed. If this option is not active, the Displace Deformer can be assigned its own texture in the Shading tab.
Mixing textures is only possible if Emulation is active.
This settings should already be familiar to you from the normal Cinema 4D material displacement settings. Their functions are identical.
Use this value to define the height of the displacement.
See Type in the Displacement material channel.
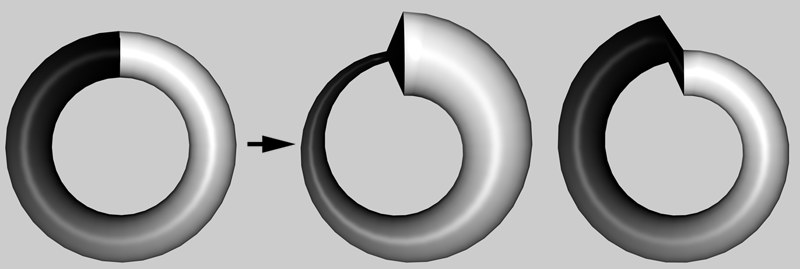
Use this setting to define the direction in which the displacement should work. The following options are available:
 From left to right: The ring in its initial state without Displace Deformer; with Displace Deformer and Vertex Normal mode; with Displace Deformer and Spherical mode.
The shift will take place in the direction of the vertex Normals.
The shift will take place around an imaginary sphere whose center lies within the Displace Deformer.
The shift can be made to take place in the +X, -X, +Y, -Y, +Z and -Z directions via the added Orientation setting.
The Displacement object moves points, with which the Vertex Normals saved in the Normal tag must also move. If this option is enabled, this will be calculated accordingly. If disabled, these will not be recalculated, which will result in incorrect shading (which, however, is required due to a functionality in the Voronoi Fracture object. In the absence of a Normal tag, this option will have no effect.
Prior to Cinema 4D R19, RGB (XYZ Object) was calcualted incorrectly. This has been rectified. If you load an older scene containing this type, the Legacy Mode will be activated and the scene will be displayed as originally saved. Disable this mode if you want the correct calculation to be made.