Falloff
The displacement effect can be spatially limited. These settings work exactly as do the falloff settings for the Effectors.
This button will only be displayed if an older scene (prior to R20) is loaded. See Loading old MoGraph scenes.
First off: Read here (Field) about Fields - what they are and how they’re used.
In the Field lists described below, Field objects, Field Layers and Modifier Layers are placed and combined with one another. This interface element can be found at numerous places in Cinema 4D (see here), which have little to do with one another at first glance. What basically takes place is that Field effects are blended with one another, which creates output values that are in turn used to affect an Effector or a group of points, for example. How Field objects are positioned in the Object Manager does not play a role for Field lists.
 The Direction channel is, for example, shown for a Target Effector.
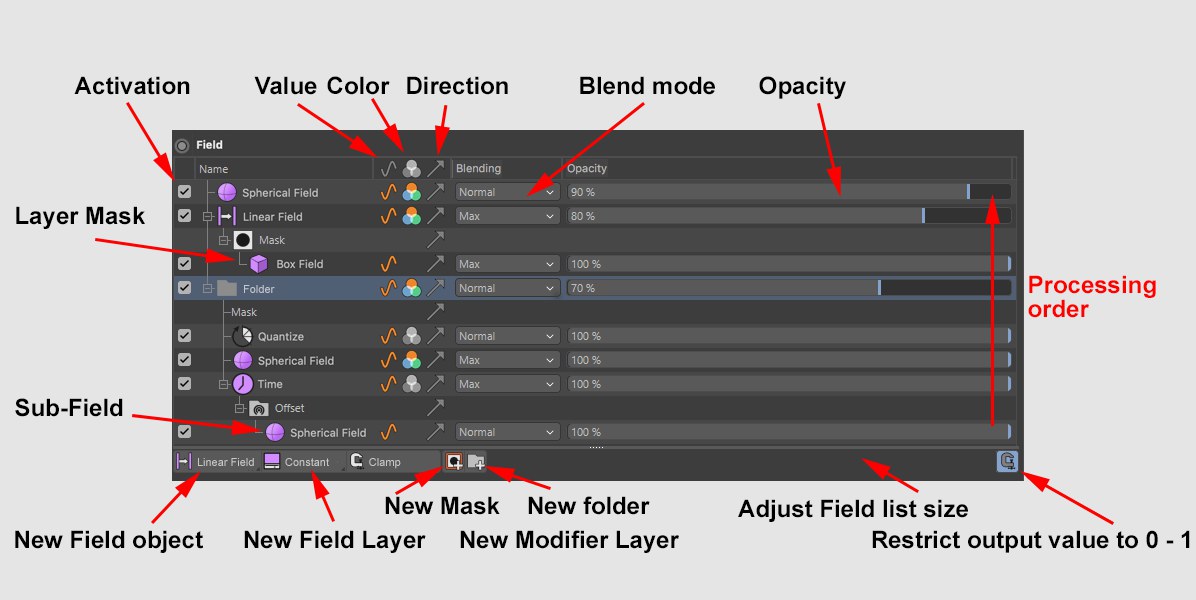
In the Field list you will find all Field Layers, Modifier Layers and folders organized in layers that are processed from bottom to top (exactly like layers that are placed in folders). The blending of elements works similarly to that of layers in image editing programs. Each layer has a blending mode, including opacity slider, that define how it should be blended with the layer below it.
The list entries can be dragged and dropped to a different location. Drop an element onto another in the list to make it a subordinate of that element (selected elements will be made subordinate elements of newly created elements). Elements can also be dragged out of a folder.
Field objects can be dragged from the Object Manager onto other Field objects in the list to replace them while maintaining their settings.
When elements (single or multiple) are selected, their properties will be displayed below. Most of these properties can be adjusted directly in the Field list. Selected elements can be deleted, either by pressing the Del key or using the respective context menu (here you will find commands for deleting elements).
When Field objects that are only located there and are not used in any other Field list are deleted from the list, the Field object will also be deleted from the Object Manager. This can be prevented by using the Erase command in the context menu instead of the Delete command.
The Value/ Color/ Direction icons function as display filters and can, for example, disable all layers that have no effect on colors.
The icons below the title bar define the functionality that they affect (value, color, direction). These properties can be defined for multiple layers by clicking and dragging vertically.
A layer can be renamed by double-clicking on it or selecting it and pressing
Note that one object can be dragged into a list multiple times or duplicated (
In addition to Fields or Field and Modifier Layers, the following objects can also be dragged into the list, each of which will be evaluated using a special layer:
- Polygon objects or their Generators (see Point Object Layer)
- Splines or their Generators (see Spline Field Layer)
- Particle Generators (see Particle Field Layer)
- Volume objects (for objects made up of Voxels; see Volume Object Field Layer)
- Numerous tags (see Field Layer Variable tag)
- Some objects (such as Cloner objects, for example) can play various roles: For example, polygons or splines can also be assigned weighting. If such objects are dragged into the Field list, a prompt will appear asking as what should the object be interpreted (spline, point or MoGraph object).
The Field effect will then be defined along or through the respective object or its components (e.g., object points).
If an object is selected in the Field list that is also present in the Object Manager, this will also be selected via a temporary modification mode so it can be immediately moved interactively, if necessary. This object will be given a unique color in the Object Manager.
This functionality should be noted to better understand the overall function: if an Effector’s Field list is completely empty, the effect will not be zero everywhere but will be the contrary - maximum at all locations. This is a small trick that can be used to simulate the previous Unlimited setting when Effectors were created. As soon as a layer is created, these will be evaluated normally.
If you want to apply an identical Field list constellation to other elements, this can be done in one of 3 ways:
- Copy and paste the parameter name Field to other Field lists
- The Set Driver/ Set Driven function can be used to synchronize entire Field lists
- Use the Group Field
Fields list elements controlled by Fields
If you drag elements into a Fields list that should in turn be controlled by it own Fields list (e.g., a Polygon Selection tag or a Group Field), its Field settings can be opened and controlled remotely from here.
Layers will be colored red if they are faulty in any way (e.g., Shader Field without a shader) and yellow if they will be ignored (empty folder).
The 5 icons below have the following functions (from left to right):
Click on this icon to open a list of all available Fields. These are Fields that will also appear in the Object Manager - they will have a defined position and a rotation. Select one to add it to the list. The Field object will automatically be made a Child object of the respective object in the Object Manager (however, this is not required for the Field to work; what’s important is that it’s in the list). Alternatively, an existing Field can be dragged into the list. In addition, if a fitting element (e.g., Effector) is selected when a Field is generated externally (i.e., via a menu command), this will automatically be added to the list.
Use this command to create a new Field Layer. Field Layers are Fields that do not appear in the Object Manager. The don’t have and don’t require a defined position or rotation.
Clicking on this icon will open a list of all available Modifier Layers that can be used to affect existing layers. Select one to add it to the list. Modifier Layers - as the name already implies - affect existing Fields and themselves make no values, colors or rotations available.
Modifier Layers work similarly to layers in image editing programs, which affect the layers below them, respectively. If you want to restrict effects to specific Fields, place the respective Modifier Layers or Field in a new folder.
Click on this icon to add a new folder to the list. If nothing in the list is selected, an empty folder will be created. Within the folder, the elements will be processed from bottom to top. The result of this folder’s processed contents will be blended accordingly using its own blending and strength settings with the remainder of the Field list elements.
This function can be used to restrict the output values for the current, complete Field list to values between 0 and 1 (for colors RGB 255, 255, 255). Applying this function is recommended for numerous purposes, e.g., if negative value or values that are too large should be excluded. For example, if a Target Field were in the Field list, the value would increase continuously. This function can be used to restrict it to a maximum value of 1.
By default, many Fields are already restricted in the Field list (Remapping tab), which can, however, be modified (Field sub-menu).
Creates a new Field Layer.
Creates a new Field Object.
Creates a new folder. The folder can be used to group layers or restrict Modifier Layers to specific layers.
Selecting this command will group the currently selected layers in a Group Filed. They will be removed from the list and replaced by the group object.
Duplicates the currently selected layer. One and the same Field (which itself only exists once) can, for example, affect different elements within the list (e.g., with different strengths or Blending modes).
These are the usual commands to remove, add and copy elements (including to other Field lists).
Clicking on this button deletes the selected list elements, including in the Object Manager (Field objects). The same happens if you delete by pressing the
Clicking on this button deletes the selected list elements. Objects in the Object Manager will not be affected.
Selects/ deselects all layers.
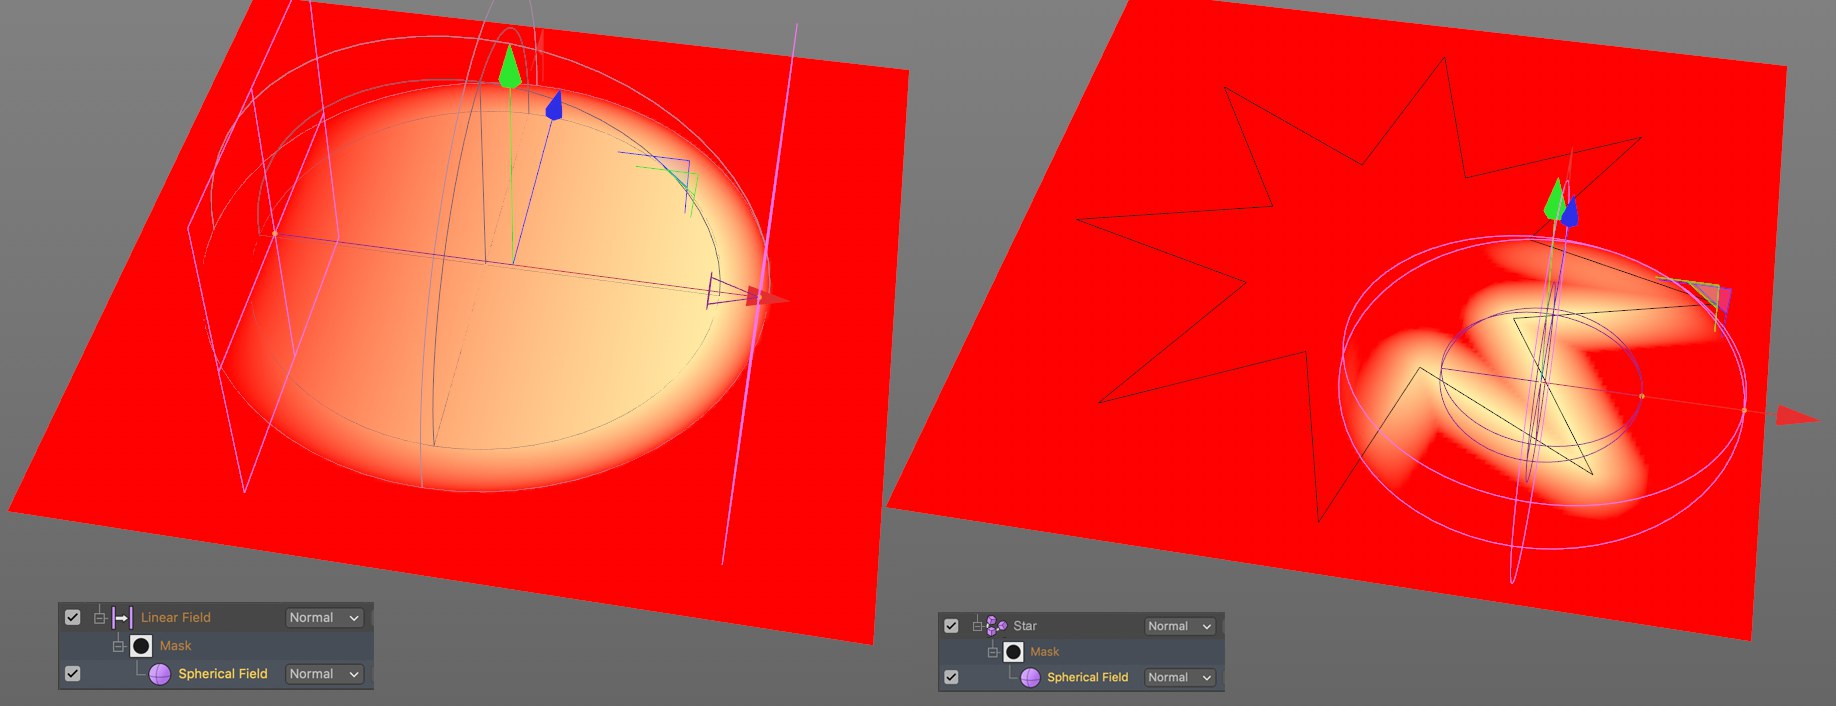 Here a Vertex Map is defined for the Linear Field (left) and the Spline Field (right), respectively, whereby a Spherical Field serves as a mask for each.
With the introduction of Cinema 4D R21, masks can be assigned to each layer. These masks are generated by other Fields and Layers and define the regions where the respective mask should work.
Masks in Cinema 4D work analog to Photoshop’s layer masks, only spatially:
- Photoshop uses a grayscale bitmap with values from 0-255 to define if and to what degree the layer should be visible.
- Cinema 4D uses - to put it simply - spatial fields with values between 0 and 1 to define if and the degree to which the layer should have an effect.
If you want to assign a mask to a layer, right-click on the layer and select Add Mask. A list of sub-folders will appear. Drag the Fields and Layers to this point for the mask to take effect.
A similar mask functionality can also be realized without the method described above: simply create a Field, apply the Blending mode Multiply and place it in a separate folder above the respective layer.
All settings that can be made in the Field list are saved as parameters in the Blending tab (and also described there).
The tabs displayed for respective list elements
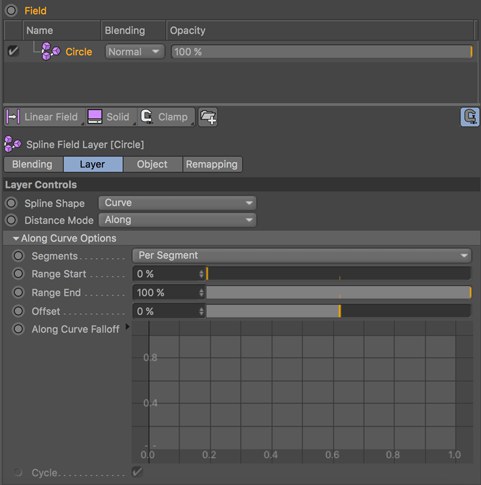
The Field list can also display compound element properties. Example: A Circle spline is dragged into the Field list. The Circle layer is displayed farther below in the dialog window with 5 tabs, of which the Object tab is assumed directly from the spline (so you can easily modify the circle’s settings without having to select the Circle spline in the Object Manager). The Layer tab contains the actual settings of the Field Layer-specific settings. The other tabs Blending, Remapping and Color Mapping are general Field list layer properties whose own properties in turn are supplied by other - invisible - objects (see also Other Objects).
This sounds much more complicated than it actually is! Everything is laid out very logically and for the easiest possible use.