Deformer object
The deformer objects deform primarily the geometry of other objects (see below for alternative uses). You can use deformers on primitive objects, Generator objects, polygon objects and splines.
The deformer will affect its parent object and the hierarchy below that parent. This means that a deformer will affect any object at its level in the hierarchy (since those objects are children of the deformer’s parent) and any object below the deformer’s level in the hierarchy (since those objects are in the hierarchy of the deformer’s parent). However, a deformer will have no affect if it is positioned at the top level of the Object Manager hierarchy, since it will have no parent.
If the object to be deformed is selected and the
- have its object origin and
- its size and orientation
adapted to that of the deformed object (originating from its bounding box).
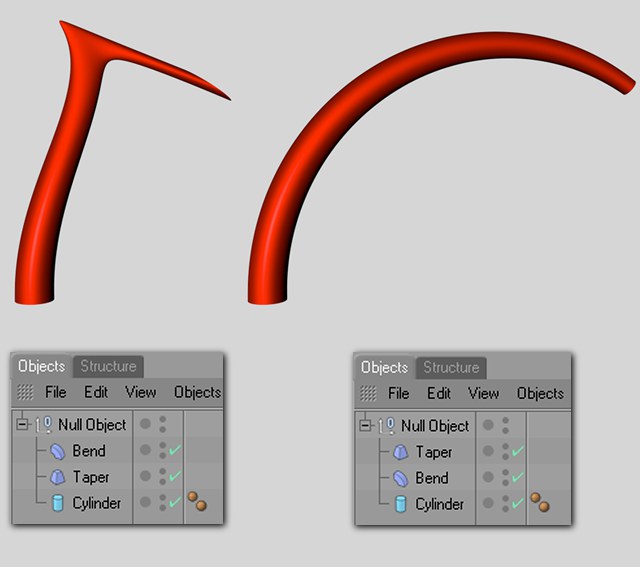 The order of the deformers is important!
You can use several deformers on the same recipient. Their order of evaluation is from top to bottom in the Object Manager. The evaluation order matters — a twist followed by a bend produces a different result from a bend followed by a twist.
The deformer can only work with what you give it. For example, to twist the recipient smoothly, ensure that it has a sufficiently high number of segments/subdivisions along the twist axis.
All deformers are activated automatically when you create them. If a deformer is activated, you will see a green checkmark icon in the Object Manager.

To deactivate the deformer, click the green checkmark. The icon changes to a red cross.

A deformation object has no effect when deactivated. You can also switch off the deformer using the Enabled option on the Attribute Manager’s Basic Properties page.
![]()
You can activate or deactivate all deformers at once by toggling the Use Deformers option on the
- Using Size in combination with Mode (Object tab).
- Using Vertex maps in combination with Restriction tags (the latter being assigned to the Deformation object).
- Using a Falloff function (Falloff tab) that can mask the effect and can reaact to particles and splines in addition to various other shapes.
Vertex Maps or polygon selections can be used to restrict a deformer’s area of influence.
Activate UVW mapping to fix textures before you deform objects. This will prevent textures from slipping. Read more here
Deformation Objects And How They Affect Other Areas
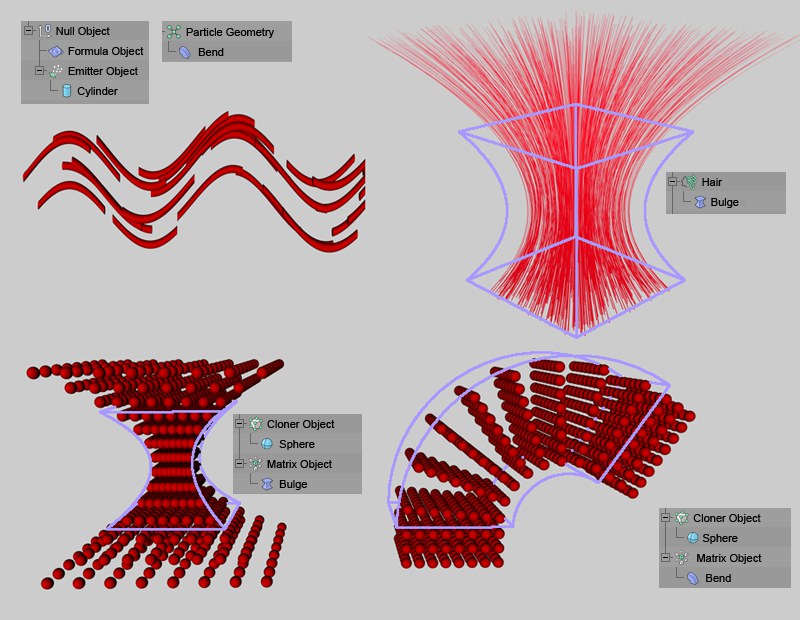 Top: Effect on particles, hair (as geometry); Bottom: Effect of two different Deformer Objects on MoGraph Cloners in grid array.
Deformer Objects affect more than just individual objects. They also basically affect all functions used to create geometry.
These include:
- Particles with geometry assigned to them (when using Thinking Particles the Deformer Object must affect the Geometry Object).
- Cloners (MoGraph), see here. Any number of clone clusters can be affected in conjunction with the Matrix Object.
- Hair (HAIR) that was created as polygonal geometry.
For self-evident reasons, the Deformer Object will not work in conjunction with the following functions: Explosion Object; ExplosionFX; Polygon Reduction; Spline Deformer; Shatter Object.
Exporting animated deformations
Deformation animations created in Cinema 4D must often be exported to other applications. To do so, the ![]() Bake Objects...
Bake Objects...
Bulge Object
Shear Object
Taper Object
Twist Object
FFD Object
Camera Deformer
Correction Deformer
Melt Object
Mesh Deformer
Explosion Object
ExplosionFX Object
Shatter Object
Jiggle
Squash & Stretch
Collision Deformer
Shrinkwrap Object
Spherify Object
Smoothing Deformer
Surface Deformer
Wrap Object
Spline Deformer Object
Spline Rail
Spline Wrap
Displacer Object
Formula Object
Morph Deformer
Point Cache
Wind Deformer Object
Bevel Deformer
Falloff General