Sources
The settings in this tab primarily control how Voronoi cell points are created and distributed.
Note that this page has two sub-pages. For technical reasons, the descriptions for the individual source types have been moved to separate pages.
Enable this option if you want effective Voronoi cell points (see Voronoi Fracture) to be displayed as dark green points in the Viewport.
Otherwise only the points of the currently selected point generator will be displayed in light green. Points will only be displayed in Use Model mode if a commonly used tool is active (e.g., Move, Scale, Rotate, Select, etc.).
If a high number of fragments are generated, the Viewport can become bogged down. In such cases, the number of fragments in the Viewport can be reduced to speed things up. This setting has no effect on the final rendering in the Picture Viewer - the complete number of fragments will always be rendered.
Note that irregularities can occur when using the MoGraph Cache tag if the number of cached fragments (those in the Viewport) is not the same as the actual number that is rendered (i.e., always cache with 100%).
All point-based objects can be dragged into this list. These are, for example, spline and polygon objects (incl. the respective parametric primitives), Generators, particle emitters (use the particle group for Thinking Particles), etc. In short, all objects that can in some way generate points. The only thing that matters is the point positions - it’s irrelevant whether or not spline segments or polygons are attached to the points. These points will be used as Voronoi cell points.
Furthermore, there are two additional point generators that you can call up using the buttons below the Source list.
One interesting object, for example, would be a very small particle emitter that emits in 360°, which will let you generate small fragments at the emitter’s location and correspondingly larger fragments in radii more distant from the emitter’s location. This would, for example, be a typical fracturing behavior of a rock hitting a surface. However, a similar effect can be achieved by setting the Distribution Type to Normal.
When working with uniformly subdivided objects (e.g., a Plane or Matrix object), rectangular fragments will be generated. Interesting, albeit non-realistic, fragments can be generated (such as linear fragmented into discs). You should experiment to get the best result. Spline primitives also produce interesting fragments. However, note that the algorithm for input points that all lie on a plane or sphere could be slower.
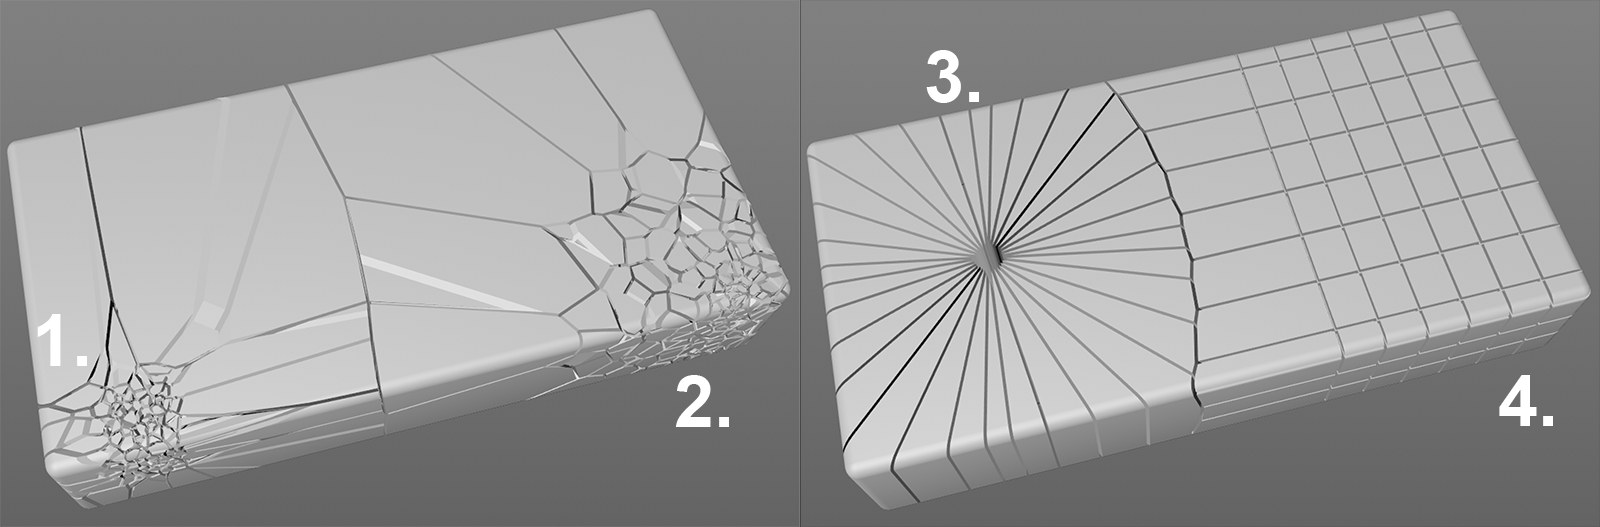 Point-generating objects from left to right: Matrix with Random Effector; Emitter; Circle spline; Matrix object without Random Effector.
You can also affect point distribution interactively using tools (see here).
The sources listed (whose order has no influence on the fragments) can be activated or deactivated by clicking on the green check mark / red x (general information about working with lists can be found here). The icon at the right can be used for enabling/disabling the point display for selected generators (if Show All Used Points is disabled).
Use this button to create a Point Generator - Distribution, which will distribute the points primarily via the bounding box of the object to be fragmented. Several settings are available for this item.
Use this button to create a Point Generator - Shader, whose settings can be used to distribute the points using a shader’s grayscale values.