Insertion
If an object is defined in this field, it will specify where components can be inserted. If it is blank, it will insert as a Child of the object with the tag. Using a Component Tag with the Component type allows you to customize the insertion for specific objects.
![]() Bone Insert
Bone Insert
This parameter allows you to add extra Joints into a component. This can be useful for things like Spline IK where the user may wish to specify the number of Joints in the chain. If you specify Bone Insert options, a parameter will appear during the build process allowing the user to define how many Joints will be created.
Multiple bone inserts can be created so that extra Joints can be added in multiple chains within the same Component.
Adds a new Bone Insert Set.
Removes the last Bone Insert Set.
The start Joint of the chain into which you want to insert. This doesn't necessarily have to be the start of the chain, it can be any Joint in the chain. Additional Joints will be inserted between the Start and End Joints.
The last Joint of the chain section into which you want to insert. This does not necessarily have to be the end of the entire Joint chain, just the end of the section for dynamic insertion. Additional Joints will be inserted between the Start and End Joints.
New Joints that are inserted will be inserted under this Joint within the hierarchy. This can be the Start Joint, or any other Joint in the chain between the Start Joint and End Joint, but cannot be the End Joint.
If Start and End are left empty, a single Count option will be made available when the character is built in which you can define the number of Joints that will be inserted under the object defined in the Insert Under field. This is useful when additional Joints need to be added to multiple identical chains, e.g., as with IK/FK blending.
If Start and End are assigned a value, multiple Count options will be made available so that different numbers of Joints can be added in two different sections of the chain (or two independent chains). This is useful if, for example, you want the user to be able to specify separate joint counts in the upper and lower leg.
If Constraints are applied to the Joints to be added, Controller objects and Constraint tags will also be added. This, for example, makes it easy to add new bones and Controllers for an FK Spline.
![]() Parent Components
Parent Components
This is where you define how and when components can be inserted.
This Button will add a new Insertion rule.
This button will remove the selected Insertion rule.
Any Insertion rules will appear in this list. The parameters below the list apply to the currently selected rule.
The Rule List has been enhanced so it matches the Adjustment tab’s list. Now you can easily see which component the Parent object is, which type of Parent rule is set and which type of Insert will be used, etc. It also makes it easy to enable, disable, copy, insert or remove Rules.
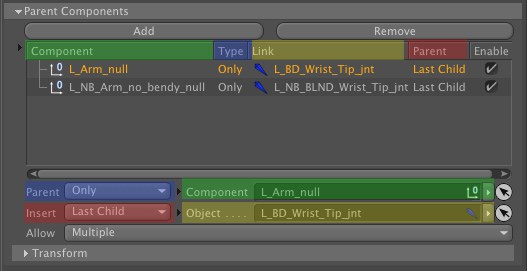 As you can see, the various columns correspond with the settings below, which makes it easy to see how and where Components were inserted.
This setting defines how an object should be inserted. Depending on this setting, you can restrict how and when a component can be created.
Means this Component can only be added only if the Character object is selected.
The component can be added at any time.
The component can be added if the parent component is set to be a Hub.
The component can only be added to the component in the Component link slot.
The Component can only be added to specific type of Component (i.e. limb, pelvis, etc.) in the Component link slot.
The component can only be added to the Component with the name specified in the Name field. In addition to the actual name of the Component (e.g., Spine) you can also specify the Component's Identifier or the name and the identifier. So in the Name field you could type Spine, Spine::9279959242827307266, or 9279959242827307266. If using the name and identifier method, make sure to separate the name from the identifier with two colons ::.
If Parent is set to Only or Type, then this link slot becomes available. The object specified should have a Component tag applied. The component with this insertion rule will only be shown in the Character object when the component specified (Parent=Only) or one of the same type (Parent=Type) is currently selected.
If Parent is set to Name, this parameter becomes available. The component with this Insertion rule will only be shown in the Builder when the currently selected object has the name specified here.
This defines where the component's elements should be inserted.
The component will be created as the first Child of the object in the Object field.
The component will be created as the last Child of the object in the Object field.
The component will be created and inserted Before the object in the Object field.
The component will be created and inserted after the object in the Object field.
This option will use the Default Insert object of the Parent component. If Default Insert is left blank, it will insert as first Child of the parent component's root.
Inserts to Component at the very end of the hierarchy of the parent component. If the hierarchy branches, the component will be added to the end of the first branch.
Makes a code slot available to write your own insertion rules with Python.
This setting defines how many of the current component can be created.
The component can be created multiple times.
The component can only be created once
With this setting, the component cannot be created if the same component already exists as a child of the selected object. In other words, each parent can have only one instance of the component as a child.
Same Root means it checks from the top most component down to ensure only one of this type of component is allowed. If for example you had a character that had two different root objects, it means that this component can only be inserted once in this root. If you select another root, or child of a different root, you could then insert the component again, but if they share the same root, it can only be inserted once.
This becomes visible only when Insert is set to Python. Here you can type custom Python code to determine where the object will be inserted.
![]() Transform
Transform
This enables you to define a transformation depending on the type of parent component. For instance, you might want an arm to come in at a different position/rotation depending on if it was added to a spine or to the head (as a crazy example).
When this option is enabled, the component will retain it's local coordinates from the template file, regardless of it's parent.
This option makes it possible for the Component to retain its relative coordinates. This lets you freeze your object and insert it at 0, 0, 0 to the object under which it will be inserted.
With the Freeze option enabled, the offset will be applied to the frozen coordinates of the object with the Component tag. This is useful if you have expressions driving local coordinates, the freeze option will allow your local coordinates to remain untouched which means your expressions on the local coordinates will still work correctly.
![]() Inherit
Inherit
This defines what exactly the component should inherit from it's parent: Position, Scale, and/or Rotation.
This option determines if the component should inherit its parent's position
This option determines if the component should inherit its parent's scale
This option determines if the component should inherit its parent's rotation
![]() Offset
Offset
The offset settings allow you to specify a custom offset for the current component from its parent component.
This value represents the position of the object in relation to the parent coordinate system.
This value represents the scale of the object in relation to the parent coordinate system
Modifying the scale of the object using this value equates to scaling in Use Object Axis mode, i.e., the object’s axis system will be modified (see also The difference between the Use Object Tool and Use Model Tool modes).
This value represents the angle of the object in relation to the parent coordinate system.