

UV Context Projection
|
|
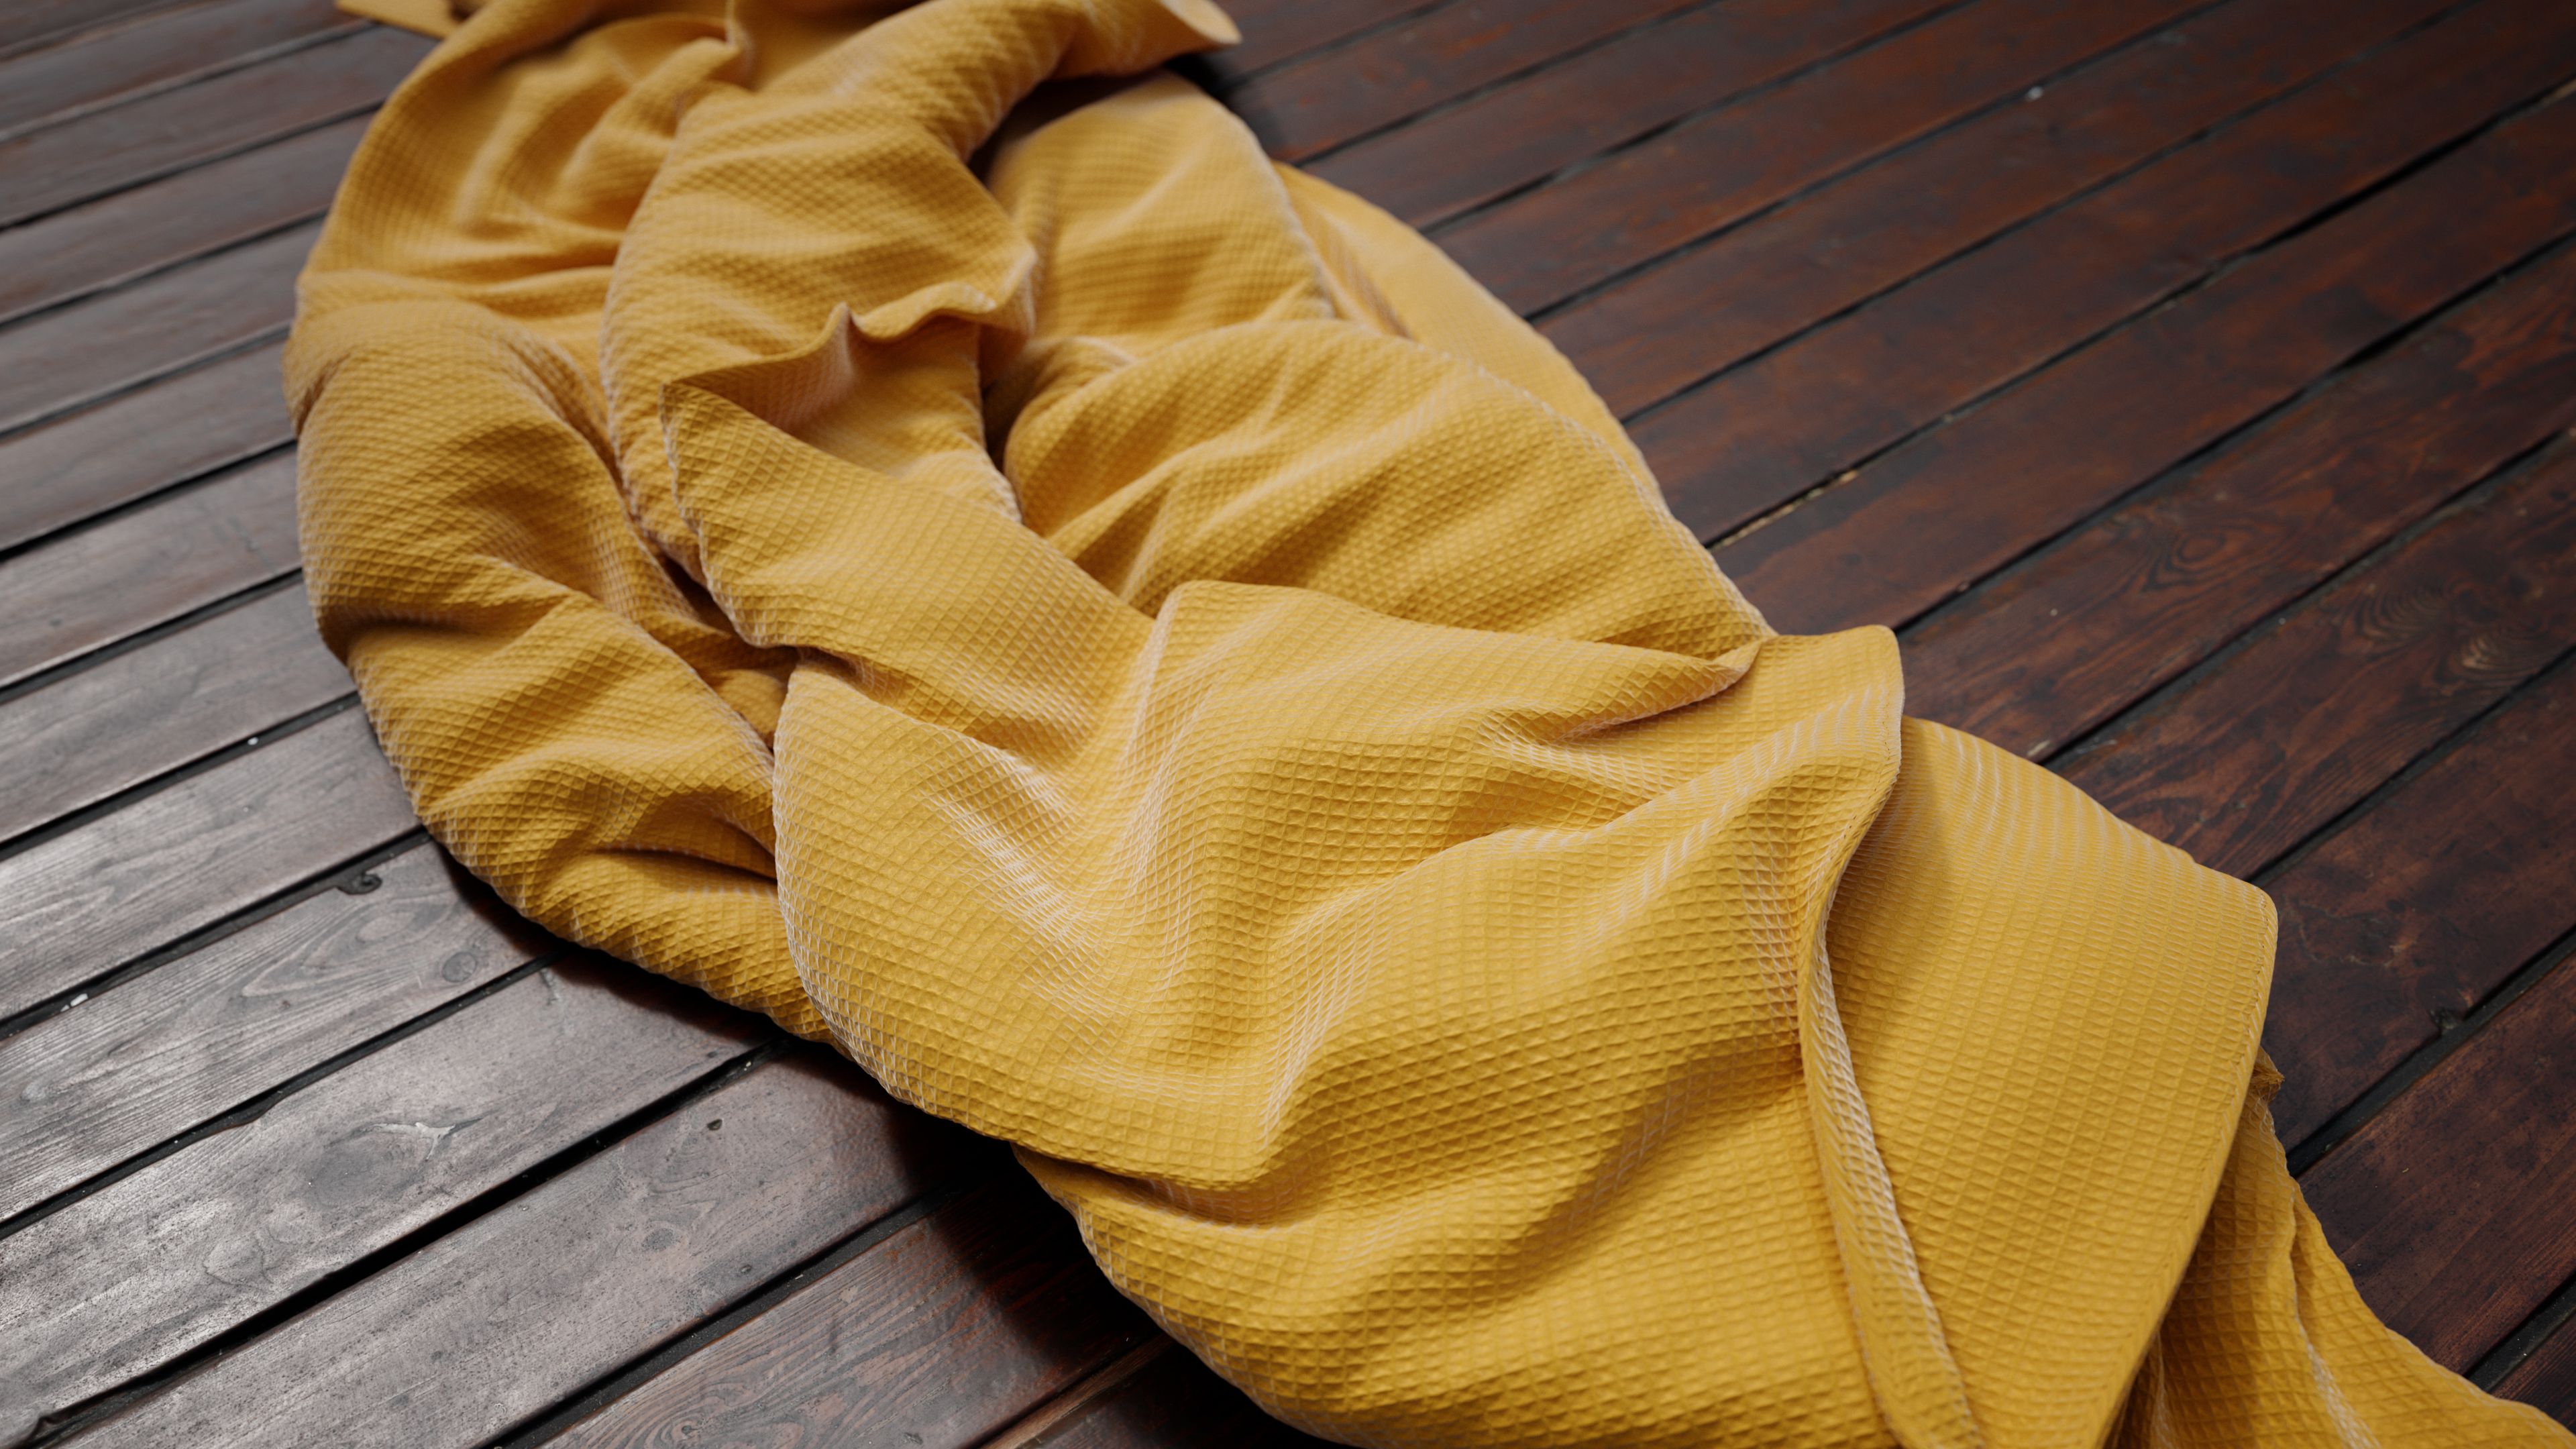
| Scene by Saul Espinosa Textures from PolyHaven.com |
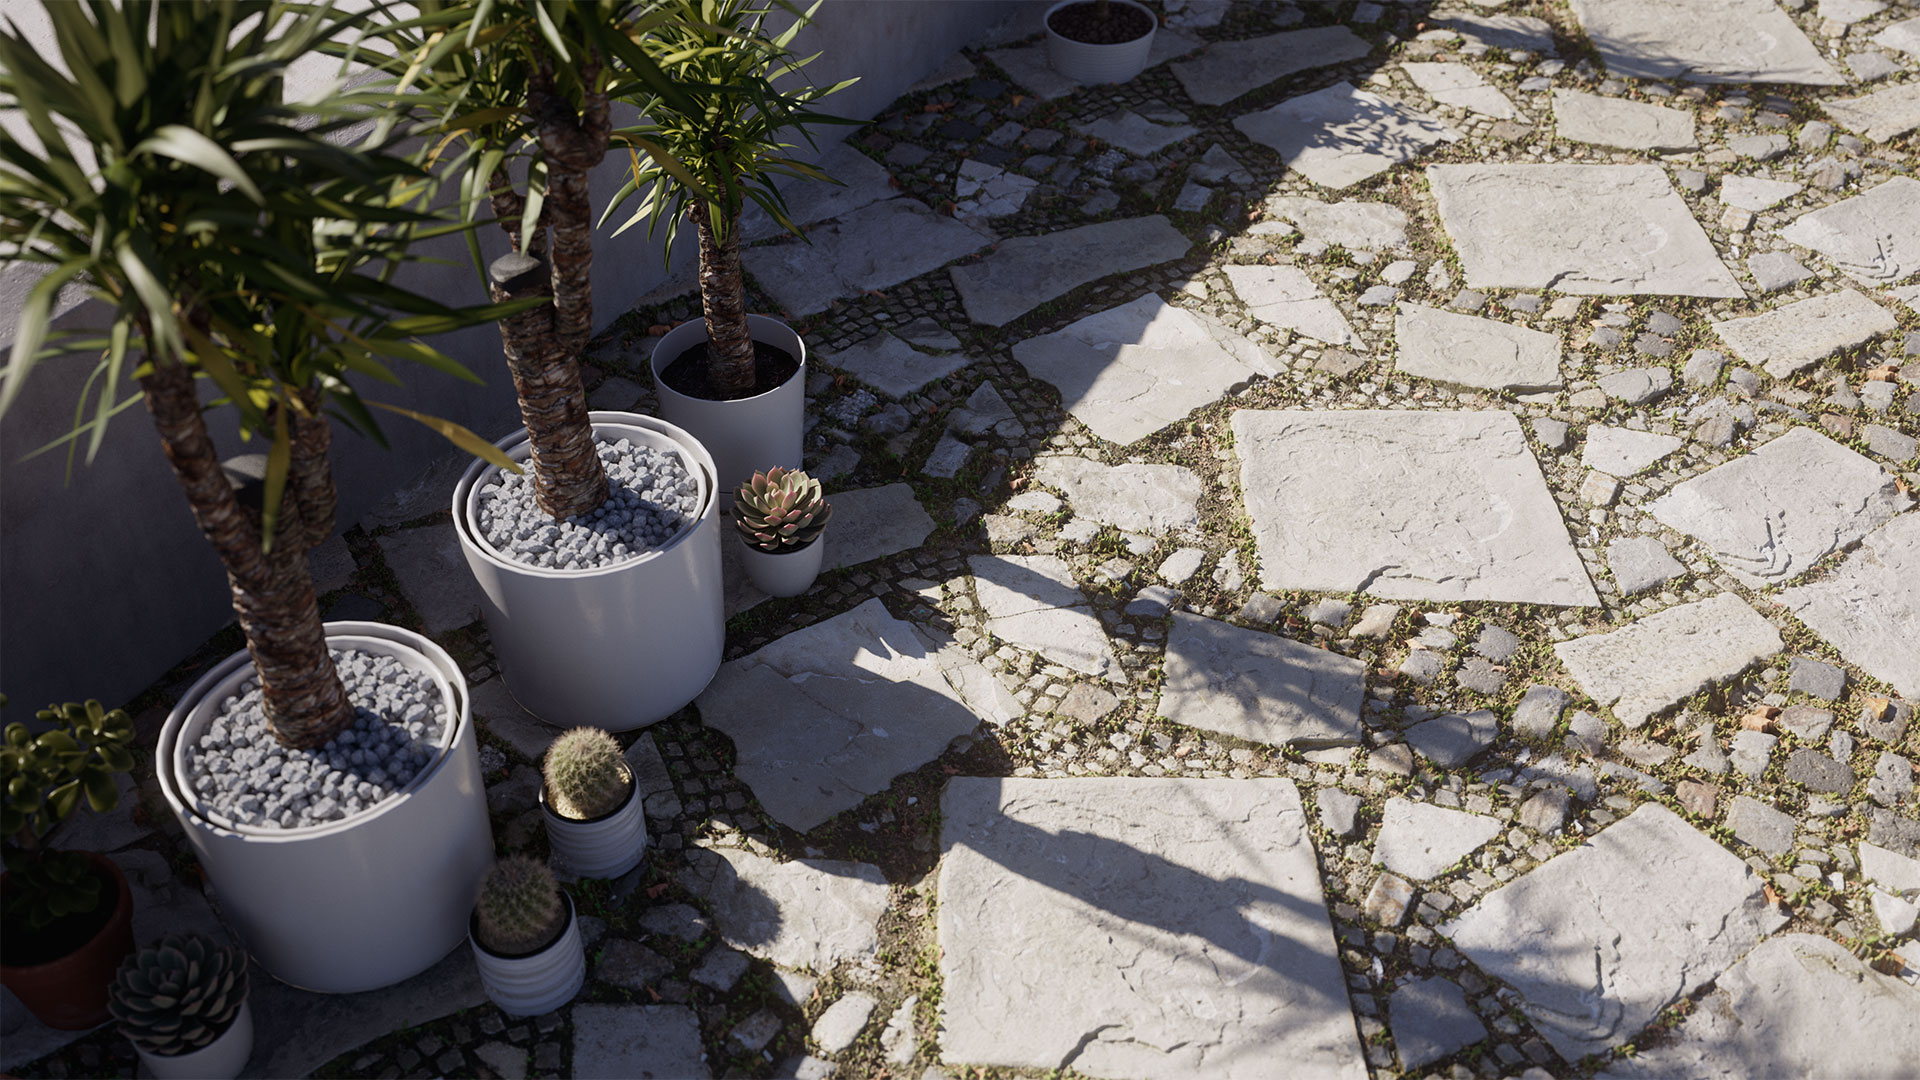
Scene by Saul Espinosa Ground texture from AmbientCG.com |
The UV Context Projection is a powerful utility node that applies the same mapping across all the textures connected to a material. Most materials are built using a set of textures that only look good when they perfectly match up with each other. The UV Context Projection node makes it easy to adjust all textures and keep them in sync. This also includes procedural textures that use UVs like the Redshift Tiles shader.
| Adjusting a material using UV Context |
| Textures from PolyHaven.com |
All the textures can use an object's UV set or be switched to a number of other UV projections like Tri-Planar, Spherical, or Flat.
| Changing the Projection type using UV Context |
| Textures from PolyHaven.com |
The UV Context Projection node requires constant inputs. For example, you cannot drive the UV Context Projection node's Transform Offset with a Maxon Noise or Jitter node the way you can on a Texture Sampler.
Examples
How it works
UV Context port: Direct or Downstream connections
Using a UV Context Projection node is as simple as connecting the OutContext to a node with a "UV Context" port.
There are two ways for a texture to receive texture mapping information, from either a direct connection or a downstream connection.
-
Direct connections: When a UV Context node is connected directly to a texture's UV Context port. This takes precedence over any downstream connection, serving as a local override.
-
Downstream connections: When an upstream texture automatically inherits mapping information from a UV Context node connected downstream in the shading graph.
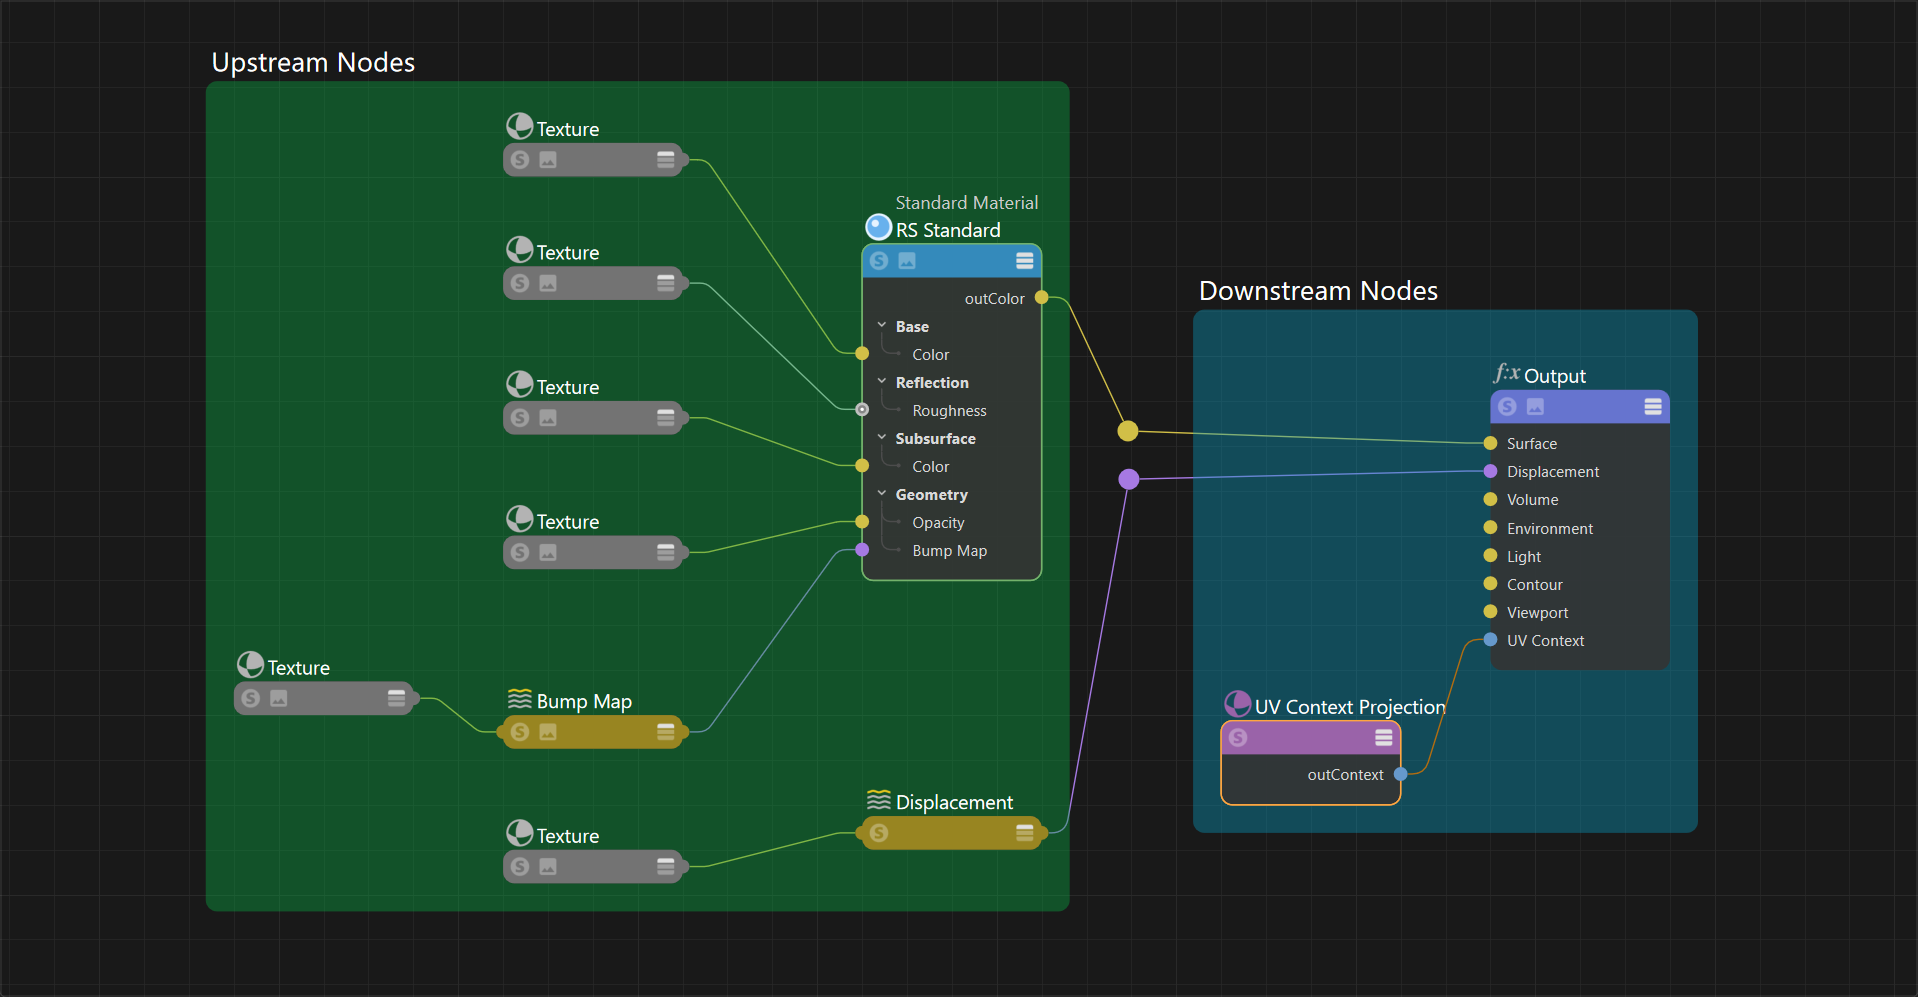
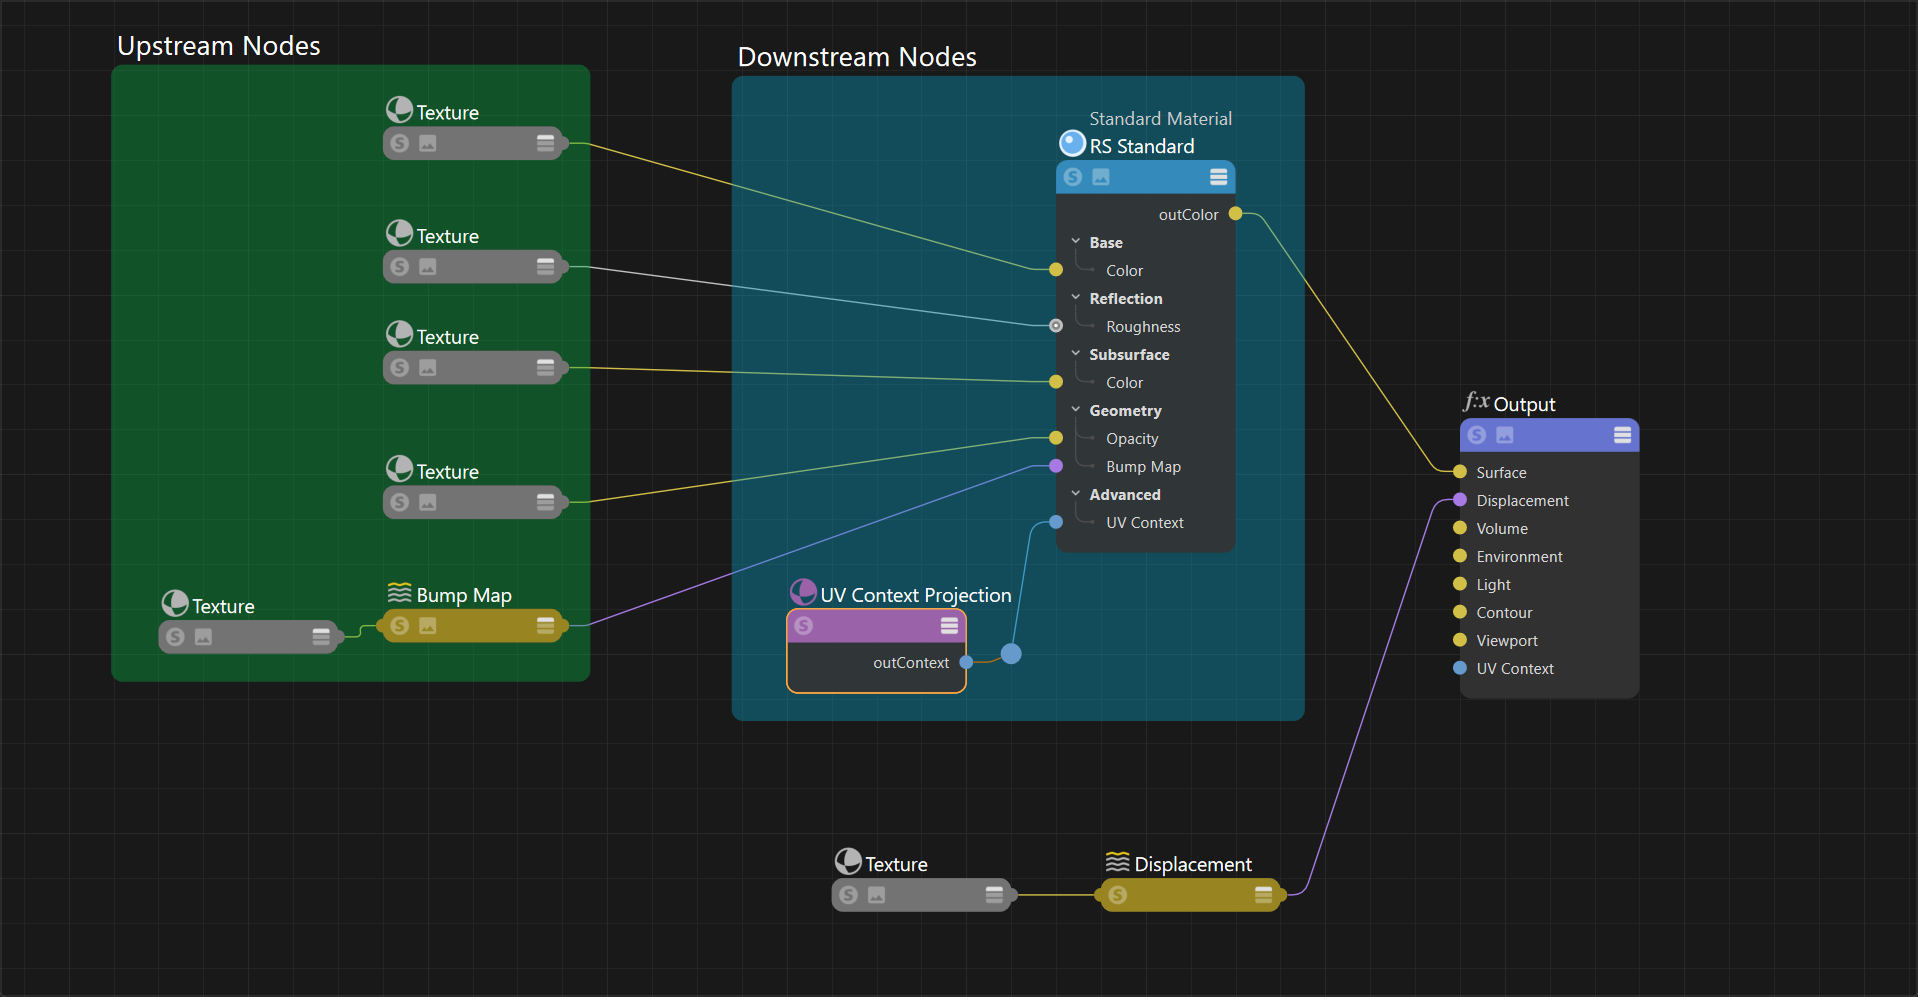
Thanks to downstream connections you don't need to manually sync each texture that should have the same mapping. That's because upstream textures are designed to automatically inherit UV Context information connected downstream in the shading graph. In the examples below, note how changing where the Context Projection node is connected affects which nodes are considered upstream. In the second example, there is no UV Context Projection node downstream from the displacement texture so it is no longer affected.
|
|
| Downstream connections UV Context Projection connected to the Material Output node All textures connected to the Material and Displacement shaders are upstream |
Downstream connections UV Context Projection connected to the Material shader node Only the textures connected to the Material shader are upstream |
Alternatively, a UV Context node can be connected directly to a texture which overrides any downstream connections.
Use downstream connections whenever possible to keep a shader graph simple, using direct connections only where necessary. However, it's possible to use direct connections on every texture and get the same result, it just requires more manual setup.
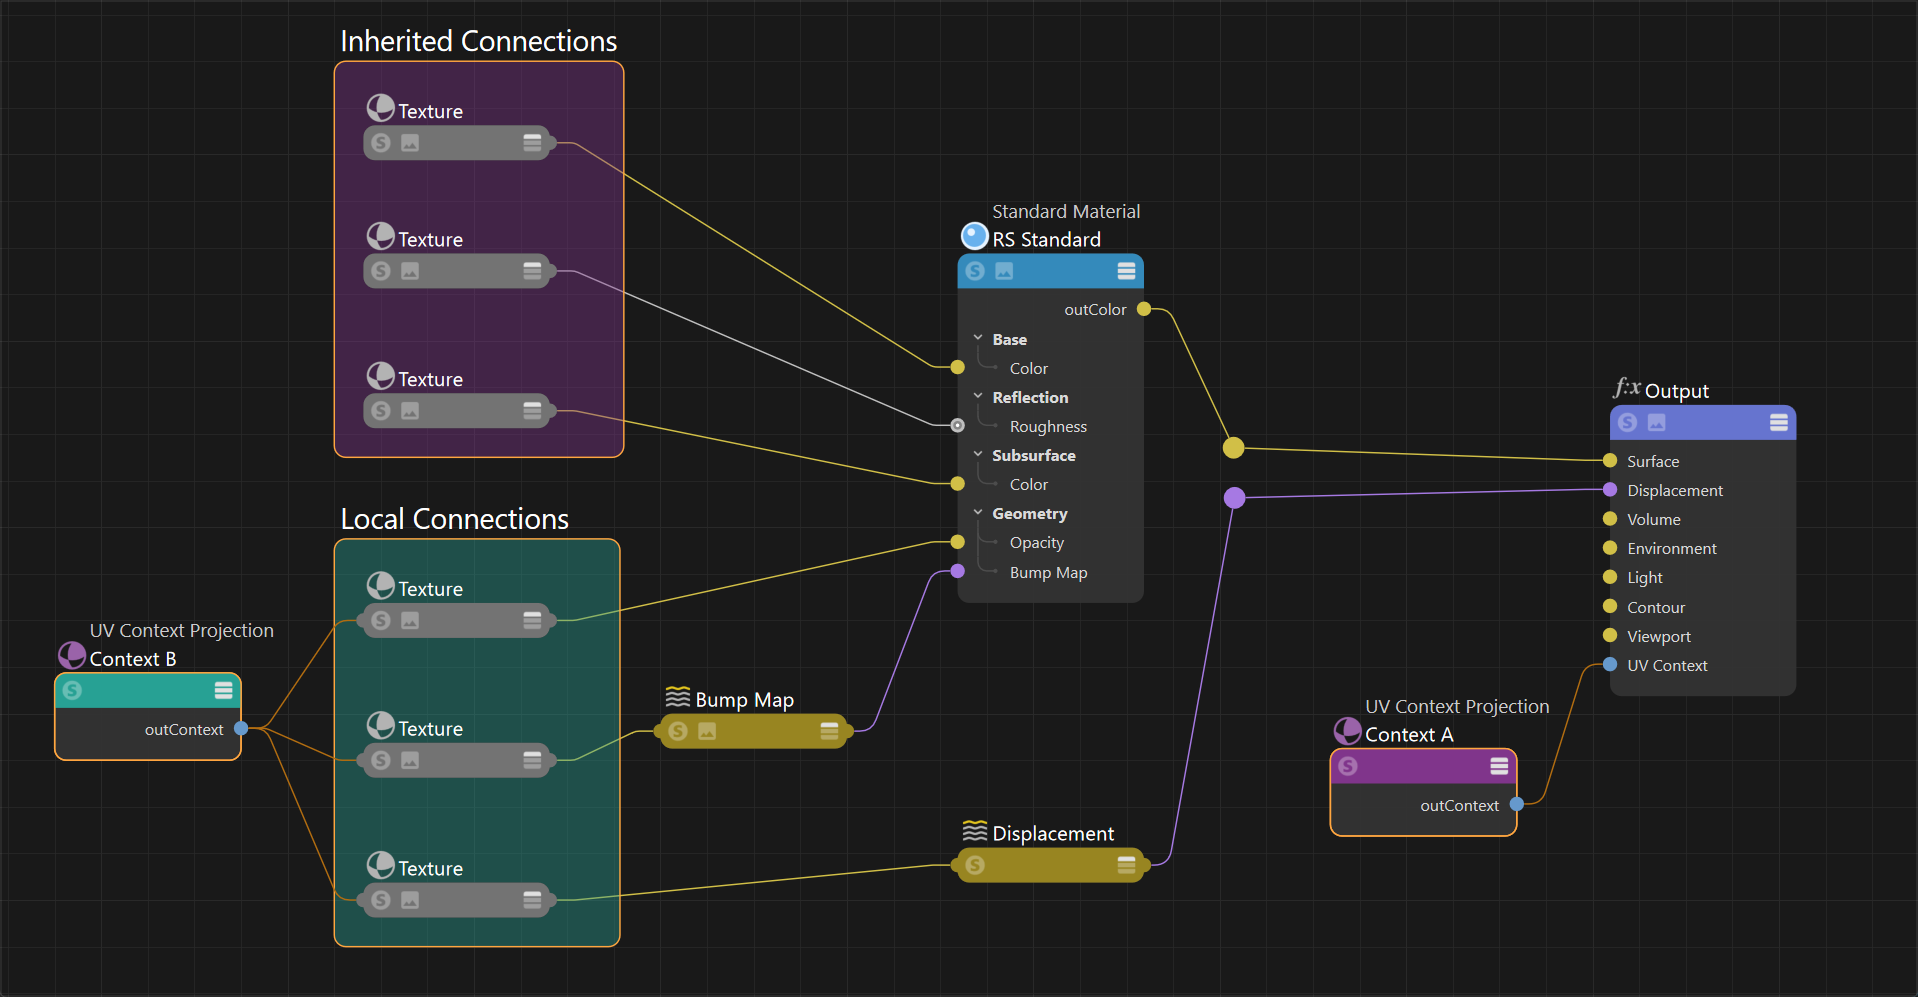
|
| Direct and Downstream connections UV Context Projection A connected to the Material Output node UV Context Projection B connected directly to three textures, overriding the downstream connection |
Textures that support a direct UV Context connection:
- Brick
- Flakes
- Pavement
- Maxon Noise
- Scalar Ramp
- Ramp
- Tiles
- Texture Sampler
Nodes with a UV Context Port that enable downstream connections to all connected textures:
- OpenPBR Material
- Standard Material
- Displacement shader
Connection examples
The simplest UV Context setup is one where it affects all textures in a material, including the displacement textures. This is accomplished by connecting one Context Projection node to the Material Output so it affects all upstream textures.
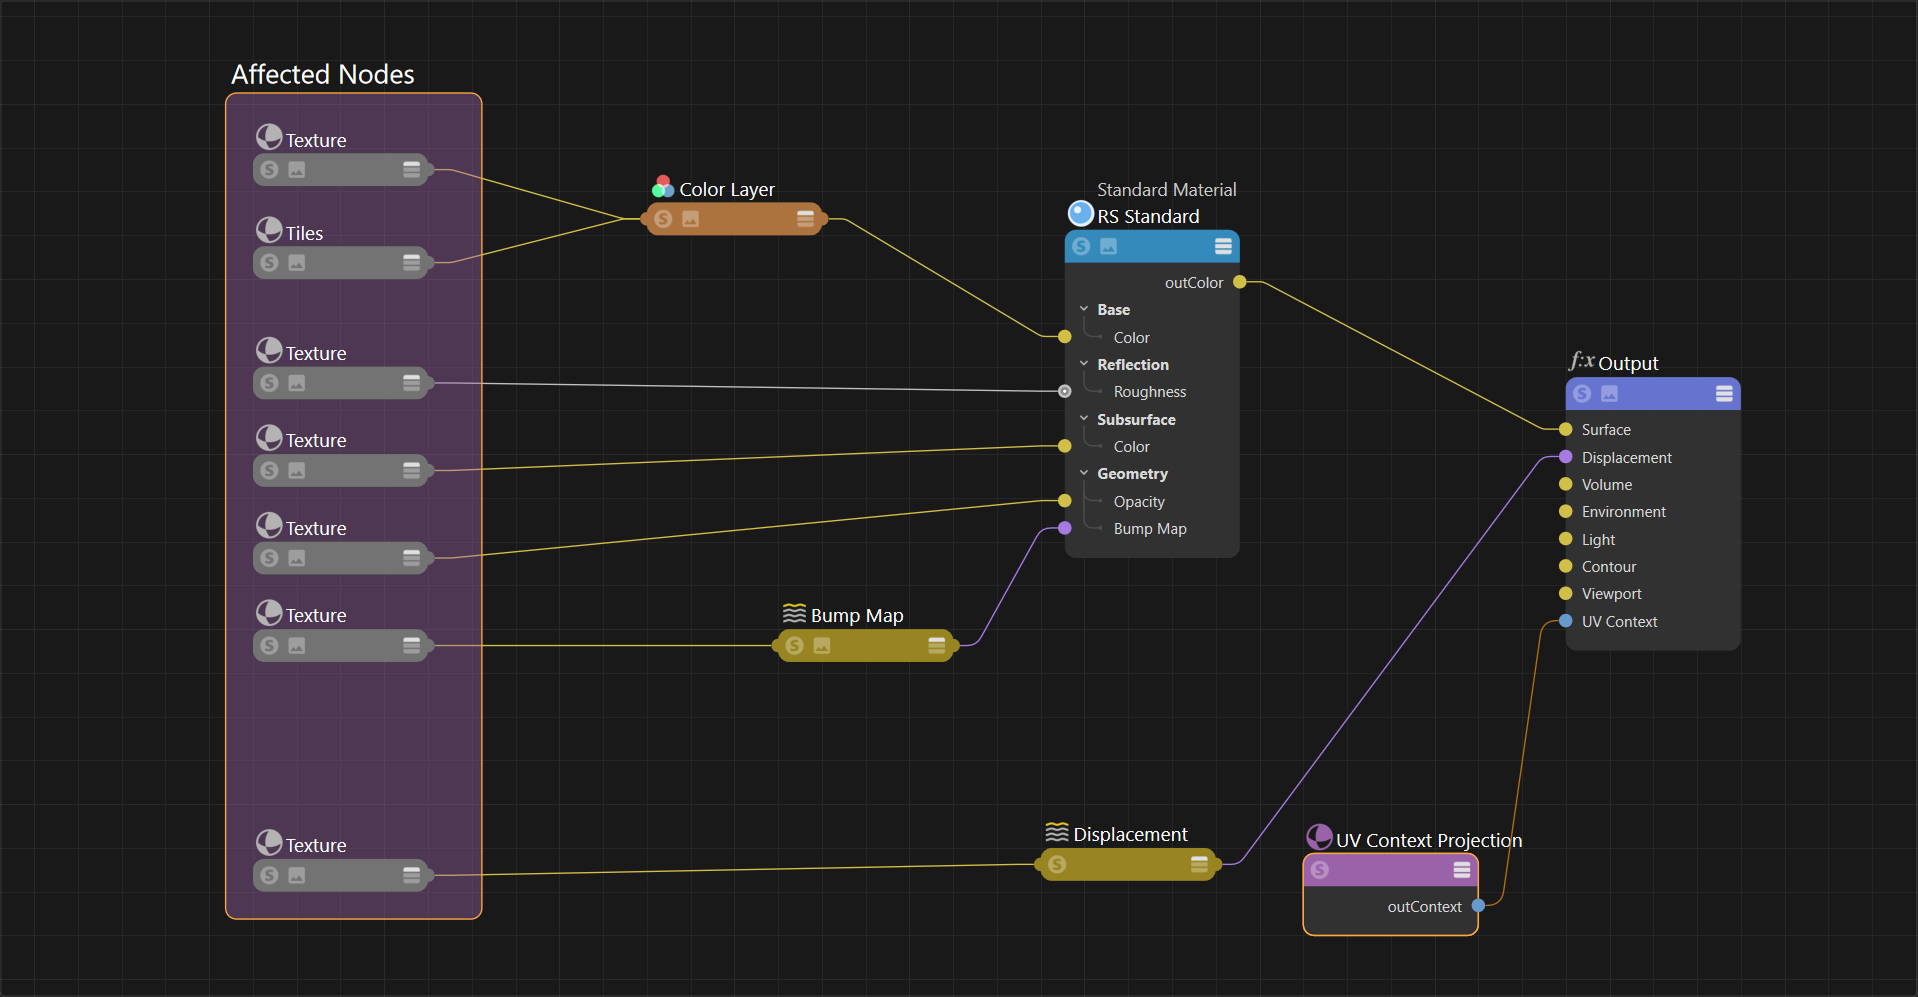
|
| UV Context Projection connected to Material Output |
Alternatively you could have a UV Context Projection node for only the Material textures or only the Displacement textures.
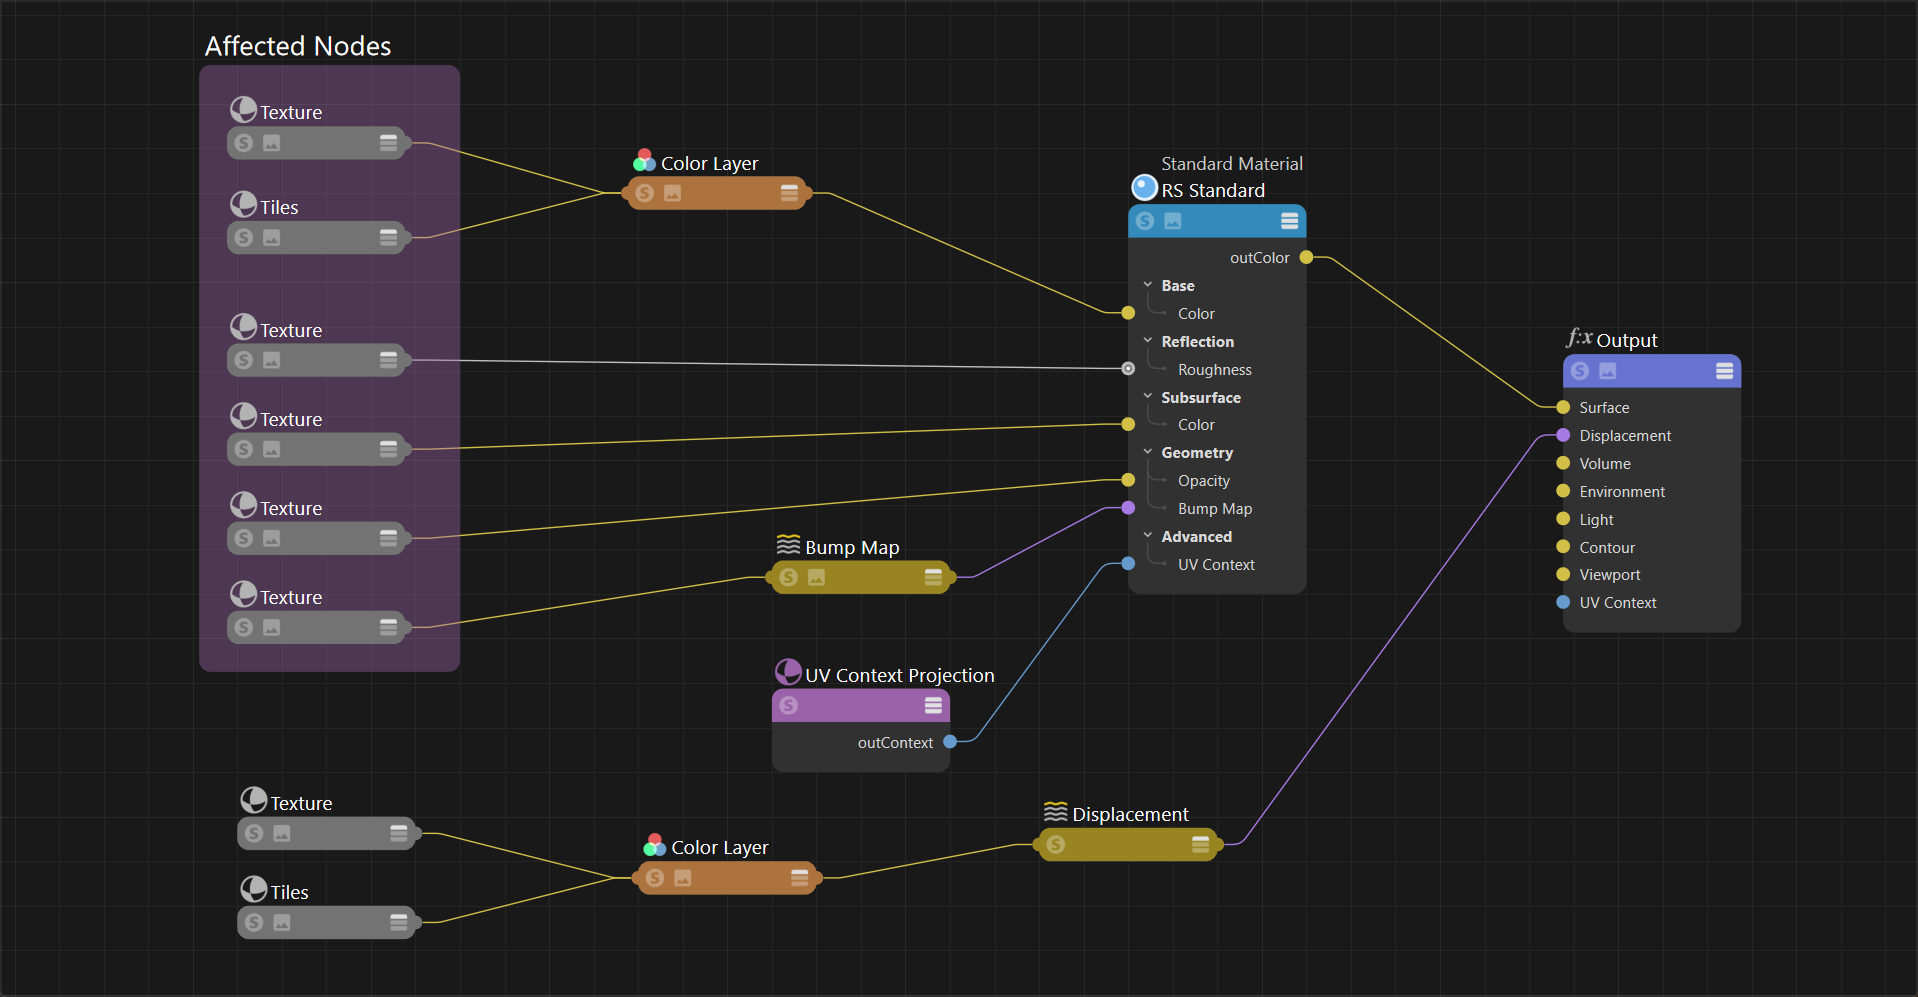
|
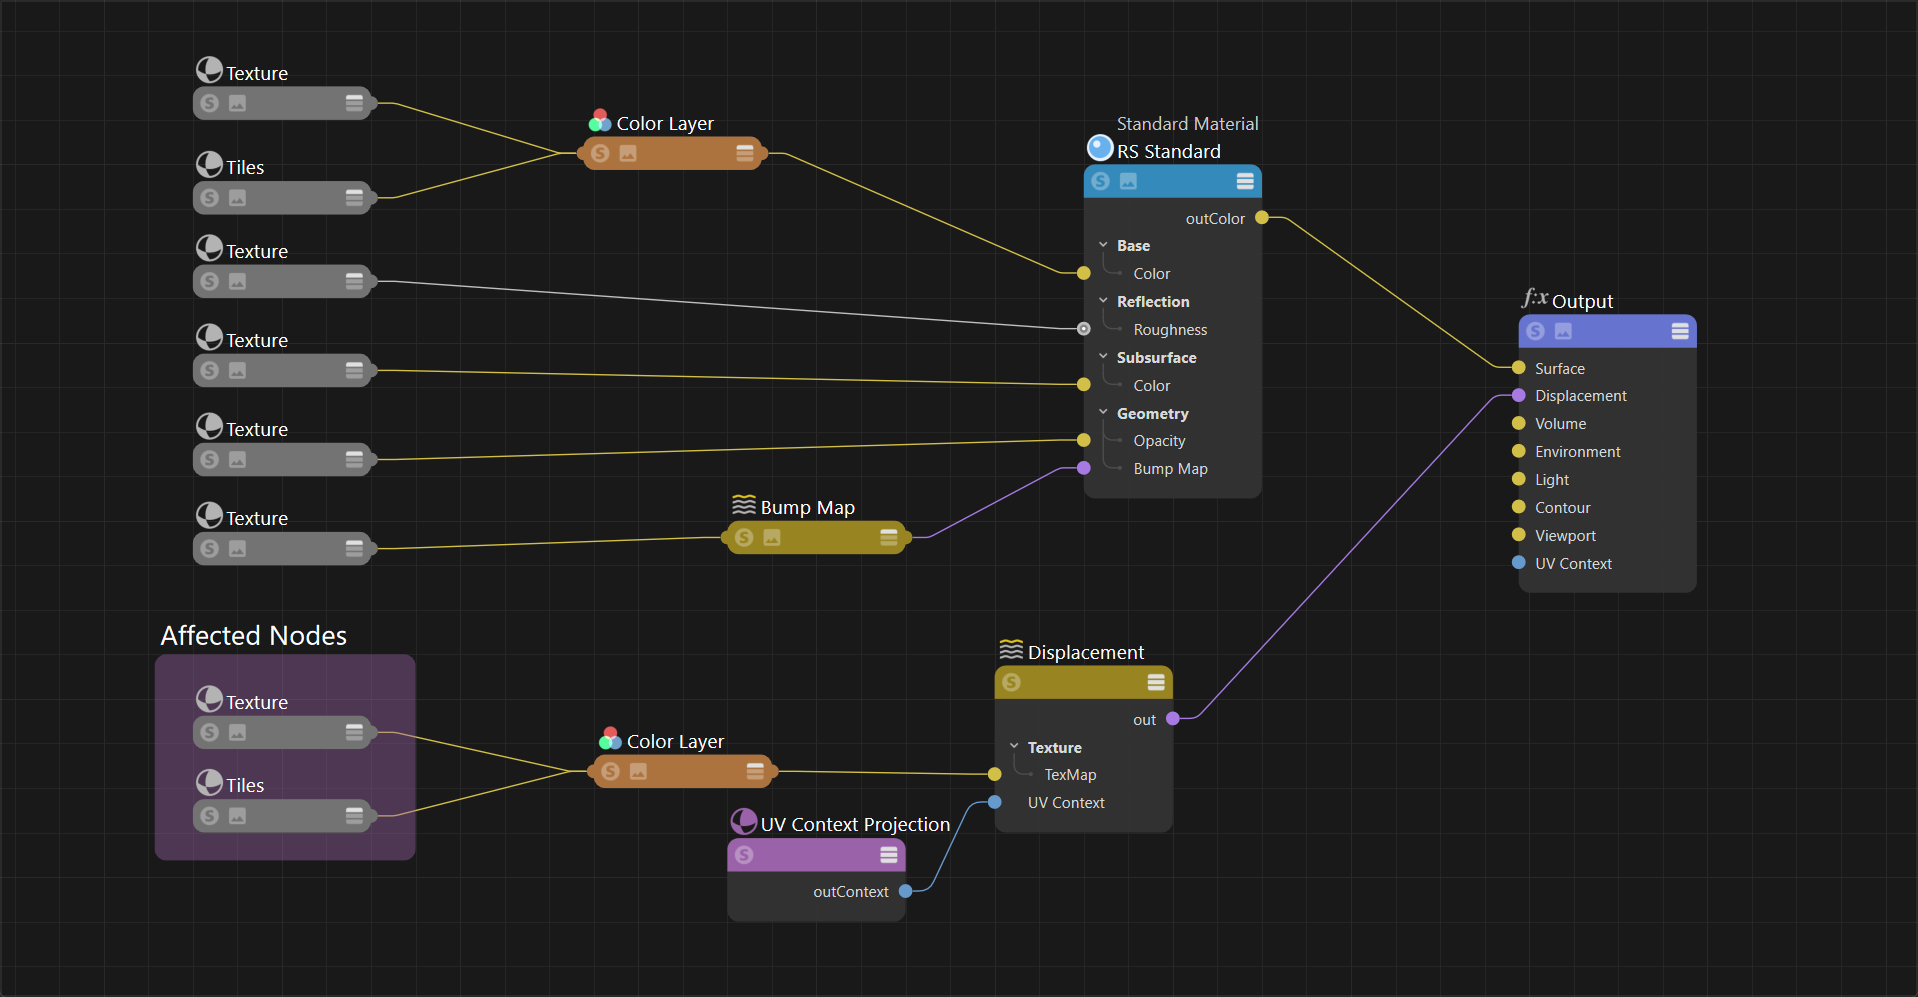
|
| UV Context Projection connected to Material | UV Context Projection connected to Displacement |
Direct connections are useful when you have some textures that need to stay in sync but are different from the rest of the material. That's as easy as connecting a UV Context Projection node directly to the texture's own UV Context Port - a directly connected texture always takes precedence over any downstream inheritance.
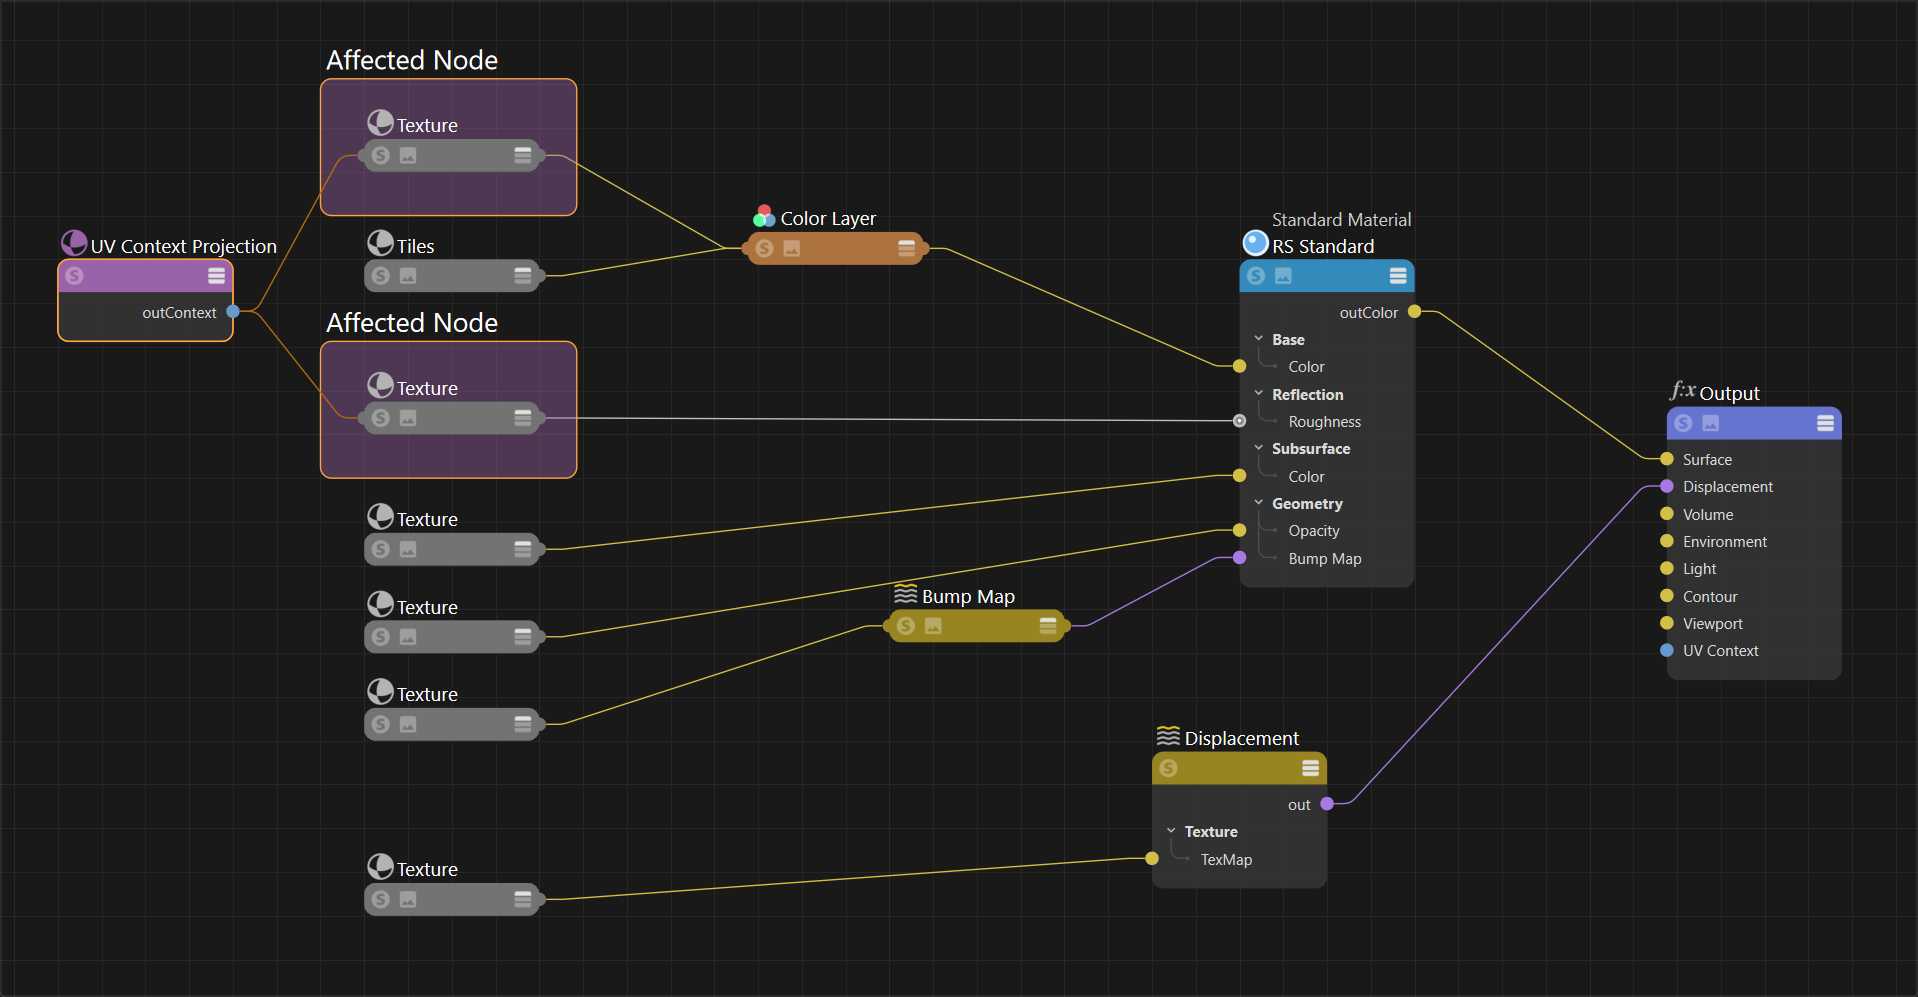
|
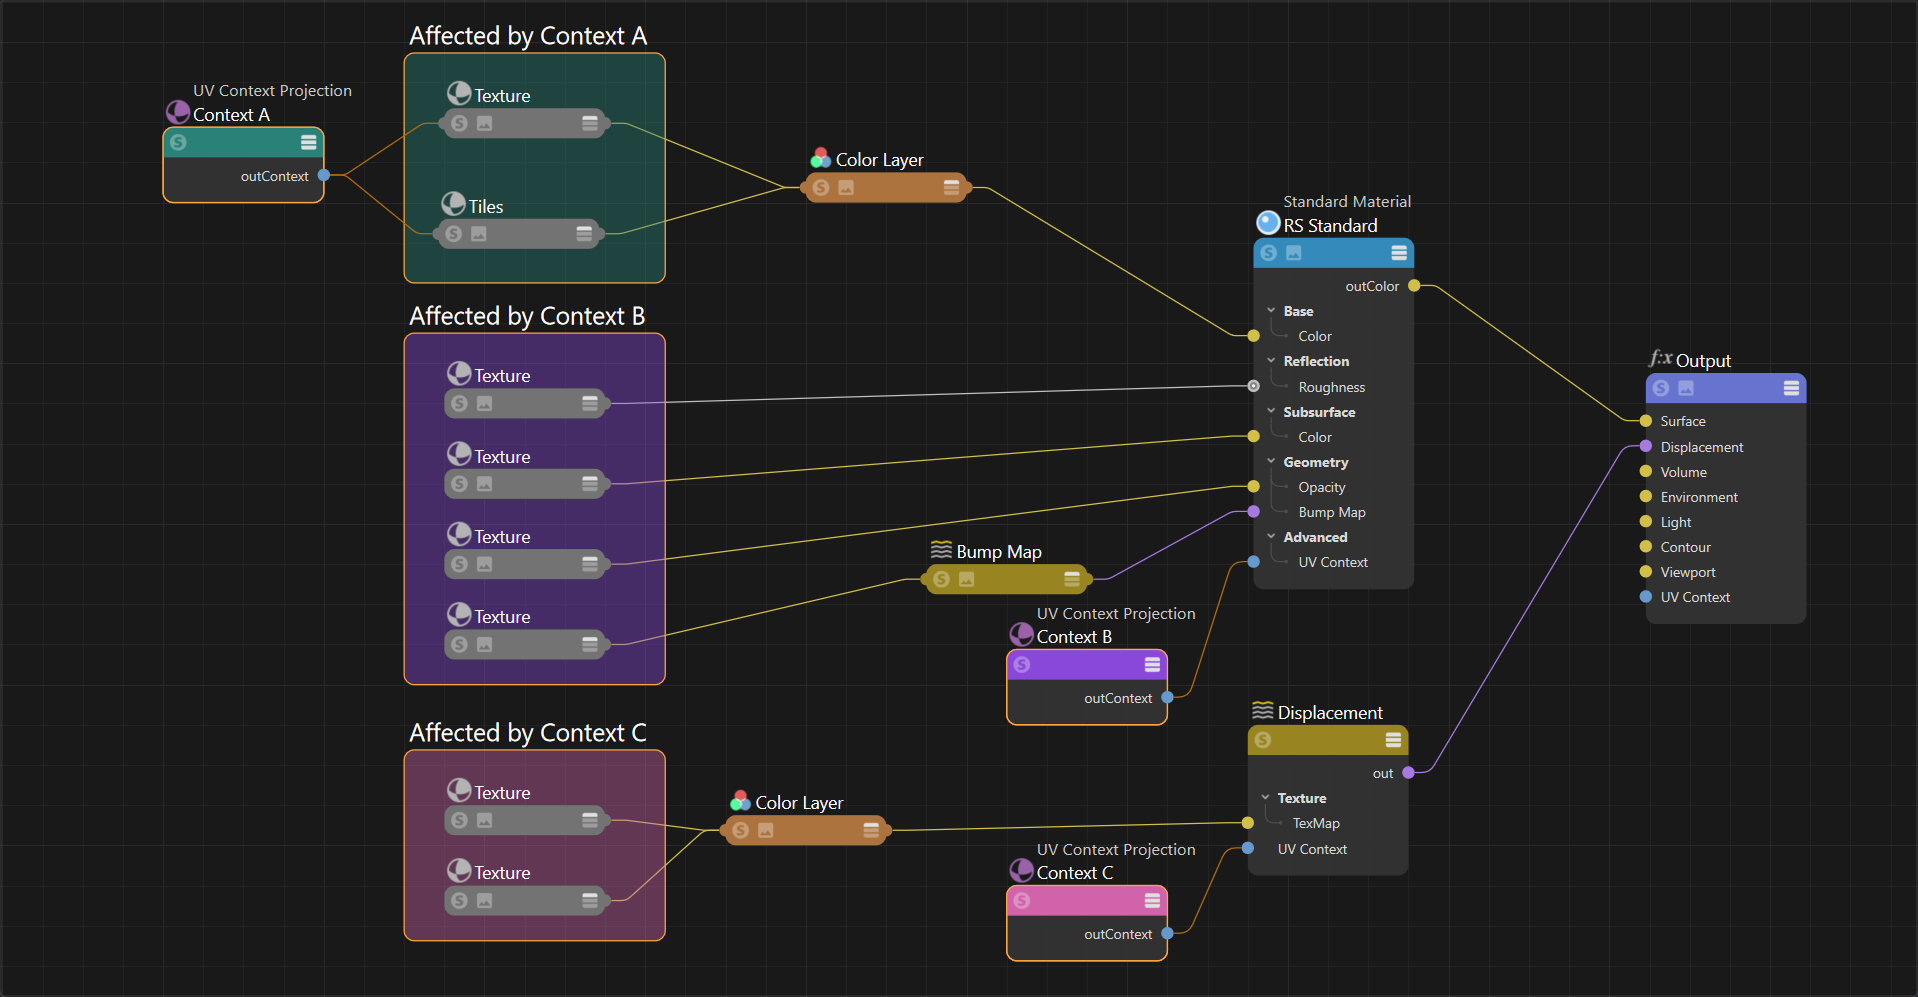
|
| UV Context Projection connected directly to two textures | Mixing direct and downstream connections |
When blending multiple materials, consider using a single UV Context Projection node for each material. In the example below, Context A is used for Material 1 and Context B is used for Material 2. Since displacement textures don't connect to the material directly you can connect the Context nodes directly to the textures to keep them in sync with their material.
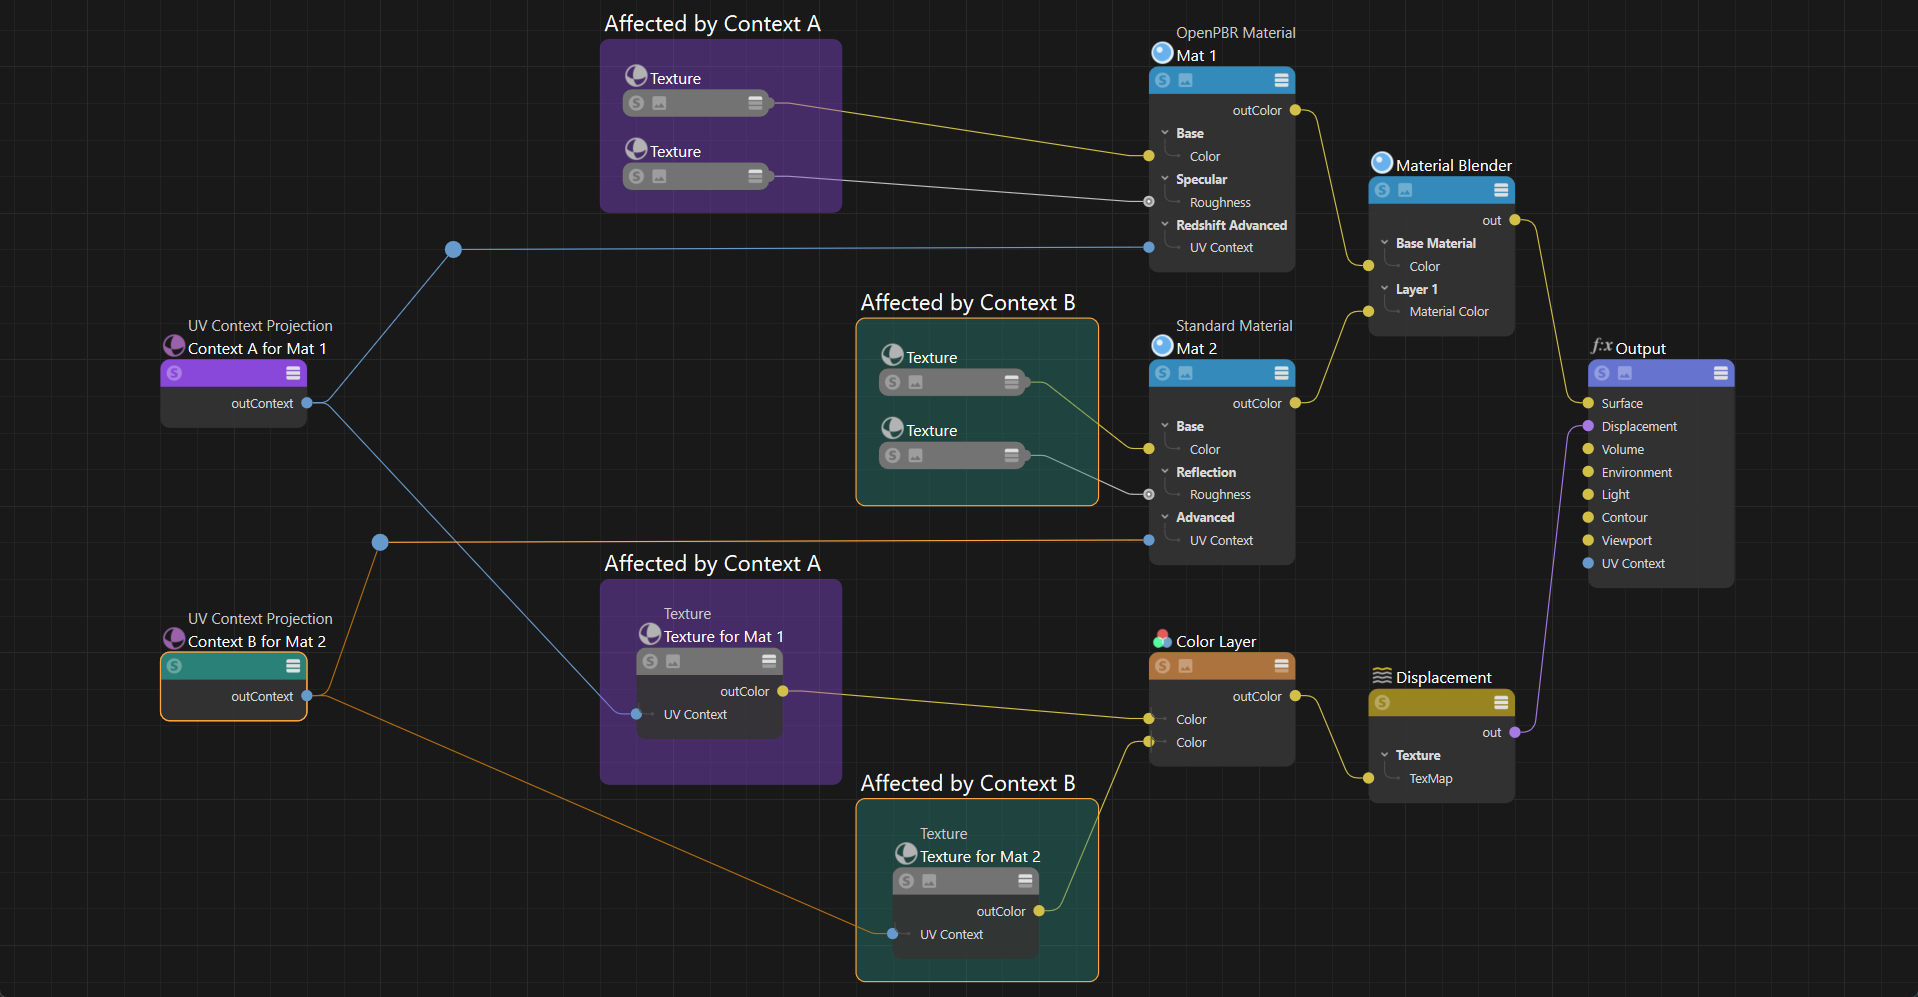
|
| Using different UV Context nodes for different materials |
Adding Randomization
The ports of a UV Context Projection node only allow a constant input, meaning nodes like a texture and jitter cannot drive its parameters. However the UV adjustment options on individual nodes still work in combination with a UV Context connection. This allows you to connect a jitter node to the Offset and Rotate of a texture node to add randomization to your material and still control overall texture placement using the UV Context Projection node.
The example graph below uses a jitter node to add variety to the base color and roughness of the marble texture on each object and still use a UV Context Projection node to control those textures using a downstream connection.
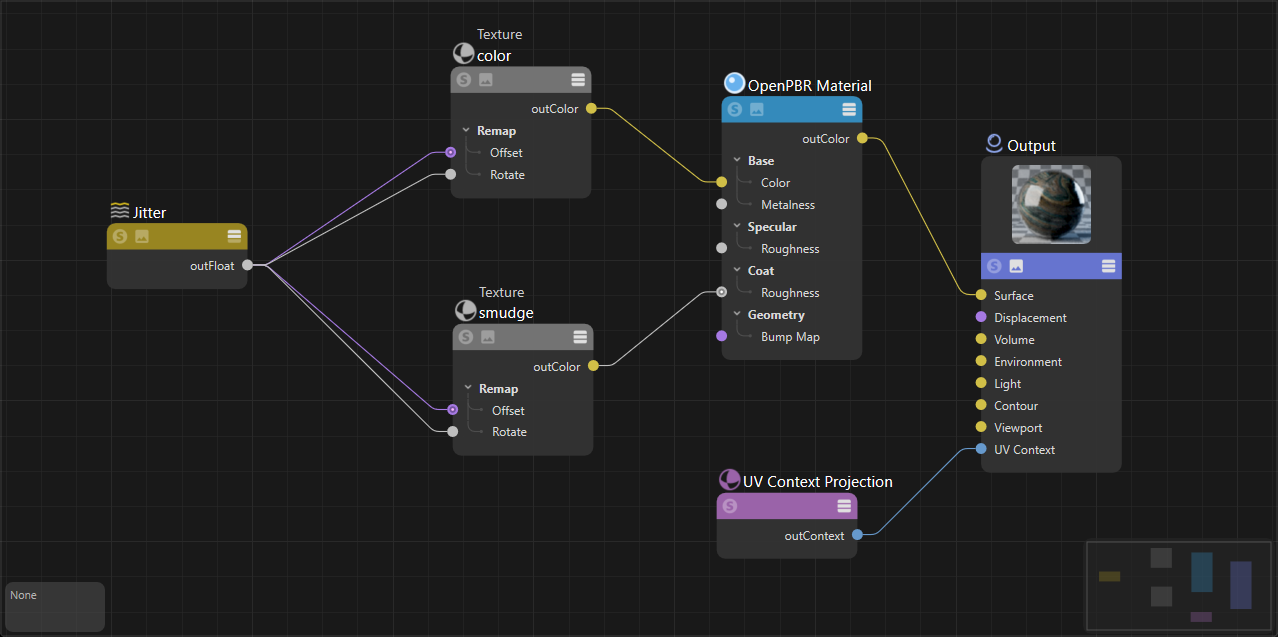
| Adding jitter randomization | Controlling overall rotation with UV Context Projection |
Placing a texture using an object
The UV Context Projection node can be used to place a texture in a scene with precision. In this example a graffiti material with the word "Cool" is placed on a brick wall material. There are two UV Context Projection nodes in use, one is used for the Brick material while the other is used for the cool material. The brick material requires displacement so it uses a UV Context node in Tri-planar mode connected downstream in the shader graph, this way the brick material and the brick's displacement textures inherit the UV mapping.
The cool material uses a UV Context node in the Flat projection mode using the "world" projection space. Then the Transform Space is set to "Object" and an object is selected using the "Object Picker." This allows the object to be referenced in world space which makes placing the projection of the graffiti texture very easy in the scene. The cool material's UV Context Projection node only needs to be connected to the cool material to override the downstream connection from the "brick context" node.
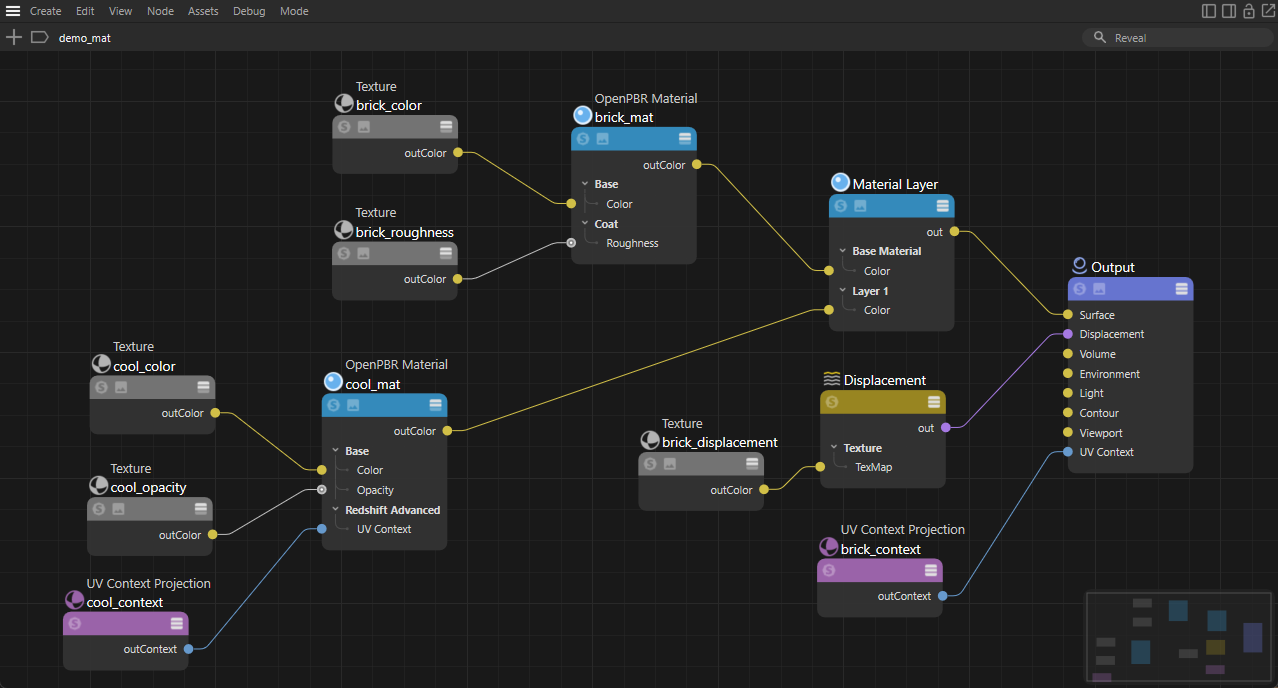
With everything in sync, the graffiti can be moved around the scene and it appears as if projected onto the brick surface at the same spot as the object driving the transform source. In the examples below, the floating gizmo object is used as the picked object to define its transform coordinates in world space.
| Moving the graffiti | Scaling the graffiti |