General
Since there are so many possible combinations of GI methods and being able to save a setup for a given Project type can really speed up workflow, this Preset option has been created, which makes it possible to save GI settings for a specific Project type.
In doing so, it's important to know how your Project is set up. You should differentiate between two main types:
- Interior spaces are mostly illuminated by fewer and smaller light sources: light that falls through windows and lamps that emit light within a limited radius. Interior spaces are therefore more difficult to calculate for GI.
- Exterior spaces are Projects that are basically set up under an open sky. Skies emit light evenly from a large surface, which makes it easier for GI to calculate exterior scenes.
These presets should only serve as a starting point. These settings can then be fine-tuned to optimize render quality or render time. Additional details can be found in each option's description. Note also the example renderings, which illustrate various GI combinations.
You can occasionally experiment with unusual combination of methods. Often enough you will discover combinations that work better for a given situation.
As soon as you modify a GI setting, this option will be activated.
(IC)
Irradiance Cache: The fastest GI method with a Diffuse Depth of 1.
Interior spaces
Irradiance Cache + Radiosity Maps: A fast preview with reduced Diffuse Depth.
Interior - Preview (High Diffuse Depth)
Irradiance Cache + Light Mapping.
Interior - Preview (Small Illuminants)
Irradiance Cache + Light Mapping.
Irradiance Cache + Irradiance Cache.
Interior - High (High Diffuse Depth)
Irradiance Cache + Light Mapping.
Interior - High (Small Illuminants)
Irradiance Cache + Light Mapping.
The following information is important with regard to Interior presets:
- Preview: These have reduced values, which can be calculated quickly and are well-suited for test renderings.
- High: These settings are designed for higher quality renderings. However, it may be necessary to increase or decrease individual values to achieve the desired render speed/quality.
- High Diffuse Depth: This refers to the effects of numerous light reflections, which produce a much more realistic result with endlessly higher ,sample depth’. Projects will tend to be rendered brighter; dark corners will also be brightened. This effect is created in conjunction with Light Mapping.
- Small Illuminants: The Project illumination will mainly be created by smaller lights, which are defined as GI Portals and Polygon Lights. IR+Light Mapping in combination with Force Per-Pixel is the best method of ensuring that small lights unfold their full potential.
Exterior spaces
Irradiance Cache + Radiosity Maps: A fast preview with reduced Diffuse Depth.
Irradiance Cache + QMC.
Irradiance Cache + QMC.
The following information is important with regard to Exterior presets:
- Preview: These have reduced values, which can be calculated quickly and are well-suited for test renderings.
- The difference between Physical Sky and HDR Image: Force Per-Pixel is enabled for the latter. An HDR image assigned to a Sky object is evaluated precisely for rendering, which will more precisely render multiple shadows - in as far as they are present in the HDR image (note that the Diffuse Depth value may have to be increased).
Object Visualization
Object Visualization - Preview
Irradiance Cache + Light Mapping.
Irradiance Cache + Irradiance Cache.
Object Visualizations are well-lit and are most often centered in the composition, which means that they generally require few light reflections.
Physical Renderer's Progressive Sampler
QMC + QMC.
Progressive - Fast Complete Diffuse
QMC + Light Mapping.
These two options are designed for use with the Physical Renderer's Progressive Sampler setting. You can quickly render rough images whose quality improves progressively and lets you check the overall render quality without long waiting periods until the image is completely rendered.
Note also the rendered examples of various combined methods.
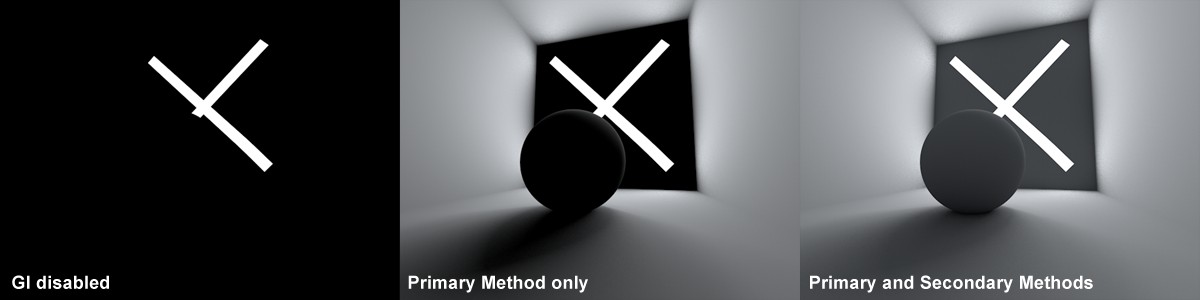 The Primary Method only brightens surfaces that are directly lit and the Secondary Method is responsible for additionally reflected light.
GI in Cinema 4D works in two parts:
- The Primary Method calculates the effect of Diffuse Depth 1, i.e., the light emitted by polygon lights or the light emitted by illuminated surfaces (via real light sources or the Physical Sky) without further reflection. In the latter case, the typical GI lighting (the red sphere that is illumintated by a white light reflects red light) with indirect reflection of light will result.
- The Secondary Method calculates the brightness of surfaces (that do not have to lie in the camera's field of view) that are brightened by multiple light reflections.
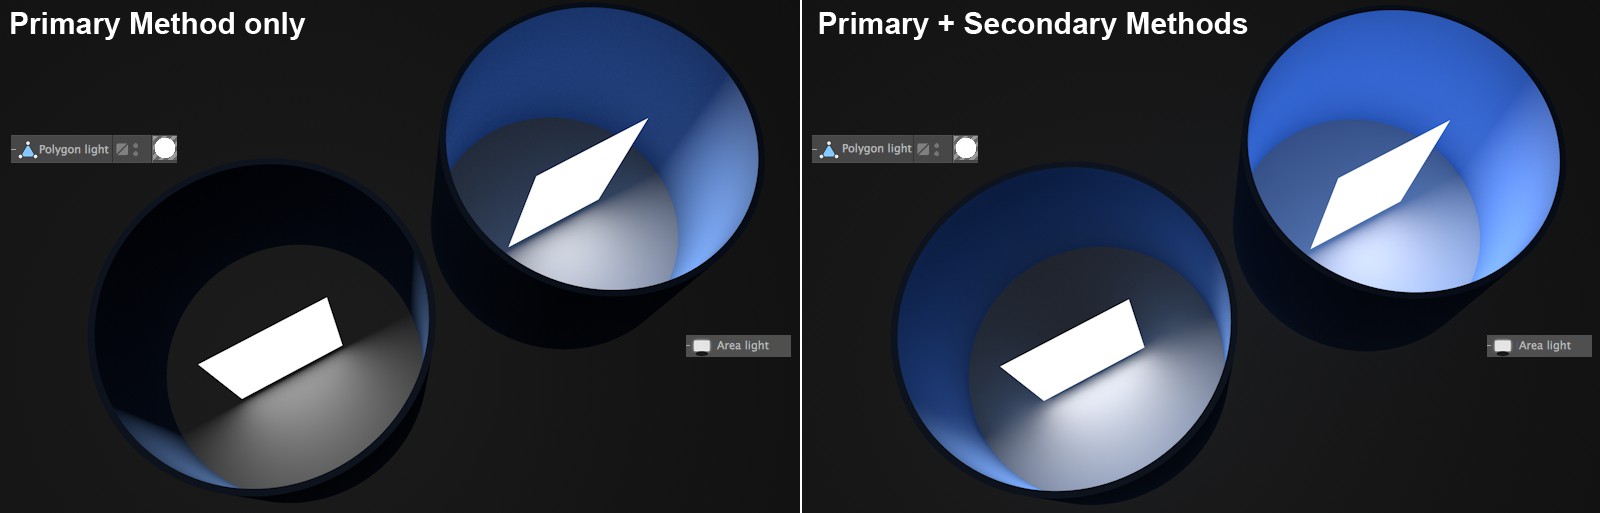 In this example, only the Primary Method was used on the left side of the picture and both Primary and Secondary methods were used on the right; on the left a polygon light, at right a normal light.
The results of both methods will be added to make up the overall GI when rendered.
Why are these methods separate? Simply because the Primary Method is most important method for the render quality and therefore higher-quality methods such as QMC or IR should be used. Of course these also take correspondingly long to render. For light that is reflected back-and-forth, methods can be used that are of "lesser quality" and render faster (such as Radiosity or Light Mapping).
Depending on the Project's setup, different methods can then be combined, which practically enough already have Presets defined for them.
Have a look at the first steps for GI rendering
In the following you will find a brief description of the individual methods.
Note also the rendered Examples, rendered with various combinations of both methods (QMC+LM, for example stands for QMC as Primary Method and Light Mapping as Secondary Method).
Primary Method
QMC is the most precise but slowest method (also works excellently when used with Light Mapping as Secondary Method at moderate render times). Animations are flicker-free (if not free of noise) when QMC+QMC is used. Details can be found here (How does QMC work?)
Irradiance Cache is a simplified, expeditious method of ascertaining the most important areas of a given Project, calculating GI at these locations and interpolating. Animations tend to flicker if the values are too low. Details can be found here (Irradiance Cache).
This is the Irradiance Cache from older versions of Cinema 4D versions. It has been maintained so older Projects can be rendered with the same render results. Note that this method cannot be used in conjunction with Team Render.
Secondary Method
QMC as a Secondary Method is best when used as IR+QMC for exterior scenes, and most precise - and slowest - as QMC+QMC.
IC as Secondary Method works well for interior spaces with small lights defined as GI area lights or GI portal lights. Make sure to reduce the Samples value in combination with QMC+IR. Internally, a much greater number of QMC samples are used for IR, which can increase render times very dramatically.
Radiosity Maps as Secondary Method are well-suited for fast preview renderings because of their low Diffuse Depth (less reflected light). Details can be found here (Radiosity Maps).
Light Mapping as Secondary Method work very well when rendering interior spaces where a lot of light is needed, which can be very quickly supplied by the high number of light reflections from Light Mapping. Details can be found here (Light Mapping).
Disables the secondary GI calculation. This represents a Diffuse Depth of 1 (see image above).
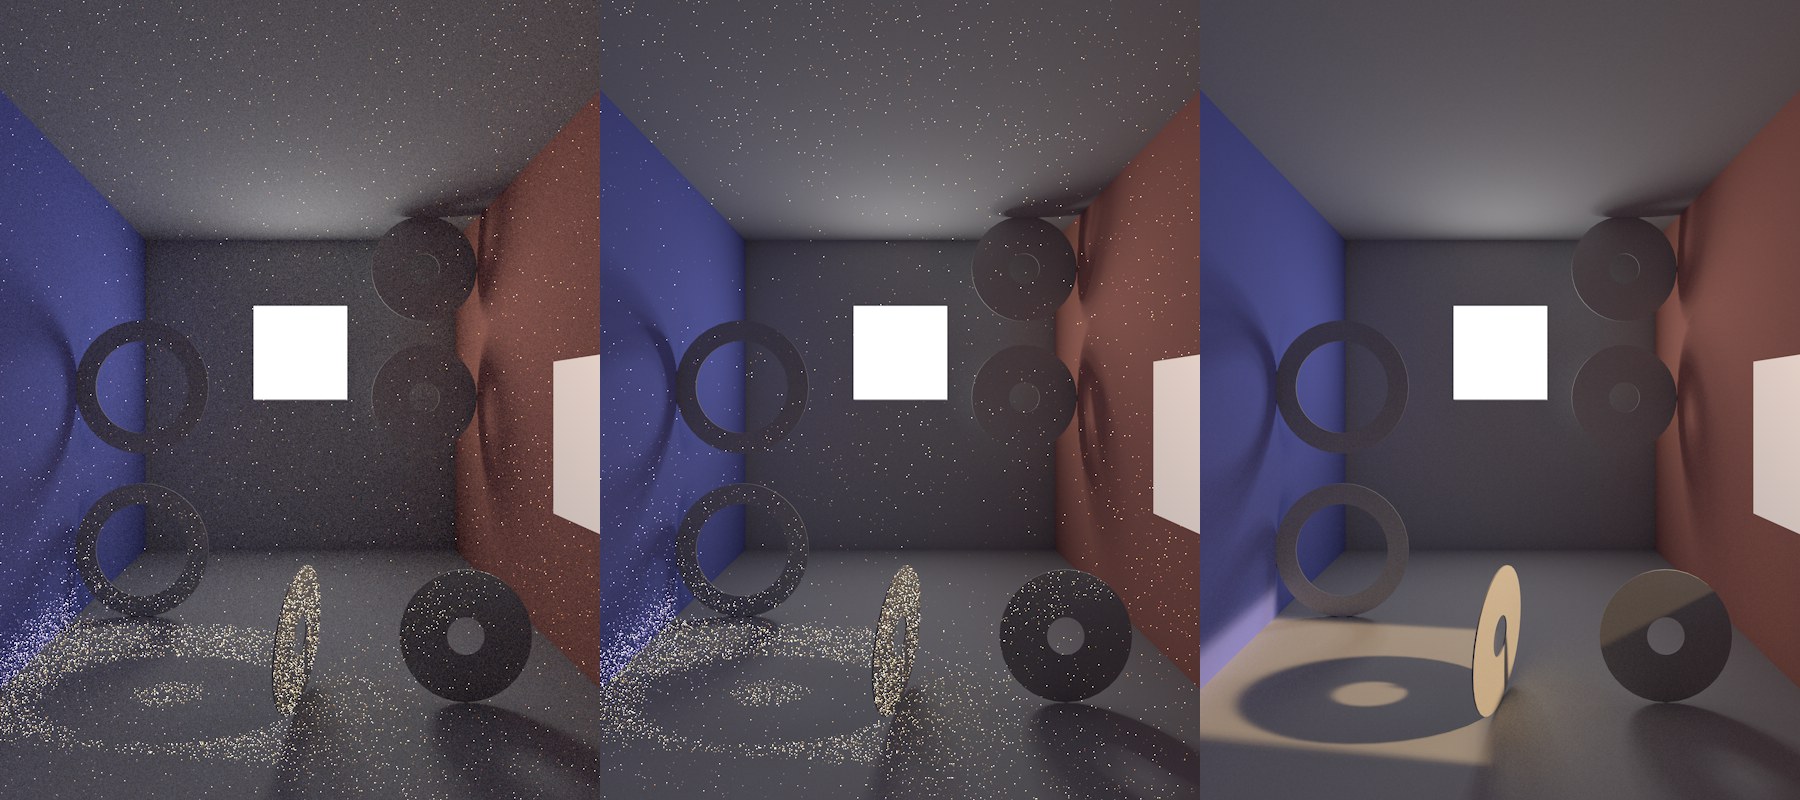
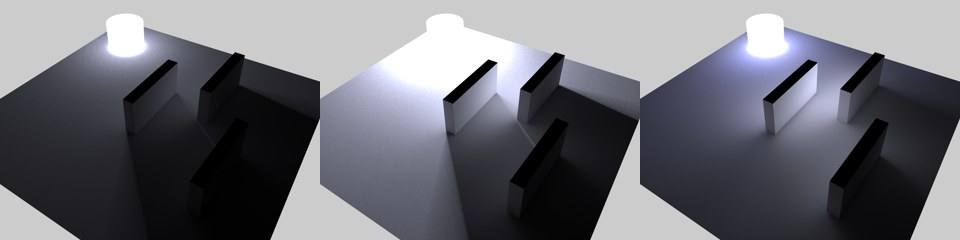 From left to right, the following Primary/Secondary Intensity values: 100%/100%, 300%/100%, 100%/500%.
Use these settings to adjust the GI's brightness according to Primary or Secondary methods (see above).
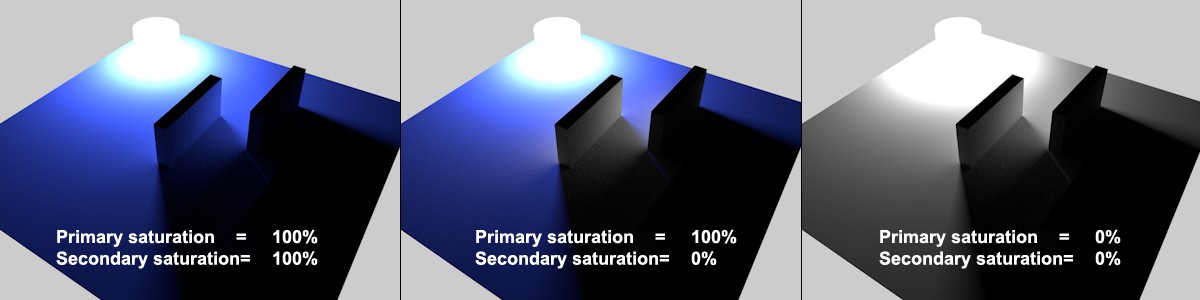 A single blue Polygon Light lights the scenery, with various Saturation settings. Note how the Secondary Method at the center emits colorless light.
This setting can be used to define the color saturation used within the GI calculation separately for the Primary Method and Secondary Method GI functions. This is especially useful if the Physical Sky produces shadows that are too blue or if the Light Mapping produces a very saturated effect. In both instances the Saturation value for the Secondary Method can be reduced. If other methods produce too little saturation (as is sometimes the case with IR/QMC as a secondary method), the Saturation value can, of course, be increased.
Note that if the Primary Method’s Saturation setting is set to 0%, no colors will be available for the Secondary Method.
For Radiosity Maps, the Secondary Method’s Saturation will only affect real Area lights (not Polygon Lights) and/or Physical Sky (which is given a real light source via the Sun light).
Color saturations can also be modified for materials (see also Saturation). Both of these parameters represent a global, Project-wide saturation setting.
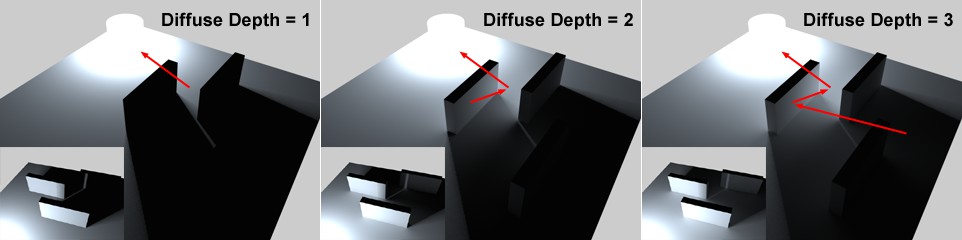 Increasing Diffuse Depth values for increased realism. Note that no light reaches behind the walls with the Diffuse Depth set to 1 (= deactivated Secondary Method).
The Diffuse Depth (that can only be defined for the Irradiance Cache or QMC Secondary Methods) determines how often light should be reflected from a surface (note the difference between polygon lights and real lights, as described here). Greater Diffuse Depth values will result in correspondingly, but moderately, longer render times (the difference between a value of 1 and 2 is greater than that between 2 and 8 - as you can see, a completely different behavior compared to previous GI versions) but the dispersion of light will become increasingly homogeneous, brighter and more realistic. However, the effect at values greater than 3 in a normal scene will become less and less noticeable and the rendered result will simply become brighter.
Note that gamma correction can, within limits, be used to compensate for lower Diffuse Depth values.
Generally speaking, high diffuse depths should be achieved by using Light Mapping
 Left: Maximum Depth = 8, right = 32.
The visual sample emitted into the scene when a Light Map is calculated (see also Light Mapping) is calculated using the number of "ricochets’ defined here. Higher values will produce a brighter and more homogenous dispersion of light with no increase in render time. The increase in brightness is less in closed spaces. In exterior scenes, the visual sample will quickly reach the sky and then be exempted from further reflections.
A reminder: No other GI method calculates high Diffuse Depth values as fast as Light Mapping!
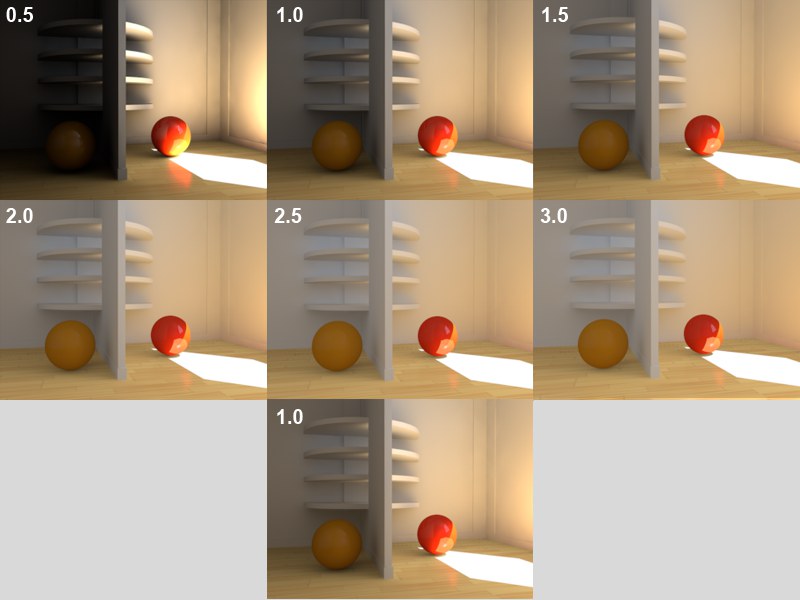 Images 1-6: Different Gamma values (Diffuse Depth each set to 3). For comparison at bottom: Gamma = 1, Diffuse Depth = 8.
This gamma value only affects the indirect GI lighting. Gamma values define how the internally rendered brightness values should be displayed in RGB mode. Simply stated, a progression from the darkest (black) to brightest (white) is defined.
This lets relatively dark renderings (e.g., resulting from a low Diffuse Depth value) be brightened. But be careful - high gamma values will reduce contrast and "flatten" the overall image (values ranging from 1 to 3 have proven to be most effective; in some instances higher values may be necessary). Values less than 1 will darken the image, whereas values greater than 1 will brighten an image (see example above).
Sampling
The Sampling tab's settings affect the GI sampling for the QMC and IR Primary Method (if both of these are also used for the Secondary Method, only a fraction of the value defined here will be used): How many samples should be sent and where in order to gather light from the environment?. Don't let the numerous settings intimidate you - the first setting -Samples - is the most important and the others are designed for fine-tuning.
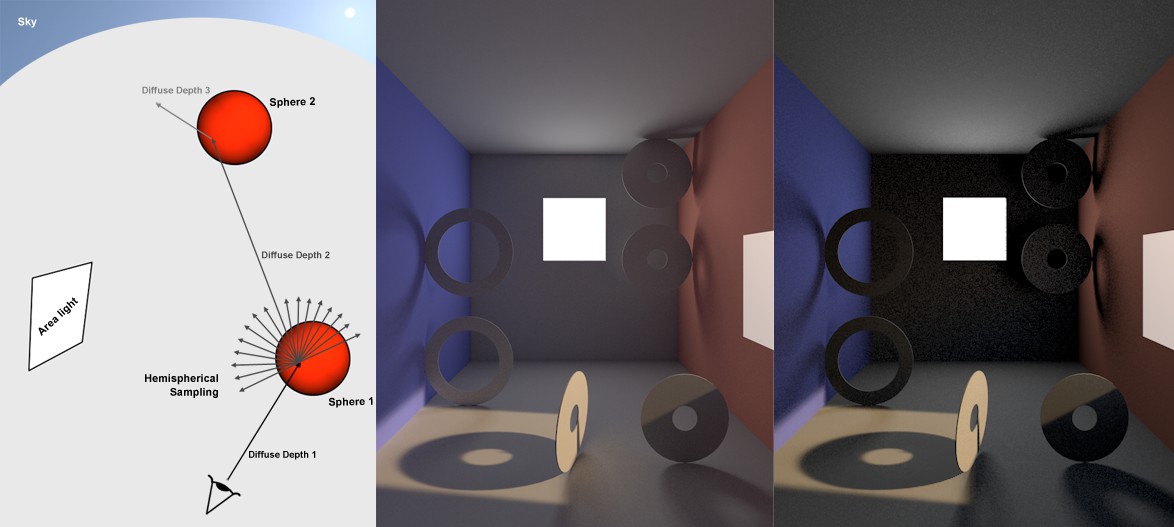
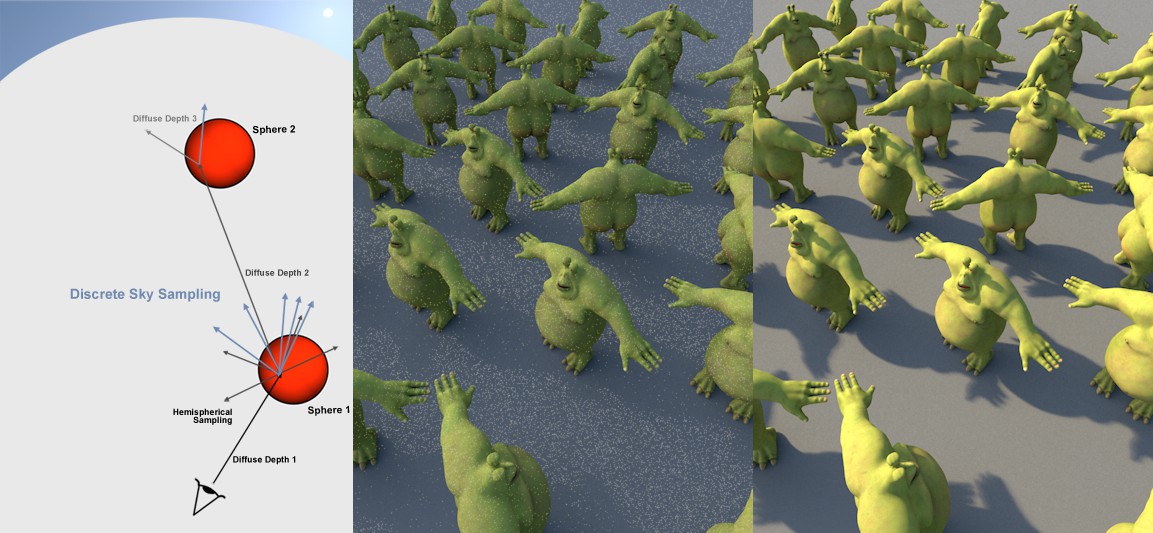
Have a look at the image below. It shows how the QMC GI Mode works (IR works similarly but not for each pixel with a Diffuse Depth value of 3.
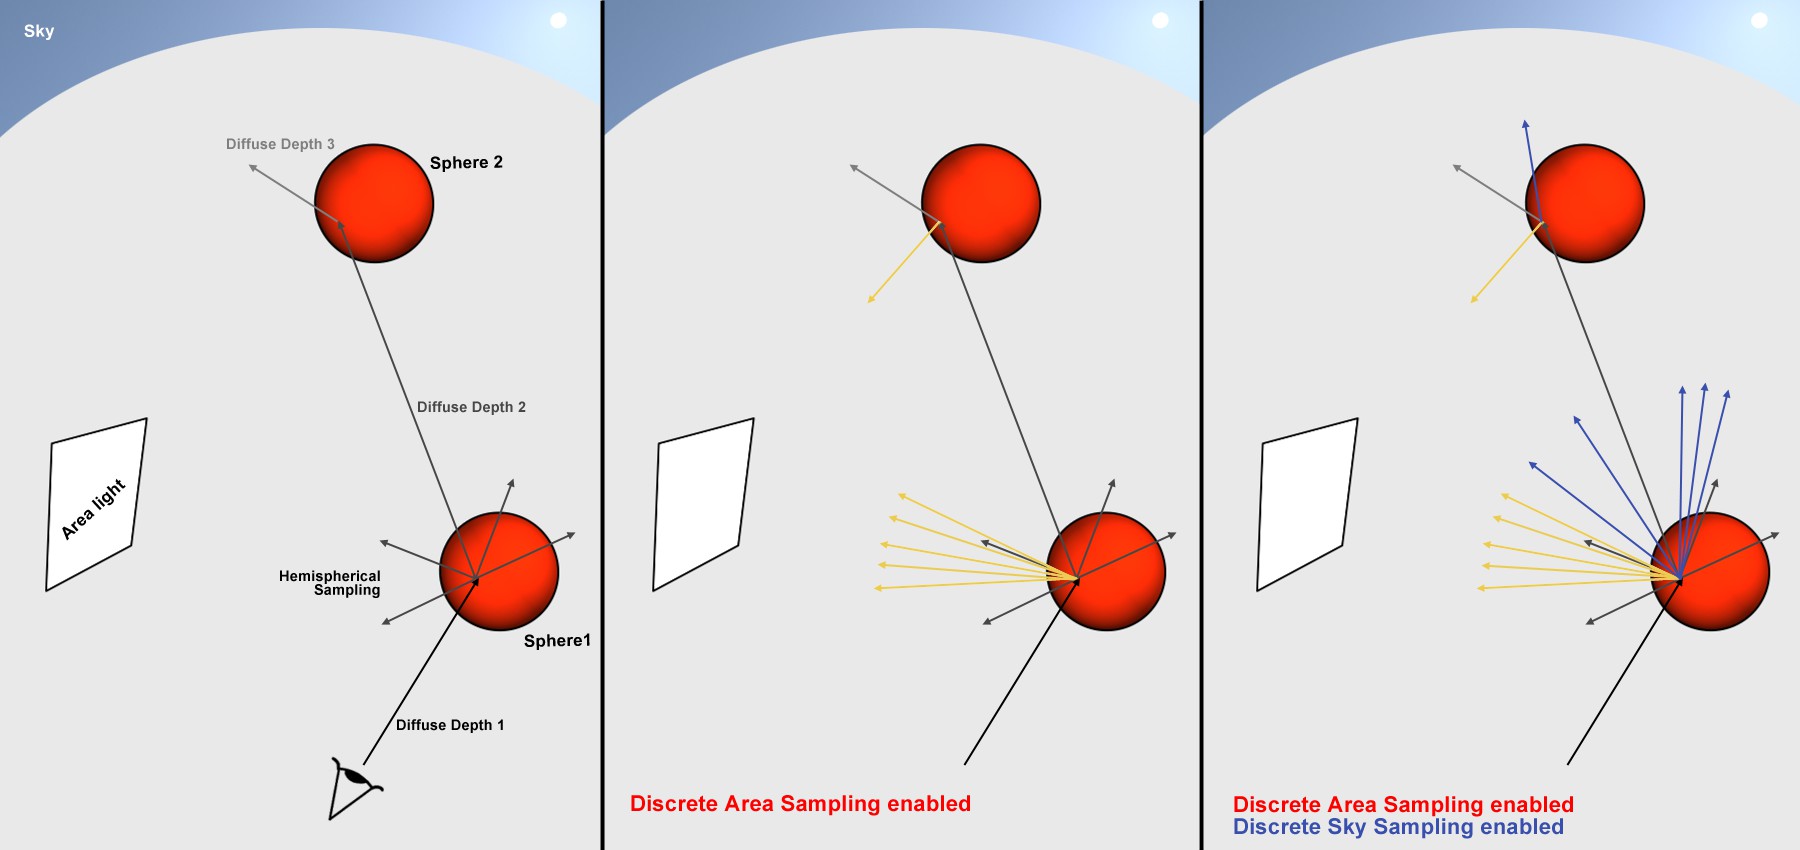
In the image above you can see what additional samples are created by a sample coming from the bottom left when it hits an object (samples are used to sample colors and brightness for a specific location in the environment =, gather’). As you can see, the most commotion takes place at the intersection point, Diffuse Depth 1’ and the first object (and subsequently the light reflections (Diffuse Depth 2, 3, etc.) have progressively decreasing influence on the rendered result).
-
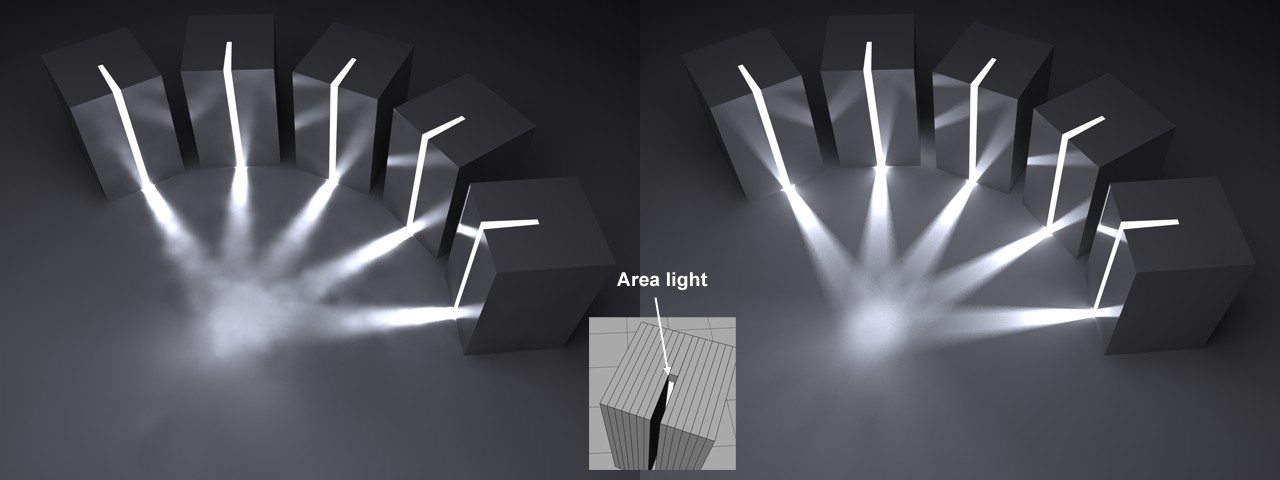
Left (Discrete Area Sampling and Discrete Sky Sampling disabled):
At the first point of contact, several samples are sent out in a hemispherical direction (this is exactly what the Hemispherical Sampling option is meant for). -
Center (Discrete Area Sampling is enabled and Discrete Sky Sampling is disabled):
In addition to the hemispherical sampling, several samples are also sent out in the direction of GI Portals / (polygonal) Area lights. -
Right (Discrete Area Sampling and Discrete Sky Sampling enabled):
In addition to the hemispherical sampling and the Area light sampling, additional samples are sent out in the direction of the sky.
The Sampling settings described below then only primarily define if and how many samples are created on Sphere 1.
In order to avoid too much technical jargon, take a look at the image below in which the options have been applied to a rendered Project:
An Area light was positioned at the rear of the room, a window in the wall on the right that looks out to a Sky object with an HDRI assigned to it (yes, it can render hard shadows!). No Cinema 4D light sources have been placed in the Project. The images were rendered in QMC Primary Method (for IC mode, imagine spots instead of graininess for the image).
-
Left (Discrete Area Sampling and Discrete Sky Sampling disabled):
This is not a viable option for this particular Project. The image itself is very grainy (which is the result of random samples hitting the Area light), the shadows - if they're even worth mentioning - are even more grainy. Bright points are also visible here and there. These are the result of very few random samples hitting the (HDRI) sky's sun. -
Center (Discrete Area Sampling enabled and Discrete Sky Sampling disabled):
The general graininess has been greatly reduced because additional samples are being sent to the Area light (each point visible to the camera is analyzed, which results in the Area light's shadow being very defined). -
Right (Discrete Area Sampling and Discrete Sky Sampling enabled):
In addition to the hemispherical sampling and the Area light samples, additional samples are sent in the direction of the sky. This abolishes the bright points because every point visible to the camera is precisely analyzed with regard to the sky's influence (including its effect on the remaining Project elements).
It's not altogether wrong to leave Discrete Sampling enabled. Only for special instances in which you want to intentionally exclude one of the Sampling modes should it be disabled. The difference in render time will be noticeable if no Area light or sky are present in the Project.
Here you will find several options from which you can choose that control the Accuracy and Sample Count settings.
- Selecting Custom Sample Count lets you manually define the Sample Count value
- Selecting Custom Accuracy lets you manually define the Accuracy value
Two methods of defining sample count are integrated:
- An automatic determination controlled by one of the quality settings (Low, Medium, High, Accuracy)
- A fixed number of samples defined by the Sample Count setting
Use this setting to automatically define an optimized sample count. The optimal count depends on the Project (and in the case of the IR Primary Method on the other Irradiance Cache settings) and of course the defined Accuracy value.
This setting defines the fixed number of samples to be used. A higher value produces a correspondingly better render quality (for QMC this can be seen in the graininess; for IR the number of spots is reduced). Depending on the Project, values in the thousands can be entered (see also Number of Samples Calculated Per Shading Point).
The number of samples used for rendering will also be used by the Discrete Area and Discrete Sky Sampling if they do not have a specific number of samples defined.
Normally, this option should always be enabled. Disabling this option will disable the samples sent out in a hemispheric manner from the shading point (also called the, primary sampler’). Disabling this option rarely makes sense but doing so can help determine how Area lights or the sky affect the Project (because the Diffuse Depth will then be reduced to a value of 1). In such an instance, Discrete Area Sampling and Discrete Sky Sampling should be enabled.
 At the left only the effect of the Hemispherical Sampling is shown. It is enabled in the center and disabled at the right (in both cases Discrete Area Sampling and Discrete Sky Sampling are enabled).
This sampling method is, for example, well-suited for use with large, homogenous Area lights (e.g., evenly overcast sky - which would not require the subsequently described sampling methods).
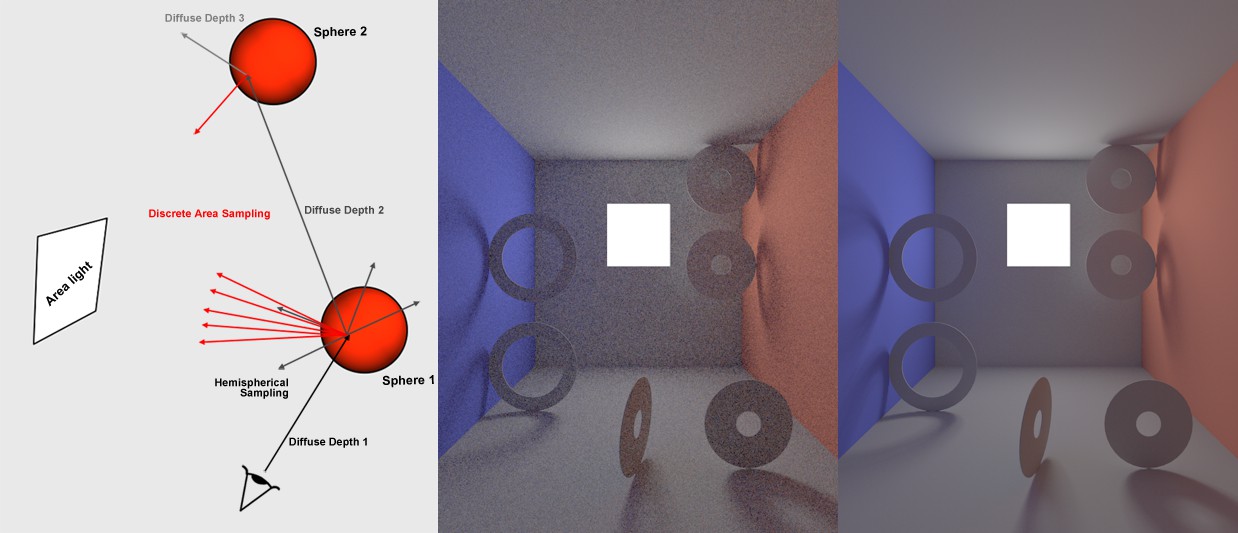 At center Discrete Area Sampling disabled, at right enabled.
In order for this sampling type to work, the Polygon Light (or for GI ports Portal) option must be enabled in the respective (illuminating) material.
This sampling method sends additional samples to (polygon) Area lights. This will, emphasize’ them disproportionally, which will have a major effect on the quality of the GI.
Note that the Area lights will NOT be omitted from the GI calculation if this option is disabled. These lights will merely receive no special attention and will be hit randomly by the hemispherical sampling (with a correspondingly grainy result).
 At left, Force Per-Pixel disabled, at right enabled.
This option is only advantageous in IR Primary Method. Normally every light will be taken into consideration for the cache when an Irradiance Cache is created. However, this does not work if you have very small, bright Area lights. The result will be spotty images. If you enable the Force Per-Pixel option, the calculation of the Area lights will be split from the cache and calculated separately (as the QMC method does by default) for each potential pixel (object surfaces but no backgrounds or skies, for example).
The result of these calculations will not be saved in the Irradiance Cache and must therefore be calculated anew for each frame of an animation.
Use these values to define a custom sample count. If Custom Count is disabled, the same number of samples will be used as is defined in the Samples setting.
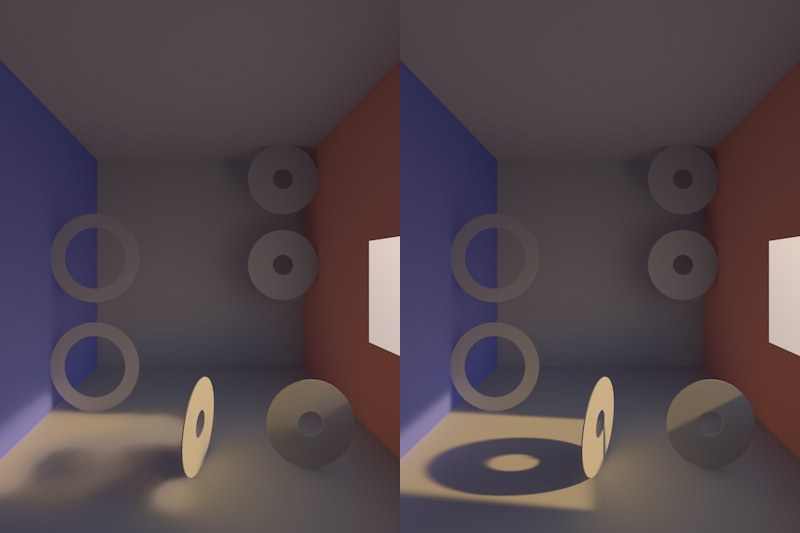
This sampling mode takes into account the sky in particular (e.g., the Physical Sky or a HDRI texture that was assigned to a Sky object).
A sky map will be calculated internally during rendering, which will then concentrate the additionally created samples primarily on the brightest regions during rendering. This means that HDRI textures with enough contrast can cast shadows with locally very bright regions, as in the image below.
 The only source of illumination here is the HDRI texture on a Sky object. Note the relatively hard shadow (option disabled at center).
Note that the Physical Sky's Merge Sky and Sun option ensures that the Physical Sky is processed internally (incl. the effects of the sun) like an HDRI texture.
If this option is disabled, the sky will NOT be omitted from the GI calculation. The sky will merely receive no special attention and will be hit randomly by the hemispherical sampling (the extremely bright sun will produce a grainy image).
 A Sky object with an HDRI texture applied to it is located behind the window; at left Force Per-Pixel disabled, at right enabled.
This option only bears advantages for the IR Primary Method. When an Irradiance Cache is created, the sky will normally be sampled and taken into consideration for the cache. For bright regions (sun) or those with smaller surfaces, this method has limits and will result in spotty renderings.
If you enable Force Per-Pixel, the calculation of the light emitted by the sky will be split from the cache and calculated separately for each pixel that comes into question (object surfaces but no backgrounds, skies, etc.), which is how the QMC method works by default.
The results of this calculation will not be saved in the Irradiance Cache but must be calculated anew for each frame of an animation.
Use these values to define a custom sample count. If Custom Count is disabled, the same number of samples will be used as is defined in the Samples setting.
How Does QMC Work?
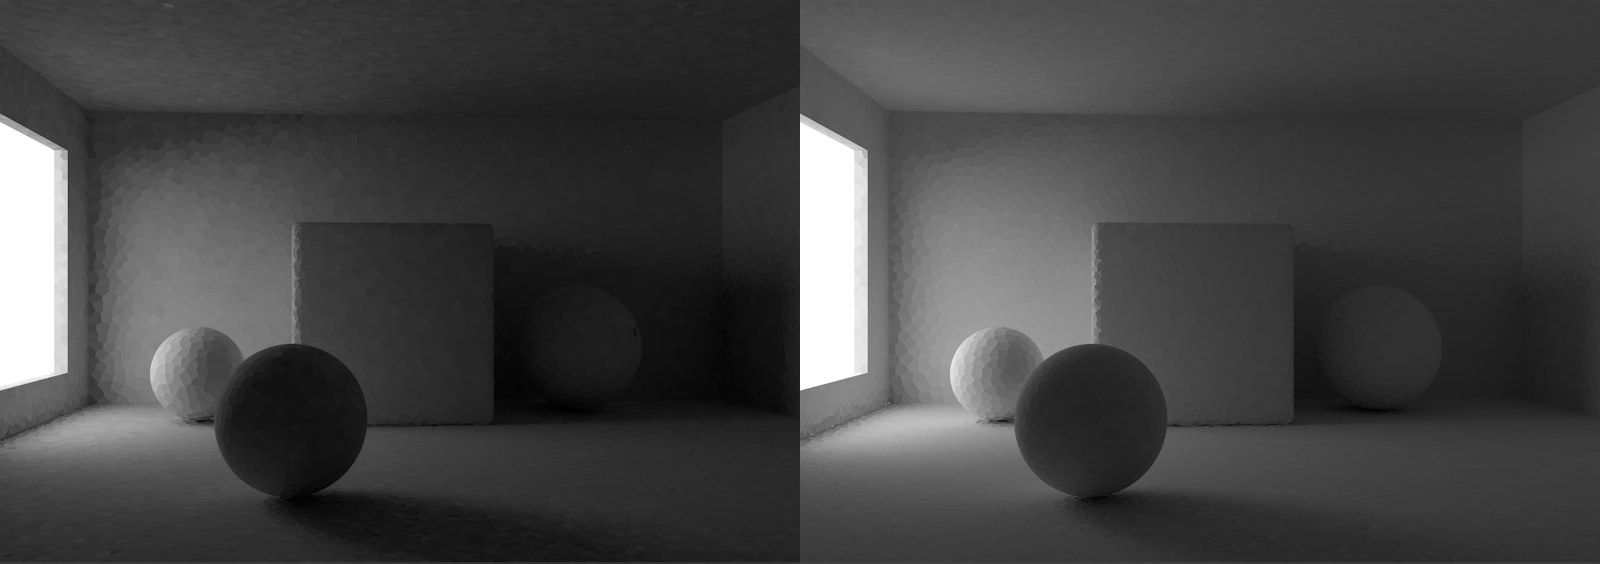
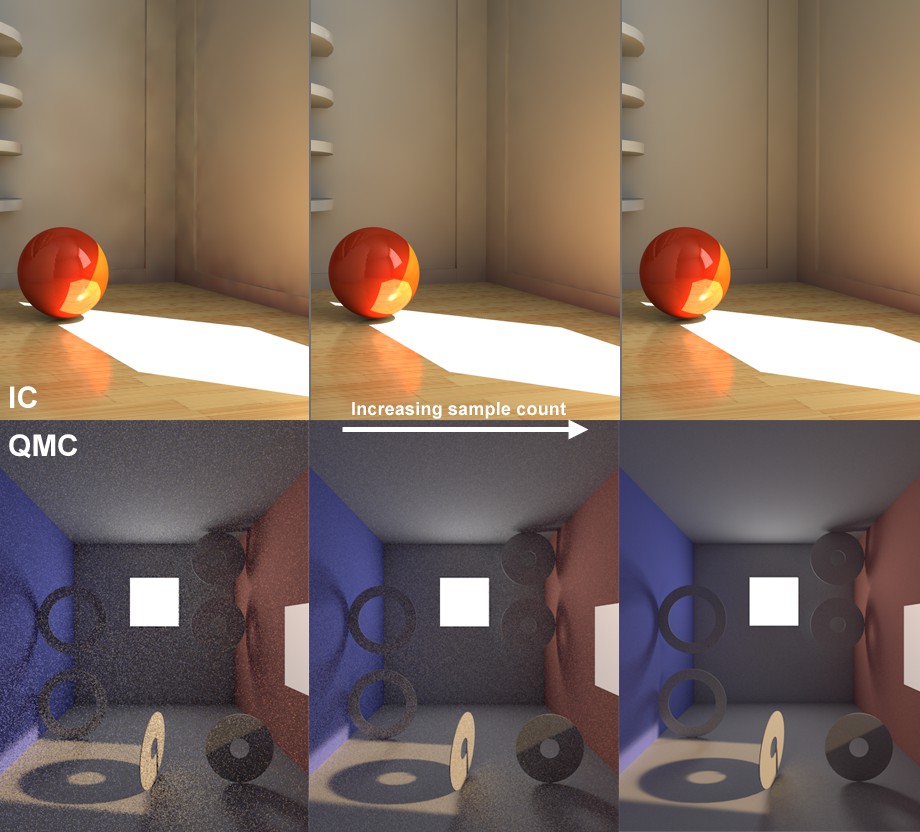
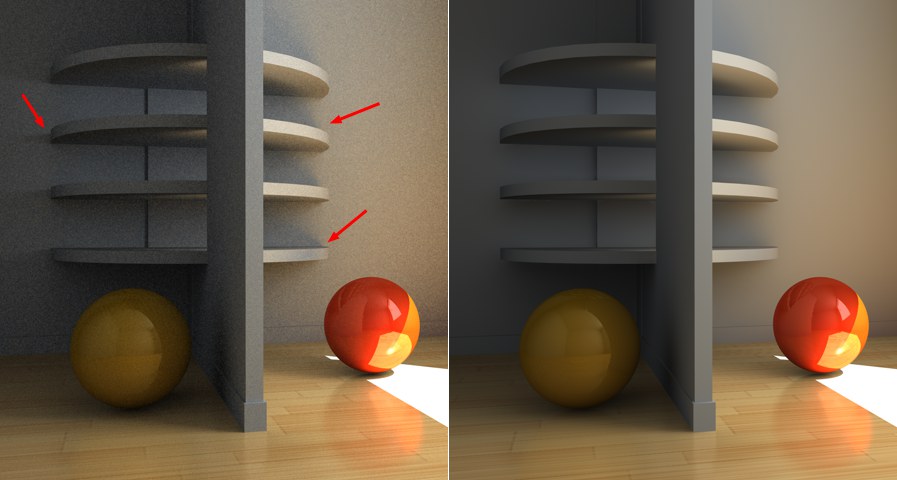 Left, rendered with QMC+QMC, right with IR+IR. Note the increased level of detail (shadows) in the QMC rendering.
The QMC method of Global Illumination calculation works under a so-called "brute force" principle. This means that, for each (!) object pixel in the image, a definable number of rays ("Sample Count") can be "beamed" in a hemispherical pattern into the scene. This is not an adaptive process and the render time will definitely not be reduced.
This bears the advantage that it offers the most precise render results. Small details in shadows and shading can be rendered out that would otherwise not be noticeable if the IR method were used.
Disadvantages of using QMC as primary method:
- The render times are maxed out (much longer than with Irradiance Cache) and, since brightness and color values based on a finite and randomly distributed number of rays ("Sample Count") is ascertained for each pixel, the images will have a slight graininess to them that can only be compensated for by increasing the sample count, which in turn increases render time accordingly. Using Polygon Lights/GI Portals (indoor scenes, primarily illuminated by light falling through windows) can noticeably improve render quality (which also saves render time).
- No caching takes place (as well as no pre-pass calculation). Hence, a lot of CPU power is needed (e.g., render farms) to render animations at an acceptable level of quality.