Track Properties
Use this setting to turn animation tracks off, i.e., the track will not be animated despite existing animation. This state will automatically be inherited by the Child objects (Child objects’ states can nevertheless be switched independently of the Parent objects). The same functionality can be found in the layer column in the form of an Film Strip icon that can be turned on or off.
Activate this setting if you want to switch the track to Solo Animation mode, i.e., only that track will be animated and all others will be turned off. This state will be inherited by all Child objects but can be changed on an individual basis. The same functionality can be found in the layer column in the form of a film strip that can be turned on or off.
See Set/Reset Constant Velocity.
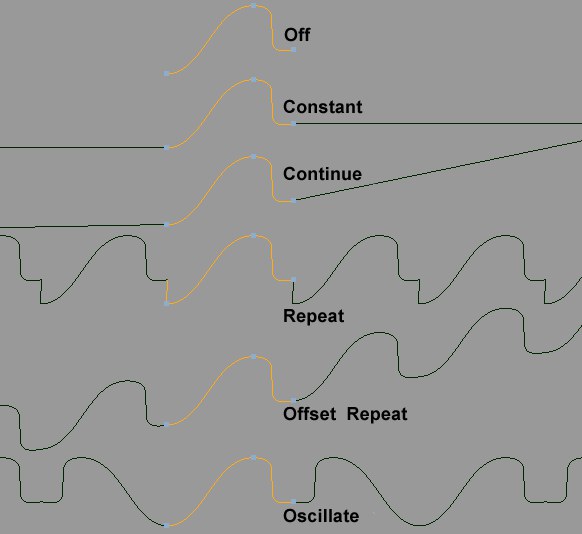
 At top the original animation containing three keys. Below the various Before and After modes.
This is where you can easily define how the track animations should behave before the first and after the last key. The following options are available:
The property’s value is undefined before and after the key animation. For a position animation this would mean that you could move the object anywhere in the editor without losing control of the animation.
The value of the first and last keys will remain before and after the key animation.
The speed with which a parameter changes will be ascertained based on a tangent’s speed of ascension and maintained infinitely until the end of the document.
The key animation will be repeated seamlessly. Here it would make sense if the first and last keys shared the same value in order to prevent a jump at the end / beginning of the animation.
Similar to Repeat. When start and end keys have different values a gradual ascending or descending curve may develop periodically due to the fact that the curve with the start key will be laid on the end key.
Start and end keys will each be mirrored horizontally. Such animations are good for extension / contraction animations (e.g., hydraulic cylinders) when the opposing movements must remain constant.
Repetitions [0..2147483647]
Repetitions [0..2147483647]
For the Before and After settings Repeat, Offset Repeat and Oscillate you can define the number of repetitions using their respective values. After the repetitions have ended the last value reached will be kept.
Drag the name of a previously created Time Curve here.
If enabled, the Time Track’s temporal position or length will no longer play a role. It will basically be adapted to the corresponding animation track (as if it were identical).
If this option is enabled the colors defined in the Preferences menu (![]() Dope Sheet
Dope Sheet![]() F-Curve Mode
F-Curve Mode
F-Curve Offset [-∞..+∞]
F-Curve Scale [-∞..+∞%]
Normally F-Curves are displayed in the F-Curve window according to their key value. This can be problematic if an object is animated from, for example, P.X.=20000 to P.X.=40000. The F-Curve will then lie far outside the normal visible F-Curve range, which usually lies around the Y=0 coordinate. Since most users want F-Curves to lie over each other in order to be better able to edit an animation, the following settings can be applied:
- The Auto Relative option will fit extreme F-Curves automatically.
- F-Curve Offset and F-Curve Scale can be used to move and scale curves manually
For either method used: No key values and the animation itself will not change. Only the visual depiction of the F-Curve will change. The track name will be marked with a mock R if different values from = or, for example, 100% is set for both values. In the Timeline’s F-Curve menu you will find the Reset Relative option which will set both values back to default.