View
You can use this setting to change the projection type (e.g., to Perspective, Bird, Diametric).
This box does the same job as the viewport’s Cameras / Use Camera sub-menu — in other words, it allows you to choose which camera the viewport is linked to. Drag & drop the desired camera from the Object Manager into this box.
To switch off texture mapping, disable this option.
Defines whether points, edges or polygons are used for display when the respective surface Normals are oriented away from the camera.
Backface culling hides an object’s elements. If you enable backface culling, you will still see objects behind other objects in wireframe display mode.
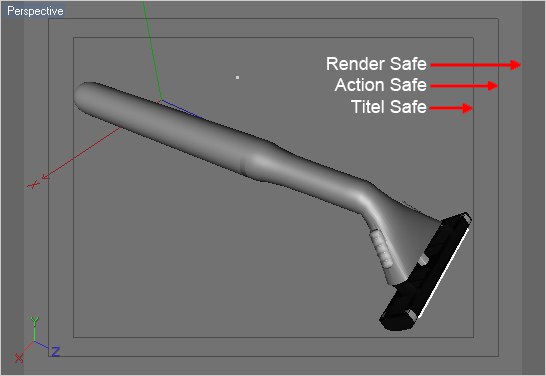
Safe frames are areas that will be in full view when played back on the target medium.
If enabled, the boundaries of the defined film format will be displayed in the Viewport (only in the Perspective window). This will be the region that will be rendered, independent of the window’s size or aspect ratio.
Let’s assume you have defined a render output of 800 x 600 pixels, which represents an aspect ratio of 4:3. Enabling the Center option for the Render, Tile or Action Safe parameters will display a 16:9 aspect ratio frame. If a 16:9 aspect ratio is defined, enabling these options will display a 4:3 aspect ratio frame.
If this option is enabled, a frame is shown in the 3D viewport. To change the size of the frame, enter a new percentage value into the Size box. The percentage is based on the film format that is selected in the Render Settings. Title Safe marks out a region in which it is safe to place opening credits, final credits and other text, where there will be a minimum of distortion when the movie is played back on the target medium.
Tinted Border
Opacity [0..100%]
Border Color
Frame segments that lie outside of the Render Safe area can be assigned a color. Use the Opacity and Border Color settings to adjust your Tinted Border.
If this option is enabled, a frame appears in the 3D viewport to mark out the region in which it is safe for action to take place so that it will be in full view when played back on the target medium (monitor, TV screen, cinema screen). To adjust the size of the frame, enter a new percentage value into the Size box. The percentage is based on the film aspect that is selected in the render settings.
If you are a frequent moviegoer, you may have noticed that the screen’s curtains are pulled closer or further apart depending on the format of the film that’s playing. Even with TV screens, some of the picture may be lost. Use Action Safe to ensure the viewer sees everything that matters.
Defines the scale of the axes and their bands.
Defines the length of the polygon and vertex Normals.
The rotation bands are the bands that appear in the viewport when the Rotate tool is selected (provided Rotation Bands is enabled on the Display tab). The Rotation Scale value defines the thickness of these rotation bands.
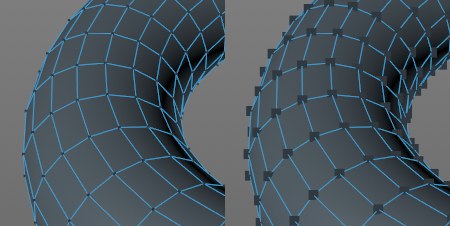 Point Handle Size set to a low value (left) and high value (right).
Here you can define the size of the object points that are displayed in point mode. These points will always directly face the camera; this can sometimes result in points being partially hidden behind object surfaces.
Here you can define the size of the virtual Rotation Circle.
Select Point Size [0..10]
Select Edge Size [0..10]
If you select an element when in Point or Edge mode, this element will be displayed in a different color. Use these settings to define the colored elements’ size. Increasing the size value will make the selected elements easier to see.
Highlight Outline Width [1..10]
Use this setting to define the thickness of the outline of selected objects or objects to be selected. See also Outlines.
Editor Axis Position
Editor Axis Type
Editor Axis Scale [0..400%]
Editor Axis Text
By default a small axis system is displayed in the bottom left of each view. Editor Axis Position defines whether — and if so, where — the editor axis system is displayed.
Editor Axis Type defines which axis system is displayed: object or world. This axis system is especially useful for indicating the editor camera’s orientation when the world grid is switched off. Editor Axis Scale defines the size of the axis system. Editor Axis Text determines whether the axis labels X, Y and Z are displayed.
Here you can, in consideration of linear workflow, turn off the display of colors, shaders, etc.