Overview
Start
To start Cinema 4D, do one of the following:
- Double-click on the program icon.
- Double-click on a scene file.
- Use the menu (Windows).
- Alternatively, drag-and-drop one or more .c4d files from Explorer (Windows) or Finder (Mac OS) onto the application icon or directly into the program.
- Via the command line input.
- Cinema 4D Lite (as well as one additional Cinema 4D version) is started directly in Adobe After Effects.
Hotkeys 1 to 9
To use a hotkey, hold down the key and drag the mouse. The default hotkeys for the view panel are:
1 Move camera
2 Move camera in direction of view
3 Orbit Camera
4 Move object
5 Scale object
6 Rotate object
7 Move object without Child objects
8 Lasso selection
9 Live Selection
The user interface
The Cinema 4D user interface has many features you will not find in the Windows or macOS GUI:
- You can dock all windows into the main window.
- When you move a docked window, the surrounding windows are resized automatically..
- You can display windows as tabs to save display space.
The Cinema 4D GUI is freely configurable. You can create your own icon palettes (including folded icons) and edit the menus. You can define various layouts and switch between them freely. For example, you may find it helpful to create a layout for modeling, a layout for texturing and a layout for animation since these tasks use different managers. A further powerful feature is that functions can be integrated into the GUI and make use of its features.
The fastest way to switch layouts can be found at the top right over the main menu.I. Choose the desired layout from the list of freely configurable layouts and menus that appears. You can add your own layouts to this list.
 To switch to one of the other preset layouts, click the Layout button at the top right and choose the desired layout from the list.
When running on macOS X, Cinema 4D can be switched to fullscreen mode by clicking on the green double arrow icon at the top of the interface. Window names and all other OS elements will be hidden. To exit fullscreen mode simply move the cursor to the very top of your monitor screen and click on the green double arrow icon that appears.
A Quick Tour
This section guides you through the GUI as it appears when you first start Cinema 4D.
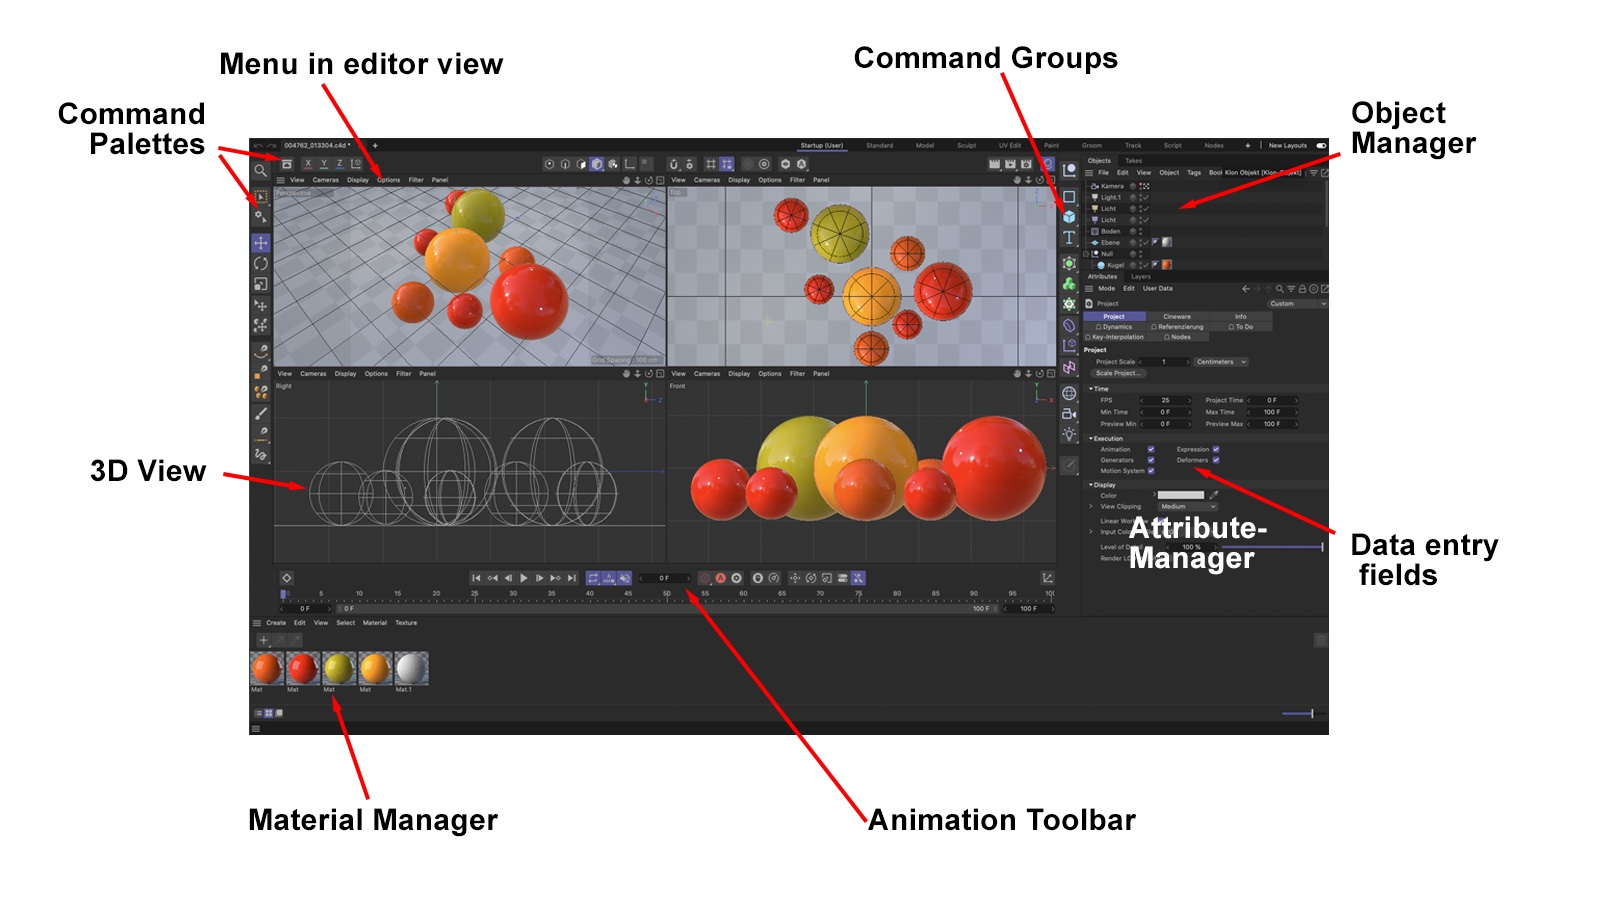
The documents and layout palette
At the very top of the main window you will find the documents and layout palette. This will help you navigate and make selections within all opened documents and selecting the proper application layout.
The items from left to right are:
Document Tabs
In addition to the already known list of open documents in the Window menu, Cinema 4D R25 offers the same as a tab above the main menu. Here you can see at a glance which projects are currently open and can switch to these right away.
The tabs can be re-arranged via drag & drop. Documents can be closed by clicking on the x next to their name.
Right-clicking on a tab will open the following commands (these are not yet described elsewhere in the documentation):
Duplicate Project
Duplicates the selected project, including all objects and settings..
Close Others
All will be closed, except the selected Documents tag. A prompt will follow asking of documents not yet saved should be saved.
Show in Explorer/Finder
This command will open the Explorer or Finder and jump to the path at which the selected document lies.
New Project
Clicking on the [+] icon will add a new project.
Layout tabs
Here you will find a list of layouts that can be loaded by clicking on them.
View
Here you will fine a list of layouts that you can display at theleft of the selection menu. Click on the layout to display or hide it.
New Layouts
Here you will find a very important function. Since all icons and their locations have changed in Cinema 4D R25, you can display the layouts of R24 here.
The (new) command icons will then lie at their old locations. This will help you get used to the new icons.
By the way, the arrangement of commands is, for the most part, unchanged compared to R24.
Main Menu

The main menu contains the most important Cinema 4D commands and functions (note that other layouts can have other main menus with different commands.). The menus of any installed plug-ins or elements added functions will also be located in the main menu.
Managers
Managers are the main program elements in Cinema 4D. Each manager has its own window and runs alongside the other managers. This means that each manager can operate independently. This makes it possible — among other things — to render an animation in the Picture viewer while you work in the view panel. Although the managers operate independently, each manager reacts immediately to relevant changes made in other managers. For example, when you move an object in the viewport, the object’s position values update automatically in the Attributes and Coordinates Managers.
Windows
Each manager has its own window. You can place windows freely or dock them into Cinema 4D’s main window. The most important functions are already docked in the main menu of the default layout. If you change the size of a docked window, the surrounding windows are resized automatically.
To undock a window, click on its Grasp icon and choose Undock. To re-dock the window, drag-and-drop its Grasp icon

onto the main window. A light colored line will indicate the insertion position. To change a window’s size, first move the mouse pointer to its border. The pointer will change into a double arrow to indicate the direction (either vertical or horizontal) in which you can drag the border. Drag the window as required. The other windows in the group will adapt to the change.
Menu bars
If there is not enough space to display the full menu bar, a triangle is shown. Click the triangle to reveal the remaining menu entries.
Icon palettes
The default layout has two icon palettes (aka toolbars) containing the most popular commands as icons. Some of the icons have a small black triangle, indicating a folded group of commands. To access the group of commands, click and hold the left mouse button. Note that the icon shown before unfolding the group is the most recently used command (provided that Lock Icon is disabled on the folded group’s context menu).
The creation of icon palettes is described here.
Tabs
You can display windows and icon palettes as tabs. For example, the Object Manager, Structure manager are displayed as tabs in the default layout. This saves display space and helps you to reach a manager or icon palette quickly. If the tabs cannot all be displayed in the space available, a small scroll button will appear with which you can scroll to the hidden tabs. Scroll the tabs by clicking the small triangle icons in the top right of the window or by dragging one of the tabs.
Context menus
To open a context menu, right-click (Windows) or Command-click (macOS).
View panel
The View panel is a collection of up to four viewports and is the heart of the program. This is where you build and animate your 3D models.
Object Manager
The Object Manager contains all your scene’s elements (objects). You can group objects hierarchically. For example, you can make a leaf a child of a branch and the branch a child of a tree. If you want to edit an object, first select it by clicking its name or icon in the Object Manager. The object’s name will turn red to indicate selection. Most objects have tags that add properties to them such as materials or Phong shading.
Items in the editor view can be hidden and unhidden as desired using Cinema 4D’s powerful layer functionalities.
Material Manager
The Material Manager contains all the materials for the scene. If you double-click on a material icon, the Material Editor will open so that you can edit the material. You can add a material to an object by dragging and dropping the material from the Material Manager onto the object.
Coordinate manager
You can use the Coordinate Manager for precision modeling or manipulation. For example, rather than scale an object in the view panel, you can enter the exact size in the Coordinate Manager. As with all numerical text boxes, you can also enter mathematical operators.
Animation Toolbar
Objects’ Position, Scale or Rotation and other properties can be easily recorded via a Record button. The Animation Palette is a simplified version of the Timeline and can be used to create more simple animations without having to switch to the Animation layout. The much more extensive Timeline is described here.
Attribute Manager
The Attributes Manager displays all properties and settings of a selected object, material, shader, tag node, tracks or key(s). These properties and settings can also be edited in the Attributes Manager.
The properties of many Cinema 4D tools can be displayed here as well.
Modeling Techniques
3-dimensional objects can be created using a wide variety of methods. Many modeling techniques are available, of which the most important are described below. Naturally each of these techniques can be applied in Cinema 4D.
CSG (Constructive Solid Geometry)
This is the easiest technique of all. All objects consist of existing parametric primitives such as cylinders, spheres, cones, etc.
-
Main menu: Create / Mesh Primitives (link).
These objects are ideal for use with , which offers endless possibilities to clone objects. - Main menu: (link).
Polygon Modeling
This is the classic modeling technique. Various tools are used to create, join and edit polygons. Although somewhat tedious, this method gives you complete control over the creation of the final object. SDS (Subdivision Surfaces) is based on polygon modeling.
- Main menu: (link)
Sculpting
Sculpting lets you create non-technical modeling, similar to real-world sculpting, in which material is added or removed using special tools (Sculpt brushes).
- Select the Sculpting layout at the top right of the Cinema 4D layout.
Generators
Generators can be used in combination with splines to help you create objects. Splines let you create various types of caps and surfaces. Although this is a very elegant modeling technique it is not for use in modeling characters.
SDS (Subdivision Surfaces)
This is the most state-of-the-art modeling technique. Objects consisting of few polygons are subdivided dynamically to create smooth, organic higher resolution objects. Sharp edges can also be created using edge weighting. You should have a very good understanding of polygon modeling when working with SDS since subdivided objects will be edited using polygon editing (see above).
- Main menu: (link)
Volumes
Volumes and their ability to execute Boolean operations, can be used easily model complex shapes. Volumes can use polygonal objects, splines, Fields and points to create shapes.
For more information, see Volumes.
Boole / Deformation
These modifiers can be used to deform objects created using the techniques described above to create new objects.
The modeling technique best used depends on the object to be created. What you need to know: Any object can be modeled. There is nothing that can’t be created using the methods described above.
Note that the Object Manager’s hierarchy allows the different techniques to be combined with one another. For example, you can use various Deformations to deform a low resolution object (e.g., a cube), place it into a hierarchy, apply additional Deformations to this object and subsequently cut a piece out using a Boole.