Shader Properties
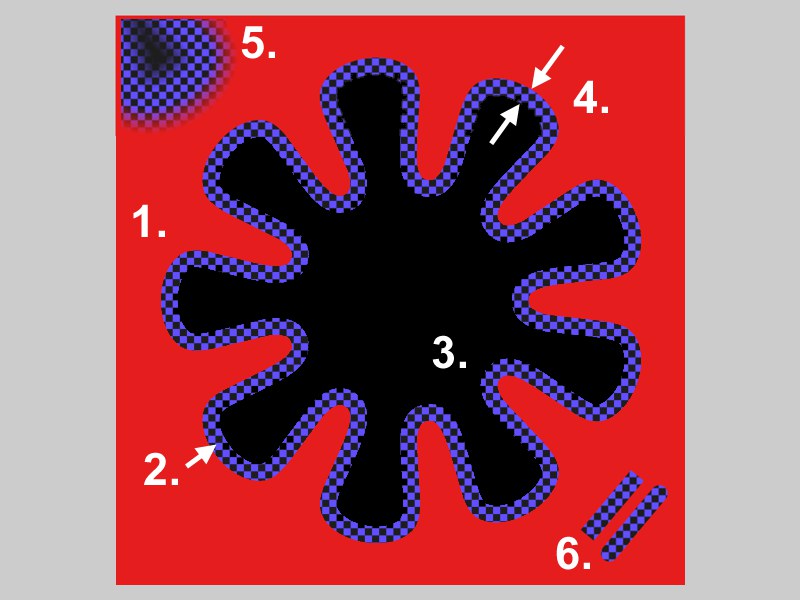
 1. Background Texture; 2. Line Texture; 3. Fill texture; 4. Line Width; 5. Smooth Width; 6. Caps.
Drag & drop the spline to be used into this box. This can be a spline primitive or a standard spline. The spline’s coordinate system plays a crucial part in the projection of the spline — see Plane.
Background Texture
Line Texture
Fill Texture
These settings specify the texture used for the background, line and fill. Close the spline to prevent unusual fill results.
If you want to define a texture here, the Fill and Use Fill Color options must first be enabled.
X Offset [-100000..100000%]
Y Offset [-100000..100000%]
X Scale [-100000..100000%]
Y Scale [-100000..100000%]
These parameters move and scale the projected spline in the X and Y directions. Use negative Scale values to mirror the spline projection.
Defines which plane in the spline’s coordinate system is used for the projection. For spline primitives, choose the XY plane.
Enable this option to set the line’s thickness to one pixel (the Line Width and Smooth Width options will then be disabled). If the lines seem jagged, in the Render Settings, on the Antialiasing tab, set Antialiasing to Best. (Textures are not smoothed in the Geometry antialiasing mode).
Line Width [0..10000%]
Smooth Width [0..10000%]
These settings will only be available if Single Pixel is disabled. The Line Width defines the line’s thickness, Smooth Width applies a soft edge to the line unless set to 0%.
This option does two things. First, it defines whether the ends have a semicircular cap (option enabled) or no cap (option disabled). Second, if enabled, it prevents the artifacts shown below from appearing.
 Caps with Smooth Width disabled.
To fill areas inside the spline, enable the Fill option. If the Use Fill Color option is enabled, the Fill Color is used to fill the spline, otherwise the Line Color is used.
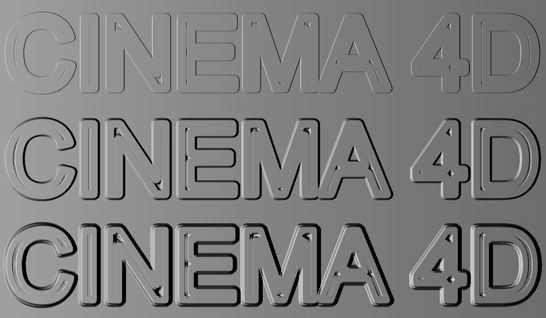
 From top to bottom: Increasing Bump Width value.
Defines the width of the bump effect around the lines. This is only relevant if you enable the Spline shader in the Bump channel.
Text Spline
Text
Font
Align
Height [-∞..+∞m]
H Spacing [-∞..+∞m]
V Spacing [-∞..+∞m]
Here you can enter text that will be projected onto the texture. Set Plane to XY (the default plane for spline primitives). See Text Spline.
Projecting the spline onto an object can seem tricky at first. Proceed as follows.
- Ensure the spline is smaller than the object. Drag & drop the spline into the Spline box in the Attribute Manager (if the box is ghosted, disable the Text Spline option).
- Set Plane to the plane in which the spline lies or mostly lies (this is XY for spline primitives by default). Enable Fill and choose background texture and line texture colors that will make the spline easy to see on the object.
- Fine-tune the position and size using X Offset, Y Offset, X Scale and Y Scale.