
Installation & Setup for Revit
On this page, we will guide you through the installation of Maxon Redshift and its individual setup in Revit.
First of all, please note the system requirements and information about supported Revit versions on this central website. There you will find a summary of all the technical requirements that must be met in order to use the various Maxon products.
Quick Navigation
- Installation
- The Toolbar
- Where to Start?
- Things to know about the workflow
- Working on several projects with Maxon Redshift
- Switching Views in Revit
- Info on Environment settings
- Working with Assets
- How to close Maxon Redshift?
- Undo/Redo Functionality
- Data Integration
Installation
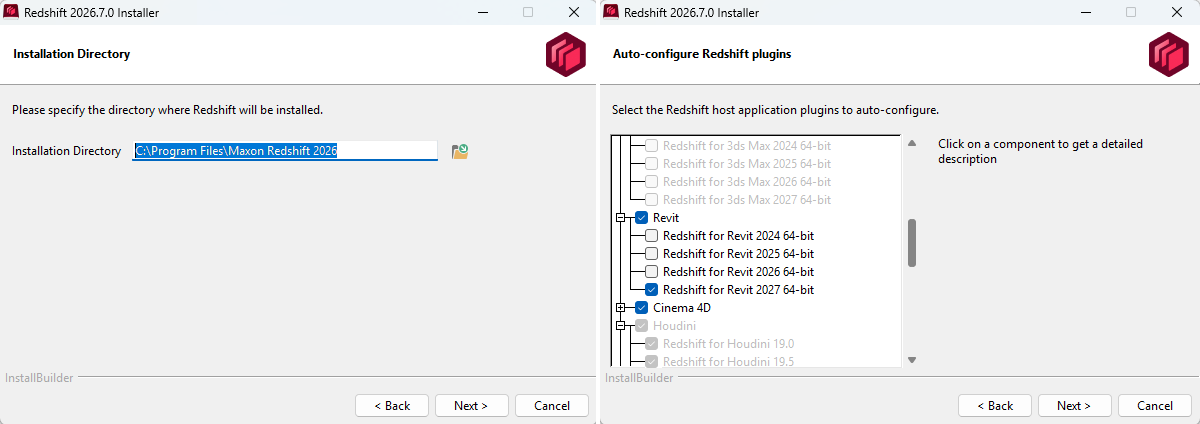
During the Maxon Redshift installation you'll be asked to select all of your host apps that should get a direct connection to it (also see Figure 1 above). In our case at least the Revit option for the available version have to be activated.
Once the Maxon Redshift installation is complete, you can launch Revit. On first use Revit may ask for permission to load Maxon Redshift. After it is granted, the add-in can be started from the new Maxon Redshift tab of the Revit ribbon toolbar (see Figure 2).
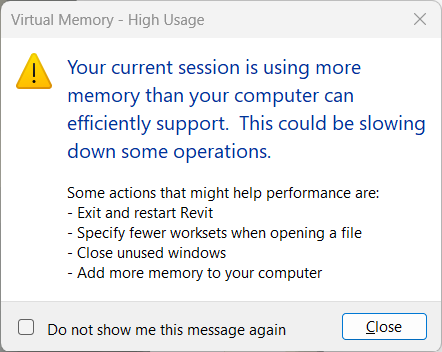
After launching Maxon Redshift, Revit may warn about high memory usage. This is due to the fact Redshift runs as a sub-process and the combined memory usage is not typical for Revit. This warning can be safely dismissed (see Figure 2).
The Toolbar
The main functions for starting, pausing, and defining the synchronization between Revit and Maxon Redshift can be controlled using the corresponding buttons (see Figure 3).
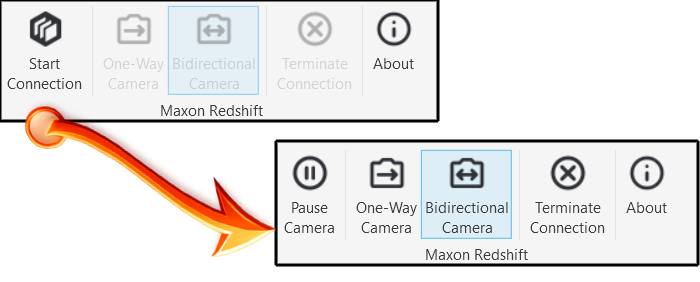
Start Connection: This starts Maxon Redshift and loads your current Revit scene into it. Once the connection is activated, the button changes so that you can pause the connection to Maxon Redshift at any time. Closing the Maxon Redshift window or using Terminate Connection automatically closes the connection, and no data is lost. The following icon buttons determine how changes to the viewport in Revit or Maxon Redshift are processed while the connection is active.
Pause Camera/Resume Camera: With Pause Camera, scene changes continue to be synchronized, only camera navigation is paused. You can switch back to a synchronized camera by activating Resume Camera.
One-Way Camera: Changes made to the camera within Revit are synchronized with Maxon Redshift. However, synchronization does not occur in the opposite direction. Navigation in Redshift is limited to its viewport.
Bidirectional Camera: Changes made to the camera are automatically synchronized between the two applications. Changes to the perspective in Maxon Redshift are automatically transferred to Revit. Changes to the perspective in Revit are automatically visible in Redshift.
Terminate Connection: This closes Maxon Redshift and stores all specific Redshift data directly in the Revit model. When the Revit model is saved, that data is also serialized within its file.
About: This opens the About dialog for Maxon Redshift, which not only provides information on the current version numbers and resource links, but also includes additional features (see Figure 4).
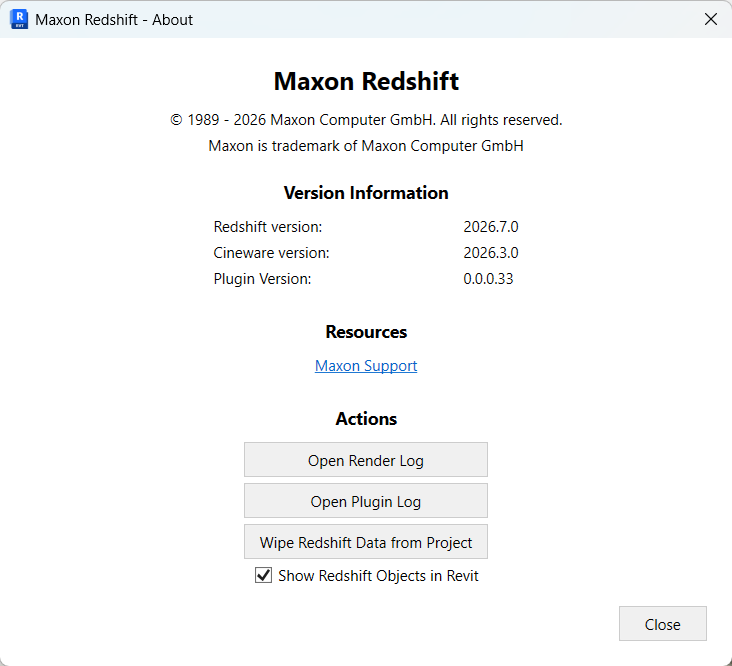
Maxon Support: Here you find access to the Maxon Support Portal.
Open Render Log/Open Plugin Log: Access to diagnostic logs.
Wipe Redshift Data from Project: If you want to remove all Redshift data from the currently open project—for example, to share the project with your client—you can use this button.
Redshift data includes, for example, Redshift camera and environment settings, saved camera views, as well as materials assigned via Redshift and assets placed in the scene. Deleting this data will therefore change the appearance of the project, reverting it to the original Revit scene.
Before using this command, you should save the project as usual to ensure that no important elements of the scene are lost and that you can access the project’s Redshift-specific properties at any time. Once the Redshift data has been removed, it cannot be recovered; you will have to recreate it from scratch again in Redshift!
Show Redshift Objects in Revit: A toggle to hide/show the representation of Maxon Redshift objects in the Revit viewport.
Where to Start?
The fastest way to get started with Redshift is to begin with the chapter on The Interface of Maxon Redshift. It explains all the functions of the user interface and provides links to related topics, such as Working with Materials, Rendering, or creating animations in The Storyboard.
We've put together some additional videos that will also make it easier for you to work with Maxon Redshift for Architects. You can find a playlist for these videos here.
Things to know about the workflow
Working on several projects with Maxon Redshift
Maxon Redshift for Revit allows you to switch between multiple projects, although this is not recommended. When switching to a view of another project, any live sync with Redshift will be paused until a view of the initial model is reselected. To switch between projects, you must first terminate the Redshift connection, activate the other model, and start a new connection. This ensures that no data can be lost.
Switching Views in Revit
When switching views within the same model, Revit automatically sends updated data to the Redshift application. This process may take time depending on model complexity.
Info on Environment settings
When opening a Revit scene in Maxon Redshift for the first time (initial sync) the position of the sun, the time of day, and geolocation data are automatically transferred to the Maxon Redshift Environment.
Changes made to these environment settings in Redshift do not change the original Revit settings. However, the Redshift environment configuration overrides the Revit environment for rendering.
Working with Assets
All objects added in Maxon Redshift can be edited both in Maxon Redshift and in Revit. We have summarized everything you need to know about working with assets and the limitations to be aware of on this page.
How to close Maxon Redshift?
In principle, the Maxon Redshift window can remain open throughout. However, if you no longer need a rendered display for other work and do not want to assign any new materials or assets, you can simply close the Maxon Redshift window at any time. All changes made will be retained and automatically transferred to Revit. Alternatively, you can also use the Terminate Connection button.
Additional options include using the Send to Cinema 4D function to open the current Revit project in Maxon Cinema 4D. This is made possible by the internal Cineware conversion of the data to the native Maxon Cinema 4D data format.
Undo/Redo Functionality
Currently this functionality is still work in progress and only partially supported in Revit.
Data Integration
All data coming from Maxon Redshift is being serialized into the corresponding Revit document. This doesn't require much additional storage. If you still want to remove the specific Redshift data from the project, you'll find the necessary functions in the About dialog described above. However, before doing so, you should save a complete copy of the scene that still contains all the Redshift data as a backup.
When working on a PC that has no active Maxon Redshift for Architects license, the layers and proxies can still be displayed and manipulated with the CAD app on that machine. Upon loading the document on a machine with the Maxon Redshift viewer and synchronizing the document, the corresponding changes (proxy manipulations) will take effect in the Maxon Redshift viewer.