3D Solve
This tab's settings come into play after 2D Tracking has been completed, i.e., Tracks with paths have been created. 3D positions have to be calculated based on these Tracks using numerous complex algorithms (which we fortunately don't have to adjust ourselves). For this process, the user supplies useful information with regard to the recording camera and the type of scenery that will be reconstructed.
Clicking on the Run 3D Solver button will reconstruct the 3D environment with various features (Null objects) that represent the Tracks in 3D space.
Attention: The reconstruction settings on this page refer primarily to Camera Tracking. The reconstruction of object movements is done using the Object Tracker.
 How was the footage created?
This drop-down menu lets you select the method with which the footage was recorded, i.e., how the camera recorded the footage. This is something that the Motion Tracker doesn't recognize automatically, which is why this menu is available.
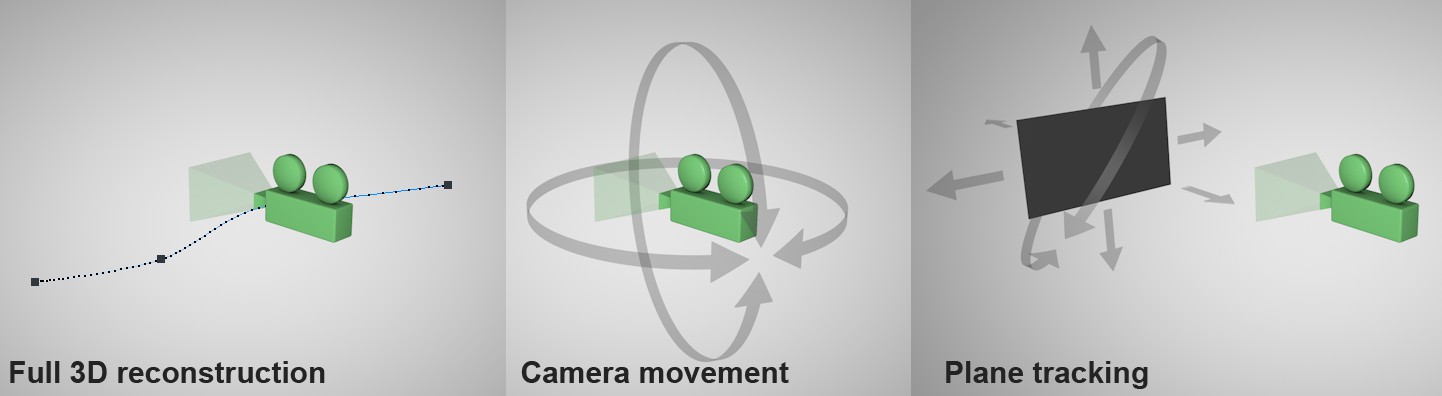
This is the most commonly used method - the camera changes its position while recording and a parallax shift occurs with the recorded objects. This is an ideal situation for the Motion Tracker because it can easily reconstruct this type of 3D scenery.
This is a special mode in which no recognizable parallax shift occurs. This is the case if the camera only rotates, without otherwise changing its position.
The Motion Tracker cannot reconstruct distances from such footage, which means all Tracks will have the same distance from the camera. All features will be positioned on a spherical surface (diameter = 10m), with the camera at the center.
Note that certain video sequences also fall in the category Nodal Pan even though, strictly speaking, they contain tracking shots. This is the case, for example, when landscapes are filmed. The hills/mountains on the horizon may have very slight parallax shifts but these can be ignored in relation to the camera movement. Nodal Pan is suited for footage that has no noticeable parallax shift.
Planar Track assumes that ALL Tracks, without exception, lie on a single plane, which can also move. This mode can be used when creating green screen footage to which elements such as matte paintings, videos, etc., will be added at marked locations on the green surface. This type of tracking can also be done using Cinema 4D. However, the camera reconstruction will in fact only reconstruct the camera and not the movement of the object (green screen) in the scene, i.e., the object movement will be simulated by the camera's movement around the object. Only the camera's movement relative to the green screen (the remaining parts of the scenery will not be included) will be calculated.
This mode only tracks the empty green screen, which means that the remaining parts of the scenery must be tracked using a different Motion Tracking mode. These must then be combined in the compositing phase.
Note that the Focal Length and Sensor Size of the recording camera must be known when in this mode.
The Object Trackers, which is a real object reconstruction, can be used to differentiate the 3D object reconstruction from this mode.
Camera Settings
This is where you enter information pertaining to the camera with which the footage was recorded. The more information you supply, the better the Motion Tracker can reconstruct the 3D camera. Therefore, it is well worth the time to ascertain this information for your reconstruction. Getting this information using the Motion Tracker itself or using the Camera Calibrator function is much more time-consuming and less precise.
Use this option if you do not know the camera's focal length.
Use this option if the camera's focal length is not known but the focal length itself remains constant (no zooming takes place). The Sensor Size setting does not play a role for this option (or with the previous option) with regard to the quality of the 3D reconstruction.
Select this option if the camera's focal length and sensor size are known and the former doesn't change throughout the footage (no zooming) and enter the known values in the Focal Length and Sensor Size fields, respectively.
Note: DO NOT select this option if the focal length is known but the sensor size is not known. Doing so will result in a faulty reconstruction!
Note that you can ascertain the camera's focal length from individual frames of footage using the Camera Calibrator tag.
This mode must also be used for geometry-assisted Object Tracking if no Camera Tracking was previously done. You must then also define an aperture length.
Sensor Size (Film Gate)[1.00..2000.00]
Enter the sensor size of the camera that recorded the footage here. The sensor size for a specific camera can be obtained by conducting an online search. If the Known and Constant option is selected, the camera's focal length must also be known! If one of the other two Focal Length options is selected, the sensor size is irrelevant with regard to the quality of the 3D reconstruction. The Sensor Size can also be modified after a reconstruction has been completed, whereby the reconstructed camera will automatically be updated accordingly (without having to perform the reconstruction again).
Field of View (Horizontal)[0..174°]
Field of View (Vertical)[0..174°]
These values primarily serve informational purposes. These values use the focal length and sensor size values as a foundation.
Click on this button to start the 3D reconstruction. This can be done after 2D Tracking has been completed.
This function must be executed successfully in order for the Scene Reconstruction to work.
What happens when this button is clicked?
An attempt will be made to calculate a 3D position from each Track - some will be unsuccessful - and save features (represented by Null objects). This process can take some time to complete. The data will also be used to calculate the camera animation. Features will be listed as Child objects of the Motion Tracker in the Object Manager:
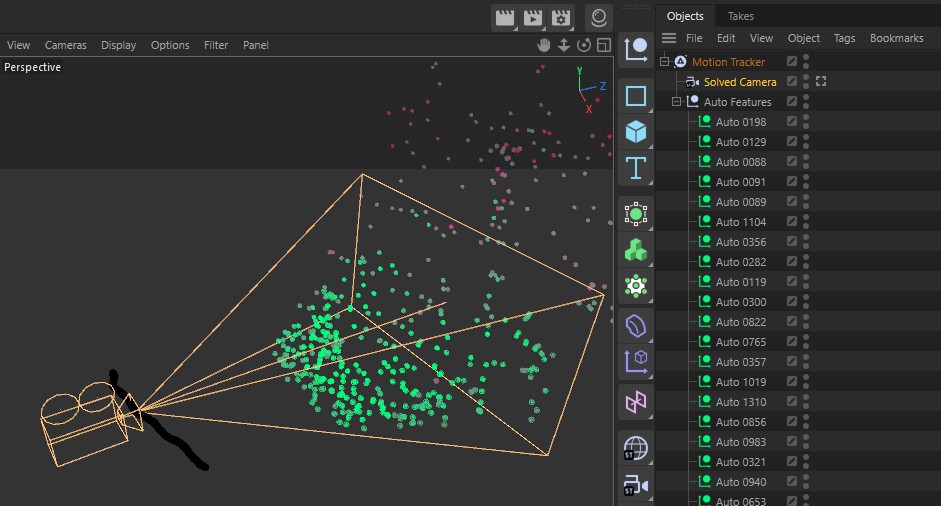 Note the reconstructed camera's animation track
The image above shows the result of a successful reconstruction. In the Viewport you will have a vertex cluster colored from green to red. Each point is a feature and represents a position in 3D space for a 2D Track (the more green a point is, the more the Motion Tracker is convinced that this Track and feature are synchronized; red points are not necessarily bad or useless but are simply the worst in relation to the green points).
The reconstructed, animated camera (see also Cameras and features created by the Motion Tracker) has a keyframe (key) for position, rotation and focal length at each frame of animation. These are precisely the camera parameters that can be calculated by a 3D construction. If you look through the camera and disable the Motion Tracker's Keep in Foreground option (Footage tab) you will see how Tracks and features behave congruently as the camera moves. Now take a look at the Constraint-Tags, which takes a vertex cluster lying relatively loosely in 3D space and with no clear size and creates a 3D Project with defined axes and a defined origin.
A reconstruction can also go awry, for example if too few and/or Tracks of poor quality are used for the calculation. This will be displayed in the status bar. As explained under What are good and bad Tracks?, you will have to manually create better Tracks and tracking. Also check the settings for the camera and footage type in the Reconstruction tab.
It can also occur that only part of the footage is reconstructed due to an insufficient number of Tracks being present for the entire sequence. This will be evident in the insufficient number of camera keys.
Note that all features and camera keys pertaining to position, rotation and focal length (other camera settings will not be affected) will be deleted if 2D Tracks are modified AFTER 3D reconstruction. The Motion Tracker will assume that the 3D reconstruction was faulty and that it will be reconstructed after the Tracks are edited. This can be prevented by enabling the Lock Solved Data option.
Normally, nothing else will have to be modified on Tracks after a successful 3D (camera) reconstruction. Each modification to the Tracks (or other settings that affect the reconstruction) will then no longer fit the successful 3D reconstruction. Therefore, the 3D (camera) reconstruction will be deleted for modified Tracks.
However, if you use the Object Tracker, a common workflow is to first create a complete Camera Tracking with a subsequent Object Tracking for which new Tracks can be created. With these new Tracks, the 3D (camera) reconstruction will not be affected.
After the 3D (camera) reconstruction you should enable the Lock Solved Data option (this option can also be activated prior to clicking on the Run 3D Solver button). The 3D (camera) reconstruction will then be locked and cannot be modified (you can, however, click on the Run 3D Solver button at any time to start a new reconstruction).
If these settings seem familiar to you it's because the same settings are also available for the Null object. They also perform the same function: they control the display type for the Null objects (features) that were created by the Motion Tracker and represent the positions of the successfully reconstructed Tracks.