Distort
 1 Original stroke; 2 Type set to Cubic and Close disabled on the Strokes tab; 3 Type set to Cubic and Close enabled on the Strokes tab; 4 Type set to Akima; 5 Type set to B-Spline.
The Distort settings enable you to add imperfections to the lines such as curves and wobbles. They are also useful for smoothing out strokes created by low poly objects.
You can optionally specify a vertex map to control which lines are distorted and by how much. To do this, assign a Sketch Style tag to the object if it does not have one already and set the map on the tag’s Maps tab (Drag & drop the tag into the Distort Map box).
Enable the Curve Stroke option to curve the strokes.
Choose the shape of the curve from the Type drop-down list: Linear, Cubic, Akima, B-Spline or Bezier. These are the same types that are available for Cinema 4D’s spline objects.
The Step value is the number of pixels between each step in the curve. Decrease the value for a smoother curve, but keep in mind it will take longer to render.
The Strength value defines the strength of the curve effect. 0% means no curve, 100% means the full effect.
 From left to right: Mode set to Sin, Noise and Spline.
The Mode settings add distortions to the lines. Choose from four modes: None, Sin, Noise or Spline.
Switches distortions off.
Sin mode distorts the lines based on a sine wave (left cube above). The Wavelength and Displace settings define the wavelength and amplitude respectively of the sine wave, in pixels.
The Noise settings are ideal for adding a natural look to the lines such as wobbles. They work in the same way as the noise settings for the Noise modifier except they modify the path of the lines instead of the color, thickness or opacity. For details, look up Noise modifier.

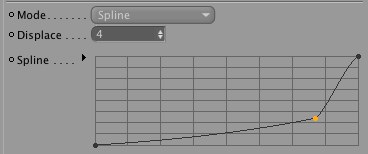
The Spline mode distorts the lines using a spline graph.
The Displace value is the strength of the distortion.
Choose from 30 types of noise such as Blistered Turbulence, Dents and Wavy Turbulence. These are the same types that are available for Cinema 4D’s Noise shader.
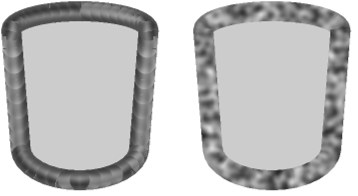
The Mapping drop-down list controls which coordinates are used to generate the noise. This can affect how the noise looks, how it changes as the object or camera moves and whether the noise is continuous over line segments if strokes are disabled.
 Strokes disabled (left) and enabled (right).
This modifier uses the position along the line. Avoid using this type if strokes are disabled, otherwise poor results are likely (see left cylinder above).
The noise is calculated in the space of the screen. The noise will change as the object’s position on the screen changes.
The noise is calculated in object space and remains the same regardless of object and camera moves.
The noise is calculated in world coordinates. The noise remains the same if you move the camera but changes if you move the object.
Controls the number of octaves over which the noise will span.
The Scale setting reflects the global expansion of the noise. The Scale X and Scale Y values are relative scale values for the noise in X and Y directions.
Defines the speed with which the noise cycles will move in cycles per second.
Used for antialiasing. In general, leave the value set to the default of 100% but if the line texture flickers when you animate, try increasing the value. Or if you are rendering a high-res still and you want crisp detail, set the value lower.
If this option is enabled, the noise is absolute, causing it to fold about its midpoint.
Enable this option to invert the noise.
The Low Clip value controls the bottom clipping value of the noise; all values below Low Clip will be clipped to zero.
The High Clip value controls the top clipping value of the noise; all values above High Clip will be clipped to 100%.
This controls the brightness of the lines as a percentage of the color sampled from the surface. In other words, the higher you set this value, the brighter the lines and the more they blend in with the image.
Use this setting to adjust the overall contrast of the noise. Values greater than 0 will increase contrast, values less than 0 will reduce contrast.
If the Sine mode is active, the wave length can be defined here. See also Mode.
If the Spline mode is active you can edit your settings here.